FIGURE 10.1 Shows a straight line connecting the beginning and the end of the different skin incisions as indicated by the pathology. This straight line is not more than 1 cm away from the junction of the route of the frontal zygoma with the orbital rim.
In this way, the starting point of the incision at the preauricular region can extend superiorly or inferiorly based on how much temporal extension of the craniotomy is needed. The frontal end of the incision is decided based on the straight line mentioned above while at the same time achieving a good cosmetic result. In a receded hairline, the incision may need more posterior extension. When a more frontal craniotomy is needed, the skin excision is extended more frontally. Extension beyond the midline is sometimes needed if a full cranio-orbital craniotomy is needed (Fig. 10.1).
Temporalis Muscle Dissection
The preservation of the integrity of the temporalis muscle is of utmost importance for a good cosmetic outcome. It is very important to preserve the bulk of the temporalis muscle as well as its blood and nerve supply. The blood supply of the muscle arises from the deep temporal artery, the branches of which run along the inner surface of the muscle. This is why it is very important that the deep fascia of the temporalis muscle be dissected very carefully from the bone. This maneuver will help to preserve the underlying blood and nerve supply to the temporalis muscle. The use of cautery to elevate the temporal muscle has a higher risk of heat injury to the nerve supply of the muscles as well as compromise of the blood supply. I prefer to leave a small cuff of fascia along the superior temporal line without leaving much of the muscle fibers along its insertion, to be used for suture reconstruction of the muscle at the end of the surgery (Fig. 10.2). The muscle is reflected inferiorly and anteriorly along the course of its origin.
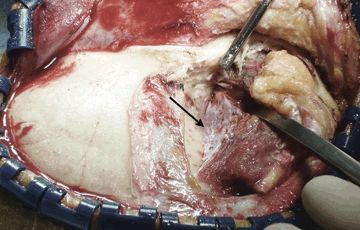
FIGURE 10.2 Shows the deep fascia of the right temporalis muscle being dissected sharply from the underlying bone (arrow).
Occasionally, the temporalis muscle is large, and when more temporal exposure is needed, the zygomatic arch is drilled to achieve better inferior reflection of the temporal muscle (Fig. 10.3). This maneuver can improve the exposure to lesions involving the middle temporal fossa and the region of the cavernous sinus and anterior upper one-third of the posterior fossa. It would also provide a more superior exposure to the suprasellar region from a lateral to medial projection.
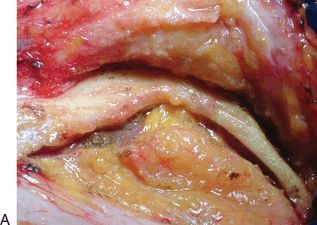
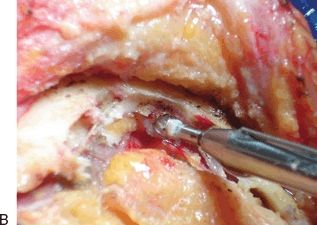
FIGURE 10.3 A and B.Shows the zygomatic arch before and after drilling it. This maneuver allows more inferior reflection of the temporalis muscle for better pretemporal and subtemporal access.
The Craniotomy
The extent of the craniotomy changes with the pathology involved. There are three variations of the pterional approach craniotomy: the standard craniotomy, craniotomy with frontal extension, and craniotomy with temporal extension (Fig. 10.4).
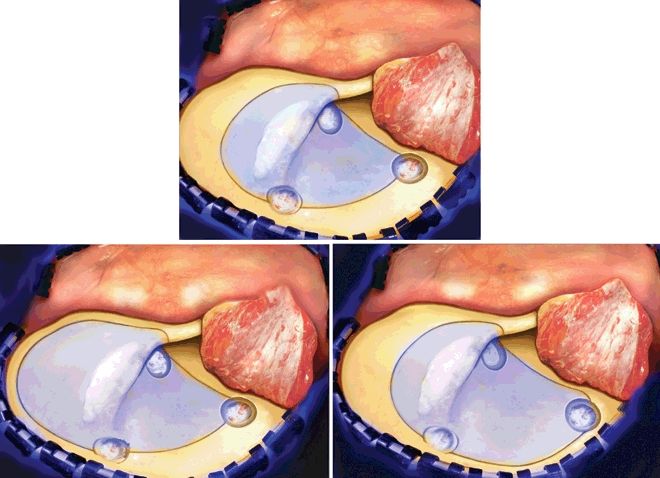
FIGURE 10.4 Shows the three variations of the pterional approach craniotomy. The upper middle picture shows the standard pterional craniotomy. The lower left shows a pterional craniotomy with more frontal extension, and the lower right shows a pterional craniotomy with a more temporal extension.
Burr Hole
Although one burr hole may be enough to establish the needed craniotomy, it has a higher risk of tearing the dura, especially in older patients who have significant adhesions between the dura and the inner surface of the skull. I generally like to drill three burr holes as indicated in Figure 10.4, all of which would be covered by the temporalis muscle during the closure and reconstruction. The location of these burr holes will help bridge the sharp, bony prominences on the inner aspect of the skull and dissect the dura before using the craniotome to create the bone flap.
Once the burr holes are made, the craniotome is used to create the craniotomy by connecting the burr holes and drilling the medial aspect of the sphenoid wing to weaken its attachment. This allows the bone flap to be reflected easily. Hemostasis in the epidural space is then established using gel foam powder along the bone edges followed by tack-up sutures. Further work is now done under magnification using the operating microscope.
Epidural Dissection and Exposure
The extent of removal of the bone of the skull base varies with the exact location of the pathologic entity being treated. In general, to gain access to the basal cisterns and to be able to open the arachnoid over the optic nerve to release spinal fluid and achieve early brain relaxation with minimal brain retraction, the sphenoid wing has to be drilled flat with the orbital roof (Fig. 10.5). The extent of removal of the sphenoid wing varies with different pathologies. In the standard pterional approach, removal of the sphenoid wing can be stopped at the level of the meningo-orbital artery. In cases where further exposure of the temporal fossa is needed, or when the anterior clinoid process needs to be removed, the epidural dissection needs to be extended in both the subfrontal and the pretemporal regions. This is done by coagulating and cutting the meningo-orbital artery and followed by dissecting the dura propria of the temporal lobe away from the region of the superior orbital fissure (Fig. 10.6). This dissection can be extended to the lateral wall of the cavernous sinus for lesions that need to be approached either in or through the cavernous sinus (Fig. 10.7). Occasionally, during this step, brisk bleeding from the cavernous sinus may occur. This is easily controlled by injecting fibrin glue into the cavernous sinus region. When performing this step, caution should be taken to prevent reflux of fibrin glue into the Sylvian veins via the sphenoparietal sinus, which may connect to the cavernous sinus. This is done by applying pressure with the suction device or with a Cottonoid over the sphenoparietal sinus to prevent retrograde reflux of fibrin glue.
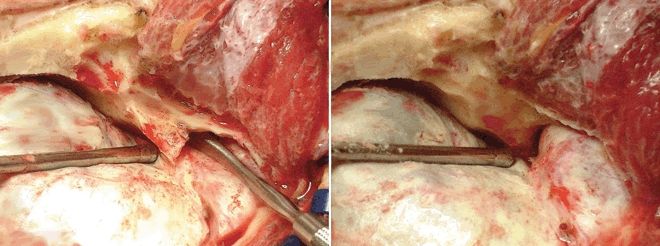
FIGURE 10.5 Shows the standard pterional approach before (left) and after (right) drilling of the sphenoid wing. Notice the advantage gained in accessing the subfrontal region by drilling the sphenoid wing flat with the orbital roof.

FIGURE 10.6 Shows the epidural peeling of the dura propria of the temporal lobe away from the lateral wall of the superior orbital fissure and anterior cavernous sinus region (asterisk). This will also enhance the exposure of the anterior clinoid process and put it in a more superficial location. (O, orbit; AC, anterior clinoid; FD, frontal dura; TD, temporal dura.)
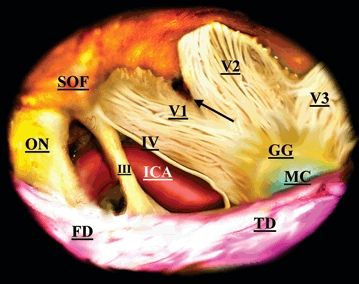
FIGURE 10.7 Retouched picture of the detailed anatomy of the neurovascular structures and the lateral wall of the cavernous sinus after removal of the anterior clinoid process. (ON, optic nerve; SOF, superior orbital fissure; ICA, internal carotid artery; FD, frontal dura; TD, temporal dura; IV, trochlear nerve; III, oculomotor nerve; V1, V2, and V3 branches of the trigeminal nerve; GG, gasserian ganglion; and MC, Meckel’s cave.)
During this step, a good understanding of the anatomy of the middle fossa is essential. Familiarity with the plane between the temporal lobe and the lateral wall of the cavernous sinus is crucial to avoid inadvertent entry into the cavernous sinus or into the intradural space on the temporal side.
The above-mentioned steps with dissection of the disconnected dura on the frontal side will lead to full exposure of the anterior clinoid process as far as its tip.
Removal of the Anterior Clinoid Process
Stay updated, free articles. Join our Telegram channel

Full access? Get Clinical Tree


