
 My colleagues and I started performing pediatric lens implantations in 1981; our first case was one of a case of traumatic cataract. Through 2009, over 11,000 pediatric cataracts have been treated. The strategy of cataract surgery then and now has been the same: to remove as much of the anterior capsule as possible, making it easier to remove the cataract and reduce the incidence and severity of secondary cataract formation. Earlier it was the can opener capsulotomy that met our needs. Now we use the Fugo blade. Our lens of choice has been an iris claw lens since we started. Now the intra-ocular lens is mostly in the bag lens when the capsule is intact and in iris claw lens when the capsule is not intact.
Use of the Fugo blade for pediatric capsulotomy is described and some case examples are explained.
Surgical Technique
- Make two incisions: A small one through which to pass the visco-elastic cannula, and a large one through which to introduce the intra-ocular lens (Fig. 22.1).
- Keep the anterior chamber deep throughout the procedure, so that the endothelium is not touched.
- Start the capsulotomy at any point on the capsule, with the Fugo blade’s energy setting at the lowest. The movement of the capsulotomy draws a line on the capsule, which is removed from the incision line instantly. The length of time needed to complete the incision depends on the surgeon—It may take 1 second or 20 seconds; the result is the same. If any area is been skipped, it can be gotten on a subsequent pass.
- Remove the cataract, which may be accomplished without difficulty because the aspirating cannula can easily reach the capsular fornices.
Any variety of intra-ocular lens can be implanted with ease.
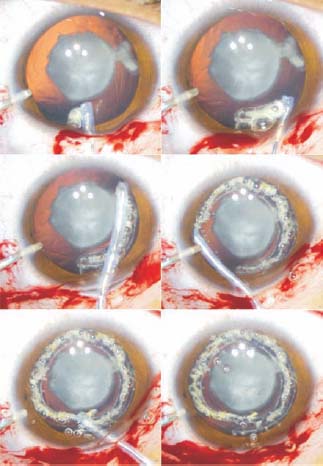
Figure 22.1. Visco-elastic material is injected through the side port, while the Fugo blade tip draws a circular ablation line on the capsule. The ablation process creates a gap between the cut edges.
CASE STUDIES
Case 1: Capsulotomy in a Pre-existing Posterior Capsule Defect
The cataract in this patient showed a positive Singh sign for a posterior capsular defect (white spots seen in front and around the posterior capsular defect). The Fugo blade capsulotomy did not cause tension or pull that could endanger the extension of posterior capsule defect. The lens was flawlessly extracted manually through the large capsulotomy, and the hole in the posterior capsule remained undisturbed until the end of the surgery (Fig. 22.2).
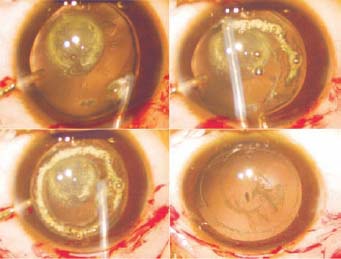
Figure 22.2. In this pre-existing posterior capsular defect (Case 1), a large anterior capsulotomy is performed with a Fugo blade. The posterior capsular hole remains undisturbed until the end of the surgery.
Case 2: Capsulotomy in Marfan Syndrome
Figure 22.3 shows an extreme example of a dislocated lens without zonular support along the inferior border. The pathology did not prevent creation of a suitable capsulotomy through which the lens matter was removed. The capsular bag remained undisturbed until the end of the surgery.
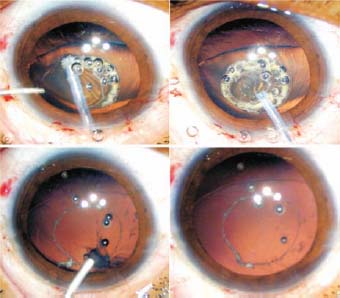
Figure 22.3. In this patient with Marfan syndrome (Case 2), a large capsulotomy was done without resistance, using the Fugo blade. The lens matter was removed without disturbing the capsular bag of the dislocated lens.
Case 3: Posterior Capsulotomy after Secondary Implant
In this case, the thick capsular membrane in the pupillary aperture could have been removed the same way that a primary capsulotomy is done. But using such an approach risked injury to the vitreous beneath the membrane. This capsulotomy was done in a manner that ensured no risk to the vitreous (Fig. 22.4).
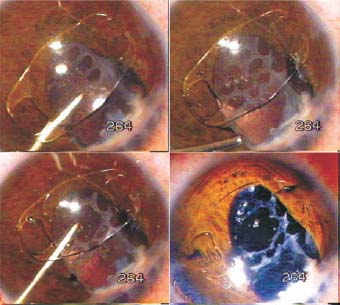
Figure 22.4. In Case 3, the opaque posterior capsule is repeatedly touched with a 300-µm tip to create multiple holes. Uniting some of them in the center creates a fair-sized capsulotomy.
After the artisan lens had been implanted, capsulotomy was begun. A 300-µm Fugo blade tip was used. The undersurface of the tip was stripped of the insulating cover. When activated and touched to the opaque membrane, it created a small hole. Many such holes were created by repeated touch. When joined together, a credible posterior capsulotomy had been produced, with only the slightest damage to the vitreous.
Summary
Performing a capsulotomy in pediatric cases presents numerous challenges, regardless of the etiology— congenital or acquired or the result of trauma or secondary changes. All of these challenges, however, can be met by using the Fugo blade, with minimal trauma and no tissue traction.
Suggested Reading
Singh D, Worst J, Singh R, Singh I R. Cataract and IOL. New Delhi. India: Jaypee, 1993.
Singh D, et al. Pediatric cataract surgery. Philadelphia, Pa: Lippincott Williams & Wilkins, 2005.
Stay updated, free articles. Join our Telegram channel

Full access? Get Clinical Tree


