CHAPTER 141 Tympanoplasty and Ossiculoplasty
Tympanoplasty
Tympanoplasty is a surgical procedure performed to eradicate infection and restore the function of the middle ear.1 Wullstein2,3 introduced a classification for tympanoplasty that is based on two things: (1) the remaining structures of the middle ear after all pathology has been eradicated, and (2) how sound is transferred to the oval window while the round window is being protected. The basic principles behind this classification still hold true today, but the practice of tympanoplasty has been modified by advances in the fields of optics, microsurgical instruments, middle ear prostheses, and surgical techniques. The presence of different tympanoplasty techniques is an indication that the otologic surgeon should be flexible when tailoring the procedure to fit the disease, rather than having a “one-size-fits-all” approach to surgery for chronic ear disease. This chapter reviews various tympanoplasty techniques and techniques for reconstructing the ossicular chain. Tympanoplasty is often performed in conjunction with mastoidectomy in cases of active chronic suppurative otitis media. Mastoidectomy techniques are reviewed in Chapters 127 and 142.
Functional Considerations
Restoration of the middle ear transformer mechanism requires a secure connection between an intact tympanic membrane and inner ear fluids. The tympanic membrane should close an air-filled, mucosa-lined middle ear cavity. Traditional teaching attributes most of the middle ear gain to the hydraulic effect, which is the ratio of the effective vibrating area of the tympanic membrane to the area of the mobile stapes footplate.4 Round window protection to avoid phase cancellation (i.e., when sound impacts the oval and round windows at the same time) was also thought to be an important contributor to effective sound transmission to the inner ear. More recent investigations of human middle ear mechanisms modified these classic teachings in the following ways5:
A perforation of the tympanic membrane causes hearing loss by reducing the difference in sound pressure across the two sides of the tympanic membrane, causing decreased ossicular coupling.9 Hearing loss is proportional to the size of perforation and is frequency dependent, with the largest losses occurring at the lowest sound frequencies.10 It also varies inversely with volume of the middle ear airspace (including the mastoid); this may explain why seemingly identical perforations in size and location produce different degrees of hearing loss, and why hearing loss may fluctuate in a given perforation with the presence or absence of otorrhea, which would decrease middle ear and mastoid airspace, causing increased hearing loss. More recent investigations also suggest that hearing loss does not vary appreciably with the location of perforation, in contrast to the long-held belief that posteroinferior perforations result in greater hearing loss than perforations at other locations owing to increased phase cancellation at the round window.10,11
Graft Materials
Temporalis fascia is the most commonly used material for the repair of tympanic membrane perforations; it was introduced for this use in the early 1960s.12 Temporalis fascia can be harvested at the time of tympanoplasty through a small incision posterosuperior to the helix in the hair-bearing scalp when using a transcanal approach, or via superior dissection from a postauricular or endaural incision. Other grafting materials have also been used.13–15 In 1960, Shea15 described the use of vein grafts in tympanoplasty. Perichondrium is frequently used in tympanoplasty, particularly if there is no temporalis fascia available (e.g., in cases of multiple revisions) or if a composite cartilage/perichondrium graft is needed to prevent retraction of the reconstructed membrane when there is suspected persistent eustachian tube dysfunction. The periosteum on the medial surface of the temporalis muscle can also be used as a graft material when temporalis fascia is unavailable if the surgeon wishes to avoid the additional incision needed to harvest tragal perichondrium.
Ringenberg14 used free autologous fat grafts in the early 1960s. A more recent study reported success rates with fat grafts to be comparable to success rates with temporalis fascia.16 AlloDerm (LifeCell Corporation, Branchburg, NJ) has also been studied and used as a graft material.17–20 To support the use of AlloDerm as a possible alternative to autologous fascia, advocates cite the avoidance of external incisions, potential reduction of surgical time, and comparable success rates.20
Minimalist Techniques
There are some clinical situations in which a minimalist approach to tympanoplasty is possible or desirable. Small, uninfected, established perforations of 1- to 2-mm diameter can often be managed in an office setting in this way. The epithelium at the margins of the perforation is cauterized or removed, and a fat plug that is slightly larger than the diameter of the perforation is removed from the lobule to use as a graft. It is placed through the opening in a dumbbell fashion and covered with a dressing such as Gelfoam or Gelfilm (Pharmacia & Upjohn Company, Kalamazoo, MI, a division of Pfizer Inc., New York, NY). Other surgeons prefer simply to cauterize the perforation edges with trichloroacetic acid or phenol and apply a patch of Gelfoam, Gelfilm, cigarette paper, or a hyaluronic acid film (Epidisc; Medtronic Xomed Inc., Jacksonville, FL). Traumatic perforations also are often managed by patching only after the perforation edges are realigned. In addition, a more recent study described the use of a simple device in the shape of a sealed tympanostomy tube (Medtronic Xomed Inc., Jacksonville, FL) that is designed to be inserted into tympanic membrane perforations in patients when surgery is contraindicated or refused by the patient.21
Formal Tympanoplasty (see Key Indicator Video on website)
Approaches and Incisions
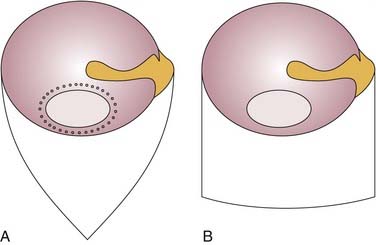
Transcanal incisions outline a medially based tympanomeatal flap. Superior and inferior incisions start at 12 o’clock and 6 o’clock. Either the incisions converge to meet on the posterior canal wall, forming a triangular skin flap (Fig. 141-1A), or each incision may be extended laterally for 6 to 7 mm, at which point the lateral ends of the incisions are connected by a horizontal incision that forms a rectangular flap (Fig. 141-1B). Before the elevation of the flap, the edge of the perforation is excised. A sharp straight pick is used to create small holes around the periphery of the perforation, similar to those of a postage stamp (see Fig. 141-1A); this outlined edge can be removed with a cupped forceps.
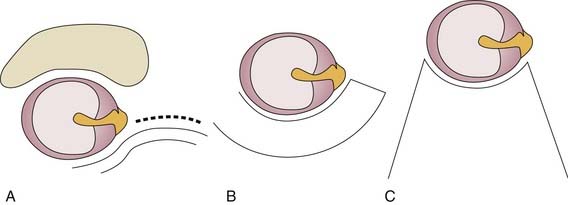
The endaural incision has a vertical limb that usually starts at 12 o’clock at the bony cartilaginous junction and extends laterally and superiorly into the cartilage-free incisura terminalis between the superior aspect of the tragus and the root of the helix (Fig. 141-2A). The incision is deepened to expose the inferior edge of the temporalis muscle, where a fascial graft can be taken. The vertical limb can be combined with one of the medially based tympanomeatal flaps described previously, an inferiorly based skin flap (Fig. 141-2B), or a laterally based Koerner flap extending onto the concha (Fig. 141-2C) (allowing cartilage excision and meatoplasty), depending on the planned surgery.
There are several options for handling the posterior canal wall skin. The canal skin can be elevated from behind with care taken not to tear the skin, particularly at its attachment at the tympanomastoid and tympanosquamous suture lines. If there is a very prominent tympanosquamous suture line, it is often helpful to incise the fibrous tissue within the suture line using a sickle knife or a 59-10 Beaver blade. The skin is elevated down to the anulus, which should be left intact at this time; vascular strip incisions can be made from behind to access the ear canal. Vertical incisions placed at the 6 o’clock and 12 o’clock positions are connected by a horizontal incision just lateral to the anulus to create a long vascular strip. The other option is to perform the vascular strip incisions through the ear canal before starting the postauricular incision.22 In cases in which there is no perforation, and surgery is performed for a second look or for ossiculoplasty (especially if an incus interposition is contemplated), it is possible not to do any canal incisions, and instead to elevate the canal skin and anulus in continuity, entering the middle ear for inspection and ossicular reconstruction.
Lateral Graft Technique
Canalplasty can be performed to remove the prominent anterior canal wall to visualize the entire perforation without having to move the microscope.23 This is accomplished by connecting the lateral ends of the vascular strip incisions along the anterior canal wall just medial to the bony-cartilaginous junction (Fig. 141-3A). The skin is dissected medially toward the anulus (Fig. 141-3B). When the elevation reaches the area medial to the anterior canal bulge, the dissection is usually done by feel until the anulus is reached. The elevation of the epithelium from the tympanic membrane remnant is performed by developing a plane superiorly or inferiorly at the level of one of the original canal incisions, near the anulus. The squamous epithelium of the tympanic membrane remnant is usually left in continuity with the previously elevated canal skin. The anterior canal skin is trimmed of irregular tags and stored in a moist sponge.
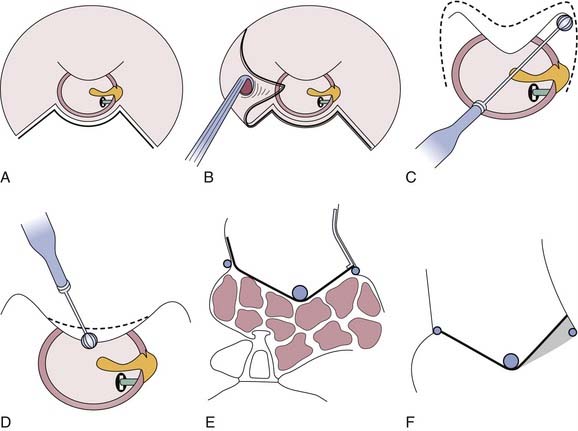
To ensure optimal graft placement, the anterior sulcus should be well visualized. This may require removal of a significant amount of the anterior canal bone (Fig. 141-3C). This removal is accomplished by using an otologic drill first to remove bone in the superior and inferior corners of the anterior bony canal. The bony bulge is gradually taken down between the two corners, keeping in mind that the prominent middle portion represents the posterior wall of the temporomandibular joint (Fig. 141-3D). It is of paramount importance to avoid violating the temporomandibular joint because this can lead to erosion of the condyle into the ear canal, which is extremely difficult to correct. In cases in which there is no anterior tympanic membrane remnant, placement of the graft may be facilitated by drilling a small trough just lateral to the anulus to create additional support for the graft anteriorly. Another alternative is to elevate the anulus from the sulcus anteriorly in continuity with the mucosa of the lateral wall of the eustachian tube, which provides a pocket to support the anterior portion of the graft.
The trimmed anterior canal skin is repositioned with its thin medial part overlying approximately 1 mm of the graft (Fig. 141-3E). The anterior tympanomeatal angle should be maintained at an acute angle (≤90 degrees) by placing pressed, rolled, dry Gelfoam in the sulcus during healing. If the graft is placed on the anterior canal wall, or the acute anterior tympanomeatal angle is not preserved, a dead space is created that gets filled with fibrous tissue, resulting in blunting (Fig. 141-3F). This reduces the area of the vibratory portion of the tympanic membrane and causes persistent conductive hearing loss. Additional Gelfoam is placed over the graft except for the portion of the fascia that extends onto the posterior canal wall. The vascular strip skin is placed back, with care taken to unfurl the skin edges to avoid burying epithelium. Ideally, the vascular strip should be long enough to overlie a portion of the graft that is resting on the posterior canal wall. The periosteum is closed, with care taken not to lift the ear forward to avoid displacement of the vascular strip. After several sutures are placed in the periosteum, the vascular strip position is reinspected through a speculum, and the ear canal is filled with Gelfoam or antibiotic ointment. The postauricular wound is closed.
Stay updated, free articles. Join our Telegram channel

Full access? Get Clinical Tree


