3 Transmastoid Approaches
 Closed Tympanoplasty (Figs. 3.1–3.18)
Indications
• Cholesteatoma in children and in patients with highly pneumatized mastoids.
• Chronic otitis media without cholesteatoma, when exploration of the mastoid cavity is required.
• Minor epitympanic erosion.
• Mesotympanic cholesteatoma.
• Cochlear implants.
• Facial nerve decompression.
• Some cases of class B glomus jugulare tumors (paragangliomas).
Surgical Steps
1. Drilling of the mastoid cortex is begun using a large cutting burr to identify the middle fossa dura. Drilling is started at the level of the temporalis ridge, which more or less corresponds to the level of the dura. The movement of the drill should be anteroposterior, parallel to the expected orientation of the middle fossa dura, and never perpendicular to it. Drilling is carried on carefully using continuous suction irrigation to provide adequate visualization. In live surgery, the signal that the level of the dura is close is provided by the appearance of the pink color of the dura through the bone, in addition to a change in the noise produced by drilling to a high-pitched sound when the dura is reached.
2. Drilling is now started at the expected level of the sigmoid sinus. As there is no solid external landmark for the position of the sigmoid sinus, the drill is moved in an oblique manner, joining the posterior edge of the upper margin of the drilling to the tip of the mastoid bone. The same principles apply here—the drill should always be moved parallel to the structure being looked for (the sigmoid sinus, in this case), and ample irrigation and suction should be used to identify the appearance of the blue color which signals that there is only a thin shell of bone separating us from the sigmoid sinus.
3. The two lines of drilling created until now are joined together by drilling the posterior tangent of the external auditory canal, thus creating a triangle of attack.
4. The bone in the center of the triangle can now be safely drilled out using the same large cutting burr. During this step, the cavity should be deepened evenly and gradually, avoiding the creation of a deep, narrow hole. The edges of the cavity should be rounded in order to provide the maximum visualization. A diamond burr is then used to thin out the remaining bone over the sigmoid sinus, the dura, and the posterior canal wall.
5. In the area of the sinodural angle, the drill should be moved in a medial to lateral direction in order to avoid injury to important structures should the drill slip medially.
6. Following the middle fossa dural plate, the antrum can be identified and opened. Once it has been opened, the lateral semicircular canal can be seen. Tilting the specimen away from the surgeon, the short process of the incus can be identified lateral to the canal, and care should be taken to avoid touching it with the rotating burr. These two structures are the first landmarks of the facial nerve (FN) to be encountered.
7. The next landmark to be identified is the digastric ridge. In the area of the mastoid tip, drilling is started in a posterior to anterior direction until the whole digastric ridge is developed. The FN will be found lying anteriorly.
8. Identification of the mastoid segment of the FN is started using a large cutting burr, which is moved in a direction parallel to the nerve and never crossing it. Once the whole length of the nerve can be seen through the bone, a smaller diamond burr is used to drill open the facial recess. While this step is being carried out, care should be taken not to move the drill too far anterolaterally, jeopardizing the annulus and tympanic membrane. On the other hand, drilling more medially would endanger the FN. For this reason, the right size of the burr should be used. Superiorly, a thin strut of bone should be left covering the short process of the incus to protect it form inadvertent injury with the burr. This strut of bone can be removed later on using a curette.
9. Epitympanotomy is started from a posterior position. A burr of a size sufficient to fit into the space between the middle fossa dural plate and the superior canal wall is used. A drill larger than the space provided will lead to injury to the dural plate, the superior canal wall, or both. On the other hand, using a smaller drill will lead to a prolonged operation. The direction of drilling is from medial to lateral, leaving a thin plate of bone overlying the ossicular chain in order to avoid touching it with the rotating burr. The anterior extent of the atticotomy should be sufficient to expose the anterior attic recess.
10. The inferior extension of the tympanotomy depends on what type of pathology is being treated and on its extent. In surgery for cochlear implantation, an attempt to preserve the chorda tympani must be made, and the inferior extension of drilling should be stopped once the chorda starts to show through the bone. The adequacy of the approach is checked, and further inferior extension can then be performed if required. However, if the pathology being treated is a cholesteatoma, middle ear tumor, a type B paraganglioma, or a facial nerve tumor, the seriousness of the condition requires the sacrifice of the chorda tympani in order to obtain adequate control of the whole extent of the pathology and allow for its complete removal. In these cases, the posterior tympanotomy should be extended to the hypotympanum.
11. Particularly in type B paragangliomas, further exposure to the hypotympanum is needed. This exposure can be achieved by a retrofacial tympanotomy. The bone medial to the FN in the area limited superiorly by the lower limit of the posterior semicircular canal and inferiorly by the jugular bulb is now drilled using a large diamond burr. In addition to the posterior canal and the jugular bulb, the posterior fossa dura forms the medial relation to this area and the FN forms the lateral limit. Extreme attention should be paid at this step to avoid injuring any of these important structures.
Hints and Pitfalls
• Adequate saucerization of the mastoid cavity, with complete drilling of the sinodural angle and bony overhang on the cavity edges, should be carried out before posterior epitympanotomy and posterior tympanotomy are performed. The saucerized cavity provides a maximum surgical view and surgical angle.
• Canalplasty is required whenever the canal wall impedes complete view of the tympanic membrane. The canal wall should therefore not be thinned from the beginning.
• The utmost care should be taken not to touch the ossicular chain with the burr when the chain is intact.
• Care should be taken not to perforate the superior wall of the external auditory canal. If this occurs, reconstruction with cartilage and bone paste is necessary.
• Care should be taken not to injure the middle fossa dura in order to avoid possible cerebrospinal fluid leakage or meningoencephalic herniation. To avoid injuring any of these structures, drilling in the area of the attic should be conducted from medial to lateral, never pressing the burr heads against the superior and inferior bony wall in this area.
• Positive identification of the facial nerve is the most effective way of avoiding injuring it.
• Dissection of pathology from fragile structures in the tympanic cavity is carried out using the combined approach, with one instrument introduced from the external auditory canal and the other from the posterior cavity. In this way, the instruments do not obscure the required view of the delicate structures.
• Dissection of the pathology from the area of the windows is started after all of the bone work has been completed. All maneuvers on the stapes superstructure should be carried out with extreme care. Dissection is conducted along with its long axis, never perpendicular to it. If the pathology is adherent underneath the arch of the superstructure, the superstructure can be removed with long and straight malleable scissors, with care being taken not to fracture the footplate. Do not use the crurotomy scissors, which can damage the footplate.
• If the hypotympanic cells are infiltrated by the pathology, the area between the jugular bulb and the carotid artery is carefully drilled with a diamond burr. Care should be taken not to damage the jugular bulb, since the structure is extremely fragile.
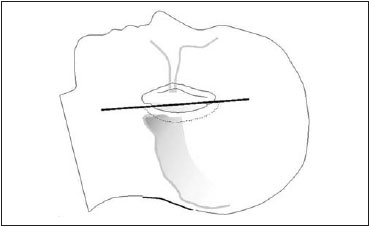
Fig. 3.1 The skin incision is carried out as shown. It should extend for 180 degrees around the insertion of the auricle for 0.5–1.0 cm posteriorly.
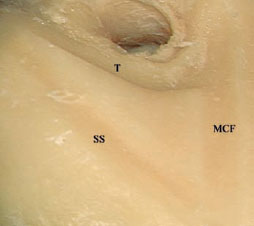
Fig. 3.2 The triangle of attack has been created in a left temporal bone. MCF Level of the middle cranial fossa, SS Expected level of the sigmoid sinus, T Posterior tangent to the external auditory canal
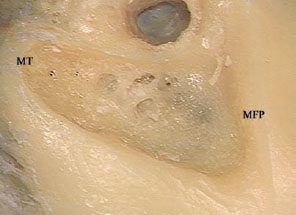
Fig. 3.3 Mastoidectomy has been started. MFP Middle fossa plate, MT Mastoid tip
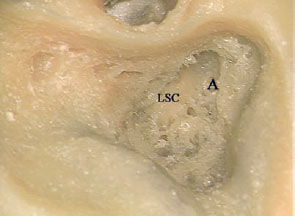
Fig. 3.4 The antrum (A) has been opened, and the lateral semicircular canal (LSC) has been identified.
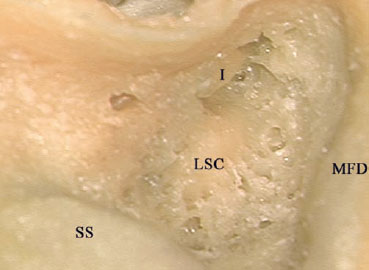
Fig. 3.5 The short process of the incus (I) has been identified. LSC Lateral semicircular canal, MFD Middle fossa dura, SS Sigmoid sinus
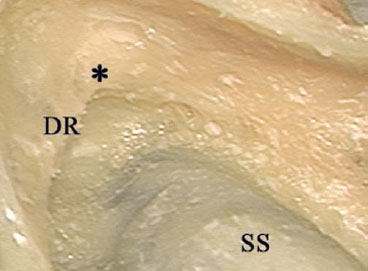
Fig. 3.6 The digastric ridge (DR) has been identified; the facial nerve lies at its anterior edge (*), at the stylomastoid foramen level. SS Sigmoid sinus
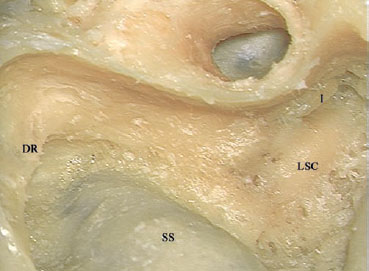
Fig. 3.7 The digastric ridge (DR), the short process of the incus (I), and the lateral semicircular canal (LSC) are the landmarks for the mastoid segment of the facial nerve. SS Sigmoid sinus
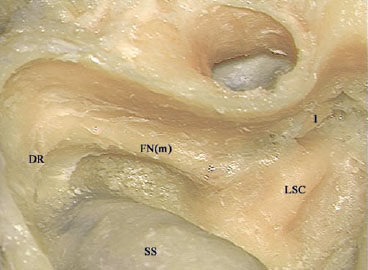
Fig. 3.8 The mastoid segment of the facial nerve (FNm) has been skeletonized. DR Digastric ridge, I Incus, LSC Lateral semicircular canal, SS Sigmoid sinus
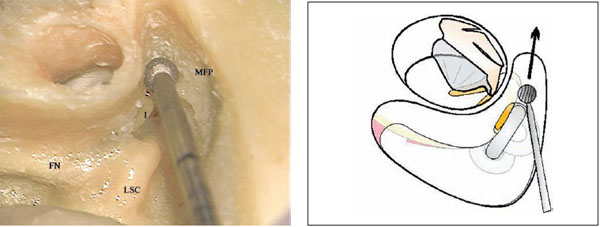
Fig. 3.9a,b Atticotomy is being carried out. Note the size of the diamond burr used for this step. The direction of movement should be from medial to lateral. FN Facial nerve, I Incus, LSC Lateral semicircular canal, MFP Middle fossa plate
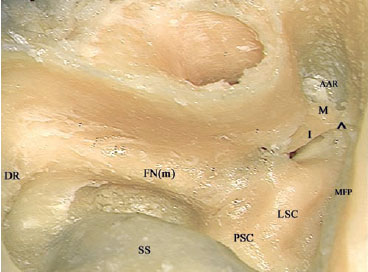
Fig. 3.10 Atticotomy has been completed. ^ Superior suspensor ligament, AAR Anterior attic recess, DR Digastric ridge, FN(m) Mastoid segment of the facial nerve, I Incus, LSC Lateral semicircular canal, M Malleus, MFP Middle fossa plate, PSC Posterior semicircular canal, SS Sigmoid sinus
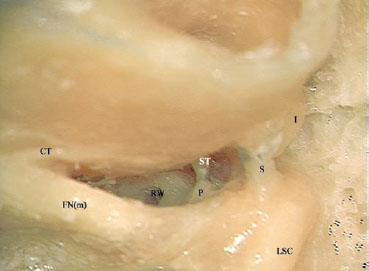
Fig. 3.11 Posterior tympanotomy has been performed, conserving the chorda tympani (CT). A strut of bone (S) has been left behind to protect the incus (I) from the rotating burr. Note that in this case, the round window exposure is complete, making this amount of posterior tympanotomy sufficient for a cochlear implant procedure. FN(m) Mastoid segment of the facial nerve, LSC Lateral semicircular canal, P Pyramidal process, RW Round window, ST Stapes
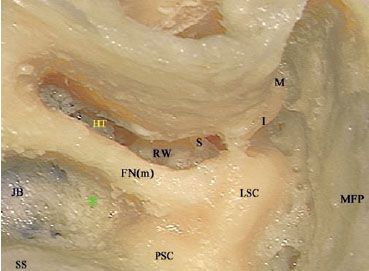
Fig. 3.12a The posterior tympanotomy has been extended inferiorly toward the hypotympanum (HT). The bone medial to the facial nerve (*) is to be removed next. FN(m) Mastoid segment of the facial nerve, I Incus, JB Jugular bulb, LSC Lateral semicircular canal, M Malleus, MFP Middle fossa plate, PSC Posterior semicircular canal, RW Round window, S Stapes, SS Sigmoid sinus
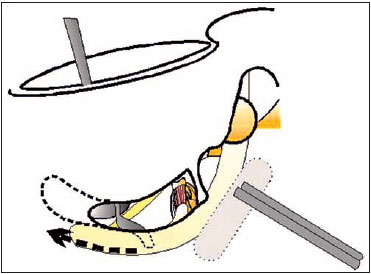
Fig. 3.12b The extended posterior tympanotomy allows management of the hypotympanum and middle ear through two different angles.
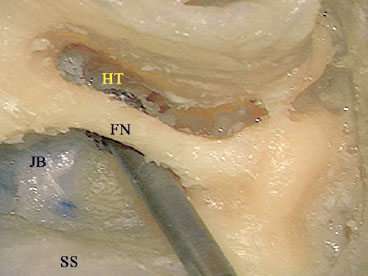
Fig. 3.13 The retrofacial tympanotomy has been performed. FN Facial nerve, HT Hypotympanum, JB Jugular bulb, SS Sigmoid sinus
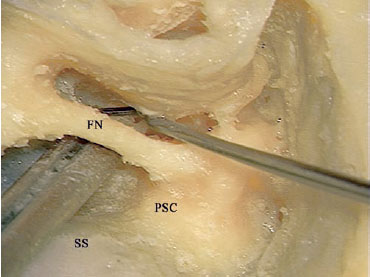
Fig. 3.14 The combination of extended tympanotomy and retrofacial tympanotomy provides wider access for management of the hypotympanum. FN Facial nerve, PSC Posterior semicircular canal, SS Sigmoid sinus
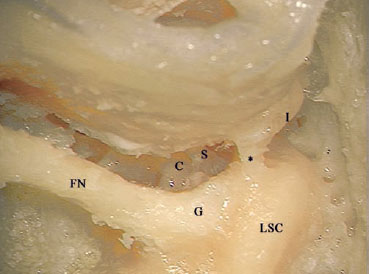
Fig. 3.15 The last step is to remove the strut of bone (*) left to protect the incus (I) using a curette. C Cochlea, FN Facial nerve, G Genu, LSC Lateral semicircular canal, S Stapes
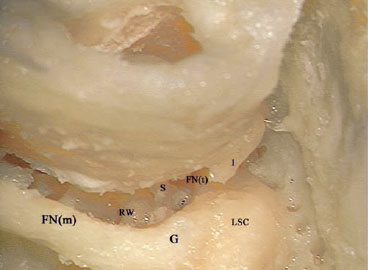
Fig. 3.16 The bone strut has been removed, and the tympanic segment of the facial nerve (FNt) is now under control. FN(m) Mastoid segment of the facial nerve, G Genu, I Incus, LSC Lateral semicircular canal, RW Round window, S Stapes
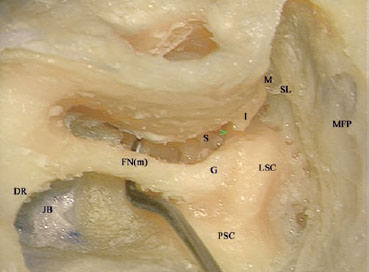
Fig. 3.17 The view after completing the approach. > Tympanic segment of the facial nerve, DR Digastric ridge, FN(m) Mastoid segment of the facial nerve, G Genu, I Incus, JB Jugular bulb, LSC Lateral semicircular canal, M Malleus, MFP Middle fossa plate, PSC Posterior semicircular canal, S Stapes, SL Suspensory ligament
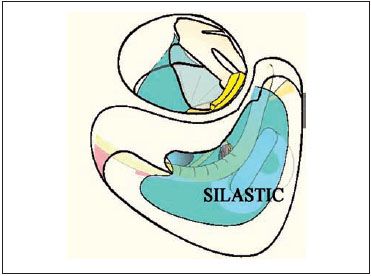
Fig. 3.18 Before closure, inserting a sheet of Silastic into the middle ear and mastoid cavity enhances the growth of healthy mucosa.
 Open Tympanoplasty (Figs. 3.19–3.37)
Indications
• Cholesteatoma in cases of:
–Contracted mastoid
–Large epitympanic erosions
–Recurrence after the closed tympanoplasty
–Bilateral cholesteatoma
–Cleft palate and Down’s syndrome
–Only hearing ear
–Large labyrinthine fistula
–Severe sensorineural hearing loss
• Some benign tumors involving the middle ear
Surgical Steps
This approach can be performed in two ways: transcortically, carrying out a closed tympanoplasty with atticotomy first, followed by removal of the posterior canal wall either using the drill or the rongeur; or transmeatally, identifying the middle fossa plate at the level of the external auditory canal with initially and following it posteriorly.
In the first case, the initial steps are identical to those described for closed tympanoplasty. After the closed tympanoplasty approach has been completed, a large cutting burr is used to drill away the posterior canal wall until the level of the FN is reached, as indicated by the digastric ridge and the lateral semicircular canal. When the level of the FN is approached, the burr is changed to a diamond burr of the same large size, and drilling is continued parallel to the orientation of the FN with ample suction irrigation. The superior canal wall is then lowered in the same manner, with care being taken not to drill over the ossicular chain, which by now should have been examined and its continuity ascertained.
1. If the start was transmeatal, superior canal wall drilling is started in an anterior to posterior manner until the middle fossa plate is identified. This level should be followed posteriorly to the sinodural angle and medially until a thin shell of bone is left covering the ossicles (the facial bridge).
2. The drilling is now shifted to the posterior canal wall, which is gradually lowered using a large cutting burr until the level of the annulus is reached. Further medial drilling in this region would jeopardize the FN, since no landmarks for the nerve have been identified yet.
3. For this reason, drilling is continued posteriorly, and the mastoid antrum and sigmoid sinus are identified. In this way, the mastoid cavity is gradually opened from anterior to posterior. While the drilling is being carried out, the cavity must always be saucerized and gradually deepened, bony overhangs should be removed from the edges, and a round-shaped cavity should be obtained. In live surgery, if bone is removed appropriately, the middle fossa dura is clearly identified through the thinned bone by its pinkish color, and the sigmoid sinus is clearly identified by its bluish color.
4. In addition to identifying the lateral semicircular canal, one of the landmarks for the mastoid segment of the nerve, this step would also lead to widening of the approach, facilitating further drilling.
5. Identification of the other landmark of the mastoid segment of the FN—the digastric ridge, at the anterior border of the lower portion of the sigmoid sinus in the area of the mastoid tip—is carried out next. Drilling is started in a posterior to anterior direction until the whole digastric ridge is developed, and the FN will be found lying anteriorly.
6. Removal and exteriorization of all air cells between the mastoid segment of the facial nerve and the sigmoid sinus is carried out.
7. Before the lowering of the FN ridge is completed, the thin shell of bone left covering the ossicles and the FN bridge is removed with a curette. This provides better visualization of the tympanic segment of the facial nerve, which can be used as a landmark when lowering the facial ridge. The anterior buttress of the bridge is drilled away using a small burr, with care being taken not to touch the ossicular chain lying behind. If there is prominent protrusion in the anterior or inferior wall, canalplasty should be carried out. The anterior meatal skin is cut laterally and detached from the bone toward the annulus. The medially folded meatal skin flap is protected with an aluminum sheet. The anterior or the inferior meatal walls, or both, are drilled to obtain a round-shaped cavity. Care should be taken not to expose the temporomandibular joint beneath the anterior wall.
8. In the last part of the approach, a large diamond burr is used to lower the FN ridge. While this step is being carried out, the direction of the movement of the burr should always be parallel to the nerve, and drilling should take place with ample suction irrigation to allow early identification of the nerve. The level to which the FN ridge should be lowered is indicated by the pathology. For management of chronic otitis media, the level to which the ridge should be lowered should be sufficient to allow adequate drainage of the mastoid cavity without the ridge hampering it. On the other hand, if the approach is being carried out for an FN tumor, further lowering should be performed. In the poorly pneumatized mastoid frequently seen in patients with chronic otitis media, the level of the ideally drilled facial ridge is almost on the same plane as the drilled mastoid cavity.
9. The final shape of the cavity is a reversed pyramid, with rounded external edges with no bony overhang in the cavity. Drilling to obtain the correct the cavity shape should be carried out to this extent.
Hints and Pitfalls
• Do not leave any bony overhangs in the edge of the cavity. The bony edges must be removed and rounded as much as possible in order to obtain a saucerized cavity.
• Thin the middle fossa plate and the sigmoid sinus plate sufficiently, but do not expose them. Open the sinodural angle widely.
• A deep, pneumatized mastoid tip must be lowered and removed.
• A posteroinferiorly based soft-tissue flap is used to obliterate the area of the mastoid tip if there is a deep dip left after these procedures.
• The facial ridge must be lowered sufficiently.
• Spaces that may become aerated and dip, especially retrofacial cells, are obliterated with autologous cartilage or bone paste, or both.
• Attention should always be paid to the facial nerve and its anatomical landmarks. An important landmark for lowering the facial ridge at the level of the antrum is the prominence of the lateral semicircular canal. The second genu of the nerve is located inferomedial to the prominence.
• Drilling over the mastoid segment of the facial nerve must be carried out with large burrs, and always with continuous suction irrigation. The burrs should be moved parallel to the nerve.
• The anterior buttress must be removed. Leaving the buttress in place may facilitate ingrowth of skin underneath it.
• Perilabyrinthine cells in the attic must be drilled out. Care should be taken not to damage the superior semicircular canal and the labyrinthine segment of the facial nerve, located medial to the geniculate ganglion.
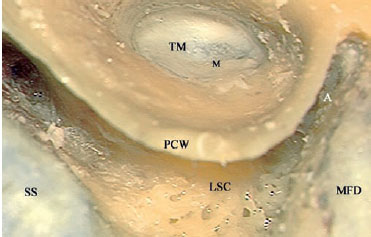
Fig. 3.19a A closed tympanoplasty with atticotomy has already been carried out in a left ear. A Attic, LSC Lateral semicircular canal, M Handle of the malleus, MFD Middle fossa dura, PCW Posterior canal wall, SS Sigmoid sinus, TM Tympanic membrane

Fig. 3.19b A diagram showing the extent of drilling of the posterior and superior canal walls required to convert a closed tympanoplasty into an open one.
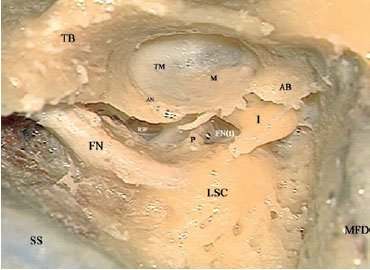
Fig. 3.20 The posterior canal wall has been drilled away, and the facial nerve (FN) has been skeletonized. AB Anterior buttress, AN Annulus, FN(t) Tympanic segment of the facial nerve, I Incus, LSC Lateral semicircular canal, M Handle of the malleus, MFD Middle fossa dura, P Pyramidal process, RW Round window, SS Sigmoid sinus, TB Tympanic bone, TM Tympanic membrane
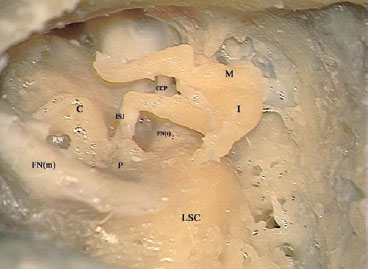
Fig. 3.21 The tympanic membrane, the anterior buttress of bone, and the remnants of the posterior canal wall have been removed, and the approach has been completed. C Cochlea, CCP Tensor tympani tendon passing through the cochleariform process, FN(m) Mastoid segment of the facial nerve, FN(t) Tympanic segment of the facial nerve, I Incus, ISJ Incudostapedial joint, LSC Lateral semicircular canal, M Malleus, P Pyramidal process, RW Round window
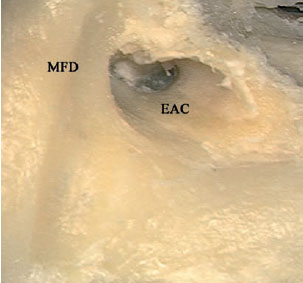
Fig. 3.22 In this case of open tympanoplasty, the approach was started transmeatally in a right ear. The identification of the middle fossa plate (MFD) was started by drilling the superior wall of the external auditory canal (EAC). Drilling then was continued posteriorly.

Fig. 3.23 After identification of the middle fossa plate (MFP), drilling has been continued in a medial direction toward the annulus. PCW Posterior canal wall, TMF Tympanomeatal flap
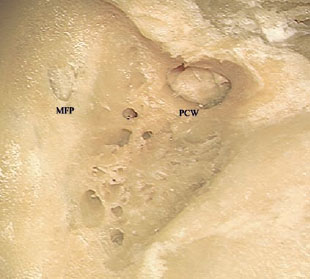
Fig. 3.24 The posterior canal wall (PCW) has been lowered. MFP Middle fossa plate
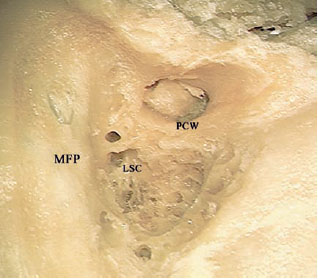
Fig. 3.25 The antrum has been opened, and the lateral semicircular canal (LSC) has been identified. MFP Middle fossa plate, PCW Posterior canal wall
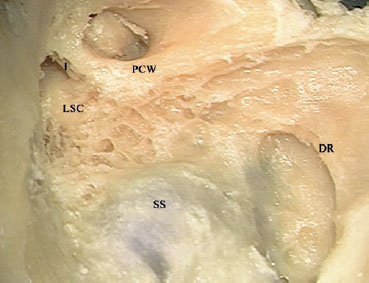
Fig. 3.26 Drilling has been further shifted posteriorly, identifying the sigmoid sinus (SS) and he digastric ridge (DR). I Incus, LSC Lateral semicircular canal, PCW Posterior canal wall
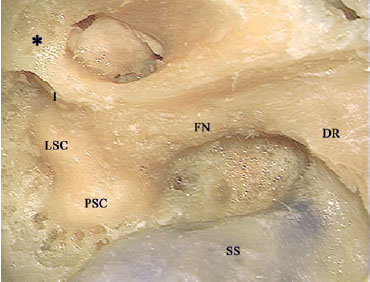
Fig. 3.27 The air cells between the facial nerve (FN) and the sigmoid sinus (SS) have been identified. The thin shell of bone (*) left covering the ossicles in the attic area is to be removed next using a curette. DR Digastric ridge, LSC Lateral semicircular canal, PSC Posterior semicircular canal
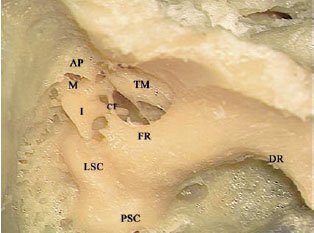
Fig. 3.28 The thin shell of bone covering the attic has been removed. The anterior buttress has yet to be removed. AP Anterior buttress, CT Chorda tympani, DR Digastric ridge, FR Facial ridge, I Incus, LSC Lateral semicircular canal, M Malleus, PSC Posterior semicircular canal, TM Tympanic membrane
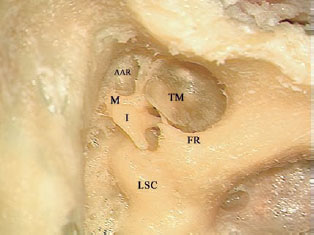
Fig. 3.29 The attic has been adequately opened, and the facial ridge (FR) will next be lowered. AAR Anterior attic recess, I Incus, LSC Lateral semicircular canal, M Head of the malleus, TM Tympanic membrane
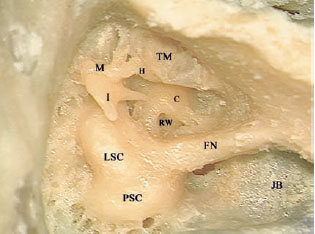
Fig. 3.30 The facial bridge has been adequately lowered, and the tympanic membrane (TM) has been reflected anteriorly. C Basal turn of the cochlea (promontory), FN Facial nerve, H Handle of the malleus, I Incus, JB Jugular bulb, LSC Lateral semicircular canal, M Malleus, PSC Posterior semicircular canal, RW Round window
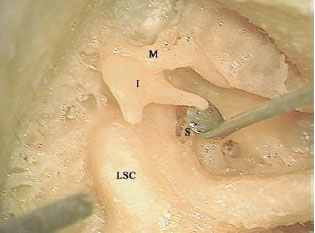
Fig. 3.31 The incudostapedial joint is being disarticulated. I Incus, LSC Lateral semicircular canal, M Malleus, S Stapes
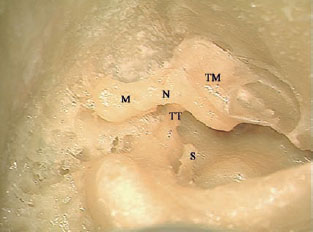
Fig. 3.32 The incus has been removed. The malleus (M) is now to be cut at the level of the neck (N). S Stapes, TM Tympanic membrane, TT Tensor tympani tendon
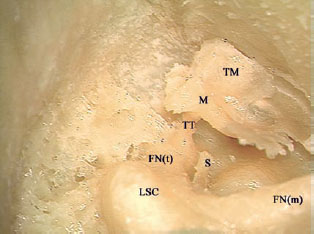
Fig. 3.33 The head of the malleus has been removed. Note the attachment of the tensor tympani (TT) to the medial aspect of the neck of the malleus, preventing anterior reflection of the malleus handle (M) together with the attached tympanic membrane (TM) to examine the anterior part of the mesotympanum. FN(m) Mastoid segment of the facial nerve, FN(t) Tympanic segment of the facial nerve, LSC Lateral semicircular canal, S Stapes
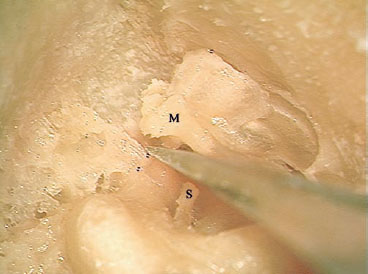
Fig. 3.34 The tensor tympani tendon is being cut. M Malleus, S Stapes
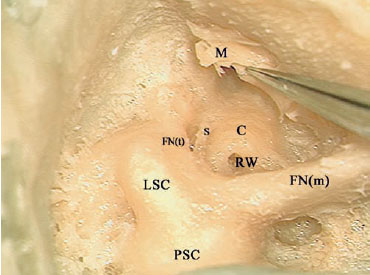
Fig. 3.35 The malleus (M), together with the attached tympanic membrane, can now be reflected anteriorly, and the middle ear cavity can be well visualized. C Basal turn of the cochlea (promontory), FN(m) Mastoid segment of the facial nerve, FN(t) Tympanic segment of the facial nerve, LSC Lateral semicircular canal, PSC Posterior semicircular canal, RW Round window, S Stapes
Fig. 3.36 A schematic presentation of the exposure required in an open tympanoplasty.
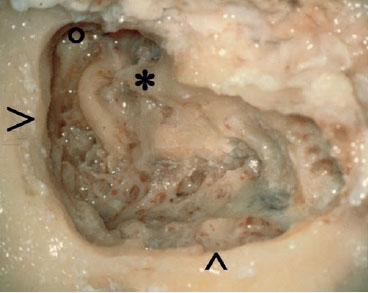
Fig. 3.37 An example of an incorrectly performed open tympanoplasty. The mistakes that can be seen are: the edges at the level of both the middle fossa plate (>) and the sigmoid sinus (^) are overhanging and not saucerized, the facial ridge is too high (*), and the anterior attic recess (o) has not been adequately opened.
 Modified Bondy Technique (Figs. 3.38–3.59)
In the modified Bondy technique, the posterior canal wall is removed but the articulations between the ossicles are not touched. The prerequisites for this technique are an intact ossicular chain and tympanic membrane, with an epitympanic cholesteatoma located lateral to the chain. Significant benefits of this technique are constant preservation of preoperative hearing due to preservation of the ossicular chain in a single-stage operation, with no need for a second-look operation. To remove the posterior canal wall, a contracted mastoid is preferable.
Indications
• Epitympanic cholesteatoma in a normal or well-hearing ear with an intact tympanic membrane and ossicular chain.
• Epitympanic cholesteatoma in the better ear or only hearing ear, with a slightly eroded ossicular chain.
• Some cases of bilateral postinflammatory canal stenosis.
Surgical Steps
1. A mastoidectomy is completed with one of two techniques described before (see open tympanoplasty, p. 27). Sufficient lowering of the facial ridge to the level of the tympanic annulus is of immense importance. Due to the presence of the incus, the facial ridge is left a little higher than usual. The drill should be moved parallel to the nerve during this procedure.
2. A highly pneumatized mastoid tip should be amputated as described. Extensive pneumatizations in the cavity are filled with cartilage or bone paste, or both.
3. In transcortical mastoidectomy, a posterior epitym-panotomy is performed, with care being taken not to touch the intact ossicular chain. The specimen should be tilted away from the surgeon to identify the chain as soon as possible. The burr should be moved from the area near the ossicles to elsewhere, but never toward the ossicles.
4. If canalplasty is required, the anterior meatal skin is cut and folded medially. The inferior canal wall is widened to obtain a round cavity. The tympanomeatal flap should be protected with a thin aluminum sheet during the drilling.
5. The facial bridge is removed with a curette, with special care being taken not to injure the chain. Burrs may be used, but since the ossicular chain is intact, this may involve a greater risk. The anterior and the posterior buttresses are also removed in the same way.
6. In live surgery, the cholesteatoma is now removed from the attic and the mastoid. The posterosuperior annulus is partially detached from the tympanic sulcus, and the tympanic cavity is carefully inspected to ensure the absence of cholesteatoma. This step is also needed for reconstruction. Pathological tissue, such as scar and granulation tissue, if any, is dissected with meticulous care from the ossicular chain. Minor invagination of cholesteatoma matrix behind the body of incus or head of the malleus, or both, is carefully dissected from the chain. A meatoplasty is carried out in order to obtain sufficiently large access to the cavity postoperatively. The conchal cartilage is harvested for subsequent reconstruction.
7. A piece of cartilage is placed in the attic, medial to the body of the incus and the head of the malleus. This cartilage prevents retraction of the skin behind the ossicles. Bone paste should not be used in this area, to avoid fixation of the ossicular chain.
8. A longitudinal cut is made in the temporalis fascia. The superior tongue is placed in the attic, medial to the body of the incus and the head of the malleus. The other tongue is inserted into the middle ear cleft, lateral to the long process of the incus and medial to the handle of the malleus, creating a fascia underlay. In some cases, a thin lamina of cartilage may be inserted over the long process of the incus to avoid retraction of the posterosuperior quadrant.
9. The widest area possible of exposed bony surface is covered with the fascia. Another piece of fascia may be placed to cover exposed bone dust and materials used for obliteration.
Hints and Pitfalls
• The modified Bondy technique forms a part of the main system of surgery, with which a skilled and experienced surgeon must be familiar.
• The major advantage of this technique over others is that it is a single-stage procedure. This is safer if preservation of hearing is of prime importance.
• When the procedure is carried out correctly in the right patient, a dry and self-cleaning cavity can be obtained in the majority of cases (more than 95% of our cases).
• It should always be borne in mind that the entire ossicular chain is intact and directly connected to the inner ear. Do not touch the intact ossicular chain with burrs.
• Drilling of the epitympanic area must be carried out very carefully. The drill is moved from medial to lateral, or away from the ossicular chain, to avoid touching it accidentally.
• The last portion of the superior canal wall (the facial bridge) is removed with a curette, rather than burrs. Do not leave the anterior buttress. This will favor invagination of the skin anterior to the head of the malleus, which is very difficult to manage.
• Insert autologous conchal cartilage beneath the body of the incus and the head of the malleus in order to avoid retraction, which creates deep spaces medial to these structures.
• If protrusion of the anterior canal wall is not too prominent, do not drill it out. This will avoid unnecessary danger not only to the temporomandibular joint but also to the ossicular chain.
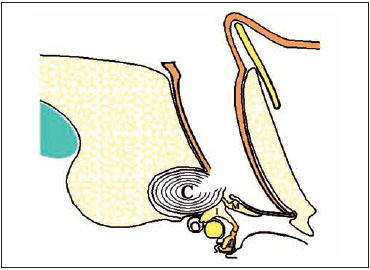
Fig. 3.38a The indication for performing a modified Bondy procedure. Note that the cholesteatoma (C) is invading only the attic lateral to the malleus (M) and incus (I), so that both the malleus and incus and also the tympanic membrane remain intact.
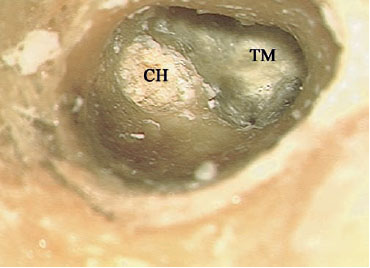
Fig. 3.38b View of the tympanic membrane (TM), with an attic cholesteatoma (CH) in a right ear.
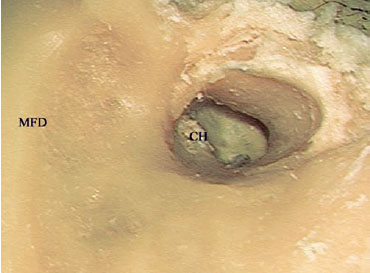
Fig. 3.39 An incision similar to that carried out in closed tympanoplasty is made. The level of the middle fossa dura (MFD) has been delineated here, and drilling has been started from the level of the anterior canal wall. CH Cholesteatoma

Fig. 3.40 The drilling has been advanced medially, leaving only a thin shell of bone covering the ossicles. FB Facial bridge, MFD Level of the middle fossa dura, PCW Posterior canal wall
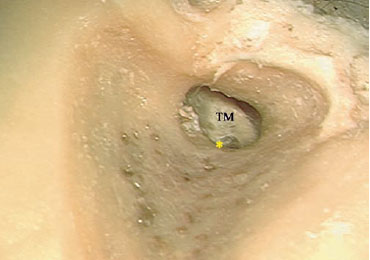
Fig. 3.41 The posterior canal wall has been lowered down to the level of the annulus (*). TM Tympanic membrane
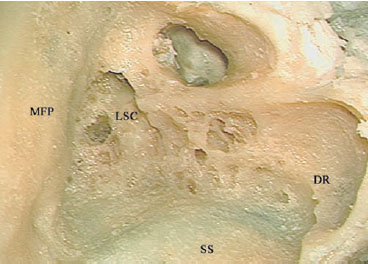
Fig. 3.42 The lateral semicircular canal (LSC), sigmoid sinus (SS), and digastric ridge (DR) have been identified. MFP Middle fossa plate
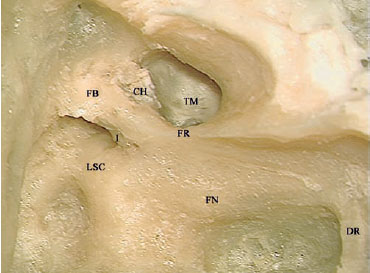
Fig. 3.43 The short process of the incus (I) and the facial nerve (FN) have been identified. CH Cholesteatoma, DR Digastric ridge, FB Facial bridge, FR Facial ridge, LSC Lateral semicircular canal, TM Tympanic membrane
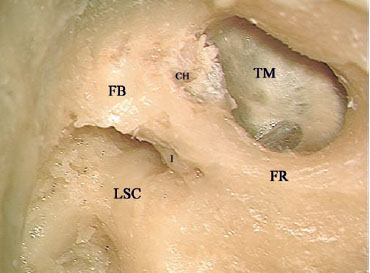
Fig. 3.44 The facial ridge (FR) has been lowered further. CH Choleste toma, FB Facial bridge, I Incus, LSC Lateral semicircular canal, TM Tym panic membrane
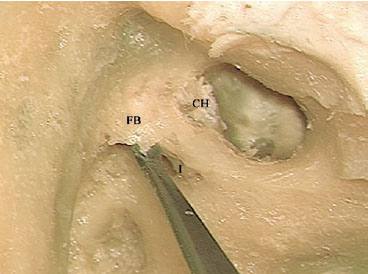
Fig. 3.45 The curette is used to remove the facial bridge (FB) and the last bone covering the ossicles. CH Cholesteatoma, I Incus
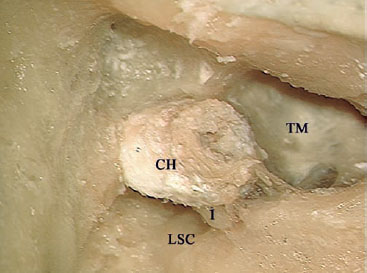
Fig. 3.46 The cholesteatoma (CH) can be seen located lateral to the incus (I) in the attic area. LSC Lateral semicircular canal, TM Tympanic membrane
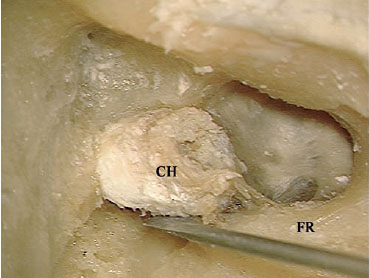
Fig. 3.47 Dissection of the cholesteatoma (CH). FR Facial ridge
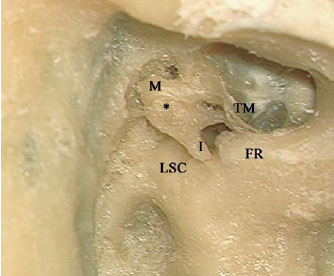
Fig. 3.48 The cholesteatoma has been removed, and the ossicles are seen to be intact, except for mild erosion (*) of the body of the incus (I). FR Facial ridge, LSC Lateral semicircular canal, M Malleus, TM Tympanic membrane
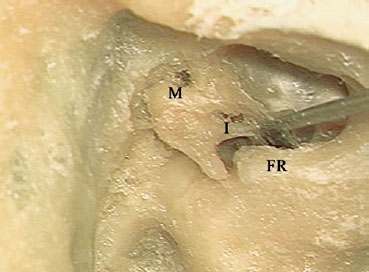
Fig. 3.49 Elevation of the tympanic membrane to examine the me-sotympanum. FR Facial ridge, I Incus, M Malleus
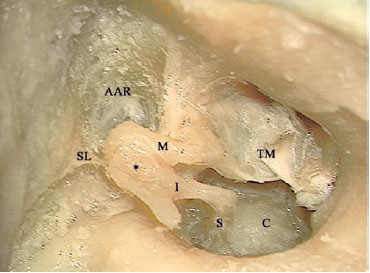
Fig. 3.50 The tympanic membrane (TM) has been reflected anteriorly. The ossicles are intact, and no cholesteatoma is found. * Erosion of the body of the incus, AAR Anterior attic recess, C Basal turn of the cochlea (promontory), I Incus, M Malleus, S Stapes, SL Superior suspensory ligament
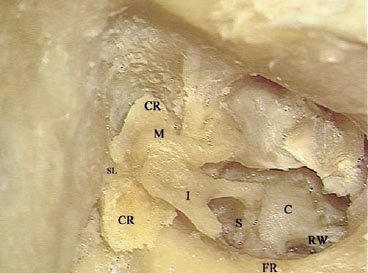
Fig. 3.51 The reconstruction is started by inserting a piece of cartilage (CR) medial to the body of the incus (I) and head of the malleus (M). C Basal turn of the cochlea (promontory), FR Facial ridge, RW Round window, S Stapes, SL Superior suspensory ligament
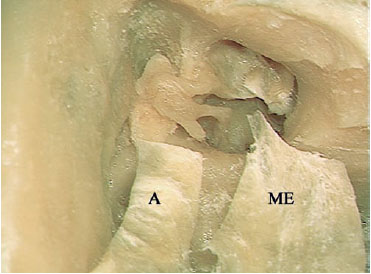
Fig. 3.52 Two tongues have been created in the fascia to be used during construction. The smaller tongue (A) will be inserted into the attic medial to the body of the incus and head of the malleus, and lateral to the cartilage, while the larger tongue (ME) will be inserted between the handle of the malleus and the long process of the incus.
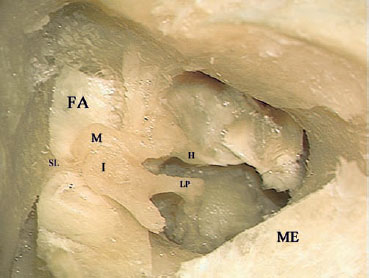
Fig. 3.53 The small tongue of the fascia (FA) is in place. H Handle of the malleus, I Body of the incus, LP Long process of the incus, M Head of the malleus, ME Larger tongue, SL Suspensory ligament
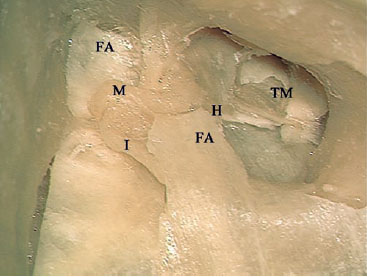
Fig. 3.54a The large tongue of the fascia (FA, right) is in place. H Handle of the malleus, I Body of the incus, M Head of the malleus, TM Tympanic membrane
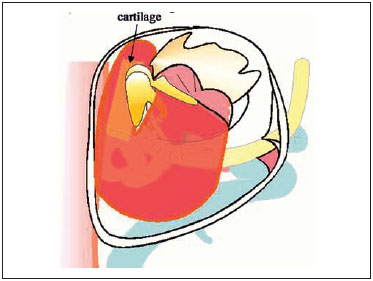
Fig. 3.54b, c Diagrams illustrating the relationship of the cartilage and fascia to the ossicles.
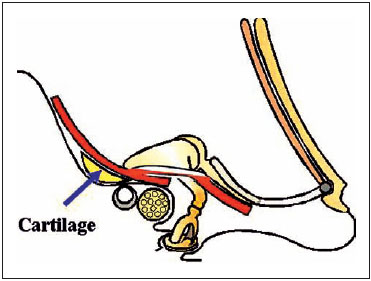
Fig. 3.54c
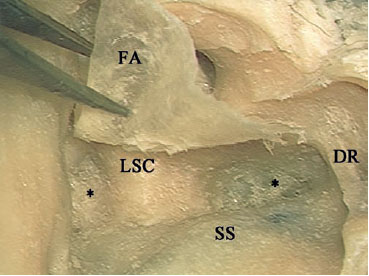
Fig. 3.55 To prevent secretions from collecting, the depression in the mastoid cavity (*) should be obliterated. DR Digastric ridge, FA Fascia, LSC Lateral semicircular canal, SS Sigmoid sinus

Fig. 3.56 Small pieces of cartilage (CR) are used first. FN Facial nerve
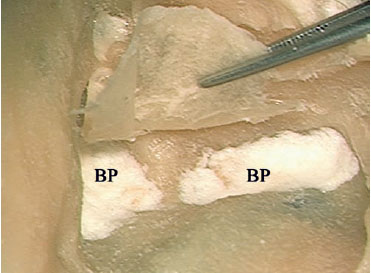
Fig. 3.57 Bone paste (BP) is added to cover the cartilage.
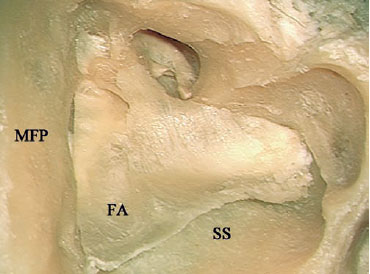
Fig. 3.58 The rest of the fascia (FA) is reflected posteriorly to cover as much of the mastoid cavity as possible. MFP Middle fossa plate, SS Sigmoid sinus
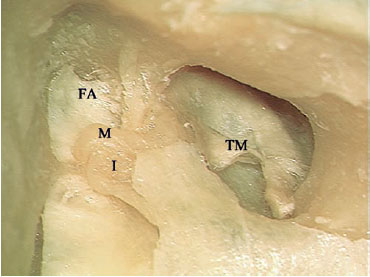
Fig. 3.59 The remnants of the tympanic membrane (TM) are reflected back. FA Fascia, I Body of the incus, M Head of the malleus
 Radical Mastoidectomy (Fig. 3.60)
Indications
The difference between this technique and open tympanoplasty is that it involves complete removal of the middle ear, including the sound transmission system (except for the footplate of the stapes), and eradication of the tubal function. This technique is used mainly in elderly patients with a preoperative dead ear or nonserviceable hearing, in whom the only goal of surgery is to obtain a dry and safe ear. Other indications are as follows:
• Presence of cochlear fistulas.
• Presence of middle ear cholesteatoma in difficult-to-reach areas—e. g., deep sinus tympani.
• Cholesteatoma with intracranial complications.
• Benign tumors in the middle ear and the mastoid, with severe sensorineural hearing loss.
 Subtotal Petrosectomy (Figs. 3.61–3.63)
In this approach, after radical mastoidectomy has been completed, complete drilling of the air cells of the temporal bone is carried out, leaving only the inner ear. The air cells to be removed include retrofacial, retrolabyrinthine, infralabyrinthine, supralabyrinthine, peritubal, and pericarotid air cells, if present. Blind-sac closure of the external auditory canal can be added to the approach, depending on the indication.
Indications
• Treatment of chronic otitis when there is no possibility of hearing reconstruction.
• Limited petrous bone cholesteatoma.
• Middle ear tumors.
• Management of posttraumatic or postoperative cerebrospinal otorrhea.
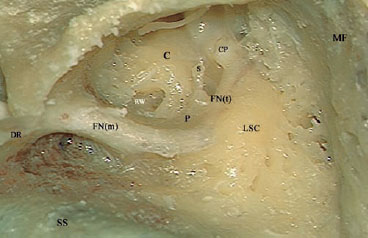
Fig. 3.60 The appearance after radical mastoidectomy. C Basal turn of the cochlea (promontory), CP Cochleariform process, DR Digastric ridge, FN(m) Mastoid segment of the facial nerve, FN(t) Tympanic segment of the facial nerve, LSC Lateral semicircular canal, MF Middle fossa plate, P Pyramid, RW Round window, S Stapes, SS Sigmoid sinus
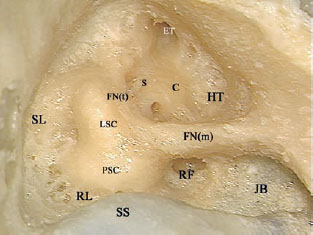
Fig. 3.61 The groups of air cells that need to be drilled out to achieve a subtotal petrosectomy in a right temporal bone. C Basal turn of the cochlea (promontory), ET Eustachian tube, FN(m) Mastoid segment of the facial nerve, FN(t) Tympanic segment of the facial nerve, HT Hypotympanic air cells, JB Jugular bulb, LSC Lateral semicircular canal, PSC Posterior semicircular canal, RF Retrofacial air cells, RL Retrolabyrinthine air cells, S Stapes, SL Supralabyrinthine air cells, SS Sigmoid sinus
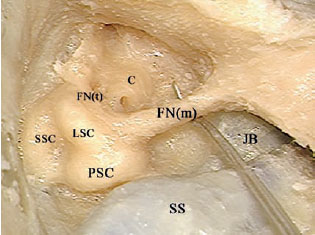
Fig. 3.62 The retrofacial and hypotympanic air cells have been drilled, as shown by the passage of the pointer medial to the mastoid segment of the facial nerve (FNm). C Basal turn of the cochlea (promontory), FN(t) Tympanic segment of the facial nerve, JB Jugular bulb, LSC Lateral semicircular canal, PSC Posterior semicircular canal, SS Sigmoid sinus, SSC Superior semicircular canal
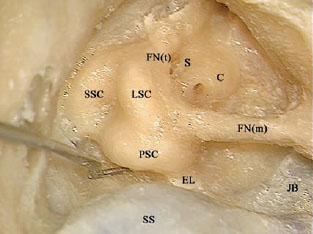
Fig. 3.63 The perilabyrinthine air cells have been drilled away. C Basal turn of the cochlea (promontory), EL Endolymphatic duct, FN(m) Mastoid segment of the facial nerve, FN(t) Tympanic segment of the facial nerve, JB Jugular bulb, LSC Lateral semicircular canal, PSC Posterior semicircular canal, S Stapes, SS Sigmoid sinus, SSC Superior semicircular canal
 En-Bloc Excision of the External Auditory Canal (Figs. 3.64–3.74)
Indication
• Malignant tumors of the external auditory canal, sparing the middle ear structures.
Surgical Steps
1. A closed mastoidectomy is carried out, as described previously.
2. The posterior tympanotomy is extended inferiorly to expose the hypotympanum.
3. Anteroinferior extension of the tympanotomy is carried out. Drilling is continued using an appropriately sized diamond burr to separate the inferior portion of the tympanic bone from the medial wall of the middle ear in the area of the hypotympanum. The drilling should be extended anteriorly until the temporomandibular joint is reached.
4. The mastoid tip is dissected away, with care being taken not to injure the closely related facial nerve.
5. The incudostapedial joint is disarticulated in order to avoid sensorineural hearing loss in live surgery while carrying out the remaining drilling in the attic area.
6. The atticotomy is now extended anteriorly until the temporomandibular joint is opened.
7. The tensor tympani tendon attachment to the malleus is sharply cut. This step allows safe removal of the external auditory canal without the risk of leaving behind any residual tumor as a result of the tendon pulling on the malleus and leading to rupture of the tympanic membrane.
8. Using the thumb, gentle anterior pressure on the external auditory canal leads to fracturing of the last attachment at the anterior wall level.
9. Inspection of both the middle ear and the medial aspect of the tympanic membrane removed with the specimen is now carried out to ensure that no remnants are left behind.
Hints and Pitfalls
• When the posterior tympanotomy is being extended anteroinferiorly, the intraparotid facial nerve may be injured. For this reason, in live surgery, identification of the intra-parotid facial nerve as far as the bifurcation is carried out before the extension. This step is also useful if the superficial loop of the parotid gland is to be included with the specimen.
• Before the sample is removed, cutting the attachment of the tensor tympani tendon to the malleus prevents the unfortunate occurrence of rupture of the tympanic membrane due to pulling on the handle of the malleus when it is integrated into the membrane layers.
• In cases in which the tumor is small and localized in the posterior wall of the external auditory canal, the anterior wall of the canal (the posterior wall of the temporomandibular joint) can be preserved, thus avoiding any masticatory problems. In these cases, the drilling need not to be extended into the joint, and the anteriorly attached soft tissues can be sharply dissected from the bone.
• In cases in which the tumor has infiltrated the temporomandibular joint through the anterior wall of the canal, the articulation (mandibular head and disk) should be included with the specimen.
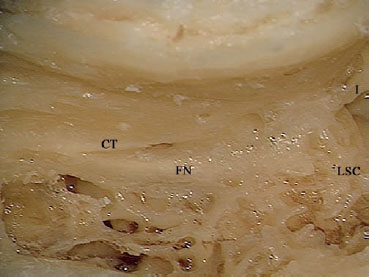
Fig. 3.64 Mastoidectomy has been carried out, and the facial nerve (FN) has been identified. CT Chorda tympani, I Incus, LSC Lateral semicircular canal
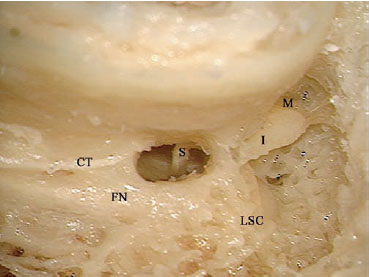
Fig. 3.65 Posterior tympanotomy has been started. CT Chorda tym pani, FN Facial nerve, I Incus, LSC Lateral semicircular canal, M Malleus S Stapes
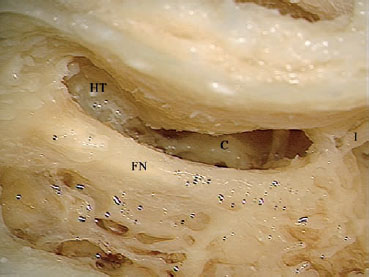
Fig. 3.66 The posterior tympanotomy has been extended toward the hypotympanum (HT). C Basal turn of the cochlea (promontory). FN Facial nerve, I Incus
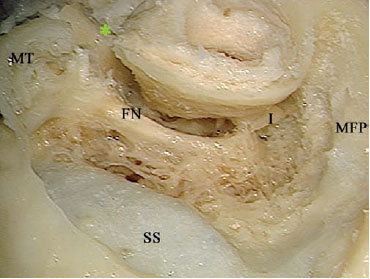
Fig. 3.67 Anteroinferior extension of the tympanotomy (*) has separated the inferior portion of the tympanic bone from the medial wall of the middle ear in the area of the hypotympanum. FN Facial nerve, I Incus, MFP Middle fossa plate, MT Mastoid tip, SS Sigmoid sinus
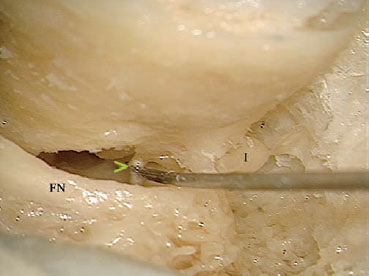
Fig. 3.68 The incudostapedial joint (>) has been isarticulated. FN Facial nerve, I Incus
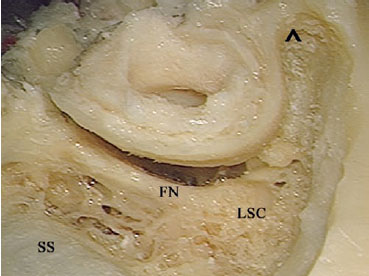
Fig. 3.69 Atticotomy has been carried out. The arrow (^) shows the last piece of bone to be removed in order to reach the temporomandibular joint. FN Facial nerve, LSC Lateral semicircular canal, SS Sigmoid sinus
Fig. 3.70 The atticotomy is now extended anteriorly until the temporomandibular joint is opened.
Fig. 3.71 The tensor tympani tendon (>) attachment to the malleus is sharply cut.
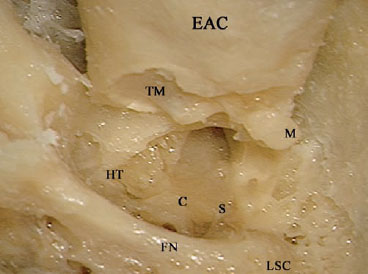
Fig. 3.72 Gentle anterior pressure on the external auditory canal (EAC) leads to fracturing of the last attachment at the level of the anterior wall. C Basal turn of the cochlea (promontory), FN Facial nerve, HT Hypotympanum, LSC Lateral semicircular canal, M Malleus, S Stapes, TM Tympanic membrane
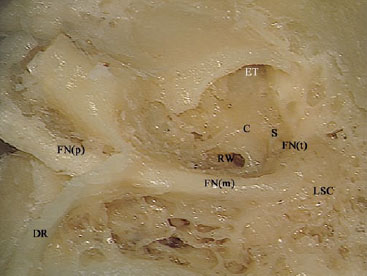
Fig. 3.73 The appearance after the procedure has been completed. C Basal turn of the cochlea (promontory), DR Digastric ridge, ET Eustachian tube, FN(m) Mastoid segment of the facial nerve, FN(p) Extratemporal facial nerve, FN(t) Tympanic segment of the facial nerve, LSC Lateral semicircular canal, RW Round window, S Stapes
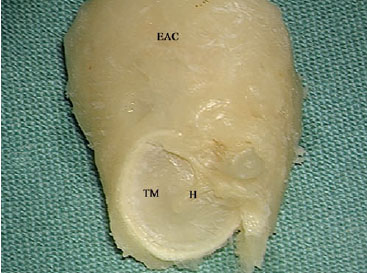
Fig. 3.74 The appearance of the removed external auditory canal (EAC) together with the intact tympanic membrane (TM). H Handle of the malleus
 Endolymphatic Sac Decompression (Figs. 3.75–3.84)
Surgical Anatomy
The endolymphatic sac is blind sac connected to the membranous labyrinth through the endolymphatic duct. Both the endolymphatic duct and the proximal part of the sac lie within a bony canal, the vestibular aqueduct, which runs medial to the posterior semicircular canal to enter the vestibule. The terminal part of the sac lies between the two layers of the posterior fossa dura, inferior to a line extending through the lateral semicircular canal (Donaldson’s line).
Indication
• Intractable Meniere’s disease with serviceable hearing.
Surgical Steps
1. Complete cortical mastoidectomy.
2. Bone over the sigmoid sinus is removed using a large diamond burr until a very thin shell of bone remains over the sinus. The jugular bulb is identified and skeletonized. The posterior semicircular canal is identified, but not blue-lined.
3. With the suction irrigator, the sigmoid sinus is gently depressed, and the posterior fossa dura in front of the sinus is carefully detached from the overlying bone. Bone between the sigmoid sinus and posterior semicircular canal can now be removed safely without injuring the dura. The posterior fossa dura should be widely exposed.
4. The exposed dura is gently depressed with a septal dissector, thus identifying the point at which the sac enters the vestibular aqueduct. If a double-curved raspatory is moved along the plane of the posterior fossa dura from superior to inferior, it fails to pass freely, since it is obstructed by the sac from entering the vestibular aqueduct. Another identifying characteristic of the sac is that it is relatively whiter in comparison with the surrounding bluish posterior fossa dura.
5. The sac is sharply opened, and the lateral wall of the sac is removed. A Silastic tube is then inserted into the lumen.
Hints and Pitfalls
• Bone removal and exposure of the posterior fossa dura should be as wide as possible, and not only restricted to the expected sac location. Failure to remove the bone in the retrofacial cells would lead to an inability to locate the sac.
• In some cases, the sac may be intimately related to the jugular bulb. Care should be taken in these cases not to injure the bulb while opening the sac.
• Since the position of the endolymphatic sac is quite variable, the various methods of identifying the sac described in the literature are of little significance in live surgery.

Fig. 3.75 An extended mastoidectomy has been carried out in a right temporal bone. Note that the bone thinning of has been extended over the sigmoid sinus (SS), while the middle fossa plate (MFP) has only been identified. DR Digastric ridge, FN Facial nerve, I Incus, LSC Lateral semicircular canal
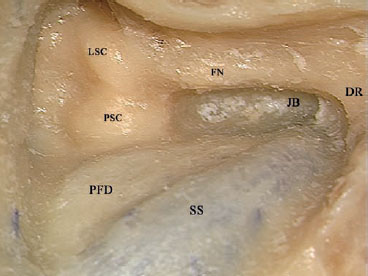
Fig. 3.76 The posterior semicircular canal (PSC) has been identified, and the bone overlying the sigmoid sinus (SS) and the posterior fossa dura (PFD) anterior to it has been thinned. DR Digastric ridge, FN Facial nerve, JB Jugular bulb, LSC Lateral semicircular canal
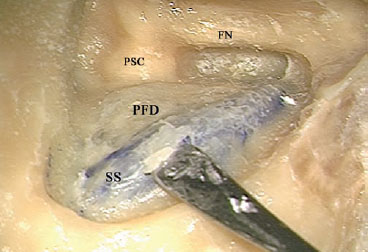
Fig. 3.77 The last shell of bone covering the sigmoid sinus (SS) and the posterior fossa dura (PFD) is being removed. FN Facial nerve, PSC Posterior semicircular canal
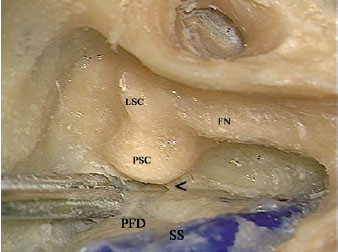
Fig. 3.78 After the sigmoid sinus (SS) and the posterior fossa dura (PFD) have been uncovered, retraction of the dura posteriorly reveals the endolymphatic duct (<) exiting medial to the posterior semicircular canal (PSC). FN Facial nerve, LSC Lateral semicircular canal
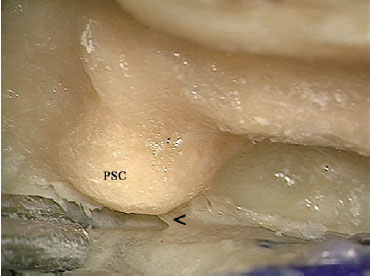
Fig. 3.79 At higher magnification, the relationship between the en-dolymphatic duct (<) and the posterior semicircular canal (PSC) can be better appreciated.
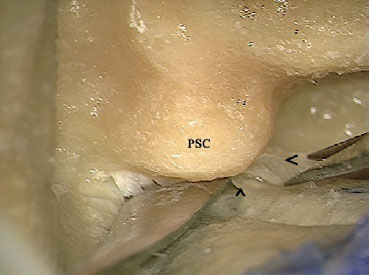
Fig. 3.80 Using microscissors, the lateral wall of the endolymphatic sac (<) is separated from its medial wall (^). PSC Posterior semicircular canal
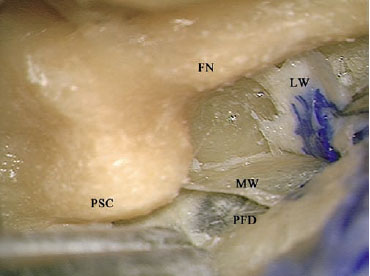
Fig. 3.81 The lateral wall of the endolymphatic sac (LW) has been dissected from the medial wall (MW). FN Facial nerve, PFD Posterior fossa dura, PSC Posterior semicircular canal
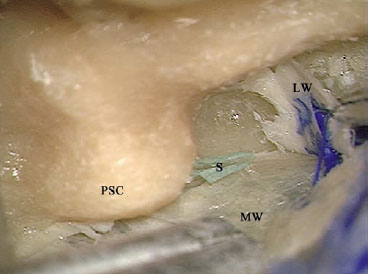
Fig. 3.82 A piece of Silastic sheet (S) has been inserted into the endolymphatic duct as it emerges from behind the posterior semicircular canal (PSC). LW Lateral wall of the endolymphatic sac, MW Medial wall of the endolymphatic sac
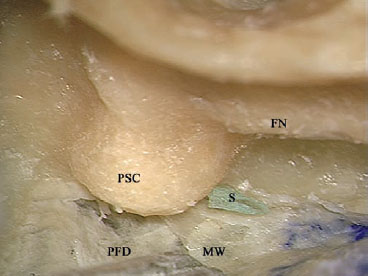
Fig. 3.83 The lateral wall of the endolymphatic sac has been excised in order to avoid closure of the drain by scar tissue. FN Facial nerve, MW Medial wall of the endolymphatic sac, PFD Posterior fossa dura, PSC Posterior semicircular canal, S Silastic
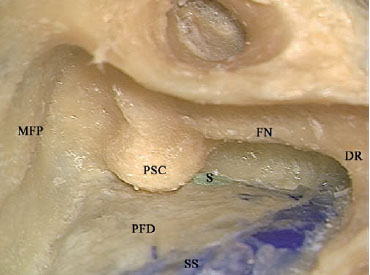
Fig. 3.84 The view at the end of the procedure. DR Digastric ridge, FN Facial nerve, MFP Middle fossa plate, PFD Posterior fossa dura, PSC Posterior semicircular canal, S Silastic, SS Sigmoid sinus
 Facial Nerve Decompression (Figs. 3.85–3.91)
Transmastoid facial nerve decompression can be carried out via either closed or open tympanoplasty. In patients with normal hearing, closed tympanoplasty allows the pathology to be managed while preserving the patient’s hearing. By contrast, open tympanoplasty is used in patients whose hearing has already been lost.
Indications
• Transverse temporal bone fractures with concomitant facial nerve paralysis in which the fracture line crosses the tympanic or mastoid segment of the facial nerve without involving a more proximal segment.
• Facial nerve tumors localized to the mastoid or tympanic segments of the facial nerve.
Surgical Technique
Closed Tympanoplasty Facial Nerve Decompression
1. A closed tympanoplasty with an extended posterior tympanotomy, as described earlier, are performed.
2. The bone covering the FN is thinned down to eggshell consistency using a large diamond burr under ample suction irrigation. The mastoid segment of the facial nerve should be skeletonized to a total of 270° of its circumference.
3. Skeletonization of the facial nerve genu is mainly carried out on the anterior and lateral surfaces. The lateral semicircular canal lies immediately posterior to the genu, and care must be taken not to open it. Care also must be taken not to touch the short process of the incus, which lies in close proximity to the lateral surface of the genu. The level of exposure that can be achieved here is only 180°. A small diamond burr is used. The drill should be rotated at a low speed and away from the incus. The bone covering the anterior and lateral surfaces of the genu is thinned out.
4. Attention is now directed to the narrowest part of the approach—the tympanic segment of the FN. This segment has to be approached through the space available between the body of the incus laterally and the anterior part of the lateral semicircular canal, the ampullae of the lateral and superior semicircular canals medially, and the middle fossa dural plate superiorly. A small diamond burr is mounted on a curved hand-piece to allow maximal utilization of the narrow visual field available. The length of the burr should also be adjusted so that the handpiece will not interrupt vision. The speed of the drill is adjusted to a low level, and the drill is rotated away from the ossicular chain. In the middle part of this segment, care also must be taken not to open the ampullated ends of the lateral and superior semicircular canals lying superior to the nerve. Drilling is advanced cautiously anteriorly until the geniculate ganglion (GG) is uncovered.
5. The last shell of thin bone covering the nerve is removed using a double-curved hook, thus uncovering the full length of the FN from the geniculate ganglion to the stylomastoid foramen.
6. At this point, the suction irrigation tube is changed to a smaller Brackmann’s suction tube.
7. Using a new Beaver knife with the sharp border facing away from the nerve, the perineural sheath of the nerve is incised, thereby completing the decompression.
Open Tympanoplasty Facial Nerve Decompression
An open tympanoplasty approach for FN decompression makes the procedure much easier, both because of the ambient space provided and because this approach is usually indicated in patients in whom hearing is not to be preserved or has already been lost.
1. An open tympanoplasty is performed as previously described.
2. After the completion of the approach, a large diamond burr is used to thin down the bony covering of the mastoid segment to a very thin transparent shell of bone. The level of exposure here should be 270°. The exposure involves the posterior, lateral, and anterior surfaces.
3. When drilling reaches the genu, the size of the drill is reduced to avoid unnecessary opening of the lateral canal, even if hearing is not to be conserved, in order to prevent postoperative vertigo.
4. Drilling is then advanced toward the tympanic segment and the geniculate ganglion, with care being not to injure the superiorly lying lateral canal and ampullae of the lateral and superior canal. If needed, the size of the burr can be further reduced.
5. The last shell of bone is removed in the usual manner using the double-curved hook, and the perineural sheath is incised as in closed tympanoplasty decompression.
Hints and Pitfalls
• In the lower part of its mastoid portion, the FN should be skeletonized up to 270° in order to facilitate surgical manipulation. However, this degree of exposure is not feasible in the area of the second genu and the tympanic segment, because of the close relationship to the canals and the ossicular chain.
• At the level of the genu, the short process of the incus lies in close proximity to the lateral surface of the facial nerve, and the lateral semicircular canal forms its posterior relationship. The working space is thus very limited, allowing only 180° of skeletonization. Any slippage of the drill can lead to sensorineural hearing loss.
• In the fortunate occurrence of a dehiscent tympanic segment or a very thin fallopian canal in this area, drilling can be avoided and the thin shell of bone can be removed using a double-curved hook, which should also be used with extreme care. If the bony canal is thick, using a hook is dangerous due to the high chance of slippage, leading to injury to the ossicular chain or the middle fossa dura.
• During skeletonization of the tympanic segment of the facial nerve, extreme attention should be paid not only to the burr head but also to the shaft, which can also lead to sensorineural hearing loss if it touches the ossicles while rotating.
• After the nerve has been completely uncovered, the suction tube is exchanged for a Brackmann suction tube. This tube has side holes that prevent direct suction on delicate structures, thus avoiding unnecessary trauma to the FN.
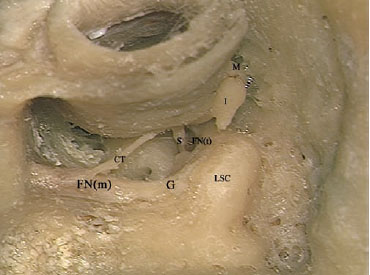
Fig. 3.85 A transmastoid decompression of the mastoid (FNm) and tympanic (FNt) segments of the facial nerve in a left temporal bone. A closed tympanoplasty with an extended facial recess has been carried out. Note that the mastoid genu (G) and tympanic segments of the facial nerve are controlled. CT Chorda tympani, I Incus, LSC Lateral semicircular canal, M Malleus, S Stapes
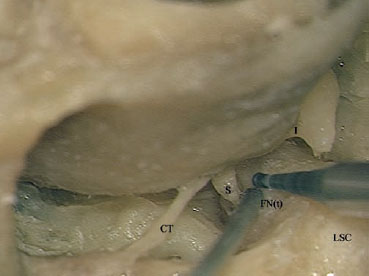
Fig. 3.86 After decompression of the mastoid segment of the nerve, attention now shifts to the tympanic segment (FNt). Note that a small diamond burr is being used; note also that marked attention is being paid to both the burr’s head and shaft, neither of which is brought into contact with the intact ossicular chain. CT Chorda tympani, I Incus, LSC Lateral semicircular canal, S Stapes
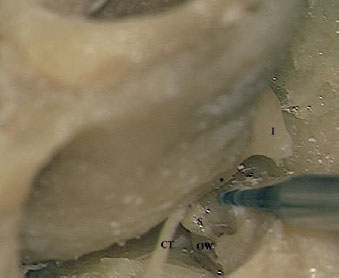
Fig. 3.87 As decompression of the tympanic segment of the facial nerve advances more anteriorly, the working angle becomes more difficult. The surgeon may have to ask for the bed to be tilted anteriorly with the head downward. Extreme attention must be given to the head and shaft of the burr. * Long process of the incus, CT Chorda tympani, I Incus, OW Oval window, S Stapes

Fig. 3.88 A double-curved hook is used to remove the last shell of bone (*). Care must be taken to prevent it from slipping and injuring either the nerve or the ossicles. CT Chorda tympani, FN(t) Tympanic segment of the facial nerve, I Incus, LSC Lateral semicircular canal, P Pyramidal process, S Stapes
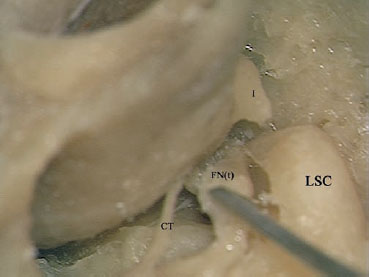
Fig. 3.89 After complete removal of the overlying bone, the nerve can now be dislocated from the fallopian canal. CT Chorda tympani, FN(t) Tympanic segment of the facial nerve, I Incus, LSC Lateral semicircular canal
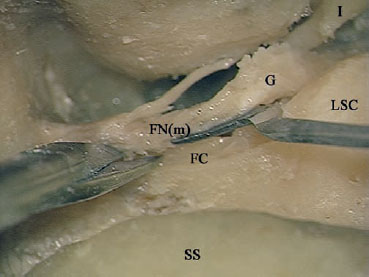
Fig. 3.90 The adhesions between the medial surface of the mastoid segment of the facial nerve (FNm) and the fallopian canal (FC) have to be sharply cut. G Genu of the facial nerve, I Incus, LSC Lateral semicircular canal, SS Sigmoid sinus

Fig. 3.91 The mastoid segment (FNm), genu (G), and tympanic segment (FNt) of the facial nerve have now been freed from the fallopian canal (FC), completing the decompression. CT Chorda tympani, I Incus, LSC Lateral semicircular canal, M Malleus
 Cochlear Implantation (Figs. 3.92–3.121)
Indications
• Profound bilateral sensorineural hearing loss, prelingual or postlingual.
Surgical Steps
1. After the incision has been completed and the flaps have been elevated, a limited canal wall-up mastoidectomy is drilled. Since the aim of the mastoidectomy in cases of cochlear implantation is only to provide access to the facial recess, the size of the mastoidectomy cavity should be as small as possible. After the mastoidectomy has been completed in live surgery, the FN monitor is turned on.
2. The identification of the landmarks for the mastoid segment of the FN is started. Drilling between the lateral semicircular canal and the digastric ridge is started using an appropriately sized drill. To avoid injury to the nerve, drilling should be parallel to the direction of the nerve and should be carried out with ample suction irrigation in order to reduce heat injury and allow maximum visualization. As drilling advances closer to the nerve, a diamond drill should be used.
3. Once the FN has been identified, the size of the burr used is reduced and a posterior tympanotomy is started. As in cholesteatoma surgery, the extent of drilling is limited initially by four landmarks: the facial nerve medially, the annulus laterally, the bar of bone to the left covering the short process of the incus superiorly, and finally the chorda tympani inferiorly.
4. After completion of the drilling, access to the round window is assessed. If the lower rim of the round window can be visualized through the posterior tympanotomy, the approach is sufficient. Otherwise, the chorda tympani is sacrificed and the posterior tympanotomy is extended inferiorly until the whole round window niche can be seen.
5. Using a water-resistant colored pen, the model provided with the implant is used to mark the extent of drilling needed to create the bed for the receiver-stimulator complex of the cochlear implant. The location of the bed lies posterior and slightly superior to the mastoid cavity created. A large cutting burr is used initially; when the depth is sufficient as checked by the implant, a diamond burr is used to smooth out the edges.
6. Two tunnels are drilled in the bone at the side of the bed, and a thick silk suture is passed into both tunnels to form a cross over the bed.
7. Attention is now paid to the round window. The superior overhang of the round window niche is drilled out. For this purpose, a small diamond burr of adequate length is used.
8. The round window membrane is identified, and drilling is continued anterolaterally to create an opening in the scala tympani adequate for insertion of the implant array. A piece of fibrous tissue is used to obliterate the opening created.
9. The receiver-stimulator complex of the implant is fitted into the bed and fixed in place by tightening the suture.
10. After the complex has been fixed in place, the surgeon is now able to use both hands to insert the array. The fibrous tissue is removed from the round window, the array is held gently with a nontoothed, straight forceps (this prevents damage to the expensive array by the forceps teeth, and unlike the micro-ear forceps generally used allows easy manipulation). To allow optimal positioning of the electrodes, the direction of the stylet should always be kept pointing inferiorly—i.e., to the right of the surgeon when operating on a right ear, and vice versa.
11. In live surgery, after the insertion of the array, the audiologist is given time to check the impedance of the electrodes and thus whether the positioning is correct. After correct positioning has been confirmed, the leading wire is withdrawn. Care should be taken to avoid accidental withdrawal of the wire before confirmation is obtained, because of the difficulty of reinserting it, which can lead to damage to the electrodes.
12. After withdrawal of the wire, pieces of fibrous tissue are used to seal the round window. The seal is reinforced by the addition of tissue glue if the need is felt. This step helps reinforce the fixation of the array, reducing the risk of cerebrospinal fluid leakage and meningitis and reducing the incidence of postoperative vertigo. Another piece of fibrous tissue is used to separate the array and the facial nerve, to reduce the chances of FN stimulation by the electrical impulse. The adequacy of the insulation can be checked by asking the audiologist to apply some stimulation to the implant while the FN monitor is on.
13. Cases of ossified cochlea are occasionally encountered after meningitis-induced deafness. In the majority of these cases, the ossification is limited to the basal turn of the cochlea. In these cases, a small diamond burr with a long shaft is used, and drilling in the area of round window and neo-ossification are carried out in an anteromedial direction, creating a tunnel in the supposed area of the basal turn. While this step is being carried out, care must be taken not to injure the FN, and the site of drilling is checked frequently to confirm the correct direction of drilling, as assessed by changes in the color and consistency of the exposed bone. Drilling is stopped whenever the opening of the scala tympani is identified, the red color of the carotid artery is encountered, or the depth of drilling exceeds 8 mm within the bone. The reason for this is that after this distance, the cochlea starts to turn superomedially, making further drilling not only dangerous to the carotid artery but also useless, since electrodes inserted afterwards will be lying away from the modiolus.
14. In cases of total ossification of the cochlea, complete identification of all the cochlear turns, using a combined approach or even an open cavity mastoidectomy and blind-sac closure of the external auditory canal, is the method of choice.
Hints and Pitfalls
• The reason for creating a small mastoidectomy during the cochlear implant procedure is to reduce surgical trauma as much as possible and to preserve the surrounding bone to serve as a bed for the implant.
• While the posterior tympanotomy is being created, preservation of the chorda tympani should be attempted only if the access created allows adequate visualization of the round window niche; otherwise, the tympanotomy is extended inferiorly, sacrificing the chorda in order to obtain an adequate and safe approach. While the posterior tympanotomy is being carried out, care should be taken not to advance drilling too far anteriorly in an attempt to avoid the facial nerve, thus leading to injury to the annulus and the tympanic membrane. The best way of avoiding such a mishap is to drill using the appropriate burr size after actively identifying the FN by visualizing it through the canal.
• While the round window niche is being drilled through the posterior tympanotomy, extreme care must be taken to avoid contact between the rotating shaft of the drill and the thinned FN canal. Inadvertent contact of this type can lead to injury to the nerve due to either heat injury or direct physical trauma.
• Cochlear implants in an ossified cochlea and revision implantation are surgically demanding procedures and should be carried out by the most experienced surgeon in the team.
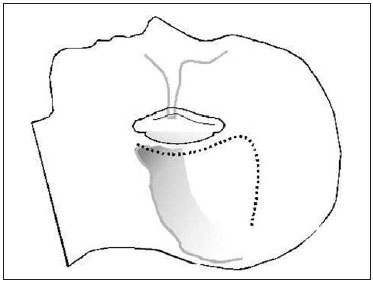
Fig. 3.92 The skin incision is made as shown.
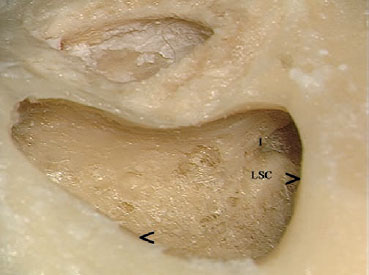
Fig. 3.93 A simple canal wall-up mastoidectomy has been carried out in a left temporal bone. Note that the superior (>) and posterior (<) limits of the cavity are not beveled and that the underlying structures have not been reached. I Incus, LSC Lateral semicircular canal

Fig. 3.94 The mastoid segment of the facial nerve (FNm) has been identified. I Incus, LSC Lateral semicircular canal
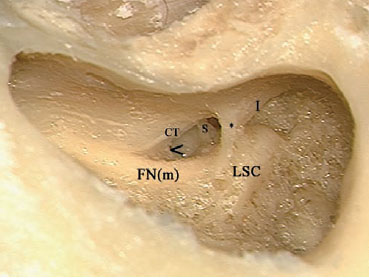
Fig. 3.95 The posterior tympanotomy has been started. Note that the lower angle (<) between the chorda tympani (CT) and the facial nerve (FNm) still has some bone, which should be removed. * Strut of bone to protect the ossicles, I Incus, LSC Lateral semicircular canal, S Stapes
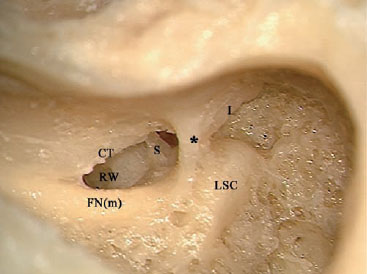
Fig. 3.96 The tympanotomy has been completed, preserving the chorda tympani (CT). Note that the round window (RW) is not yet under adequate control, so that the posterior tympanotomy needs to be further extended inferiorly, with the chorda tympani having to be sacrificed. * Strut of bone to protect the ossicles, FN(m) Mastoid segment of the facial nerve, I Incus, LSC Lateral semicircular canal, S Stapes
Fig. 3.97 After inferior extension of the posterior tympanotomy, the lower limit of the round window (>) can be clearly seen.
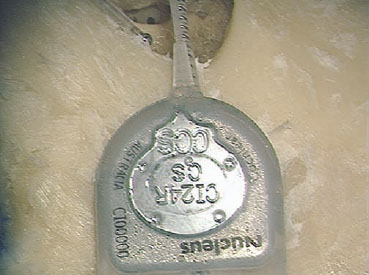
Fig. 3.98 The model provided with the implant is used to mark the implant bed.
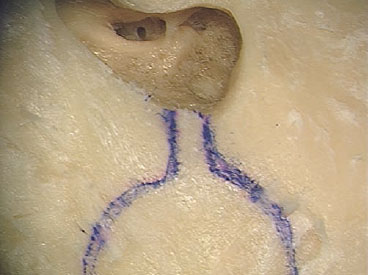
Fig. 3.99 Water-resistant ink is used to mark the area to be drilled.
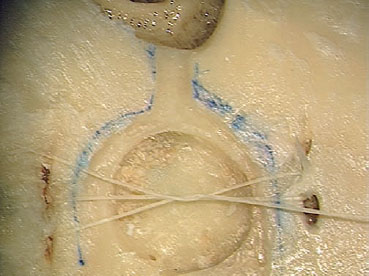
Fig. 3.100 The bed and the two tunnels at its side have been drilled, and the surgical thread used to fix the implant’s receiver-stimulator complex in place has been inserted.
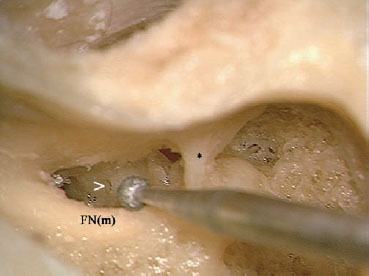
Fig. 3.101 A small diamond burr of adequate length is used to drill the round window niche overhang (>). * Strut of bone, FN(m) Mastoid segment of the facial nerve
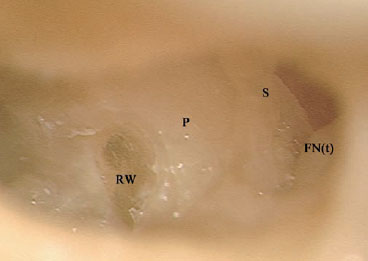
Fig. 3.102 The overhang has been drilled, and the round window membrane (RW) can clearly be seen. FN(t) Tympanic segment of the facial nerve, P Promontory, S Stapes
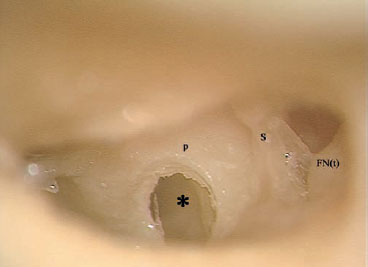
Fig. 3.103 The oval window and the scala tympani (*) have been adequately opened. FN(t) Tympanic segment of the facial nerve, P Promontory, S Stapes
Fig. 3.104 The receiver-stimulator complex of the cochlear implant has been fixed in its bed.
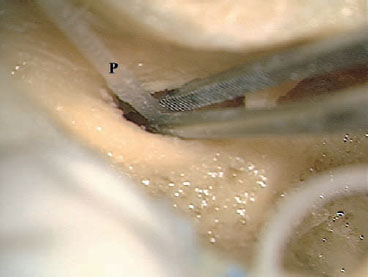
Fig. 3.105 A nontoothed forceps is used to insert the array (P) into the scala tympani.
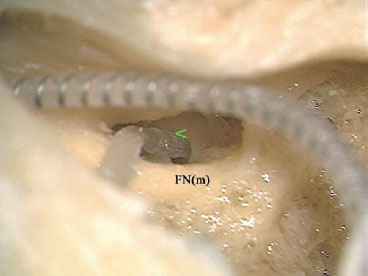
Fig. 3.106 Adequate insertion, as seen by contact between the middle ring on the array (<) and the edge of the cochleostomy, has been achieved. FN(m) Mastoid segment of the facial nerve
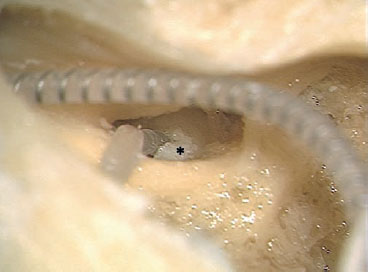
Fig. 3.107 A piece of fascia (*) is used to obliterate the space surrounding the array.
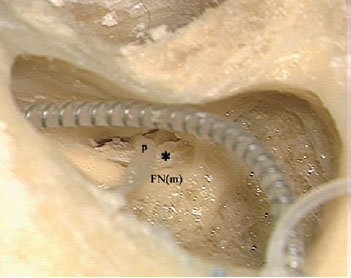
Fig. 3.108 Another piece of fascia (*) is inserted between the array (P) and the mastoid segment of the facial nerve (FNm).
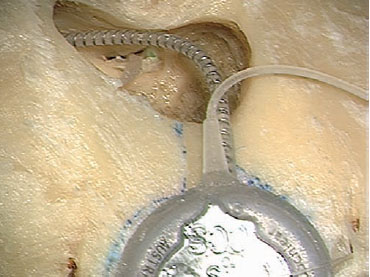
Fig. 3.109 The view after the procedure has been completed.

Fig. 3.110 In cases of ossified cochlea, the combined approach can be used to identify the cochlea turns. > The round window seen through the posterior tympanotomy, FN(m) Mastoid segment of the facial nerve, LSC Lateral semicircular canal, M Handle of the malleus
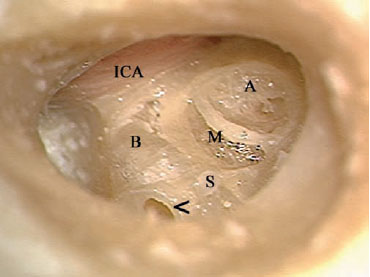
Fig. 3.111 The membranous part of the basal (B), middle (M), and apical (A) turns of the cochlea can be seen after the cortical bony covering has been drilled away. < The edge of the cochleostomy, ICA Internal carotid artery, S Stapes
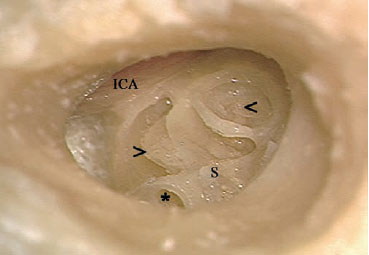
Fig. 3.112 The membranous part of the cochlea has been removed, and the bony spiral lamina (>) and the apex of the modiolus (<) can both be seen. Note that the basal turn of the cochlea starts to curve superiorly near the internal carotid artery (ICA), after a short distance from the level of the round window (*). S Stapes
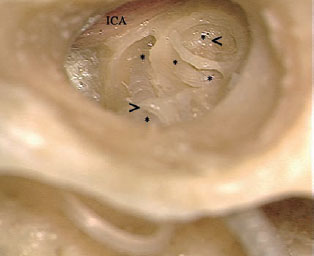
Fig. 3.113 The probe of the cochlear implant has been inserted. Note the course of the probe (***) as it spirals round, hugging the modiolus and reaching as far as the apical turn (<). > The edge of the cochleostomy, ICA Internal carotid artery
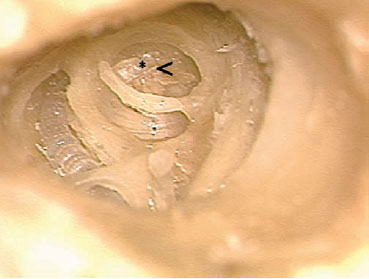
Fig. 3.114 Another, clearer view of this relationship. * Tip of the array, < Tip of the modiolus
Fig. 3.115 The overall view after the procedure has been completed.
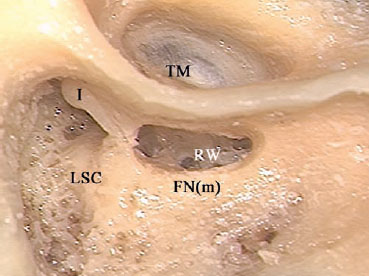
Fig. 3.116 Another option for dealing with the implantation of an ossified cochlea is to identify the cochlear turns through an open tympanoplasty. A canal wall-up mastoidectomy and posterior tympanotomy have been carried out in this right temporal bone. FN(m) Mastoid segment of the facial nerve, I Incus, LSC Lateral semicircular canal, RW Round Window, TM Tympanic membrane
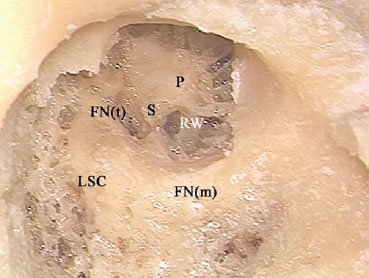
Fig. 3.117 The posterior and superior canal walls, tympanic membrane, malleus, and incus have all been removed. FN(m) Mastoid segment of the facial nerve, FN(t) Tympanic segment of the facial nerve, LSC Lateral semicircular canal, P Promontory, RW Round window, S Stapes
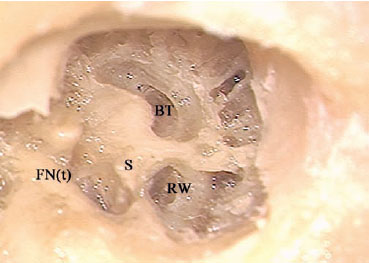
Fig. 3.118 The basal turn (BT) of the cochlea has been identified. FN(t) Tympanic segment of the facial nerve, RW Round window, S Stapes
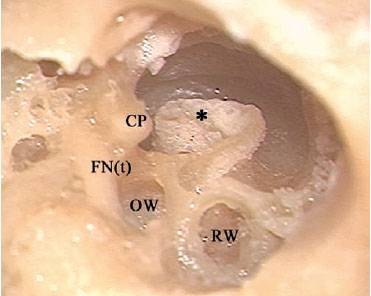
Fig. 3.119 The whole length of the cochlea turns has been identified. * Modiolus, CP Cochleariform process, FN(t) Tympanic segment of the facial nerve, OW Oval window, RW Round window
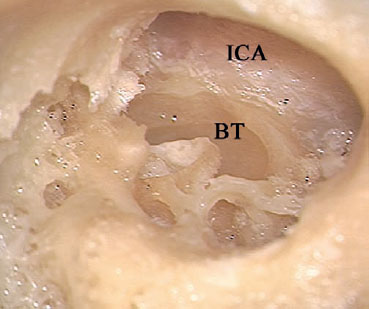
Fig. 3.120 Note that the basal turn of the cochlea (BT) starts to curve superiorly near the internal carotid artery (ICA), a short distance from the level of the round window.
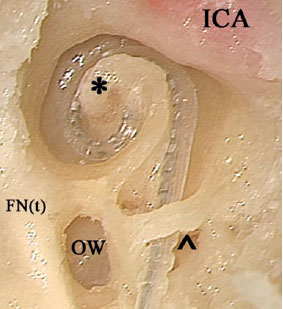
Fig. 3.121 The anterior wall of the external auditory canal and the cochleariform process, along with the tensor tympani muscle, have been removed here to show the relationship between the array and the modiolus (*) and between the array and the tympanic segment of the facial nerve (FNt). ^ Edge of the round window, ICA Internal carotid artery, OW Oval window
< div class='tao-gold-member'>


