1 Temporal Bone Dissection Laboratory
 Surgical Instruments
A minimum set of surgical instruments is needed in order to carry out a temporal bone dissection that as far as possible imitates live surgery:
• A good-quality microscope
• A nonsterilizable micromotor with various sizes of diamond and cutting burrs
• Suction tubes and suction irrigation tubes of different sizes
• Surgical knives
• Tissue scissors and microsurgery scissors
• Tissue elevators and dissectors. The following set is recommended: Lempert periosteal elevator, two Freer elevators, three straight dissectors, four round dissectors (right-angled), five round dissectors (straight), six fine dissector hooks (right-angled), and a fine dissector needle
• Self-retaining retractor
• Rongeur
 General Guidelines for Drilling
In general, a lower level of magnification is preferable to provide comprehensive orientation in relation to the relevant anatomy. On the other hand, a higher magnification level is important for appreciating minute details. Magnification by four is rarely needed in temporal bone dissections, though it does become important in extensive skull base procedures in order to provide a general view of the whole approach.
• Use the largest possible burr; small burrs are very dangerous.
• Adjust the length of the burr according to the depth of the area to be drilled. In general, the shorter the burr, the better the control you have.
• Most bone work is done using cutting burrs. Diamond burrs are reserved for working near delicate structures such as the facial nerve, dura, or sigmoid sinus, or for stopping bleeding originating from the bone.
• Straight handpieces are preferable to angulated ones, since the surgeon has much better control with the former.
• Hold the drill like a pen, and always try to make the direction of the drill strike in a tangential direction rather than perpendicular to the structures you are drilling, so that the drilling is carried out with the side rather than the tip of the burr.
• Drilling should start from the most dangerous areas and progress to the least dangerous ones, always parallel to the important structures, and always in one direction.
• Apply minimal pressure or no pressure during drilling, especially near important strucures.
• In delicate work near important structures, the direction of rotation can be adjusted so that the burr rotates away from the structure rather than toward it.
• In fine work, the little finger is placed on the patient’s head to support the hand while drilling.
 Suction Irrigation
Ensuring adequate suction irrigation is indispensable in otologic and neuro-otologic surgery. Suction irrigation removes bone dust that impedes vision and becomes clogged between the flukes of the burr end, making it less sharp. It also cools the surface being drilled, avoiding thermal injury. Ample irrigation is important when the facial nerve is being identified, or during blue-lining of a semicircular canal.
The suction irrigator should not be held steady during burring. Instead, it should wander around the burr. A useful trick is to place the sucker between a structure of importance (especially when already exposed) and the burr. In this way, if control of the burr is lost, it strikes the sucker instead of going through the structure.
There is a special type of suction tip called the Brackmann sucker. The tip of this is blunt, and it has side holes to avoid direct suction being applied to neurovascular structures during neuro-otologic work in the cerebellopontine angle.
 Preparation of the Specimen
We prefer freshly obtained bones preserved in formalin. Older bone is subject to color changes, and the vessels are usually obliterated by hard, difficult-to-remove coagula. Before dissection, the bones are immersed in water for 2 hours to remove the unpleasant odor of formalin. The specimens should never be left exposed overnight, since this causes the dura and soft tissues to become dry, resulting in color changes and increased fragility.
The injection technique described here was developed at our center by Dr. M. Landolfi. The internal jugular vein and internal carotid artery are identified in the neck. The vessels are washed with tap water repeatedly, using a 20 mL syringe, to remove all the small coagula. Once the water begins to flow freely, colored silicone is injected. In cadaver heads, we prefer to inject into the transverse sinus rather than the internal jugular vein in the neck, while the internal carotid and external carotid arteries are injected in the neck. The dye is left to harden before dissection is started.
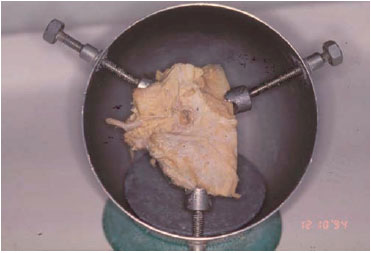
Fig. 1.1 A temporal bone mounted on a House—Urban temporal bone holder.
Preparation of colored silicone. The materials used are as follows:
• Transparent silicone
• Coloring agent (water or oil colors)
• A solvent—e. g., any commercially available benzene solution
• Syringes, catheters, butterflies, etc.
The density of the solution injected can be varied by modifying the relative amounts of the components used:
• Dense solution: 20 mL silicone, 10 mL solvent, and 5 mL coloring agent
• Medium-density solution: 10 mL silicone, 10 mL solvent, and 5 mL coloring agent
• Fluid solution: 15 mL silicone, 20 mL solvent, and 5 mL of coloring agent
A dense solution has the advantage of providing rapid hardening, with better filling of large vessels that have relatively thin walls—e. g., the lateral sinus and jugular bulb. In addition, minor injuries to the sinus or bulb during dissection will not involve any risk of the dye spreading all over the bone, producing a poor appearance. The disadvantage of a dense solution, however, is that the dye sometimes fails to pass through the smaller venous channels (e.g., the superior petrosal sinus). Amedium-densitydye is used when injecting the internal carotid artery, while a more fluid dye is used when injecting the small intracranial vessels when carrying out a cadaveric dissection.
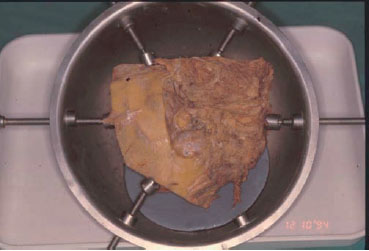
Fig. 1.2 For half-head preparations, we use this holder that we designed ourselves.
The dye is injected using a 20 mL syringe with a mounted catheter. The catheter is then withdrawn while the injection is still continuing.
 Temporal Bone Holder
To facilitate dissection in the temporal bone laboratory, the bones are mounted on a House—Urban temporal bone holder (Fig. 1.1). For half-head preparations used for skull base approaches, we use a special temporal bone holder that we designed ourselves. This has a larger diameter and five fixing rods, making it suitable for these large specimens (Fig. 1.2).
< div class='tao-gold-member'>


