12
Performing Videostroboscopy
Laryngeal videostroboscopy has become the gold standard for the evaluation of laryngeal structure and function during voicing. The well-performed exam can offer a wealth of diagnostic as well as therapeutic information. This chapter will describe methods for achieving a successful and informative stroboscopic examination.
Those new to laryngeal visualization are referred to the American Speech-Language-Hearing Association’s “Training Guidelines for Laryngeal Videoendoscopy/Stroboscopy” for a thorough review of the competencies and skills required for this procedure.1 The document clearly outlines key competency areas (eg, anatomy, physiology, pathophysiology, equipment management, etc.) and serves as a comprehensive knowledge and skill checklist for clinicians and for those charged with their supervision.
Finally, it should be stated up front that laryngeal videostroboscopy can be performed with either rigid or flexible scopes. This chapter will focus on completing the stroboscopic exam using the rigid scope. Many of the principles discussed in the pages that follow apply to use of flexible scopes as well and should, therefore, be considered applicable to those exams. When appropriate, the authors have provided additional comments regarding the use of the flexible scope.
 Preparing the Clinician
The successful stroboscopic examination begins with the clinician’s preparation. Skill in performing and interpreting stroboscopy comes only after hours of study and practice with willing volunteers. Once clinicians have reached an appropriate level of proficiency and confidence with the exam procedures, they bring a sense of comfort into the setting and set the stage for a successful exam.
Many experienced clinicians establish and follow a basic routine for arranging the room, setting up the equipment, positioning the patient, and placing their protective gear. Clinicians can set the tone for the exam by going through their preparation routine in a relaxed manner, maintaining light conversation with the patient.
At the start of the exam, the clinician’s physical demeanor plays a significant role in either reassuring the patient or contributing to the patient’s concerns. Consequently, the clinician should approach the patient in a slow, casual manner. Steady eye contact with the patient during this time conveys a sense of confidence and familiarity with the procedure and allays fears. During the exam, a relaxed posture with “soft hands” and “soft shoulders” will help to keep the patient calm as well.
 Preparing the Patient
Preparing the patient for the stroboscopic evaluation has as much to do with the success of the procedure as does scoping technique. Most patients have at least some level of anxiety about undergoing any medical procedure. Most of the patients seen for the stroboscopic procedure have had a previous mirror examination, which may or may not have been pleasant. The idea of a more extensive examination may be frightening. When a patient is anxious, his or her entire body is stiff, including the neck, jaw, and tongue. This stiffness contributes to a difficult examination. Consequently, relieving anxiety from the start should be a goal of the examiner.
Scheduling the Examination
Patients are scheduled for stroboscopic examinations several different ways. The exam may simply be a part of the routine otolaryngology examination or a later referral to the speech-language pathologist as a part of the diagnostic voice evaluation. When the examination is being scheduled for a later time, the scheduler actually becomes an important part of preparing the patient and reducing anxiety. Schedulers should be trained to describe the procedure to the patient, assuring them that the scope is merely placed in the mouth and will not be inserted deep in the throat. Patients are often given inaccurate information about examinations by friends and family—information that has no basis in truth. They often ask the schedulers if someone needs to accompany them; if they are permitted to eat; if there is recovery time; and so on. The scheduler can be extremely helpful in sharing accurate information and reassuring the patient.
Greeting the Patient
The examiner should make it a point to greet patients in the waiting room prior to a stroboscopic examination. This greeting gives the examiner the opportunity to shake the patient’s hand and gauge the level of anxiety. If a patient’s hand is cold and damp and his or her demeanor suggests anxiety, the clinician should begin discussing the examination with the patient as the clinician and patient walk to the exam room. The clinician may ask the patient what he or she knows about the test and immediately clear any misconceptions the patient might have. This 1- or 2-minute conversation along with the clinician’s relaxed, friendly demeanor and obvious concern for the patient’s feelings and well-being can make a significant difference in the quality of the examination.
Explaining the Procedure
There is no greater fear than fear of the unknown. Have you ever had a medical procedure where the technician, therapist, or physician is moving about the room, preparing instruments, handling supplies, putting on gloves, and so forth, while you wonder what it is all about? What are they doing? Are they going to use that with me? As medical professionals, otolaryngologists and speech-language pathologists are familiar with this environment and comfortably move about their instruments doing the routine “dance” of the day. However, for the majority of patients, the examination area is a scary, foreign environment. Because the goal is to reduce anxiety even before beginning the examination, it is very helpful for clinicians to talk the patient through every step of the procedure.
Once in the examination room, ask the patient to sit in the examination chair. While raising the level of the chair to the appropriate height, explain to the patient that raising the chair to eye level enables you to better see in the patient’s mouth. At that point, show the patient the scope. Never point the scope right at the patient as this is a somewhat threatening posture; rather hold it parallel to your body. Explain to the patient that you will be placing the scope in his or her mouth and not down the throat. Tell the patient that you will be holding his or her tongue with a gauze pad, just to keep it out of the way, and that he or she will be saying “e-e-e-e” during the exam. Explain the purpose of the neck microphone and then turn the strobe light on to demonstrate the sound and the flashing light, so that the patient will be familiar with this during the actual exam. Place the scope back in the holder and wash and glove your hands. When the patient sees you hand washing, it provides a subtle comfort as to the sterility of the procedure. Some patients have even been known to inquire about how the scope is cleaned between examinations. By taking steps to demonstrate care and cleanliness throughout the preparation process, concerns such as this may be allayed and patient confidence increased. Once the above steps have been completed, tell the patient that you are ready to begin the examination.
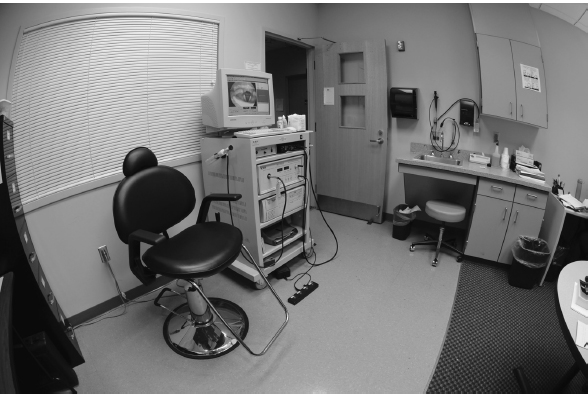
Fig. 12.1 View of the examination room set up to perform videostroboscopy.
 Preparing the Room
The room and equipment should be arranged in a manner that is convenient for the clinician yet not intimidating for the patient. Personal protective equipment, gauze, cleaning supplies, warming devices/solutions, topical anesthesia, and so forth, should be housed in close proximity to the strobe unit and should be arranged so that each can be accessed easily as the clinician works through his or her routine.
These authors recommend that the clinician arrange the room so that the sink and all needed supplies are located on a single side of the strobe unit, away from the patient. By doing so, you can prepare yourself and the equipment for the study without needlessly passing the scope, cords, or other supplies over or in front of the patient (Fig. 12.1).
Finally, management of lighting can be quite important during an exam. Dimming bright overhead lights and/or closing window blinds help to reduce glare on the screen and permit improved viewing throughout the exam.
 Examining the Patient
At this point, all of the pre-examination issues that will help ensure a successful stroboscopic study have been addressed. It is now time to do the study. A key to success for many clinicians is the development of a systematic routine for completing the exam. One might equate this to choreographing a dance. If clinicians develop and follow the same routine for each examination, all will go smoothly. When developing the routine, clinicians will need to consider and work through a variety of exam scenarios, eventually choosing the format that is best for them. For example, clinicians may ask: will I stand in front or slightly to the side of the patient? How will I turn toward the sink if I am warming the scope with warm water? Will the cords and wires easily reach? Where will I place the gauze and the waste receptacle for easy access? When do I tell the patient how to position himself or herself? Will I turn the light source on before or after I place the scope in the mouth, and will the patient begin saying the “e-e-e-e” before I actually see the folds? Choreographing and practicing this dance routine with many practice subjects prior to actual patient examination will serve clinicians well. The following are examination tips that clinicians might find useful with the majority of patients.
Positioning the Patient
Because patients vary anatomically, positioning all patients for a rigid scope exam in a single, standard posture is not possible. However, for the majority of patients, sitting up straight with the neck extended forward is often the position of choice. When the neck is extended forward, the pharynx is lengthened giving better unimpeded access to the 70-degree angle scope. At the onset of the examination, the patient should be instructed to sit up straight with the chin forward, mouth open, and tongue out.
Tongue Issues
Having taught many people over the years how to do stroboscopic examinations and having served as practice subjects, the authors are very sensitive to tongue issues. The manner in which the tongue is handled has a major impact on the success or failure of the examination. The importance of relaxed eyes, arms, shoulders, and hands of the examiner to a successful examination has been previously stated. The clinician’s handling of the tongue is an extension of that discussion. Much can be learned in this area by considering how one is trained in riding horses. An important concept taught in riding lessons is that if the rider’s hands are “heavy” or tight on the reins, the horse will respond in the same manner and be heavy against the rider’s hands. The rider and horse will be fighting each other for control. The same holds true for clinician handling of the tongue in a stroboscopic examination.
If the clinician squeezes the tongue with his or her fingers, it will be painful, and the patient will pull back. If the clinician pulls the tongue too far forward, the same response will occur. This concept can be easily tested out with a colleague. After your colleague has washed and gloved his or her hands, assume the posture for the examination. Open your mouth and protrude your tongue. Ask your colleague to both pinch your tongue and pull it forward. You will see that your automatic response is to brace the back of your tongue in a protective manner which stiffens and decreases the diameter of your pharynx and makes the epiglottis less flexible thus less able to tilt forward. The examination is therefore unpleasant, and the view is often less than adequate. By working cooperatively with clients and allowing clients a degree of control over tongue position, improved tongue posture can be achieved, and improved viewing will result. Clinicians working in this manner may avoid situations such as that reported by a recent patient who was asked what the doctor saw when he looked at her vocal folds with the mirror. Her response was both humorous and telling. She said, “You’re not going to do that are you? Why, it felt like he ripped out my tongue, threw it on the floor, and stomped on it!”
We would suggest that the examiner hold the tongue with the nondominant hand with the index and middle fingers on top and the thumb below. Ask the patient to stick out the tongue. Once holding the tongue in the above manner, say to the patient, “…now, let the tongue go back in your mouth.” This request accomplishes two things. First, some patients protrude their tongues with extreme stiffness, and this request will encourage them to relax. Second, it reminds the examiner that he or she is simply controlling the tongue and not pulling it forward, thus permitting it to assume a more natural posture. Some endoscopists might suggest that pulling the tongue forward with the thumb on the top aids in viewing the vocal folds by forcing the epiglottis to tilt forward. However, others (including the authors) may argue that permitting the tongue to reside in a more natural position in the mouth and only controlling the tip will permit the patient to produce the “e-e-e-e” in a more natural manner that not only tilts the epiglottis but also permits a more natural vibration of the vocal folds.
Positioning the two fingers on the top of the tongue also permits the examiner to use the fingers as a fulcrum for the scope. Without this fulcrum, the scope is permitted to float in the mouth often hitting teeth and other oral structures. The fulcrum steadies the clinician’s scoping hand and permits the subtle movements necessary to attain the desired view (Fig. 12.2).
The “eeee” Sound
Successful rigid scope exams require that the tongue base and epiglottis be moved out of the viewing area. Consequently, patients are instructed to produce the front vowel /i/. This task is quite challenging for some patients and may require additional guidance from the clinician. This author is in the habit of saying to patients during the examination, “more eeee-like.” It is true that the /i/ will encourage the tilt of the epiglottis better than any other vowel. However, in the unnatural environment of someone holding a patient’s tongue while a scope is placed in his or her mouth, some individuals need to be encouraged to produce the sound as close to the /i/ as possible. Sometimes patients struggle so hard to produce the /i/ that they actually create excessive and unwanted tension in the oral and pharyngeal regions. If this is the case, remove the scope and have the patient practice the desired sound with a protruded tongue. This coaching can often make the difference between an adequate and an inadequate exam.
Breathing
Sometimes it is necessary to instruct the patient in how to breathe during the examination. Occasionally, patients attempt to breathe through their noses while being scoped, a posture that invites the tongue to block the oral cavity and impede the view of the scope. If this behavior continues, clinicians may place a nose clip to occlude the nares and force the patient to breathe through the mouth.
The “No-Fault” Gag
A good rule of thumb when performing stroboscopy is to never bring up the subject of a gag unless the patient does. The mere suggestion of gag often causes a gag. If a patient says, “is that going to make me gag” or “I gag when I brush my teeth,” it is important to remind them that the scope is only going in the mouth, not down the throat. Notice when a patient does gag that the response is typically to apologize profusely. The more patients gag, the more they worry about the gag and compromise the exam even further. At this point, to relieve the patient, it can be helpful to introduce the “no-fault gag.” Explain to the patient that everyone has a gag reflex and, in fact, you worry if a patient does not show at least some sign of gagging during the exam. Consequently, their gagging is something that is natural and not something that they can be expected to control. This explanation often relieves them and reduces the intensity of their gagging behavior. If the protocols have been established for use of topical anesthesia in your facility, even a small touch of spray at this point may be all that is needed to control the reflex.
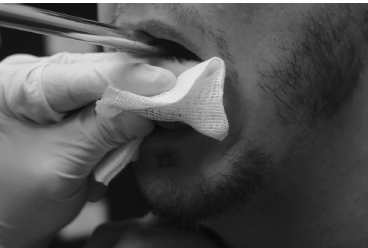
Fig. 12.2 The tongue is held between two fingers and the scope is steadied during the exam.
Other suggestions for reducing the gag reflex involve distraction. Never permit the patient to close his or her eyes during the examination. When the eyes are closed, the patient is able to concentrate more on the sensation of the scope in the mouth. Tell patients as the scope is entering the mouth to look up and instruct them to open their eyes if they close. It can also be helpful to have a second monitor in the room within the view of the patient so that the patient can see the exam, which will also distract them from being a part of the exam. Finally, asking the patient to pant like a dog in between saying /i/ may prove helpful. Realistically, some individuals possess significant gag responses. These patients will continue to exhibit that response no matter what the examiner tries. If a rigid scope examination is required, demonstrate patience and take the time to get the best examination possible.
 The Exam Protocol
Camera Setup
Just prior to initiating the exam, the clinician must attach the rigid scope to the unit’s camera. Care should be taken to ensure that the scope is aligned properly on the camera base, allowing a straight, midline view. When the angle of alignment between the camera and scope is off, even by a slight degree, visual artifacts may taint the image observed by the clinician. Improperly positioned cameras can lead to erroneous conclusions regarding vocal fold symmetry and motion. Once attached, camera alignment can be confirmed by holding the scope over a reference point (eg, unit’s keyboard, piece of typed text). If the text appears off midline or rotated, the scope’s attachment to the camera should be readjusted slightly and reevaluated for its alignment.
After alignment is confirmed, the camera should be white-balanced. This step takes only a moment to complete and ensures that the coloration of the larynx is correctly represented on the recording. Though clinicians have a variety of ways of white balancing, many place the scope 2 inches to 3 inches from a white sheet of paper with black text, turn on the light source, and follow the unit’s instructions to balance. (Step-by-step instructions for white balancing differ across systems and are generally provided with the camera unit’s instruction manual.) Other clinicians confirm the balance and test the coloration by making a slightly opened fist with the non-scoping hand and placing the scope over the fist, as if to peer into the tube formed by the fingers. If properly balanced, the coloration of the skin should be true-to-life, and the lower aspects of the “tube” should be properly illuminated. Some cameras automatically white-balance, precluding the need for this step.
Scope Warming/Defogging
Placing a room-temperature scope into a patient’s warm oral cavity generally results in fogging of the lens. When this occurs, views of the larynx are severely limited. Consequently, it is important that the scope be warmed prior to its insertion into the mouth. A variety of methods are currently used for this purpose. Commercially available defogging agents and warming beads are frequently used. These authors prefer to gently warm the scope by holding it under warm running water for a few seconds or by immersing it into a cup of warm water. This method effectively prepares the scope without exposing it to potentially harmful chemicals or rough surfaces and without the requirement of additional supply costs.
Scope Insertion
Proper insertion of the scope sets the foundation for a good examination. Though many different methods of holding and inserting the scope are available, several basic principles of scope management are quite helpful. As previously mentioned, the clinician’s hand often has a way of drifting with his or her body’s movements. It is therefore helpful to use the nonscoping hand not only to anchor the tongue but also to create a fulcrum on which the scope can tilt, slide, or rotate. Such a posture keeps the scope more steady in the mouth and allows the clinician to make small adjustments in the scope’s position that are not bothersome to the patient. Once the clinician has established his or her hand position, the scope can be slowly advanced into the mouth, sliding along the fulcrum created by the clinician’s nonscoping hand. At this point, it is important that the clinician’s gaze be fixed on the computer screen rather than in the patient’s oral cavity, as the visual feedback on the screen will aid the clinician in maneuvering the scope and achieving a proper placement. The scope should be advanced until the clinician sees initial landmarks such as the base of the tongue, the pyriform sinus, and the arytenoid cartilages on the screen. The landmarks generally become visible when the scope tip reaches the region where the hard and soft palates unite.
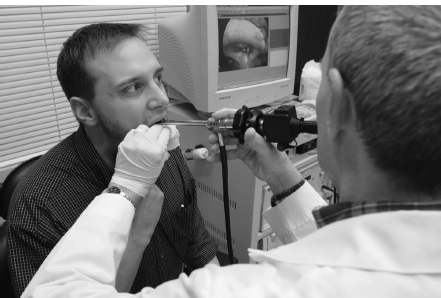
Fig. 12.3 View of patient and examiner during videostroboscopy.
Scope Maneuvering
Once in position, the scope will need to be maneuvered slightly during the exam to ensure optimal viewing of the vocal folds. The examiner should be aware that a very small movement of the hand creates a larger movement at the tip of the scope. Once again, the clinician will find it helpful to use the nonscoping hand as a fulcrum. This allows the clinician to make subtle changes in the scope’s position without losing his or her basic position and without bothering the patient. Finally, it is important that the scope be kept in the middle of the oral cavity, away from the tongue, palate, and teeth. Placing the scope too near the tongue and palate can trigger a gag reflex in some patients, and allowing the metal shaft to touch the teeth can be quite bothersome to others (Fig. 12.3).
When at all possible, achieve all necessary views on the first attempt at scoping, as repeated episodes of placing and removing the scope often increase patient anxiety and make the patient more aversive to the scope. Consequently, subsequent views may not be as optimal as early views. Verbally encouraging the patient during the exam and allowing moments of quiet breathing can often extend the exam and eliminate the need for repeated scopings.
The Voice Sample
Once the scope has been optimally positioned, the patient should be asked to perform a series of vocal tasks. Though the sequence may vary across clinicians, it is important that the chosen protocol allow visualization of the laryngeal structures in a variety of postures (eg, abducted, adducted) and appreciation of the vocal folds during an array of vibratory modes (eg, modal, falsetto). The following sequence is helpful in achieving a comprehensive assessment of laryngeal function during the rigid exam*:
 Modal pitch at comfortable loudness, loud, and soft
 High pitch at comfortable loudness, loud, and soft
 Low pitch at comfortable loudness, loud, and soft
 Glide upward
 Glide downward
 Production of /hi-hi-hi/ and /i-i-i/ for laryngeal diadochokinesis
 Forceful inhalation/exhalation
 Panning of the laryngeal region during quiet breathing
While working through the above protocol will give the clinician a comprehensive understanding of the patient’s vocal physiology, the formal assessment of vibratory parameters (eg, amplitude, mucosal wave) should be made from samples obtained at a modal pitch and comfortable loudness. Once the protocol has been completed, the scope can be reinserted a second time for modal pitch examination to confirm the results of the previous sample.
Finally, it is important to note that some patients use a disengaged manner of voicing during the procedure, failing to contract the thyroarytenoid muscle and producing a breathy, weak tone. If this occurs, it is important to remind the patient to “engage” the voice or to encourage a louder production, modeling the proper tone for the patient as needed.
 Overcoming Problems
The above discussion has presented the ideal protocol for the patient who is typically cooperative, anatomically normal, and can tolerate the procedure well. However, not all patients fit the mold for the typical evaluation technique and protocol. Age, cognition, anatomy, and physical restrictions may all play a role in the successful examination. Below are some thoughts on each of these areas.
*The flexible scope permits observation during a wider range of voicing tasks (eg, connected speech, singing). However, this list of basic tasks should still be documented during flexible examinations to allow a comprehensive understanding of laryngeal function.
Age and Cognition
There are very few individuals who cannot be successfully examined through stroboscopy using a rigid scope. However, as individuals approach the extremes of age, both the very young and some in the elderly population, the challenge may become greater. A good approach with young children is to take the time to desensitize them to both the instruments and the technique prior to the actual exam. To accomplish this, the clinician should first talk about why the doctor and their parents want them to have the exam. The clinician may then discuss the voice and the fact that it comes from the throat. The child is told that a special television camera can be used to look in the mouth and see how the vocal folds are vibrating. The clinician may then hold the child’s hand over his or her own larynx and let the child feel the vibrations—repeating the same procedure with the child feeling his or her own vibrations. The clinician may then show the child the scope, explaining that it will go in the mouth to look at the vocal cords while they make sound. Additionally, the clinician might turn on the light source and permit the child to watch the monitor to see how the camera can visualize his or her fingers, hair, and so forth. During this time, the child will become familiar with the noise and the light that accompany the strobe exam. Next, using a gauze pad and a tongue blade, the clinician may hold the child’s tongue and place the tongue blade in the mouth while they say “eeee.” Almost all children have had a tongue blade in the mouth with the only new sensation being that of having the tongue held and saying the sound. Having taken the time to desensitize the child to these new experiences, the examiner has a greater chance of successfully completing the stroboscopic examination.
Even after this slow seduction, clinicians often have only a single opportunity to complete the exam with a young child. Consequently, clinicians should make sure their technique is solid and that they move deliberately. Clinicians should continue the exam even if the child begins to protest and cry. Some of the best views of the vocal folds might be gained when the child takes a deep breath to cry. Many children have been spared a direct laryngoscopy because of the view obtained of the vocal folds during a less than adequate stroboscopic examination. Chronological age is not the issue with children but rather maturity and cooperation. Experienced clinicians can attest to the fact that they have examined some 4-year-old children with complete exam protocols while not being able to get near some 10-year-old children. A final suggestion is to try to accomplish the examination without the parent in the room. Children often put up a much braver front without their parents to console them.
Most elderly individuals do not present unusual challenges to completing a successful examination. One issue to consider is what to do with dentures. Dentures that fit well and that stay firmly in place when the mouth is opened widely may remain in the mouth during the exam. Loose-fitting dentures must be removed for fear of becoming dislodged and interfering with the examination.
Individuals who are cognitively impaired at any age should be examined with a caregiver in the room. These authors would advise that clinicians speak directly to the person being examined, giving all of the typical information/protocol but with the understanding that the information is being shared with the care-giver as well. At times, the caregiver can be a great help in comforting the patient and actually assisting the clinician during the examination by controlling interfering head and hand movement.
Anatomic Challenges
Some individuals present anatomic challenges to completing the successful stroboscopic examination. These individuals may include those with a short thick neck, individuals with reduced oral opening or a short frenulum, and those with an omega-shaped epiglottis. These individuals often require that the examiner deviate from the normal exam protocol. For example, the individual with the short neck may best be viewed by tilting the head back instead of forward. The examiner should not hesitate to position the head and neck of this individual multiple ways in an attempt to view the folds. Finally, for patients in whom the mouth opening is restricted (eg, temporomandibular joint syndrome, scleroderma), it can be helpful to use a 90-degree scope that does not require the upward angle of the 70-degree scope. Otherwise, visualization with a rigid scope may not be possible.
Considering the discussion of tongue issues earlier in this chapter, the reader is aware of how careful the examiner should be with the tongue. Some individuals have a short frenulum making holding the tongue nearly impossible in the normal manner. When this is the case, clinicians may try asking the patient to hold his or her own tongue with the gauze. The patient is not likely to cause himself or herself discomfort. If the patient is not successful in doing this, the examiner may place his or her fingers behind the lower front teeth with the gauze on top of the tongue and with the thumb placed below the jaw. With this technique, the examiner is controlling the tongue and lower jaw.
Finally, the omega-shaped epiglottis is a unique challenge. When present, the examiner must carefully place the 70-degree scope as closely to the tip of the epiglottis as possible and peer between the lateral edges of the epiglottis into the interior of the larynx. At times, this placement requires firm pressure to be applied to the base of the tongue with the middle of the scope as a means of mechanically moving the epiglottis forward. This is a challenge even for the experienced examiner.
Physical Challenges
Some individuals are referred for stroboscopic evaluations who present the examiner with physical challenges. Perhaps the easiest with which to deal is the patient confined to a wheelchair. If at all possible, safely transfer this patient to the examination chair and proceed as normal. When transfer is not possible, position the wheelchair in an adequate position to conduct the examination while sitting on a stool; this may require that you move the examination chair from the room. In the authors’ experience, a patient that was brought into the facility by ambulance for the examination. He was confined to a supine position on a gurney and could not be transferred to any other position. The stroboscopic examination was conducted with the examiner standing on a chair positioned above the patient with the scope pointing toward the ground. Thus, with flexibility and ingenuity, even the most challenging physical restrictions can be overcome and successful examinations completed.
 Conclusion
The serious voice care team of the 21st century relies upon high-quality laryngeal visualization for the diagnosis and management of voice concerns. When performed properly, laryngeal videostroboscopy can offer a wealth of information to team members. For physicians, the procedure may offer vital diagnostic information and additional guidance for managing the condition. For speech-language pathologists, stroboscopy may offer insight into the patient’s manner of voice production and subsequently guide the clinician in goal setting, treatment planning, and the monitoring of progress. The successful stroboscopic exam begins well before the patient is seated in the exam chair and encompasses much more than the physical management of a scope. The clinician who is attentive to detail at all phases of the exam process—from scheduling to examination—will reap optimal benefits of his or her study.
Reference
1. American Speech-Language-Hearing Association. Training guidelines for laryngeal videoendoscopy/stroboscopy. 1998. Available at: http://www.asha.org/docs/html/GL1998-00064.html
Stay updated, free articles. Join our Telegram channel

Full access? Get Clinical Tree


