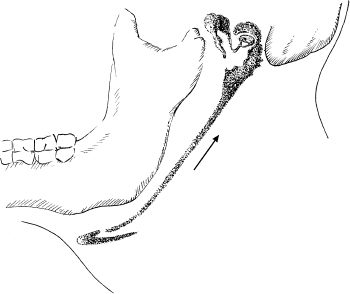
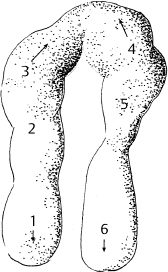
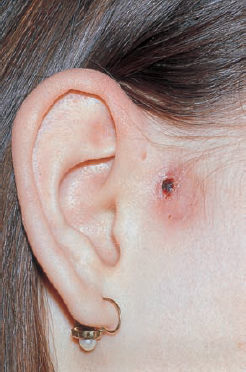
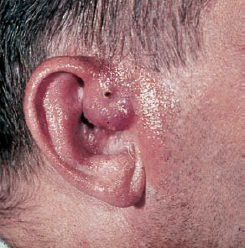
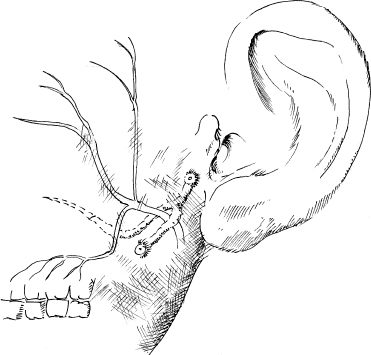
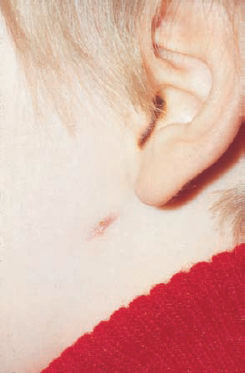
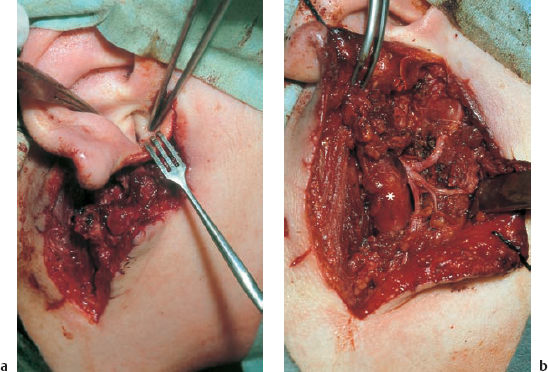
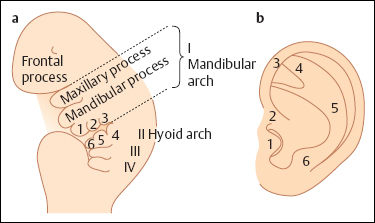
6 Malformations of the Ear and Temporal Bone Abnormal individual anatomy need not necessarily imply aesthetic or functional impairment, and in this book we have concentrated on the clinical relevance of variations. A thorough discussion of every known pathological disfigurement of the temporal bone would take up too much space, and might well prove tedious. Some problems are mentioned here along-side other entities for practical reasons–for instance, abnormal courses of the facial nerve with congenital atresia, and hyperplasia of the jugular bulb and endolymphatic duct in the section on tumor-like lesions. In general, any items of little surgical interest have been omitted. Probably the most fascinating embryological phenomenon in otology is the ontogenetic development of the external and middle ear from so many different primordial origins. The material of the first branchial arch contributes to the temporomandibular joint and to the tensor tympani muscle, innervated by the trigeminal nerve. In contrast to the widely held assumption that the auditory ossicles also originate from Meckel’s cartilage (Hanson et al. 1962), it has now become clear that all three of them derive from the blastoma of Reichert’s cartilage—i.e, the second branchial arch, innervated by the facial nerve (Otto 1994) (Fig. 6.1). The external auditory canal is constituted as a new, appositional formation of ectoderm and mesenchyme in the area of the first branchial groove. The pinna grows from three of the six auricular humps, differentiating into the typical cartilaginous complex (Fig. 6.2). The middle ear spaces, finally, are highly differentiated extensions of the first pharyngeal pouch, carrying the respiratory epithelium into the ear region and transforming the temporal bone marrow into a system of communicating pneumatized cells. Malformations of the inner ear—which originates from the ectodermal neural crest and descends as a vesicle into the depth of the petrous bone—are much rarer, and often appear to be independent of middle ear deformities. It is miraculous that the synergistic maturation processes that form the acoustic apparatus function synchronously, and that dysplasias caused by genetic or acquired disorders of the germ layers are so rarely seen. Otto (1994) has recently provided a plausible interpretation of the typical forms of congenital ear malformation. Among these, periauricular cysts and fistulas are familiar entities. One or two pores may be visible, most often located at the superior root of the helix, in the pretragal fold (Fig. 6.3), or slightly inferior to the tragus. They never exist within the concha or in the postauricular fold, but can occur in the meatal entrance. Below the ostium, a tiny duct lined with squamous epithelium may lead into the anterior or posterior wall of the external auditory canal, and possibly to the stylomastoid foramen. Another type enters the cheek and may reach the neighborhood of the oral cavity. There are branching ducts embracing the facial nerve, some of which anastomose with a second or third cutaneous ostium. Other modifications of these derivatives of persistent temporofacial clefts include extensions into preauricular cysts (Fig. 6.4). Periauricular fistulas are usually only detected when an inflammatory condition develops, with swelling, reddening, and discharge from the fistular mouth (Fig. 6.3–5). This may happen during childhood, but it sometimes first develops in adults. Stenosis of the external auditory meatus due to the development of a subcutaneous empyema may also occur, leading to aural pain, deafness, and purulent secretion. For instance, we have seen a 16-year-old girl who presented with unbearable headache and persistent eczema in the concha, who had a branched aural fistula that originated on the floor of the external auditory canal (EAC) and passed deep into the premastoid groove, close to the stylomastoid foramen—displacing and flattening the facial nerve (Fig. 6.6). Ultrasound may delineate a broader fistula or cyst, but normally it is necessary to probe the duct into the depth, using a blunt and flexible probe. If there is any suspicion of a continuation into the temporal bone, a high-resolution computed tomography (CT) study is helpful. It is more difficult to locate preauricular fistulas with a duct leading into the buccinator region (Fig. 6.7), and the patient therefore needs to be informed in greater detail regarding the necessity for parotid exposure, with the risk of facial paralysis. Fig. 6.1 The origin of the auditory ossicles in the framework of the hyoid arch. The material of Reichert’s cartilage contributes to the formation of the malleus, incus, stapes with its muscle, fallopian canal, styloid process, and superior half of the hyoid bone, in addition to some of the muscles. (Adapted from Otto 1994). Fig. 6.2 Derivation of the pinna from auricular knobs 3–5. Numbers 1 and 2 form the tragus and mandibular region, while knob 6 constitutes the entire skin of the neck in front of branchial border II (adapted from Otto 1994). Fig. 6.3 An inflamed superior preauricular fistula, with scars after repeated incisions. A second rudimentary ostium is visible at the superior base of the helix. Fig. 6.4 Combined congenital fistulas and cysts. A large cavity has developed at the superior root of the helix. Fig. 6.5 An inferior preauricular fistula, covered with crusts after repeated incisions. Awareness of periauricular cysts and fistulas is often poor in the medical profession; the majority of my own patients had undergone previous incisions and drainage with incorrect diagnoses of abscess, furuncle, atheroma, or purulent parotitis (Fig. 6.7), and even of otitis externa and mastoiditis. In all of these cases, more scrupulous microscopic inspection would have revealed the small pore or pores in the typical locations. Although they are simple subcutaneous structures, periauricular fistulas and ducts may present surgical problems when they are being removed. The wall of the fistula or duct can be very thin and may not provide a resistant structure that can be followed. I recommend the use of the operating microscope in doubtful cases. Intraoperative probing is more practical than staining with methylene blue, since any tears in the wall will make it even more difficult to identify the duct in an area that is now also colored. Dissection of the duct begins with an oval skin excision. Since the preauricular skin is ample and elastic, following a duct does not usually require a long skin incision. If the course cannot be followed from the first opening, a second short skin incision at a certain distance from the first may allow subcutaneous pull-through, and is in principle more aesthetic than a long scar. Fistulas that lead into the buccinator region require wider exposure of the parotid gland, with identification of the facial nerve branches (Fig. 6.8). The typical bayonet-like skin incision for parotidectomies is always preferable to opening the cheek at the shortest distance. Endaural congenital fistulas are also lined with squamous epithelium, and have to be excised in a similar way. Depending on the site, a typical endaural incision through the tragohelicine notch, or a marginal semicircular incision at the meatal entrance are good starting-points for deeper dissection. In one of our own patients with penetration of an endaural fistula into the premastoid groove, a postauricular skin incision with dissection of the mastoid down to the stylomastoid foramen became necessary. Fig. 6.7 A deep subauricular congenital fistula, which had been misdiagnosed as a parotid fistula. Removal of a fistula along with an epithelialized duct is carried out using a semisharp dissection technique. I prefer sharp, small scissors to separate the visible duct from the surrounding soft tissue. The same technique is used to mobilize preauricular cysts. It is sometimes difficult to define the point at which a duct becomes atretic and epithelium-free, and terminates. In such cases, it may be better to resect a marginal strip of the adjacent tissue for frozen-section checking. Incomplete removal must always be avoided, since recurrent growth of epithelium below the resulting scars will lead to even greater difficulties for the revision operation that will be needed. Wound closure with subcutaneous and intracutaneous sutures is unproblematic. Most interventions can be carried out under local anesthesia and require little postoperative care. However, it is prudent to carry out a late check-up to assess recurrence-free healing. G. Rettinger The external ear includes the auricle and the external meatus. The lateral aspect of the auricle is characterized by eminences and fossae of the ear cartilage, covered with thin skin without a subcutaneous layer. Only the lobule and its connection to the helix is not supported by cartilage. Due to the absence of subcutaneous tissue, the skin of the lateral aspect of the auricle is tightly connected to the perichondrium, and this explains the vulnerability of the auricle to parallel trauma. The medial surface, on the other hand, is characterized by a thick subcutaneous layer covering vessels, nerves, and muscles. The lateral aspect of a normally shaped auricle has typical structures (Fig. 6.9 b). The free margin (the rim of the helix) is involuted laterally, with a smooth transition to the tail of the helix and the lobule. While the skin at the anterior border of the upper rim of the helix is part of the lateral facial plane, its tip bends posteriorly and builds up the crus of the helix. The antihelix is parallel to the helix, and is cranially split into two crura (the superior crus and inferior crus). In between them lies the triangular fossa. The groove between the helix and antihelix is called the scapha. The central part of the auricle is known as the concha. It is divided by the crus of the helix into the cymba (superior) and the cavity of the concha (inferior). The cavity of the concha is the vestibule to the external meatus. It forms the posterior and inferior border of the meatus. The cranial border is the crus of the helix, and the anterior border is the antitragus, overriding the meatus. Opposite to the tragus is the antitragus, which is in fact a prominence of the antihelical fold. No cartilage is found between the crus of the helix and the tragus (anterior incisure). This incisure is filled with muscles (the anterior auricular muscle superficially, and the temporalis muscle as the deep plane), and can be used to widen the access to the external meatus (endaural incision). The characteristics of the auricle are mainly determined by its lateral aspect. The first defining component is the outline, consisting of the helix. This line has to be smooth and gently curved to be regarded as normal. Skin incisions that interrupt the integrity of the helix should therefore be avoided if possible. Other important factors are the size and position of the auricle when viewed anteriorly and laterally, as well as posteriorly (Fig. 6.9 a). In the lateral view, on the Frankfurt horizontal, the auricle lies between horizontal lines through the glabella (the most prominent part in between the two eyebrows) and the sub-nasal point (the junction between the columella and the upper lip). The long axis of the auricle (the line between the most superior and most inferior points) is slightly tilted, and roughly parallel to the ascending ramus of the mandible. Viewed from the front, the maximum distance from the free margin of the auricle in the medial part to the lateral facial plane should not exceed 18–20 mm, with the helix at or slightly lateral to the level of the antihelix. The lobule should be in line with the rim of the helix, with a maximum distance to the facial plane of 16–18 mm. The corresponding distance from the superior margin is 15–17 mm (Siegert et al. 1998b). Fig. 6.9 Analysis of the auricle (from Rettinger 1996). a Position of the auricle. The longitudinal axis lies parallel to the ascending ramus of the mandible and at an angle of 30° vertical to the Frankfurt horizontal (FH). The size and position lie within horizontal lines through 3 and 4. Fig. 6.9b Normal auricular structures: The characteristic structure of the lateral aspect of the auricle contrasts with the smooth surface of the medial plane. There is only an angulation between the scapha and the concha of about 90°. Because of this difference between the lateral and medial aspects, the relevant points for surgery have to be identified using special marking methods. Like other facial orifices, the external auditory meatus is surrounded with muscles (superior, anterior, and posterior auricular muscles), which are innervated by the facial nerve. The sensory supply to the anterior parts derives from branches of the auriculotemporal nerve (trigeminal nerve) and the supply to the posterior part originates from the greater auricular nerve (cervical plexus). The main blood supply is based on branches of the superficial temporal artery and the posterior auricular artery (a branch of the occipital artery). As most of these vessels enter the auricle from below, special care needs to be given to this area in trauma surgery and reconstructive surgery. The development of the head and neck after four to five weeks of gestation is characterized by the formation of four branchial arches, separated by branchial clefts (Karmody and Amino 1995). The entoderm of the primitive pharynx forms pharyngeal pouches that come into contact with the ectoderm of the branchial clefts. The auricle develops around the first branchial cleft, between the first branchial arch (mandibular arch) and the second branchial arch (the hyoid arch). Six mesenchymal hillocks surround the first branchial cleft, that later formes the external auditory meatus (Fig. 6.10). The area of contact between the ectoderm of the first branchial cleft and the entoderm of the first pharyngeal pouch forms the later ear drum. The mandibular arch forms not only part of the maxilla and mandible, but also the malleus and incus, as well as the mastication muscles and the mandibular nerve. The second branchial arch (hyoid arch) forms the stapes, the styloid process, and parts of the hyoid. It contains the facial nerve and all the muscles supplied by it: the stapedius muscle, stylohyoid muscle, anterior belly of the biventer muscle, and the mimetic facial muscles. The six hillocks forming the auricle around the first branchial cleft (three on the mandibular arch, three on the hyoid arch) develop in the sixth week. A dominant role is played by the hillocks of the hyoid arch, which form the lobule, antihelix, and caudal part of the helix. Some 85% of the auricle develops from the second branchial arch. The tragus develops from the first hillock. In addition to forming its characteristic structure from these hillocks, the auricle moves from a ventral caudal position in relation to the jaw to a more dorsocranial position. This explains why severe malformations at an early stage of development not only show significant abnormalities of the auricle (microtia), but also a more anterior and caudal position. Fig. 6.10 Embryology of the auricle. a The auricle develops from six hillocks (auricular knobs) around the brachial cleft between the mandibular and the hyoid arch (compare Fig. 6.2). b The contribution of the hillocks (a: 1–6) to specific auricular structures (b: 1–6). The complexity of the development of the auricle explains the numerous variations in its shape that are seen, ranging from a nearly normal-looking auricle (grade I dysplasia) to absence of the ear (anotia, grade III dysplasia). Some classifications describe special types of variation or malformation (Tanzer 1975,1977, Rettinger 1996). From the surgical point of view, Weerda (1988a) introduced a distinction into three grades relative to the surgical implications (Table 6.1).
 Congenital Cysts and Fistulas
Clinical Entities
Signs and Symptoms
Diagnosis and Differential Diagnosis

Surgical Management
 Auricular Deformities
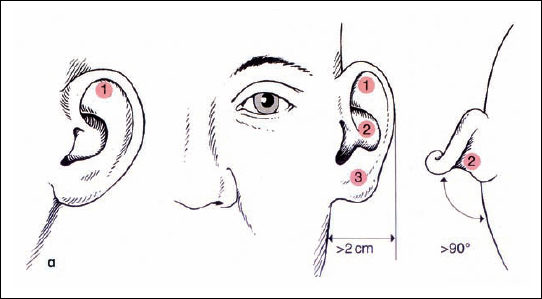
Surgical Anatomy
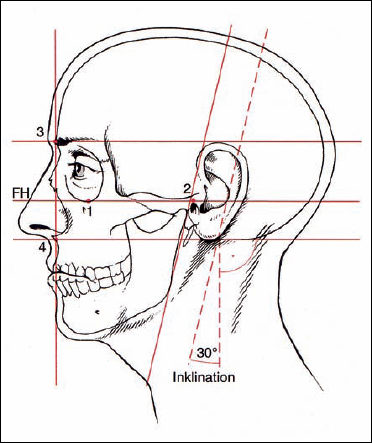
FH Frankfurt horizontal
1 Infraorbital rim
2 External auditory meatus
3 Supraorbital rim
4 Subnasal point

1 = Antihelix, superior crus
2 = Triangular fossa
3 = Antihelix, inferior crus
4 = Cymba of concha
5 = Helical crus
6 = Anterior incisure
7 = Tragus
8 = Intertragical incisure
9 = Lobule
10 = Helical rim
11 = Darwin’s tubercle
12 = Scapha
13 = Antihelical fold
14 = Cavum of concha
15 = Helical tail
16 = Antitragus
Malformations
Embryology
Classification
| Grade 1 dysplasia | |
| Principle | All structures of a normal auricle are present Ear canal mostly normal |
| Surgical implications | No additional skin or cartilage necessary |
| Types |
|
| Grade 2 dysplasia | |
| Principle | Some normal structures are present Stenosis of ear canal possible |
| Surgical implications | Additional skin or cartilage necessary |
| Types |
|
| Grade 3 dysplasia | |
| Principle | No normal structures are present. Mostly atresia of ear canal. |
| Surgical principle | Total reconstruction with skin and cartilage framework necessary. |
| Types |
|
Protruding Ears
Analysis. The most frequent auricular deformity is protruding ears. This is not a real malformation, but rather a variation. There are typically three components (Fig. 6.11 a):
- Position
- Size
- Shape
The size of the auricle is primarily determined by the depths of the concha, and the shape by the antihelix. The term “protruding ears” means an increased distance between the rim of the helix and the lateral facial plane. This distance involves several factors: the height of the concha, the shape of the antihelix (the angle between the concha and scapha), and the angle between the concha and lateral facial plane. Depending on the individual problem, all or only some of these factors need to be addressed by the surgical procedure.
Surgical procedure. In general, the surgical procedure consists of three principles:
- Reducing the size by excising an appropriate crescent of cartilage around the conchal rim.
- Remodeling the antihelical fold and retropositioning the lobule if necessary.
- Setting back the newly formed and reduced auricle into its new position relative to the mastoid surface.
The desired form and position of the auricle can be visualized by manipulating it at the anterior surface. However, the surgical technique is carried out at the posterior aspect: the procedure is planned on the anterior surface, but surgery is carried out on the posterior surface.
Numerous techniques are described in the literature, most of which deal with the method of creating an antihelical fold. The combination of different principles which we prefer is described here, taking the individual resilience of the cartilage into account. The surgical procedure can be divided into six steps (Fig. 6.11 b):
- Incision and approach
- Reducing the height of the concha
- Creating an antihelical fold
- Retropositioning the lobule
- Setting back of the cavum
- Skin excision and closure
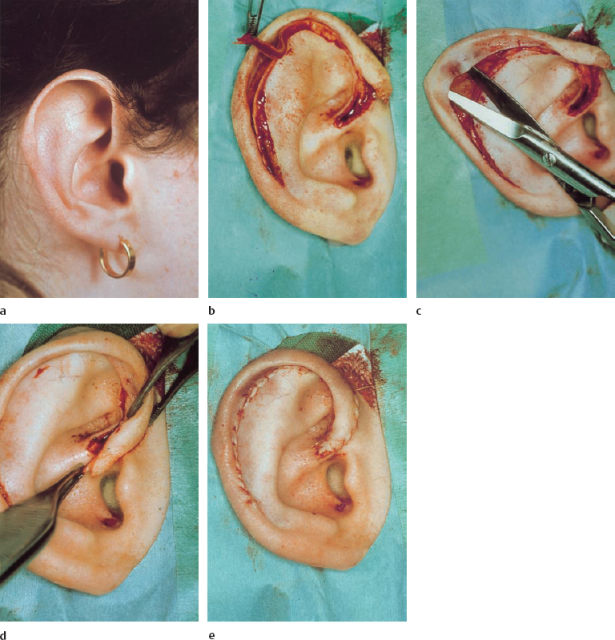
Incision and approach. Using a postauricular incision, the whole posterior surface of the auricle, as well as the mastoid plane, is exposed. As most corrections are achieved by sutures, the incision line should not be immediately superficial to the sutures creating the new antihelical fold. The incision should therefore lie about 1 cm lateral to the postauricular sulcus, extending from the inferior lobule near to the upper insertion of the auricle. The skin is elevated along a plane superficial to the perichondrium, leaving an intact connection between the skin and cartilage at the rim of the helix. Posteriorly, the skin is undermined, and the periosteum of the mastoid is exposed. The posterior auricular muscle is resected along with the surrounding connective tissue.
Reducing the height of the cavity of the concha (Fig. 6.12). The vertical part of the conchal rim is marked with three needles medial to the antitragus, through the most protruding part of the concha and medial to the inferior crus of the antihelix. The cartilage is incised from posterior, following the semicircular line marked by the needles. The anterior perichondrium is preserved. The skin of the cavum is elevated on a subperichondral plane near the external meatus. This mobilization allows better draping of the surplus anterior skin after cartilage resection. A crescent-shaped part of the cartilage is resected, with its maximum width at the level of the middle marking needle. The cut edges of the cartilage are approximated with resorbable sutures.
Reconstructing the antihelical fold (Figs. 6.13–15). Most of the various surgical techniques that have been published discuss this step in the surgical intervention. Roughly, they are based on three principles, all of which were first described in 1963:
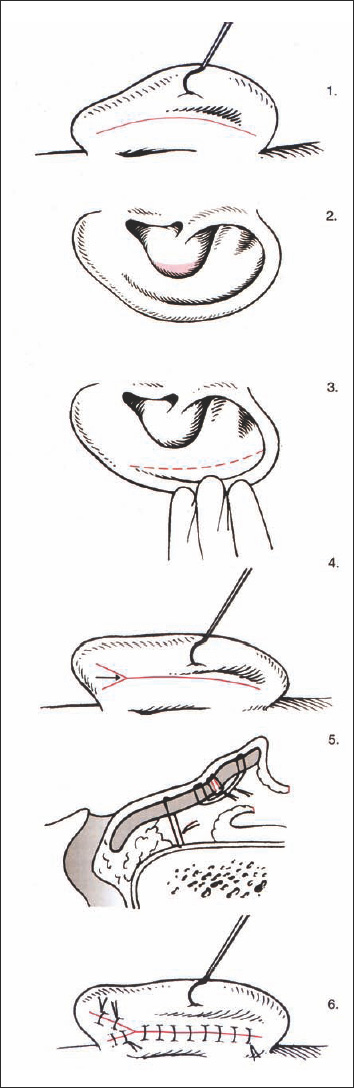
Fig. 6.11b Surgical steps to correct protruding ears (reproduced with permission from Rettinger 1996). The principle is to plan on the anterior surface and to carry out the surgery on the posterior surface. 1 Retroauricular incision, 2 reduction of the conchal cavity, 3 forming the antihelical fold, 4 lowering of the lobule, 5 setting back procedure, 6 closure of the incision.
- Anterior scoring technique (Stenström 1963)
- Permanent mattress sutures (Mustardé 1963)
- Cartilage incisions and sutures (Converse and Wood-Smith 1963)
The Stenström technique is based on experiments carried out by Gibson and Davis (1958). They found that hyaline rib cartilage bends to the opposite side after superficial incision. Stenström repeated these experiments with elastic auricular cartilages, and found the same results. He approached the anterior surface of the antihelical fold via a postauricular incision and a cut in the conchal cartilage. Scoring of the anterior surface of the cartilage was carried out with the branch of a Brown–Adson forceps. Cartilage sutures were not used, but resection of postauricular skin was an essential part of the operation. Chong-chet (1963) used the same principle, but approached the anterior surface of the cartilage via an incision in the scapha. Mustardé created a new antihelix by placing silk mattress sutures between the scapha and the conchal rim. This allows a natural and smooth fold to be created in a predictable fashion. Problems can arise due to granulations and fistulas caused by the nonabsorbable suture material. The extrusion rate of Mersilene sutures at the antihelix was found to be 15%, in contrast to Gore-Tex (2%), although the latter was more often exposed in the conchal area (Walter and Nolst Trenité 1994). Converse and Wood-Smith (1963) incised the cartilage in the scapha, cavum, and triangular fossa. The cut edges were approximated with sutures. If there was strong cartilage, it was thinned from the postauricular direction using a burr.
The goal of the procedure is to create an antihelical fold in a predictable way, creating a smooth, natural-looking bend. Mattress sutures are an appropriate method of meeting these criteria. We therefore prefer the Mustardé technique when there is soft cartilage. When the cartilage is more resilient, a combination of the Stenström and Chongchet procedures is advocated. The principle of the Mustardé suture is to approximate two points. The direction of the suture’s pulling force can be described as a vector. The goal is to retrodisplace the rim of the helix to the level of the newly formed antihelix, without overcorrection (Fig. 6.13).
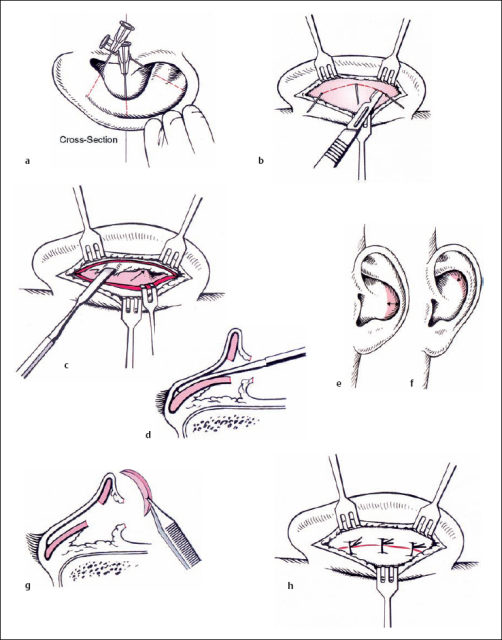
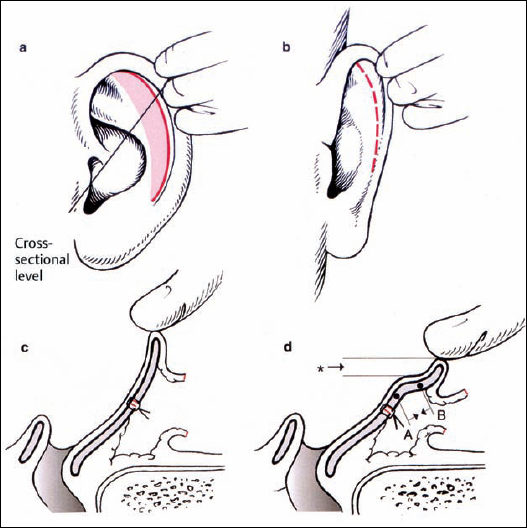
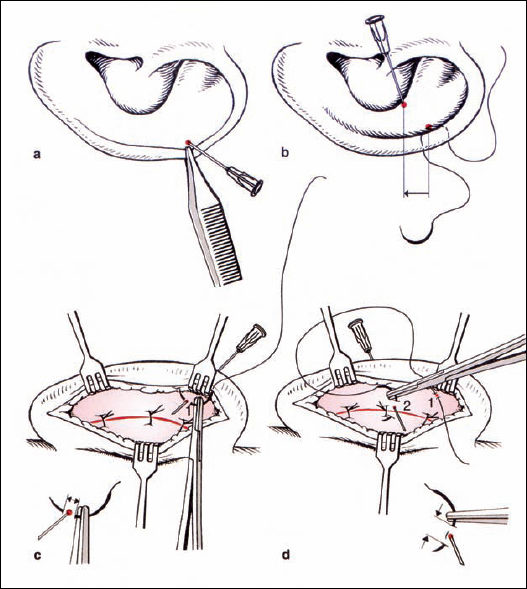
Fig. 6.14 Reconstructing the antihelical fold: marking and suture placement (reproduced with permission from Rettinger 1996). a Definition of point 1 in the scapha, using pressure from a forceps. b Placement of a suture. The corresponding point 2 in the concha is marked. Point 2 is caudal to point 1 (arrow). c Posterior aspect: the cartilage at point 1 is fixed only with a small bite of the needle (double arrow). d At point 2, more cartilage is included in the suture (arrowheads). Point 2 is usually at the level of the previous cartilage incision in the concha.
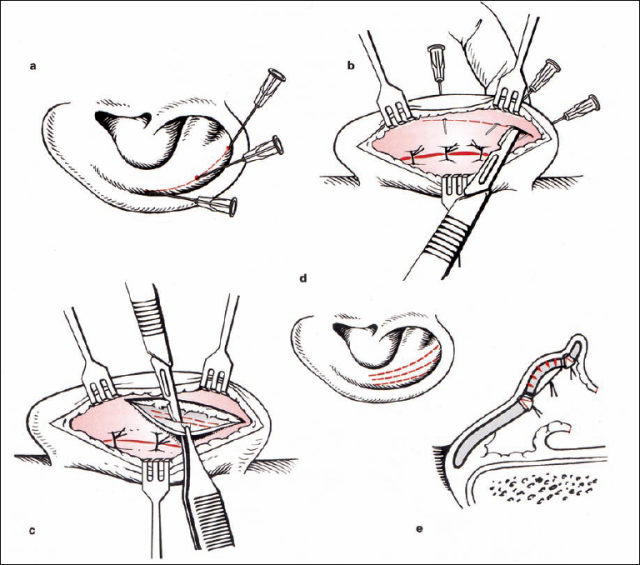
The pairs of points in the scapha and conchal rim are identified using gentle pressure from the forceps, and marked with needles. An absorbable or permanent suture from the posterior surface is used to approximate these two points. The amount of approximation is controlled from the anterior surface while the knot is tightened. Three or four pairs of points are connected. Retrodisplacement of the tail of the helix is particularly important, without causing excessive eversion of the antitragus (Fig. 6.14).
If there is weak cartilage, the suture technique alone may be sufficient. If the cartilage is too strong, then a cartilage-weakening procedure can be included using the Stenström (1963) and Chongchet (1963) methods. To obtain access to the anterior surface, the deepest part of the scapha is marked with three needles, and the cartilage is incised from posterior while the anterior perichondrium is preserved. The perichondrium is elevated to the conchal rim, and very superficial incisions are made into the cartilage using a no. 11 blade. If these incisions are too deep, ridges may be visible through thin skin. The cut edges of the cartilage are approximated with resorbable sutures, as in the conchal incision (Fig. 6.15).
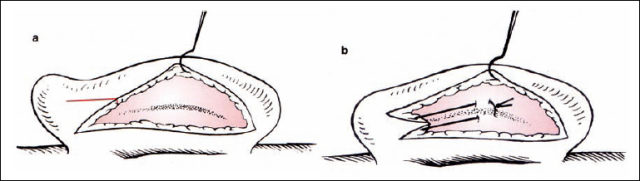
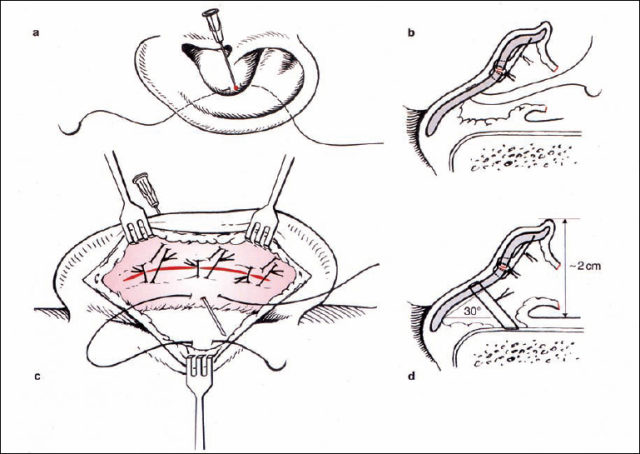
Fig. 6.17 Setting back the auricle (reproduced with permission from Rettinger 1996). a, b Marking an appropriate point in the conchal cavity, with the suture being placed from posterior. c Suturing through the periosteum of the mastoid. d The suture is tightened when the auricle is in the correct position relative to the mastoid surface (angle 30°, distance 2 cm). Pulling the suture posteriorly prevents meatal stenosis.
Retropositioning the lobule (Fig. 6.16). An additional skin incision on the posterior surface of the lobule is made, creating a Y-shaped postauricular incision. If this triangular skin flap is moved superiorly (reversed VY advancement or YV advancement), the lobule will be in line with the rim of the helix (Rettinger 1996). The position of the lobule is secured using a resorbable suture between the subcutaneous tissue of the triangular flap and the perichondrium of the posterior surface of the auricle. The suture is tightened while controlling the position of the lobule from the anterior aspect. If the cartilage of the tail of the helix is protruding, this cartilage is incised.
Setting back the concha (Fig. 6.17). One point of the conchal cartilage is approximated to a periosteal point on the mastoid plane. The appropriate conchal point is identified by pressure from a forceps. In general, there is a single point that not only brings the concha nearer to the lateral facial plane, but also helps bend the long axis of the newly formed antihelix if it is too straight. The vector of this suture, toward the mastoid plane, has to be directed away from the external meatus in order to prevent narrowing of the meatal entrance by inappropriate cavity rotation. This concha-mastoid suture (Furnas 1968) is tightened until the distance between the antihelix and the mastoid is 18–20 mm. A resorbable or nonresorbable suture is used.
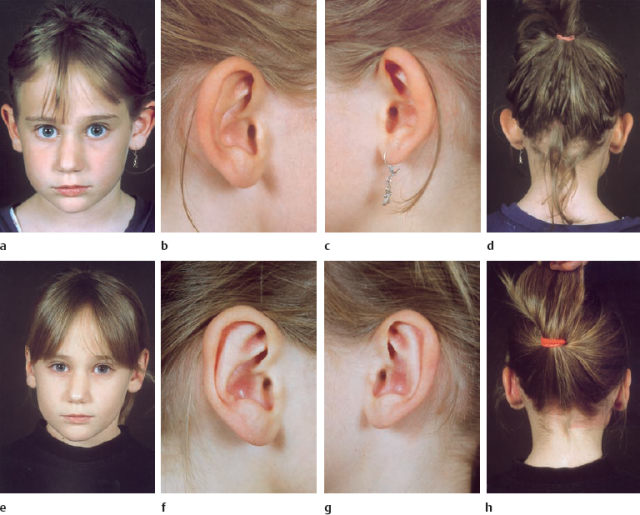
Fig. 6.18a-h An example of the results of the suture technique for reconstructing the antihelix and setting back the lobule and auricle.
a-d Preoperative appearance.
e-h Postoperative appearance.
Skin incision and closure. Only the overlap of the skin is resected, to ensure that a postauricular sulcus is preserved. The skin is best closed with a running 6–0 catgut suture, with no need for suture removal.
Wound dressing and postoperative care. The newly formed scapha and concha are filled with pieces of gauze soaked in solution or ointment. The mobilized postauricular skin is readapted using a triangular piece of gauze, which also restores the concha-mastoid angle. Only mild pressure with a circular head bandage is applied for about five days. After this has been removed, patients are asked to wear a headband at night for six weeks. A clinical example is shown in Figure 6.18.
Complications. Early complications can be seen within four weeks of the intervention. Perichondritis and pressure marks from the dressing should be treated with antibiotics and ointment. Late complications can include fistulas caused by nonresorbable sutures, residual deformities, recurrent deformities, and keloids. If suture fistulas occur, the suture has to be removed. Sutures are no longer needed after a few weeks, due to scar formation between the approximated points of the antihelix and the concha-mastoid area. If the sutures have to be removed earlier, recurrent deformities are possible; these are best corrected a year after the first operation, as are residual deformities.
Keloids are a severe problem. Various procedures, such as resection, cortisone injection, pressure application, and radiotherapy have been described, but keloids still have a high recurrence rate after treatent. Good results have been reported after keloid resection when the skin defect is covered with a full-thickness skin graft from the groin (Staindl 1986).
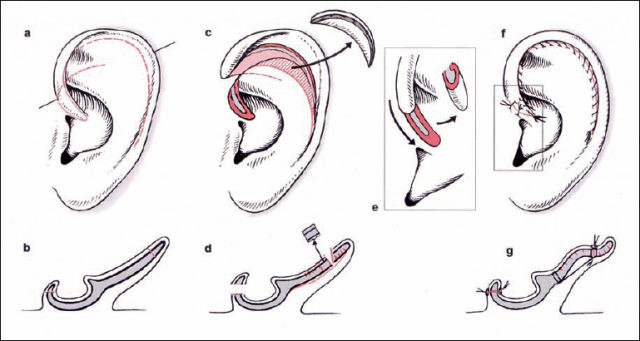
Fig. 6.19 Correction of macrotia (reproduced with permission from Rettinger 1996). a The missing roll on the rim of the helix, with an enlarged scapha and upper third of the auricle. Incisions are marked. b The corresponding cross-section through the line marked in a. c Mobilizing the helix after an incision into the scapha. The size is reduced by resecting the anterior skin and cartilage. d The corresponding cross-section, with scoring of the cartilage to create an antihelical fold and rim of the helix. e Shortening the length of the helix at the crus. f The situation after suturing. g The corresponding cross-section.
Macrotia
(Figs. 6.19, 6.20)
In principle, all the structures of the auricle are capable of being too large, but it is most often the upper third that is affected. The antihelical fold and the roll of the helix are absent, giving a flat appearance to the plane between the conchal rim and the margin of the helix (Fig. 6.20a). A pointed upper helix is called “Satyr ear,” and a high cavum combined with soft ear cartilage a “Machiavelli ear” (Table 6.1).
The main problem is the length of the rim of the helix. In mild forms of macrotia, the same principles as those applied with protruding ears may be sufficient, but marked forms require shortening of the helix. In the technique described by Davis (1986), the helix is separated from the antihelix using an anterior incision starting from the crus to the tail of the helix, preserving the postauricular skin (Fig. 6.19c). The crus of the helix is incised in a V-shape, and posterior scoring of the helical cartilage is carried out (Fig. 6.19d). In addition to reconstructing the antihelical fold with sutures and scoring of the anterior cartilage, or both, one of the most essential parts of the operation is resection of a sickle-shaped area of anterior skin and cartilage at the scapha (Figs. 6.19c, 6.20b). A smooth roll on the helix is produced by resecting redundant skin and cartilage at the crus (Figs. 6.19e, 20d).
Cryptotia
When the upper pole of the ear cartilage is hidden by skin, the upper auricle can be elevated along with the surrounding skin, leaving a posterior defect in the elevated ear as well as at the area of the hairline. The defect in the lateral facial area can be covered by undermining the hair-bearing skin and advancing it anterocaudally. The postauricular skin defect can be closed with transposition flaps from the retroauricular area, or with full-thickness skin grafts.
Cup Ear
In contrast to macrotia, the characteristic of this deformity is that the rim of the helix is too short. This results in a “constricted ear,” with an overhanging upper pole (lop) and a protrusion (cup) (Tanzer 1975). There are four main components to this abnormality:
Lidding. A reduced or absent triangular fossa, scapha, and superior crus contribute to the flattened and overhanging medical rim (Fig. 6.23 a).
Protrusion. The flattened antihelix and rim of the helix deepen the conchal fossa, resulting in protrusion.
Reduced ear size. In severe cases, the entire cartilage skeleton and skin envelope may be reduced in size.
Low ear position is found in moderate and severe deformity (Herlock et al. 1998) (Fig. 6.21).
In mild cup ear deformities (type I), the standard techniques as used in protruding ears may be sufficient (Fig. 6.21). However, the difference from the length of the normal contralateral ear should not exceed 10 mm. In type II cup ear deformities, there may be two choices: elevation of the lidding helix can be sufficient, sometimes in combination with limited resection of skin and cartilage at its free margin. However, if the auricular structures cannot be developed by retrodisplacement of the helix because the helix is too short (constricted ear), then a procedure to lengthen the helix is needed. This can be carried out with anterior incisions and VY advancement of the root of the helix (Herlock et al. 1998). If more lengthening is necessary, the helix is separated from the antihelix using an anterior skin–cartilage incision, as in macrotia repair (Fig. 6.22). However, the incision at the anterior pole of the helix is continued into the skin anterior to the tragus (pretragal flap) (Fig. 6.22a+b, 6.23b+c). This allows the helix to be elevated without tension and brought into a position similar to that on the normal contralateral side. The tissue defect between the antihelix and helix after reconstruction of the antihelical fold can be filled with cartilage from the concha, or even with a composite skin–cartilage graft (Walter and Nolst Trenité 1994). The construction of a superior crus using a cartilage flap from the antihelix has been described in the literature (Elsahy 1990). Closure of the donor area for the pretragal skin flap is accomplished using a VY procedure (Fig. 6.22f, 6.23c). The continuity of the helix is preserved, and visible depressions caused by scars running across the free helical margin are avoided.
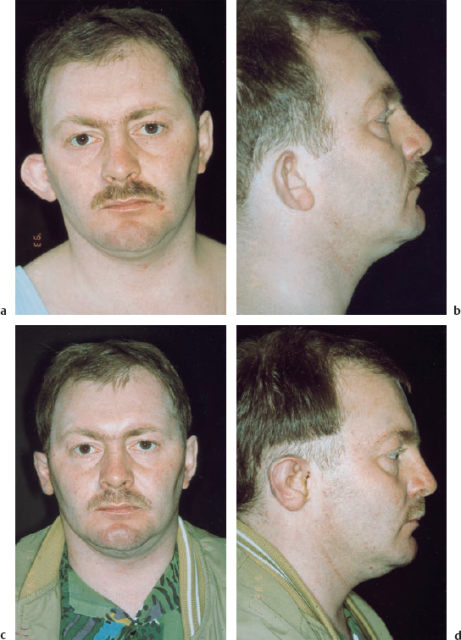
Fig. 6.21 Type I microtia. a, b The patient has a protruding auricle, which is caudally displaced and lacking an antihelix. The proportions of the upper third of the auricle are reduced. c, d
Stay updated, free articles. Join our Telegram channel

Full access? Get Clinical Tree


