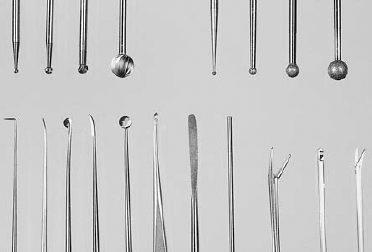
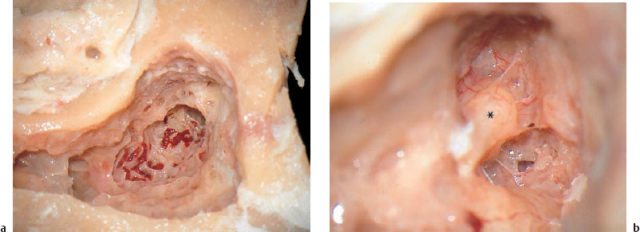
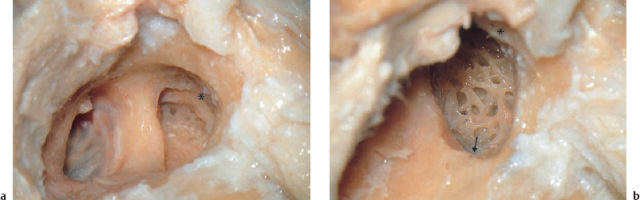
4 Otosurgical Anatomy: a Training Manual for Temporal Bone Dissection Intimate knowledge of the normal three-dimensional topographic anatomy of the temporal bone is a basic requirement for every otosurgical intervention. Although most advanced surgeons would admit that they did not fully grasp the orthodox anatomy until after they had struggled with many “unorthodox” ears during operations, thorough dissection training in typical cadavers is an indispensable prerequisite. Examining illustrations in a book may help provide a basis, but observing a teacher—either live or on a video—is better. The following sections are taken from training programs used at the Erlangen temporal bone laboratory. The various anatomical approaches are not completely identical with the surgical procedures described in the following chapters on diseases. To learn the three-dimensional topography of the temporal bone in the laboratory, much more extensive bone removal is required than is normally used in operations on patients. An otosurgeon who has first thoroughly understood the geometrical relationships within this fascinating anatomical landscape will be able to adapt dissections in vivo to the individual requirements of the disease and to his concepts of conservative removal and functional reconstruction. Recent books on studying ear micro-anatomy by approaches (Sanna et al. 1995, Thumfart et al. 1999) may help the reader. Fig. 4.1 Workplace in the Erlangen otorhinology training laboratory. Figure 4.1 shows a workplace equipped with the Erlangen specimen holder (in which flexibility is provided by a ball-and-socket joint), the mounted microscope, a protection shield, and the integrated suction-irrigation handpiece. The cold light source for the microscope can also be attached to an endoscope using a flexible light fiber. A small video camera can be mounted onto the microscope and connected to a monitor above the rest of the equipment (these facilities were designed in collaboration with the Johnsen Company, Würzburg, Germany). Adequate instrumentation should be available (Fig. 4.2). The use of burrs and other instruments is described in Chapter 2 above. Fig. 4.2 Instruments for the dissection of temporal bones. Upper row: four cutting burrs, four diamonds. Lower row: hook, needle, Plester’s knife, sickle knife, round knife, dissector, suction tube, forceps, micropunch, scissors. Although the indications for the postauricular transmastoid approach to the middle ear have been confined in my department to revision surgery, complications, trauma, and tumor, the features of this approach should be learned in a training course as a valuable and classic access route. Since this elementary lesson provides the best introduction to the rich topography of the middle ear, it is usually presented as the first exercise. However, when performing bone resections in the laboratory, one should be aware that the use of this approach in living patients has to take other parameters into account as well, including the preservation of certain superstructures and of the mastoid mucosal lining. Step 1: identification of the mastoid antrum and attic (Figs. 4.3, 4.4). In live operations, a mastoidectomy procedure starts with a semicircular skin incision in the postauricular fold or, better, at a distance of 1 cm posteriorly parallel to that fold. After subcutaneous mobilization of the skin, an anteriorly pedicled flap of muscle and periosteum from the mastoid cortex is tailored and retracted forward. For radical operations, the periosteum is lifted in continuity from the posterior wall of the external auditory canal. With a circular incision of the posterior canal skin in a U shape, a second, externally pedicled flap is formed, which can be retracted out of the external meatus, exposing the meatus down to the tympanic membrane. This procedure can be practiced in the specimen. Although in real-life tympanoplastic procedures a radical operation usually begins with resection of the posterior canal wall, with subsequent exenteration of the mastoid, for learning purposes the radical operation can be practiced in a specimen in the opposite direction. This procedure enables the trainee to understand both the classic mastoidectomy and the “closed technique” of tympanoplasty. After exposure of the mastoid (Fig. 4.3) the mastoid antrum is the first target. This is normally found in a triangle formed by the horizontal plane through the roof of the external ear canal, by the assumed anterior wall of the sigmoid sinus (Schüller projection radiograph), and by the posterior wall of the external auditory meatus. Using a chisel may save time when looking for the antrum. However, a cutting burr under microscopic control can also easily locate some periantral cells. I advise systematic opening: an initial cutting stroke is brought down craniocaudally almost to the mastoid tip, starting at a safe area just below the linea temporalis, 1.5 cm in front of the posterior mastoid border (Fig. 4.4). The second stroke is caudocranial, and comes close to the meatal entrance. The third movement runs posteroanteriorly, halfway between the meatal roof and the linea temporalis. At this moment, the antrum can usually already be identified. A switch to a diamond is now made. The posterior epitym-panum is opened, and the body of the incus is exposed (Fig. 4.4b). Thinning out the lateral attic wall from behind without injury to the incus provides good exercise for various operations. Step 2: mastoidectomy and posterior tympanotomy (Figs. 4.5–4.7). Systematic bone removal should now follow, exposing the antral tegmen (above), the posterior canal wall (anteriorly), and the solid shell of the sigmoid sinus (posteriorly). This bone removal is continued caudally to achieve complete exenteration of the mastoid tip, sculpturing the digastric ridge (Fig. 4.5). At this stage, a classic transcortical mastoidectomy is terminated if zygomatic or retrosigmoid cells do not invite further exenteration. An exercise in the posterior tympanotomy or extended facial recess approach can now be added. Particular attention should be paid to enlargement of the aditus. When bone is further drilled away superiorly toward the tegmen epitympani, and laterally toward the osseous annulus, both the body of the incus and the head of the malleus are visualized: this is a posterior atticotomy. From here, very careful bone removal using a diamond opens the chorda–facial angle (Fig. 4.6). The lateral semicircular canal and then the facial canal below it have to be identified, and one proceeds from here caudally to the curved channel of the chorda tympani. This triangular bone complex has to be removed into the tympanic cavity, exposing the facial recess, the tendon of the stapedius muscle, the stapes, and, if possible, the niche of the round window as well (Fig. 4.7). For practice, one can continue the bone removal down to the hypotympanum and, following the fallopian canal, to the stylomastoid foramen. Step 3: posterior approach to the endolymphatic sac and jugular bulb. Complete exposure from behind of the triad of the sigmoid sinus–jugular bulb–deep jugular vein is not a very easy exercise. However, this precise maneuver has to be mastered by every otological skull base surgeon. Intimate familiarity with the maneuver is helpful in surgery for glomus jugulare tumors, as well as in translabyrinthine operations in the cerebellopontine angle. The landmarks are the sigmoid sinus, posterior semicircular canal, and fallopian canal. Bone removal starts from the anterior wall of the sigmoid sinus; continues with removal of the bone above the cerebellar dura; and then identifies the endolymphatic sac a few millimeters behind the posterior canal. An extrapolation of the gray line of the lateral semicircular canal behind the posterior semicircular canal acts as a pointer to the center of the endolymphatic sac. Drilling from the posterior semicircular canal caudally, and remaining behind the facial nerve and the stylomastoid foramen, one will approach closer and closer to the posterior wall of the jugular bulb (Fig. 4.7b). The exercise should not be stopped after reaching this wall; bone removal should continue caudally and anterosuperiorly in order to visualize both the ascending and descending branches of the bulb completely. Deliberate resection of the mastoid tip may help extend this approach to the styloid process and to the jugular foramen, where lower cranial nerves IX, X, and XI can be identified together with the deep jugular vein (see the section below on the transmastoid–transcervical inferior approach, pp. 41 and 43). Fig. 4.4 Opening of the antrum and epitympanum. a A third posteroanterior drilling move, just below the level of the tegmen, goes deeper and opens the central cavity. Fig. 4.5 Transcortical mastoidectomy Fig. 4.7 Posterior tympanotomy through the chorda–facial angle (continued). a The facial nerve is skeletonized, and the facial recess is exposed from behind. b Posterior sub-labyrinthine exposure of the jugular bulb (*). Step 4: removal of the posterior wall of the external auditory canal; formation of a radical cavity (Fig. 4.8). Many contemporary authors prefer to unite the external auditory meatus with the mastoid cavity to form a common “radical operation cavity,” with complete removal of the posterior canal wall, by starting this removal anteriorly from the lateral attic wall, and proceeding backward—the Stacke method (Stacke 1911). However, the opposite direction—the Zaufal method (Zaufal 1890)—can also serve as a useful exercise in the laboratory. Using the same specimen as in the previous exercise, the procedure is easy to terminate by drilling down the already thinned posterior canal wall, starting in the chorda-facial angle mentioned above and flattening the facial ridge medially, and bringing the floor of the external meatus to a continuous level with the anterior wall of the radical cavity (Fig. 4.8). If a second temporal bone specimen is available, one should try obtaining the same formal result—a large radical cavity—using a transmeatal approach, milling down the posterior canal wall from anterior to posterior. One should also take the opportunity to try a “conservative radical operation” (the Bondy technique) by leaving the fibrous osseous annulus with the drum membrane intact, but starting the backbiting wall removal at the bony bridge. Another important parameter for this exercise is full visualization of the above-mentioned functional structures in the medial wall of the middle ear (the labyrinth, facial nerve, sigmoid sinus, ossicles, etc.). This approach to the tympanic cavity and to the mastoid is strictly endaural and preserves the mastoid cortex, but it can be extended to the mastoid tip, the hypotympanic area, and to the petrous apex. Its peculiarity, the preservation of a bony bridge over the epitympanum, is characteristic in endaural tympanomeatoplasty—reconstructing the drum membrane, a new lateral attic wall, and the posterior meatal wall in conjunction with the preserved bony bridge, and thus restoring normal air volumes to the middle ear spaces. Step 1: exposure of the posterior canal wall (Fig. 4.9). In a wet specimen, the usual tailoring of a caudally pedicled flap of the posterior meatal wall (Stacke II) can be practiced. The auxiliary skin incision at the 12-o’clock position is combined with a perpendicular incision around the posterior circumference (6–12-o’clock), down to the bone. From here, a sharp dissector will expose the suprameatal spine of Henle. A second perpendicular skin incision is brought down from the first auxiliary incision parallel to and close to the posterior annulus. This incision is extended into the anterior meatal wall, making it possible to retract a long flap of the posterior canal skin. In a dry specimen, the interior incisions can be practiced. Skin removal is mostly destructive after fixation with formalin. Using gentle sharp drilling, the posterior canal wall is slightly excavated in order to expose the drum membrane and the lateral attic wall (Fig. 4.9). Step 2: mastoid control (Figs. 4.10, 4.11). Following the shadows of the translucent periantral cells, the posterosuperior face of the canal wall is opened into the antrum (antrum control) (Fig. 4.10). Care has to be taken to flatten the posterior canal wall. Blind drilling must be avoided behind overhanging bone. Starting from this initial opening, a larger window is created—first in an anterocranial direction, in order to visualize the lateral semicircular canal, the tegmen antri, the sinus–dura angle, and the posterior epitympanum (Fig. 4.11). The remaining strip of bone—separating the window that has been created in the posterior canal wall from the tympanic cavity, and representing the posterocranial frame of the drum—is called the “bony bridge.” The thinning out of this bridge during a posterior atticotomy is described below. Bone removal from the posterior canal wall now continues caudally, and the inferior pneumatization of the mastoid process is exenterated down to the mastoid tip. Step 3: posterior atticotomy (Fig. 4.12). Starting from the antrum control hole, the whole epitympanum can now be exposed as well. For this antero-superior bone resection, a diamond burr of adequate size is used to protect the underlying incus and malleus. The overhanging bone is removed from the aditus and from the inner surface of the lateral attic wall (Fig. 4.12), until the tegmen and the proepitympanum in front of the malleus head can be fully inspected. Step 4: exposure of the tympanic cavity and of the facial nerve (Figs. 4.13–4.16). For exposure of the tympanic cavity, a short tympanomeatal flap is tailored by superior and inferior circular incisions of the drumhead parallel to the margins of the tympanic membrane and Shrapnell’s membrane, leaving a strip of 2 mm of the adherent canal skin with the membrane (Fig. 4.13). The fibrous annulus is lifted in continuity with the skin. After transection of the tympanic mucosa along the annulus, the tympanic cavity can be opened (Fig. 4.14). A circular incision around the superior and inferior posterior quadrants is usually sufficient, but it can be extended anteriorly as far as necessary—e.g., to check the tubal orifice or the most anterior epitympanum or hypotympanum. One should learn how to carry out a circular incision into the adjacent tympanal mucosa without laceration, in order to keep the tympanal walls epithelialized. The three ossicles can now be dissected free (Fig. 4.15). Fig. 4.10 Establishment of the antrum control hole. After the chorda tympani has been identified and mobilized by milling away the covering bone, 1–2 mm of the osseous annulus is removed for broad exposure of the oval niche, including the tympanic portion of the fallopian canal. It is a useful additional exercise to drill back as much bone as is necessary to obtain complete exposure of the facial recess (Fig. 4.16a, b). One can also study the important topography of the vertical portion of the facial nerve, and examine how to expose it adequately via the endaural access through the posterior canal wall. Fig. 4.12 Posterior atticotomy behind the bony bridge. a A cranioanterior curved bone resection, exposing the incus. Internal thinning of the lateral attic wall.
 The Laboratory Workplace
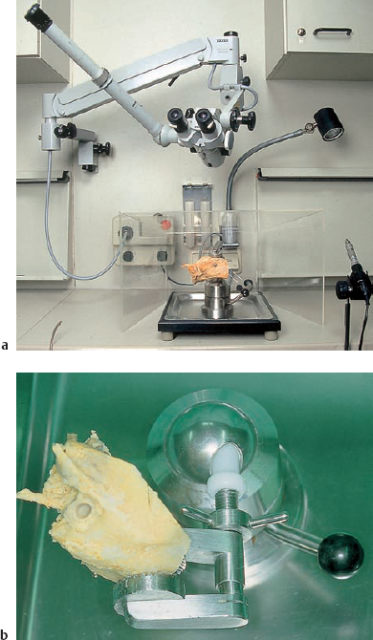
a Equipment for microsurgical dissection of the temporal bone and paranasal sinuses. b The temporal bone holder for all-round exposure.
 Postauricular Transmastoid Approach: Mastoidectomy and Radical Operation (Left Ear) (Figs. 4.3–4.8)
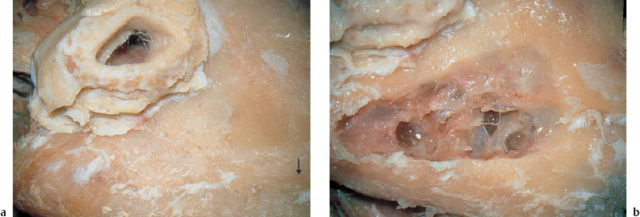
b Careful anteromedial resection with a diamond has exposed the body of the incus (*).
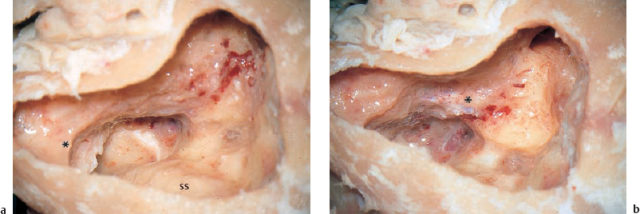
a Completed exenteration of the mastoid tip has identified the digastric ridge (*) and the sigmoid sinus (SS). The tegmen antri is fully visible. b Exposure of the labyrinth block, with the endolymphatic duct and the sinus–dura angle. The facial nerve has become translucent (*).

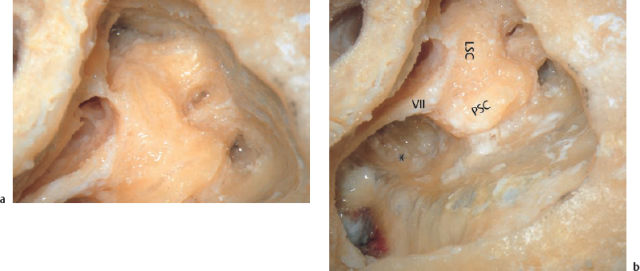
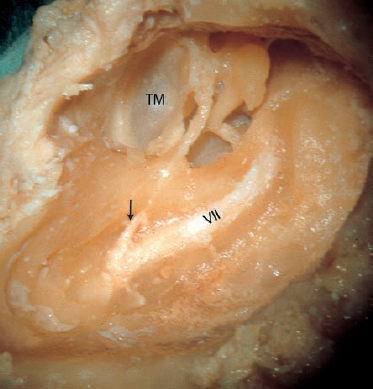
VII Facial nerve
LSC Lateral semicircular canal
PSC Posterior semicircular canal
 Endaural Transmeatal Approach (Left Ear) (Figs. 4.9–4.16)
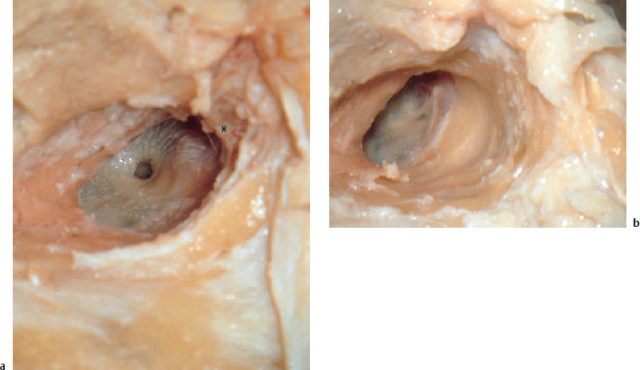

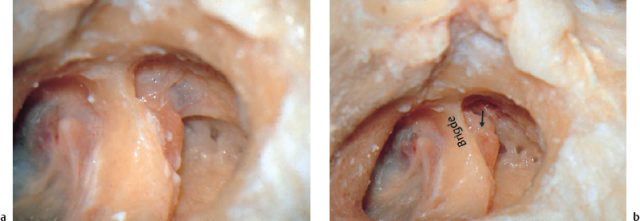
a As the posterosuperior meatal wall is thinned out, the periantral cells (arrow) are opened, leading the way to the antrum. b The observation hole behind the long incudal process, exposing the lateral semicircular canal.
b![]()
Stay updated, free articles. Join our Telegram channel

Full access? Get Clinical Tree


