(1)
Department of Ophthalmology, St. Thomas’ Hospital, London, UK
9.1 Introduction
9.2.1 Clinical Features
9.2.2 Secondary Macular Holes
9.2.4 Surgery
9.2.5 Success Rates
9.2.6 Reoperation
9.3 Microplasmin
9.4 Summary
Abstract
The macula is a common site of symptomatic retinal pathology requiring vitreoretinal intervention. Posterior vitreous detachment is implicated in the production of most common macular disorders.
Electronic supplementary material
The online version of this chapter (doi:10.1007/978-3-642-31872-6_9) contains supplementary material, which is available to authorized users.
9.1 Introduction
The macula is a common site of symptomatic retinal pathology requiring vitreoretinal intervention. Posterior vitreous detachment is implicated in the production of most common macular disorders.
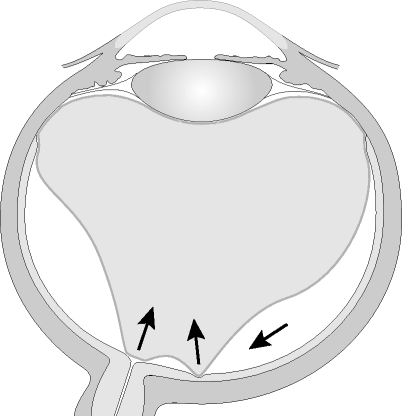

Fig. 9.1
The vitreous has attachments at the vitreous base and weaker attachments at the disc and fovea. These are vulnerable to damage during PVD. Arrows shows forces on the vitreous and retina
Fig. 9.2
Vitreous separation may start temporally but attachments at the fovea are stronger commencing the process of macular hole formation
9.2 Idiopathic Macular Hole
9.2.1 Clinical Features
Introduction
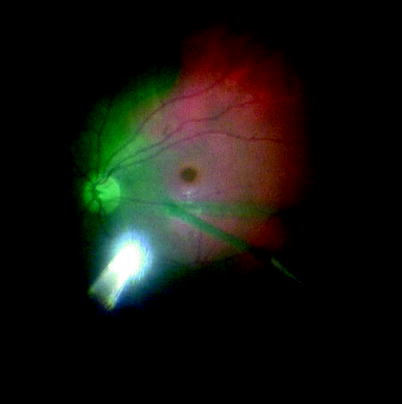
Age-related macular hole is a dehiscence of the neuroretina at the fovea, which occurs in middle-aged or elderly patients, and more often in females (3.321 females:1 male, with 7.8/100,000 population) (McCannel et al. 2009). They are bilateral in 12–13 % in 2 years after presentation in one eye (Lewis et al. 1996). Patients present with blurred vision or distortion. In the early stages (grade 1), the patient notices a small central grey patch without distortion of the image. Distortion becomes a feature as the fovea dehisces and the photoreceptors are moved outwards onto the rim of the hole (grades 2 and 3). Typically, the features at the centre of an image (e.g. the nose and mouth of a face) are seen as smaller, giving the appearance that the centre of someone’s face is ‘scrunched up’. The receptors are on the perimeter of the hole and spread out by the dehiscence. The brain therefore receives fewer signals than it should in the central of the macula and interprets this as a falsely small image centrally. Eventually, the receptors at the edge of the hole will stop functioning (grades 3 and 4) and the patient will only perceive a central scotoma.
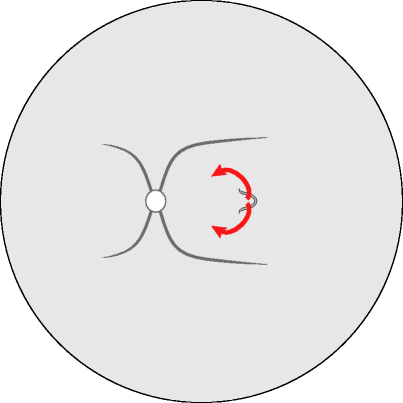
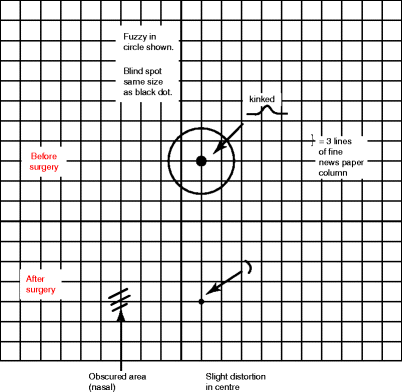
Fig. 9.3
A patients’ representation of the distortion of their faces created by their own macular hole because the central receptors are spread around the edge of the hole; the cental image is minified
Fig. 9.4
An early macular hole may show traction (arrows) on OCT indicating tearing towards the disc
Fig. 9.5
A patient’s description of symptoms before and after macular hole surgery
Watzke–Allen Test
The phenomena of distortion and loss of vision are exploited in the Watzke–Allen test (Watzke and Allen 1969). This involves shining a thin line of light (usually vertically) via the slit lamp biomicroscope over the macular hole, whilst asking the patient to describe whether the line of light is straight or has a narrowing (waist) or gap (break) centrally (Watzke and Allen 1969). A straight line indicates an intact fovea whilst a narrowing or a gap is seen in macular holes (Tanner and Williamson 2000). A narrowing indicates separated but functioning foveal receptors and a break loss of function of those receptors. If you place the beam on the edge of the hole, a kink is perceived with the apex pointing towards the hole.
Vitreous detachment stimulates the dehiscence of the fovea. Indeed, a subclinical separation of the vitreous is visible on optical coherence tomography (OCT) of the macula and can sometimes be seen clinically, evidenced by the presence of a prefoveal operculum in the early stages. The operculum does not consist of full thickness retina but is made up of glial tissue and a few neural tissue remnants or receptors (Ezra et al. 1997, 2001).
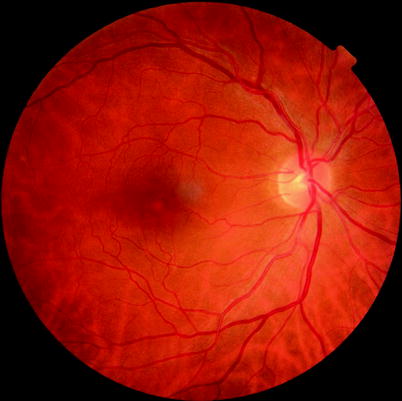
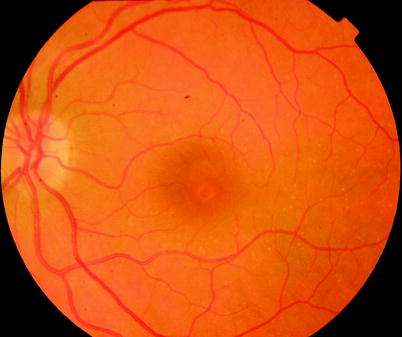
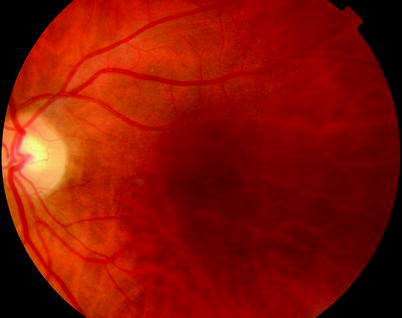
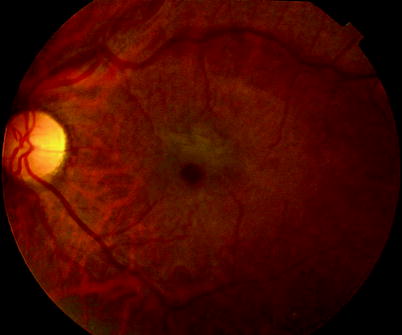
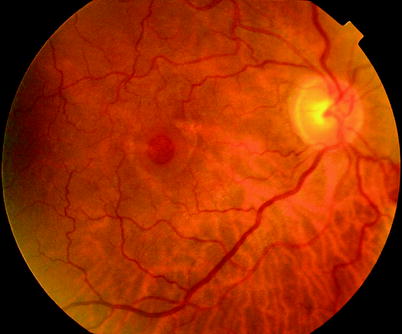

Fig. 9.6
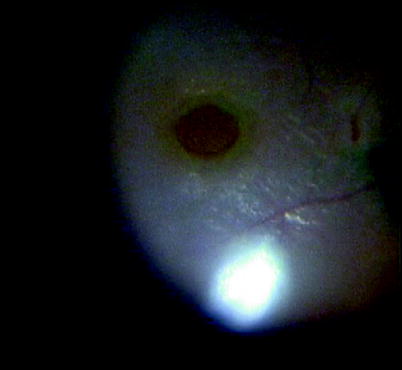
A grade 1 hole is a very subtle sign often as a small yellow spot in the fovea
Fig. 9.7
A grade 1A macular hole
Fig. 9.8
Grade 1B, a ring of yellow spots
Fig. 9.9
A grade 1B hole with an incomplete ring of spots
Fig. 9.10
A grade 2 vitreous attached and hole diameter less than 400 μm
Fig. 9.11
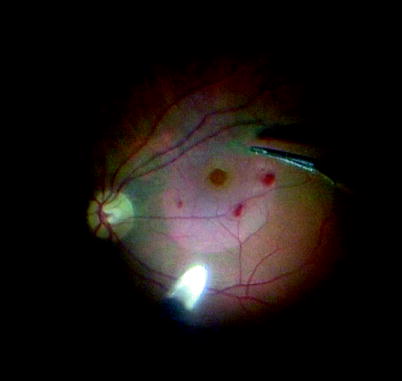
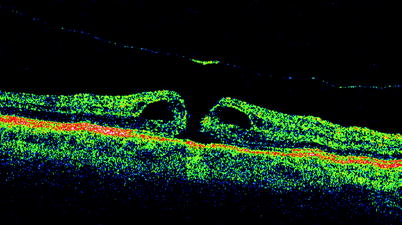
A grade 3 vitreous attached with hole diameter 400 μ or more. This hole has some surrounding retinal thickening and subretinal fluid
Fig. 9.12
A long-standing macular hole with yellow flecks in its base
Fig. 9.13
Different patterns of abnormality are seen in Watzke–Allen Test including a break, central narrowing and bowing of this slit lamp beam. The first two are associated with macular hole. The second two are associated with epiretinal membrane, but this abnormality can also be demonstrated on the edge of macular holes
Grading
It is useful to use the grading system devised by Gass to describe macular holes because these have been shown to relate to surgical success rates and visual outcome.
Grade 1 | |
Grade 2 | A small crescentic or round hole less than 400 μm. |
Grade 3 | A large round hole of more than 400 μm diameter |
Grade 4 | A hole with an associated posterior vitreous detachment. |
Note: The grading system Gass devised relates to ophthalmoscopy and not to OCT findings; therefore, a microseparation of the vitreous, with or without an operculum, in an eye with a full thickness break would be graded as 3 not a grade 4.
OCT can be used to measure the width of the hole at its narrowest separation to discriminate grades 2 and 3.
Natural History
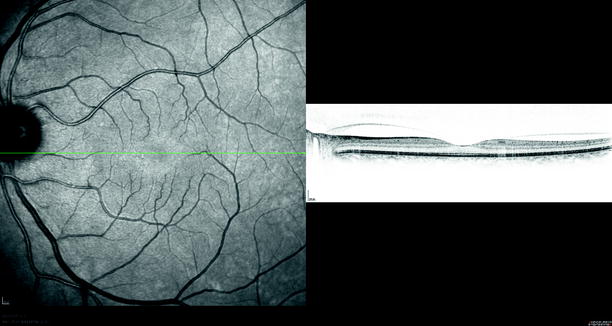
Fig. 9.14
When examining the risk to the fellow eye of a patient with macular hole, any sign of traction from the posterior hyaloid on the fovea as in this patient (which has been named as grade 0 macular hole) increases the risk of progression to full thickness macular hole to 40 %. In absence of this sign, risk of progression is low
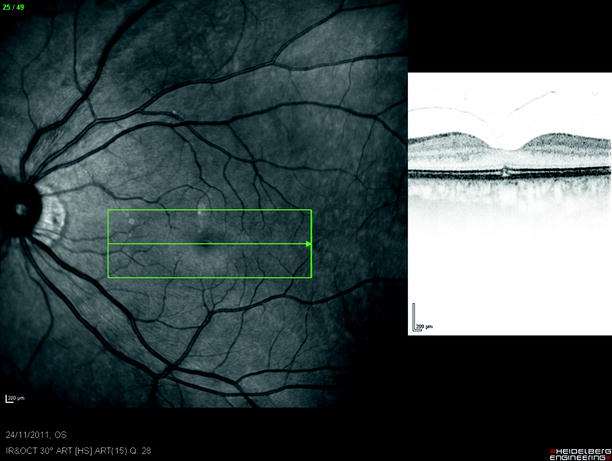
Fig. 9.15
Mild foveal disruption is present from vitreofoveal traction. The vitreous separated without progression to macular hole
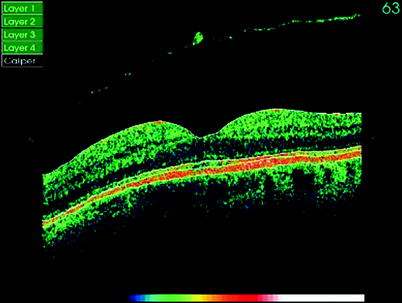
Fig. 9.16
The vitreous has separated taking a small operculum of tissue (usually glial tissue) with it

Fig. 9.17
A grade 1A macular hole may stay stable for months but usually with mild visual loss (20/40 in this patient)
Fig. 9.18
High-definition OCT of a grade 1 macular hole
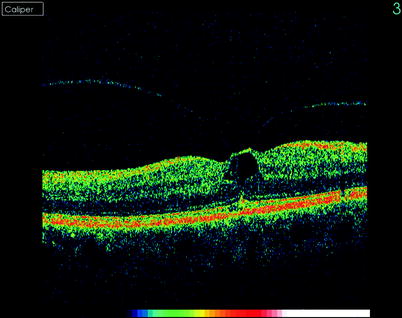
Fig. 9.19
The vitreal traction can be clearly seen on this OCT of a grade 1 macular hole
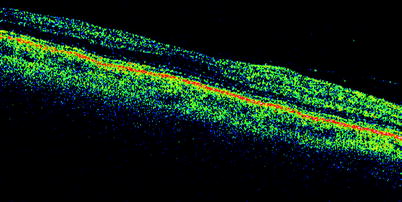
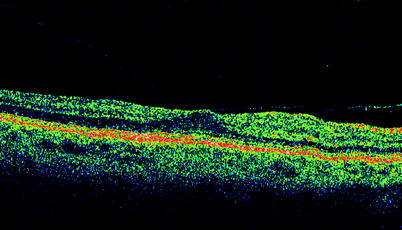
Fig. 9.21
∎ See previous figure
Grade 1 holes progress to full thickness holes in approximately 40 % of cases (de Bustros 1994).
Grade 1 holes with poorer vision have a higher chance of progressing (Kokame and de Bustros 1995)
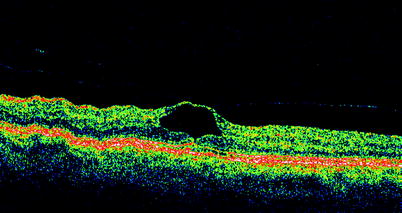
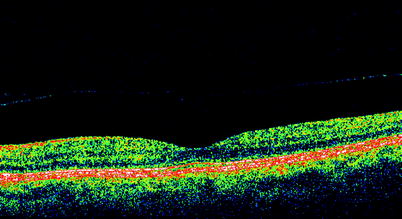
Fig. 9.23
A grade 1 hole which regressed without progression to a full thickness hole. Note the separation of the posterior hyaloid membrane. Vision remained 20/60 (see Fig. 9.24)
Fig. 9.24
See previous figure
Grade 2 holes have 74 % chance of proceeding to stage 3 or 4 in 6–12 months (Kim et al. 1995).
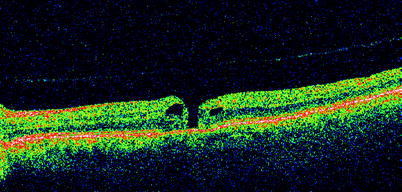
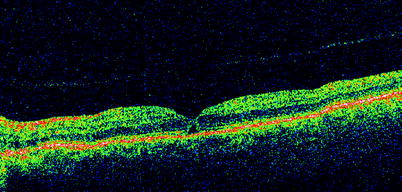
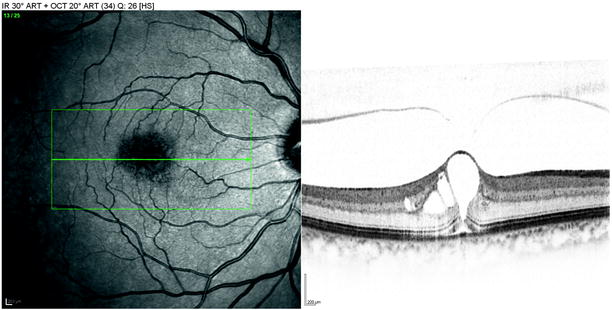

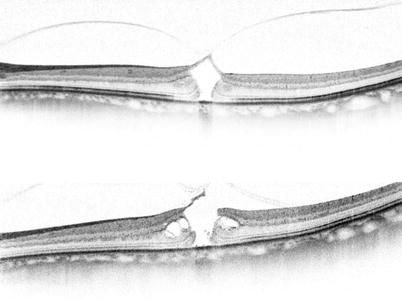
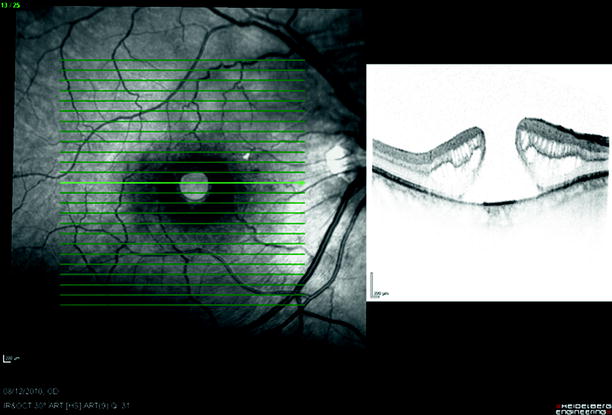
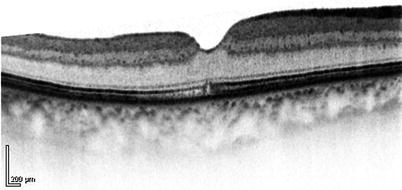
Fig. 9.25
A grade 2 hole with traction of vitreous and its closure after PPV and gas (see Fig. 9.26)
Fig. 9.26
See previous figure
Fig. 9.27
Spontaneous closure of a grade 2 hole can occur in the first 2 months as in this case. It may be prudent to wait for 1 or 2 months for spontaneous closure before proceeding to surgery
Fig. 9.28
See previous figure
Fig. 9.29
A very early grade 2 macular hole seen on HD OCT
Fig. 9.30
A grade 2 macular hole on HD OCT showing cystoid spaces beginning to appear at the edge of the hole
Fig. 9.31
A grade 2 hole progresses from outer retina dehiscence to full thickness hole
Fig. 9.32
A large grade 4 macular hole
Fig. 9.33
A postoperative HD OCT of a grade 2 macular hole with 20/30 vision
At 5 years without treatment, there is a 75 % chance of 20/200 vision or worse (Casuso et al. 2001; Lewis et al. 1996).
Spontaneous closure can occur especially with grade 2 holes, 11.5 % (Ezra and Gregor 2004), reducing in grade 3 and 4 holes to 4 % (Freeman et al. 1997).
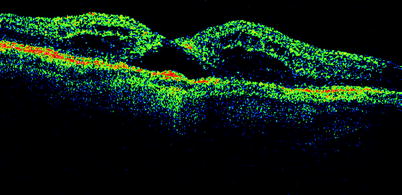
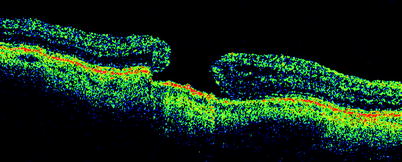
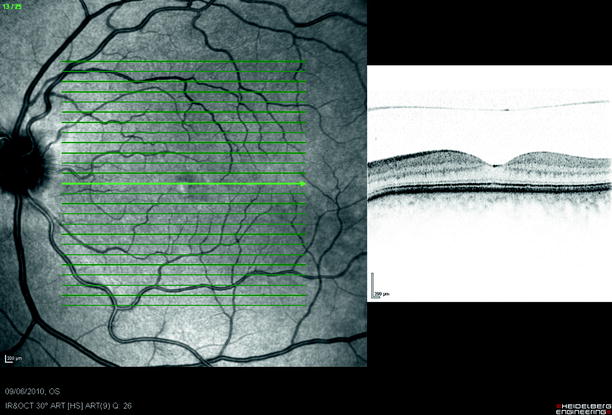
Fig. 9.34
Macular holes may appear to close postoperatively as in this patient only to reopen later (see Fig. 9.35)
Fig. 9.35
See previous figure
Fig. 9.36
An occult separation of the posterior hyaloid membrane from the macula, only visible on OCT
Optical Coherence Tomography
This methodology is useful for confirming the diagnosis and to help determine the risk to the other eye (Hee et al. 1995; Tanner et al. 2001). Optical coherence tomography (OCT) images also aid the discrimination of partial thickness and pseudoholes (from epiretinal membrane) from full thickness macular holes.
In the grade 1 hole, the posterior hyaloid pulls on the fovea causing an intraretinal cyst.
In the grade 2 hole, the retina ruptures producing a small full thickness hole often with the vitreous still attached to one edge which causes an eccentric opening of the roof of the hole by traction from the posterior hyaloid (Chauhan et al. 2000).
In a grade 3 hole, the vitreous is often separated (but too close to the retina to see biomicroscopically) whilst the hole has enlarged.
The occult separation of the vitreous detectable on OCT is seen in 74 % of grade 2 and 3 holes and is attached to the disc margin in 33 % (Chauhan et al. 2000; Ito et al. 2003). The visible membrane on the posterior hyaloid probably consists of vitreous cortex with fragments of ILM (Smiddy et al. 1989). The fellow eye shows separation of the vitreous on OCT in 31 %.
Grade 0 macular holes have been described as a vitreous separation on OCT but with persistent attachment to the fovea. Grade 0 is present in 29 % of the contralateral eyes of patients with macular holes. 46 % of eyes with Grade 0 progress to macular hole at 2 years compared with 6 % in those with no vitreous attachments (Chan et al. 2004).
9.2.2 Secondary Macular Holes
Contusion injury to the eye can result in secondary macular holes (Ismail et al. 2002) which have a high spontaneous closure rate (50 %) in the first few months; therefore, it is recommended to wait 4 months from the trauma before surgical intervention (Yamashita et al. 2002). Traumatic macular holes can be associated with the production of retinal detachment (Chen et al. 2005).
Rhegmatogenous retinal detachment may produce a secondary macular hole, and Yag laser injury has been associated with hole formation (Sakaguchi et al. 2000). Holes may appear in other retinal pathologies such as sickle cell retinopathy and von Hippel–Lindau disease.
9.2.3 Lamellar and Partial Thickness Holes
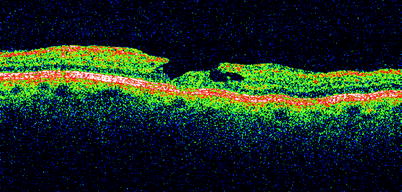
Fig. 9.37
OCT is very useful for determining whether apparent macular holes are full thickness or partial thickness. In general, the Watzke–Allen test is negative for partial thickness holes, but it is reassuring to see outer layers of retina still present in the foveal pit on OCT. These patients should be left alone, and vision usually stabilises with a small amount of visual loss
On some occasions, macular holes will not penetrate through the whole retina, producing a partial thickness hole with mild reduction of vision. Some are seen in the fellow eyes of macular hole patients. They are often associated with ERM discovered on OCT or found if surgery is performed. They should be discriminated from pseudoholes which are holes in an ERM over the fovea with underlying intact retina (Spaide 2000; Haouchine et al. 2004; Patel et al. 1988; Unoki et al. 2009; Gass 1976; Hirakawa et al. 2005; Garretson et al. 2008). Surgical intervention will improve the anatomical appearance of the hole, but as yet good data on surgical outcomes is not available. Although visual improvement has been shown, the influence of removal of the ERM on visual recovery needs to be determined (Garretson et al. 2008). PPV has been combined with ERM peel and ILM peel in these eyes. Left alone, the patient often experiences further slow deterioration of vision over years to the 20/120. Lamellar holes have also been described after chronic cystoid macular oedema in diabetes or after cataract surgery and associated with idiopathic retinal telangiectasia (Lewis et al. 1996; Patel et al. 1988; Unoki et al. 2009; Gass 1976).
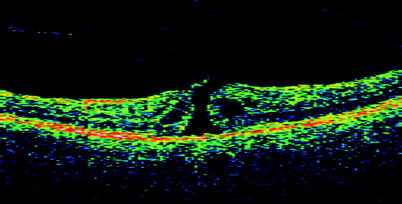
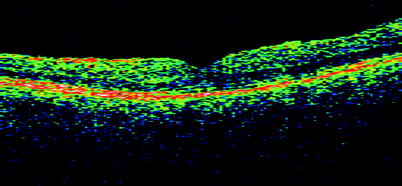
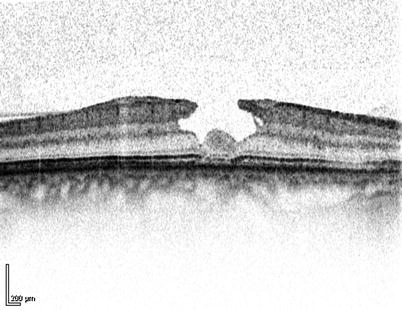
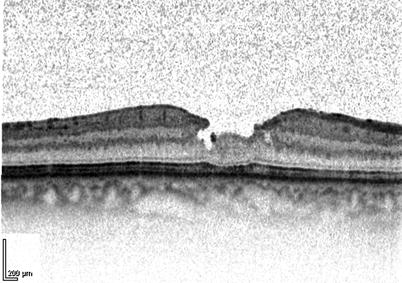
Fig. 9.38
This early macular hole grade 2 had reduced vision to 20/80 and can be seen on the OCT with a flap towards the optic disc. Postoperatively, the vision improved to 20/20, and the normal architecture is restored on OCT (see Fig. 9.39)
Fig. 9.39
See previous figure
Fig. 9.40
Lamellar macular holes can be associated with ERM
Fig. 9.41
Removal of the ERM causes resolution of the hole (5 days postop in this case)
9.2.4 Surgery
Table 9.1
Difficulty rating of PPV for macular hole
Difficulty rating | Moderate |
Success rates | Good |
Complication rates | Medium |
When to use in training | Middle |
Additional Surgical Steps
Peel posterior hyaloid membrane off retina (in grade 2 and 3 holes).
Stain the internal limiting membrane (ILM) with brilliant blue.
Remove ILM.
Insert air.
Insert long-acting gas.
Introduction
In macular hole surgery, vitrectomy is performed (Kelly and Wendel 1991). A gas bubble is inserted to tamponade the hole. During the first week, the patient may have the inconvenience of positioning their face towards the ground, allowing the bubble to float against the hole. Many other manoeuvres have been added to this procedure to try to maximise the chances of hole closure, such as dissection of the internal limiting membrane from the retina or application of autologous platelets to the hole (platelets obtained from the patient’s blood by spinning, separation and alliquoting). Successful closure of the hole arrests progression to a stage 4 hole and frequently reduces the distorting effects of the hole and improves vision.
Surgery
Once the core vitrectomy has been performed, detach the posterior hyaloid from the retina in all macular holes except grade 4.
Peeling the Posterior Hyaloid Membrane
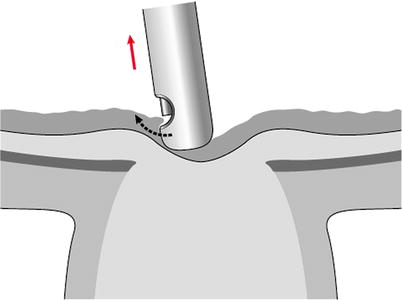
Fig. 9.42
When starting the posterior hyaloid peel, go to the edge of the optic disc, try to engage the posterior hyaloid and then elevate away from the disc. Arrows shows movement of instrument
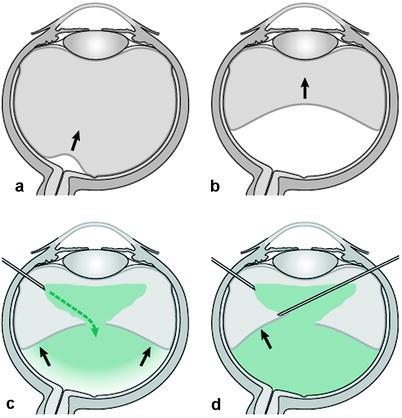
Fig. 9.43
Peel a posterior vitreous detachment in the centre of the eye going towards the back of the lens (a and b, black arrows indicate direction of force). Once the core of the vitreous has been removed, the infusion fluid has access to behind the posterior hyaloid membrane (c). By making a hole in the posterior hyaloid membrane, the fluid can pass through (dashed arrow). This will aid dissection of the posterior hyaloid membrane by the infusion fluid. Once the PVD is more established, an instrument such as a cutter can be inserted through the hole and the membrane elevated along an axis tangentially to the retina, in each quadrant (d). Commencing the PVD peel is safe. Commencing the posterior vitreous hyaloid is performed at the optic disc. Pull perpendicularly away from the disc to commence the peel. A ring of attachment is seen around the disc. This will expand as the hyaloid detaches, and this should be watched more to confirm elevation of the membrane
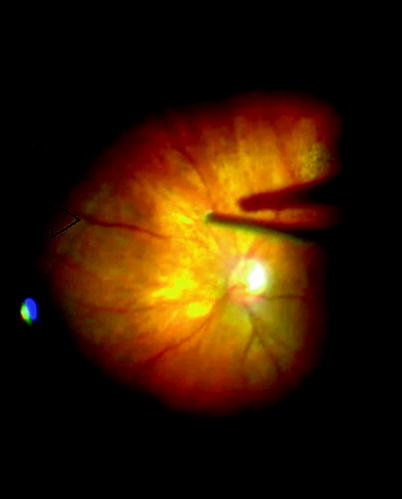
Fig. 9.44
The edge of the posterior hyaloid (arrow) peeling off the retina can be observed during PVD induction and is a good guide to the extent of PVD produced
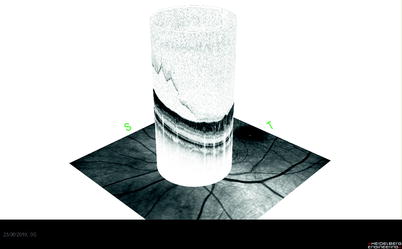
Fig. 9.45
In macular hole, the PHM can be easily engaged because it is already separated around the disc. Peeling the PHM off other eyes may be more difficult because this microseparation has not yet occurred
Detect preoperatively whether the posterior hyaloid has detached or not. This will save time and anxiety during the operation. Remove as much vitreous as possible over the optic disc. If there is too much cortical vitreous overlying the hyaloid membrane, the vitreous will engage in the port and shred without pulling up the hyaloid. The membrane needs to be engaged to start the detachment process. Use the vitrectomy cutter on aspiration, place the tip near the optic disc so that it is almost touching the disc and aspirate on 150–300 mmHg vacuum. Allow a moment for the hyaloid to engage and then move the cutter 1 mm tangentially over the optic nerve rim taking care not to touch the nerve or retina. Then, move the cutter tip towards the centre of the eye. Keep trying different parts of the optic nerve head until suddenly a ring indicating the juncture of the attached and detached hyaloid is seen circumferential to the disc margin. Observe the ring, and again aspirate over the nerve; this time, pull further into the centre of the eye; see the ring increase in size as the detachment spreads to the equator of the globe. Early in this process, create a hole in the elevated posterior hyaloid membrane to allow vitreous cavity fluid to enter between the PHM and the retinal surface. This breaks the ‘vacuum’ between the PHM and the retina and aids elevation of the rest of the PHM to the periphery.
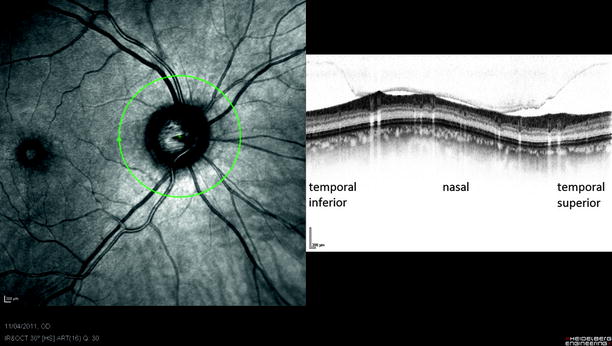
Fig. 9.46
The vitreous remains attached on the blood vessels and is separated less from the retina on the nasal side
Note: Make a hole in the centre of the posterior hyaloid to allow fluid to enter between the PHM and the retina.
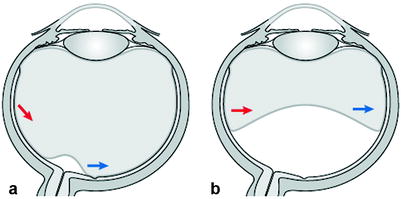
Fig. 9.47
Do not pull the membrane as shown by the (blue arrows) as this will cause traction on the opposite retina (red arrows), and if there are any, retinal adhesions may increase the chance of retinal tear formation. Similarly, when the PVD peel is just started, do not pull tangentially across the retina as this runs the risk of producing forces at the vitreous base which could tear
It should now be possible to see the posterior hyaloid floating in the vitreous cavity. Continue the detachment process by aspirating the hyaloid into the four quadrants of the eye. If this is not working or the instruments are getting close to the lens, use the cutter to remove the central membrane, place the cutter through the hole and aspirate the posterior aspect of the hyaloid in each quadrant and lift the membrane towards the periphery. Stop before the insertion of the vitreous base because the vitreous will not detach any further, forcing it anteriorly will cause retinal tearing. Similarly, do not pull through abnormal vitreoretinal attachments such as lattice degeneration because traction on these will cause retinal tears. Instead, trim the vitreous around these adhesions. Once the posterior hyaloid has been detached, remove the vitreous and hyaloid. It is especially important to search for breaks by internal search after surgical PVD. The tears are often easy to find because they are of moderate size with often a ragged appearance and may bleed.
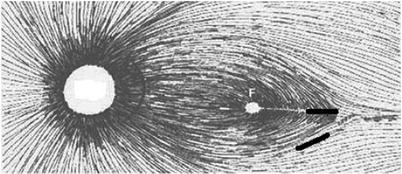
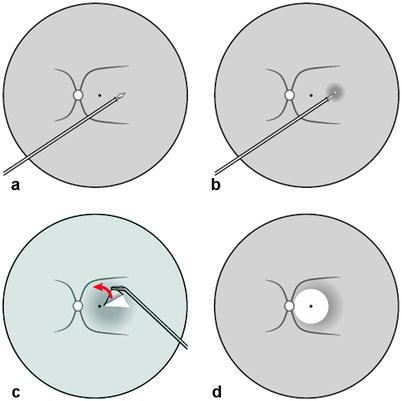
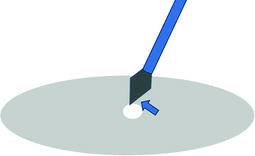
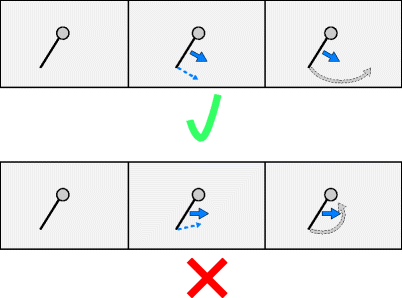
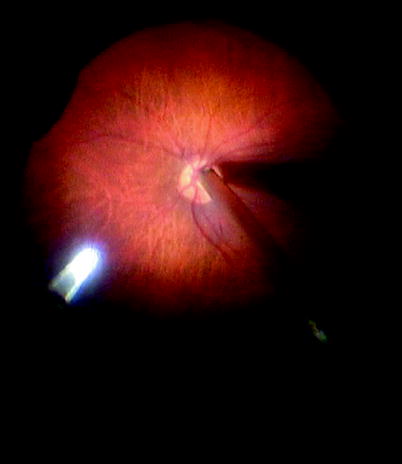
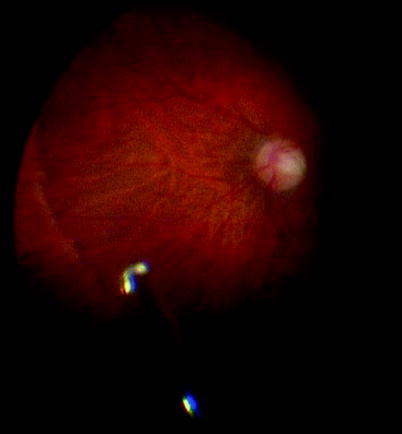
Fig. 9.48
When commencing the ILM peel, incise as shown to minimise damage the nerve fibres in the nerve fibre layer
Fig. 9.49
To start the ILM peel, perform a slight incision of the ILM temporal to the fovea (a and b). In this area, you are less likely to slice nerve fibres and cause small paracentral scotoma. Alternatively, use a diamond-dusted brush to start the ILM peel. Once the ILM is lifted, remove it further in the fashion of the capsulorhexis going around the fovea in a circular fashion (c and d). To maintain an intact ILM during peeling, first, pull perpendicularly to the edge of attachment of the ILM to the retina, and, second, readjust the forceps every so often so that you are grasping the membrane close to the edge of attachment. Angled forceps allow you to see the point at which to grasp the ILM. Be careful that you intermittently check the position of the heel of the forceps to avoid damaging retina with this whilst you are distracted by the ILM peel
Fig. 9.50
When starting an ILM peel, you can use the flat edge of the MVR blade to scrape the surface; because the ILM is relatively stiff, this will induce a small hole to appear providing an edge to allowing forceps to grasp the ILM. The ILM is so close to the underlying nerve fibres that trying to insert a blade under the ILM to start lifting is very difficult and should be avoided
Fig. 9.51
When peeling the ILM, pull in a perpendicular motion to the edge of the torn ILM; this encourages the ILM to tear around the hole in a circumferential way as the top graphic shows. Do not pull the edge over the hole or the ILM will tear towards the hole as shown in the bottom graphic reducing the quantity of ILM that you will remove and requiring a regrip of the ILM at another site
Fig. 9.52
Aspirate on the disc to engage the PHM. Watch the PHM peel from the retina. When applying any dyes to the macula, apply the dye away from the fovea in the first instance to avoid damage to the retinal pigment epithelium and to avoid insertion of the dye underneath the retina. Using a contact lens provides high magnification and enhanced depth perception to incise the ILM. Peel the ILM, search the peripheral retina and fill with gas (see Figs. 9.53–9.58)
Fig. 9.53
See previous figure