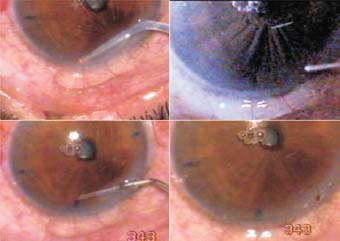
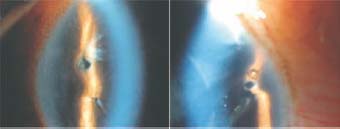
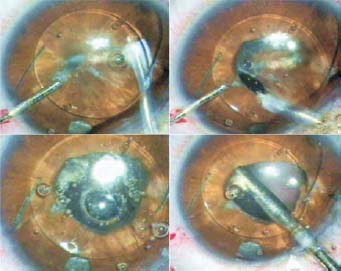
Cutting the iris is required in every case of cataract in which any lens other than in-the-bag is to be implanted. It is needed in most cases of traumatic cataract damage following penetrating injury. The iris must also be cut from the adherent leukoma. Pupilloplasty requires extensive cutting of the iris. In a behind-the-iris phakic lens implantation, iridectomy is needed. This can be done with the yttrium–aluminum–garnet (YAG) laser, but that is often easier said than done. A dark, thick iris responds poorly to laser treatment; it may become inflamed or may close. A reliable iridectomy is one in which the iris tissue is actually removed, before or after phakic lens implantation. All anterior chamber filtration procedures require a patent iridectomy. It is necessary in pseudophakic pupillary block glaucoma, with or without an iris bombe. If the iris bombe is multiloculated, more than one iridectomy is necessary. In such cases, the usual manual approach will require multiple corneal incisions. The introduction of the Fugo blade for iridectomy changes the scene completely. Iridectomy can be done in situ by mere “touch-and-ablate,” with no bleeding. Multiple iridectomies may be done through tiny incisions or through a single incision. An iridectomy may be done toward the diametrically opposite limbus; for example, if an incision has been made at the 12 o’clock position and the situation demands an iridectomy at 6 o’clock, this can be done by carrying the Fugo blade tip across the pupil to the required point. The only requirement is a deep anterior chamber, which is easily created using a visco-elastic agent. The iridectomy/iridotomy may be the size of a pinpoint or larger. It may be circular or linear. In cases of adherent leukoma, the iris must be separated from the lesion. A properly directed Fugo blade tip can incise the iris effortlessly, such that the iris entangled in adherent leukoma is not pulled or tugged, as would be the case in manual iridotomy. The following two cases illustrate iridectomy in three different situations. CASE STUDIES Case 1: Iridectomy in Ab Interno Filtration The patient shown in Figure 23.1 was undergoing an ab interno filtration procedure. Iridectomy was required. Figure 23.1. Iridectomy before ab interno filtration. The 300-micron Fugo blade tip is activated to ablate the iris. An irrigation cannula verifies the completeness of iridectomy. The cavitation bubbles formed during iridectomy collect under the iris and raise it. Oblique illumination clearly demonstrates this phenomenon. Surgical Technique Case 2: Iridectomy in Traumatic Cataract Figure 23.2 shows a young patient with a traumatic cataract in which an anterior chamber lens (iris claw (artisan lens)) had been implanted. Postoperative inflammation led to closure of iridectomy and the pupil. When the patient presented at our clinic, he had severe iris bombe and glaucoma. The anterior chamber was very shallow. This eye was treated as follows. Figure 23.2. A case of pseudophakic pupillary block. A clean-cut iridectomy is made over the temporal claw, and a clear cornea filtration track (close to the iris hole) along with iridectomy is made on the nasal claw. Surgical Technique Postoperative Management Two months after our surgery, the anterior chamber remained well formed and intra-ocular pressure was 19 mm Hg. Case 3: Pupilloplasty Numerous situations arise in which the iris must be ablated to get the desired result. In this case, a 9-year-old child showed an angle-supported lens made out of a posterior chamber lens. There was contraction and occlusion of the pupil and adhesions to the vitreous. This was a situation that is ordinarily not easy to handle. Any manual procedure would cause bleeding from the iris and cause traction to the vitreous. This case was managed as follows (Fig. 23.3). Figure 23.3. An irrigation cannula pushes methylcellulose from the side port, while the capsulotomy tip performs membranectomy-cum-pupilloplasty. The vitrector removes the detritus. Surgical Technique There was no bleeding or traction of the tissues during our procedure. Summary In our clinic we have performed countless iridectomies in a variety of clinical situations. I note here three particular precautions for performing iridectomy and iridotomy using the Fugo blade. Suggested Reading Kellan R, Fugo RJ. Device increases safety, efficiency of cataract surgery. Ophthalmol Times. 2000;25:7–9. Roy FH. Course for Fugo blade is enlightening, surgeon says. Ocular Surg News. 2001;19:35–38.
 raditionally, a manual iridectomy could be done only after making a suitable incision, inserting a forceps, holding and pulling the iris out of the incision line, and cutting it with scissors. This was followed by irrigation of the anterior chamber and verification of the iris opening. This approach has disadvantages such as bleeding from the iris or from its torn root. The bleeding may be minimal or moderate and rarely massive, and it comes as a shock when it happens in a surgery in which iridectomy was supposed to be a minor component.
Stay updated, free articles. Join our Telegram channel

Full access? Get Clinical Tree


