(1)
Department of Ophthalmology, St. Thomas’ Hospital, London, UK
2.1 Introduction
2.3.1 Sclerotomies
2.3.4 Checking the Infusion
2.3.7 Checking the View
2.3.9 Removing the Vitreous
2.8 Endolaser
2.10 Maintaining a View
2.10.1 Microscope
2.10.2 IVS
2.10.3 Cornea
2.10.6 Cataract Formation
2.10.7 Pupillary Dilation
2.11 Closing
2.12.1 Iatrogenic Breaks
2.12.2 Choroidal Haemorrhage
2.12.4 Lens Touch
2.12.5 Hypotony
2.13.1 Cataract
2.13.2 Endophthalmitis
2.13.3 Corneal Changes
2.13.4 Choroidal Haemorrhage
2.13.5 Raised Intraocular Pressure
2.13.6 Retinal Breaks and RRD
2.13.7 Hypotony
2.13.8 Scleritis
2.13.9 Sympathetic Uveitis
2.14.2 Priming
2.14.3 Self-Sealing Sclerotomies
2.15.1 Instrumentation
2.15.2 Surgical Technique
2.15.3 Flexibility
2.15.4 Indentation
2.15.5 Flow Rates
2.15.6 Trochar Internal Protrusion
2.15.7 Silicone Oil
2.16 Complications
2.16.1 Peroperative
2.19 Biometry
2.20.1 Possible Complications
2.21 Dyes
2.22.1 Injection Medications
2.24 Summary
Abstract
A variety of surgical techniques exist to treat vitreoretinal disorders, and the choice of method depends upon the individual surgeon. Pars plana vitrectomy is however the most versatile methodology available (Machemer et al. 1971). Before starting the operation, run through the usual surgical preoperative checks:
Electronic supplementary material
The online version of this chapter (doi:10.1007/978-3-642-31872-6_2) contains supplementary material, which is available to authorized users.
2.1 Introduction
A variety of surgical techniques exist to treat vitreoretinal disorders, and the choice of method depends upon the individual surgeon. Pars plana vitrectomy is however the most versatile methodology available (Machemer et al. 1971). Before starting the operation, run through the usual surgical preoperative checks:

Do you have the correct patient? | Check the notes and the patient |
Do you have the correct operation? | Check the notes for the pathology, intended operation and the dates of the clinical entries |
Do you have the correct eye? | Check the notes and the eye to be operated upon, tape down the other eye (some surgeons like to put a plastic eye shield over the fellow eye to avoid putting pressure on this eye during surgery) and check the preoperative marking for the eye to be operated |
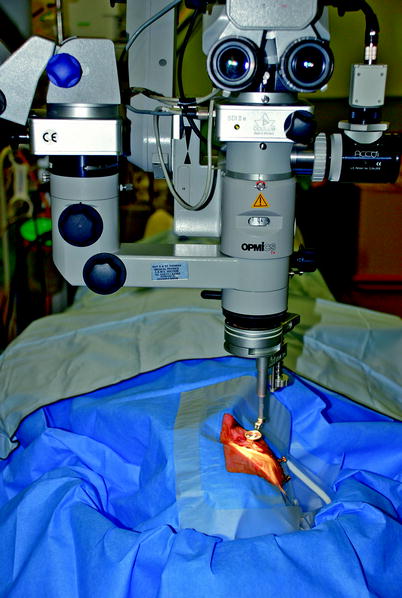
Fig. 2.1
A typical setup for a PPV with surgical drapes
Fig. 2.2
A standard footpedal arrangement vitrectomy on left and microscope controls on the right. The laser controls in the centre can be worked with the left foot whilst using the microscope X/Y on the right
Confirm the pupils have been dilated. Warn the theatre staff of the need for any special instrumentation or medications. Now look at the setup of the operating table and the position of the patient on it (see Fig. 2.1). Use a horse shoe wrist rest (e.g. Chan) which goes around the head of the patient horizontally at the level of the patient’s zygoma. You will lay the base of your fifth metacarpal of each hand on the rest during surgery. Make sure the patient’s head is only 0.5 cm from the apex of the rest. This keeps the eye as close to your body as possible during surgery preventing any leaning on your part which leads to backache. Adjust the operator’s seat height to allow a straight back and legs bent under the table in comfortable reach of the foot pedals, weight resting on the heels to allow easy mobility of the fore foot. Use elbow rests especially when embarking on long operating sessions.
I prefer the microscope pedal on the dominant foot as the X-Y control is the most actively used function during surgery. This leaves the vitrectomy pedal on the other foot. Set up the vitrectomy equipment with 150–250 mmHg vacuum, 600–2,500 cuts/min vitrectomy and the infusion bottle height 40 cm above the patient’s eye, see later for setups for 23 and 25 gauge vitrectomy. Smaller gauge instrumentation is now routinely used in many institutions. There are subtle differences in surgical technique with these methods which will be described later in the chapter.
2.2 Choice of Anaesthesia
The anaesthesia for the operation is down to personal preference and circumstance, but both general anaesthesia and local anaesthesia are appropriate. In order to minimise conjunctival manipulation, I favour peribulbar anaesthesia before draping (with a top up of sub-Tenon’s anaesthesia if the conjunctiva has been opened). In 23 and 25 gauge where the conjunctiva is not opened, use peribulbar anaesthesia. The patient may be given sedation intravenously under anaesthetic supervision to block out memory of the procedure and to reduce anxiety. This runs the risk however that the patient falls asleep and on awakening may move their head which is potentially problematic if you are starting an internal limiting membrane (ILM) peel or other delicate procedure. In most circumstances, local anaesthesia is satisfactory; however, some patients do not enjoy the experience. Anaesthetic blockade of the relatively large optic nerve is not consistent so that some patients may visualise instrumentation in the eye during surgery especially when it is close to the retina and therefore in focus with only 10 % having total loss of vision (Sugisaka et al. 2007). Most patients find this experience interesting rather than frightening (6 % the latter). General anaesthesia is useful for very prolonged operations, when training surgeons, for young patients or patients with anxiety and those with poor communication.
Patients can be treated as day case without overnight stay, but most surgeons will review the next day although same day review has been described (Desai et al. 2008). Next day review is primarily for measuring the intraocular pressure either high from the gas bubble or low from small incision surgery.
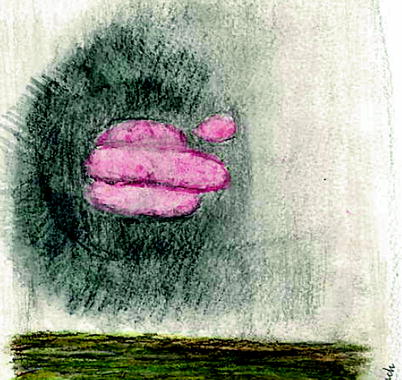
Fig. 2.3
A patient’s drawing of his/her visual experience during vitrectomy surgery under local anaesthesia for macular hole
2.3 Pars Plana Vitrectomy
Prepare the eye with dilute povidone-iodine and topical anaesthetic onto the conjunctiva
1.
Drape and insert a lid speculum.
2.
Incise the sclerotomy.
3.
Secure the infusion cannula and check its penetration into the vitreous cavity.
4.
Incise the other two sclerotomies.
5.
Insert the endo-illumination and focus the viewing system.
6.
Insert vitrectomy cutter and excise the vitreous.
7.
Take as much vitreous as possible.
8.
Search the retina for iatrogenic or pre-existing breaks with endo-illumination and indentation.
9.
Close the sclerotomies.
This is the most commonly performed operation in modern vitreoretinal practice and the second commonest ophthalmic operation in the USA. Variations in technique with different gauge instrumentation will be described later in the chapter. The basic operation is described here with additional manoeuvres explained in the following chapters. In most centres, a three-port approach is used, one sclerotomy for an infusion cannula and two used alternately for a light pipe and a surgical instrument of varying sorts.
For draping and sterility, follow the usual processes. A lid speculum is inserted.
Table 2.1
Typical vitrectomy cutter settings
Modality | Low-speed cutter | High-speed cutter |
|---|---|---|
Infusion | 20–30 mmHg (26–39 cmH20) | 20–30 mmHg (26–39 cmH20) |
Cutter rate | 600 cpm | 2,500–5,000 cpm |
Vacuum | 150 mmHg | 250 mmHg |
2.3.1 Sclerotomies
Fig. 2.4
Measure 3.5–4 mm from the limbus to determine the site of a sclerotomy for PPV avoiding the lens and ciliary body and the commencement of the retina at the ora serrata
Fig. 2.5
Three sclerotomies are fashioned: one for the light pipe, one for the infusion and one for the instrument, such as the cutter
2.3.2 Where to Place the Sclerotomies
The sclerotomies should be placed 4 mm from the corneo scleral limbus in the phakic eye and 3.5 mm in the aphakic or pseudophakic eye. None of the sclerotomies should be placed on the horizontal meridian where they would damage the long ciliary arteries and nerves.
Start with the infusion sclerotomy. This is created in the inferotemporal quadrant just below the horizontal meridian. This sclerotomy should not be too inferior where it will tend to knock against the lid speculum restricting movement of the eye inferiorly during searches of the retina. Theoretically, the incisions are best made circumferentially to the limbus because of the orientation of the scleral collagen fibres. In practice, radial cuts are also safe and effective and especially useful in repeat operations by preventing coalescence of adjacent circumferential wounds.
2.3.3 Securing the Infusion Cannula
Once inserted, make sure that the infusion cannula is secure and unlikely to disengage or move position because movement of the cannula can cause a number of problems:
1.
Damage to the peripheral posterior lens capsule or lens zonule.
2.
Incarceration of the vitreous base preventing fluid infusion and causing peroperative hypotony.
3.
Retinal tear formation.
4.
Misdirection of tamponade agents, for example, gas or oil into the anterior chamber or even into the subretinal or suprachoroidal spaces.
Tape the infusion line to the drape about 5 cm from the eye.
2.3.4 Checking the Infusion
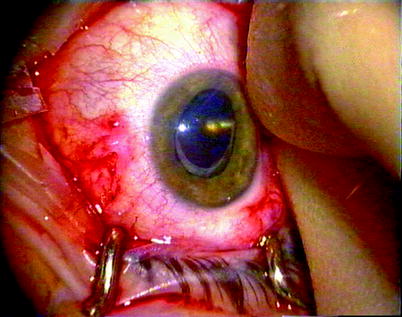
Fig. 2.6
Check that the infusion is inserted properly before turning on the fluid, a metallic glint must be seen
Now check that the cannula has penetrated the choroid and will infuse into the vitreous cavity. To do this, view the cannula tip in the eye from the side and with the naked eye (use the light pipe, positioned superonasally, to illuminate the tip). A glistening metallic tip should be seen. If so, switch on the infusion. If the tip has a dull brown appearance, the choroid may have been pushed inwards but not penetrated. Do not switch on the infusion. The end of the cannula must be cleared; otherwise, the infusion fluid will enter the suprachoroidal space causing a choroidal effusion. If an effusion is created, this will usually resolve quickly if the cannula penetration into the vitreous cavity is achieved and fluid allowed to perfuse the cavity.
Note small gauge trochars can be quite long; in time, the infusion cannula check can be dropped; however, be careful in eyes with total retinal detachment, anterior proliferative vitreoretinopathy or choroidal effusions where the inner structures can be lifted away from the sclera increasing the risk of nonpenetration.
2.3.5 How to Clear the End of Non-penetrating Infusion Cannula
In an aphake or pseudophake, make the superonasal sclerotomy with the micro vitreoretinal blade (MVR), or cutter tip with small gauge, and push the MVR tip against the end of the cannula to clear the choroid away. In a phakic patient, insert the vitreous cutter and remove some of the vitreous whilst pressing the infusion cannula into the eye to allow apposition of the cutter tip to the cannula without touching the lens. This allows clearance of the choroid by scraping the cannula tip onto the cutter. Turn the infusion on before releasing the indentation of the cannula:
1.
To allow the pressure to rise in a controlled fashion.
2.
To prevent movement of the infusion tip back under the choroid before the flow of fluid has commenced.
2.3.6 The Superior Sclerotomies
Where to Place
Incise the two superior sclerotomies, one in the superotemporal quadrant and one in the superonasal quadrant. Place these approximately 150° apart. If the sclerotomies are too close together, they will force the surgeon’s hands close together and reduce manoeuvrability. Too far apart and the movement of the eye becomes difficult. In particular, when one sclerotomy is being used during indentation, a sclerotomy on the horizontal will tend to cause circumferential rotation of the eye instead of a movement in the superior to inferior plane.
Surgical Tip
Subconsciously, the surgeon uses the force of the instruments on the sclerotomies to move the eye around to aid visualisation of the different parts of the retina when operating, for example, to move a slightly depressed eye superiorly to allow direct viewing of the macula or to move the eye superiorly to see the superior retina. Placing the sclerotomies too close to the horizontal creates difficulty with manipulation of the eye in this way.
Wash the eye with balanced salt solution to clear any blot clots and apply hydroxymethylcellulose (HPMC) to the cornea.
Note: During 20 G surgery, insert the light pipe first (usually, this is easy to insert) because the internal illumination shows up the second sclerotomy as an orange spot in the darkened room. In contrast, during 23 G surgery, insert the light pipe second using its illumination to find the exterior portion of the trochar for insertion of the instrument, for example, cutter.
2.3.7 Checking the View
Insert the light pipe into one sclerotomy, rotate in the indirect viewing system (IVS) and dim the room lights. With the BIOM system, set the focus wheel to ¼ from the top of its range of adjustment. Invert the image (a stereo image inverter is required), and use the XY control of the microscope to obtain a red reflex in the lens. Increase the magnification to higher than is anticipated during the surgery, and focus onto the optic disc by adjusting the IVS lens.
Note: Using high magnification at this stage ensures that the focus at lower magnifications is maintained for later in the operation. Time is not wasted later by refocusing during crucial manoeuvres in the operation.
Lower the IVS lens until it reaches the lowest point that the optic disc remains in focus. This results in a focal range which is anterior to the optic disc and will allow a focussed image from the disc to the ora serrata throughout surgery in all but highly myopic eyes. There is no point in the focal plane existing posterior to the disc, that is, into the invisible tissue in the orbit!
2.3.8 The Independent Viewing System
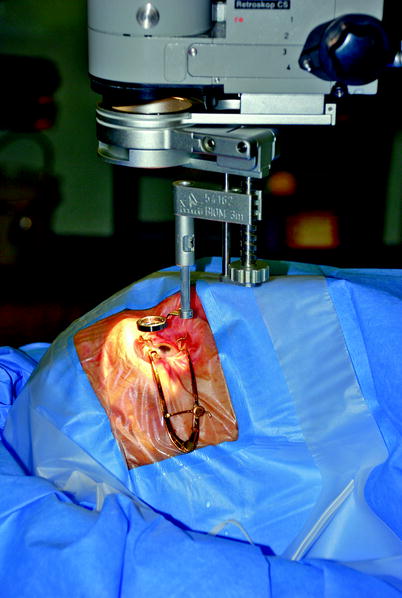
Fig. 2.7
The IVS (in this case, a BIOM system) is attached to the microscope allowing visualisation of the posterior segment without a contact lens
1.
To focus anteriorly, the IVS lens goes down, and to focus posteriorly, the lens goes up.
2.
The IVS is easier to use when it is further away from the cornea.
3.
The field of view is increased when the lens is closer to the cornea.
The assistant should use a straight bore cannula to irrigate the cornea to help avoid splashing the lens or preferably place HPMC onto the cornea which requires less frequent application and helps keep the corneal epithelium healthy.
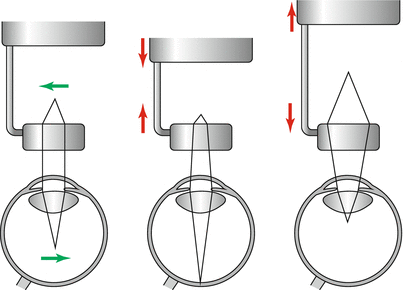
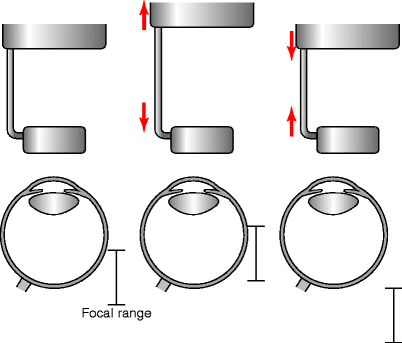
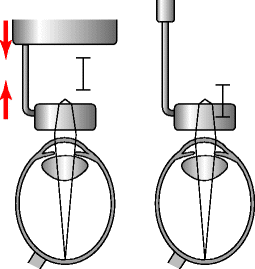
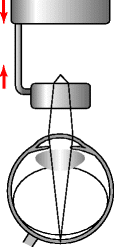
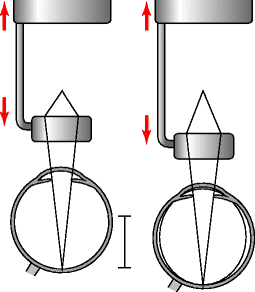
Fig. 2.8
When visualising an image in the centre of the vitreous cavity, a neutral distance of the IVS from the microscope is utilised. On a BIOM system, this is approximately one-quarter down from its highest point. To focus more posteriorly, move the objective lens closer to the microscope as the rays of light from a more posterior image become more convergent through the lens and are focussed closer to the objective lens. Conversely, to focus more anteriorly, for example, during the search for retinal tears at the end of a vitrectomy procedure, move the objective lens further away from the microscope, as the rays of a near object are more divergent and are focussed further away from the objective lens, horizontal green arrows = image inversion, vertical red arrows indicate direction of movement of the lenses
Fig. 2.9
When finding the optimal focal range for use at the beginning of the operation, increase the magnification of vision and focus on the disc. Increasing the magnification in this way ensures that there is a fine focus on the back of the eye. Because there is a focal range for the lens system (analogous to that used in photography), employ this focal range during the surgery. With the focal range in the midposition, it is possible to focus in the mid vitreous without the disadvantage of focal range going into the invisible tissues of the orbit behind the eye. By moving the objective lens further away from the microscope, until focus is just retained in the posterior pole or the optic disc, a focal range going from the optic disc, anteriorly to as far as the ora serrata, is possible in most eyes. This will allow visualisation of the whole retina throughout the surgery without having to refocus or readjust the lens. This manoeuvre at the beginning of the operation will save time later on avoiding readjusting focus throughout points of the surgery where delay is not advantageous. On the other hand, focusing onto the optic disc with the objective lens too close to the microscope will only allow focus on the optic disc and the rest of the focal range will be going into the orbit, forcing you to refocus during surgery, vertical red arrows indicate direction of movement of the lenses
Fig. 2.10
In a highly myopic eye, it may not be possible to bring the virtual image into focus when the +2 lens is inserted between the microscope and the objective lens. Only by removing this lens will the focal range for the system to allow visualisation of the image, vertical red arrows indicate direction of movement of the lenses
Fig. 2.11
The reduced refractive index of air causes a myopic shift on the back of an intraocular lens or phakic lens by producing convergence of the rays of light from an image, thereby, producing an image closer to the objective lens of the IVS. Therefore, the lens needs to be elevated relative to the microscope to overcome this and retain focus, vertical red arrows indicate direction of movement of the lenses
Fig. 2.12
The loss of the intraocular lens causes light to diverge from the eye. The virtual image then is further away from the objective lens, and the lens needs to be moved further away from the microscope to retain focus. When air is inserted, having contact either with the cornea or bulging through the pupil, the light diverges further and the vitreal image is then further away from the objective lens and there must be more distance produced between the objective lens and the microscope, vertical red arrows indicate direction of movement of the lenses
There are now a number of IVS systems. The Eibos is compact and easy to focus with a fingertip during surgery but provides a smaller field of view than the BIOM (Oculus). It is covered with a sterilised sleeve and so requires only one system per operating theatre. The BIOM is sterilised in total requiring at least two or three systems per theatre. It is more difficult to focus peroperatively unless a motorised unit is purchased. The view is however superior and is therefore the system favoured by this surgeon. The Zeiss system has an even wider field of view and a useful focussing system in the +2D objective lens. Most come with a wide angle lens for peripheral retina and a high magnification lens for the macula. The IVS provides reduced depth perception compared with contact lenses which can be helpful for macular membrane peels.
Surgical Pearl of Wisdom
Getting the BIOM Focussed
When operating, having a good view is essential. Start with the BIOM indirect viewing system well focussed.
When you start your surgery, make sure the microscope is centred on neutral and focussed on neutral. Take the BIOMR and use the turn screw to get the lower lens as high up as possible. Put the BIOMR in place. This usually gives a small blurry view of the retina. Try to find a blood vessel or the disc, and use the turn screw to lower the lens so the disc/vessel is in focus. At this point, use the ‘focus down’ pedal on the microscope to enlarge the field of view. Make sure you look past the microscope at the eye and not through the microscope as you enlarge the field of view, so as not to inadvertently hit the eye.
Sarit Lesnik Oberstein, Dept of Ophthalmology, University of Amsterdam, Amsterdam, The Netherlands
Surgical Pearl of Wisdom
Optimum use of noncontact wide angle viewing systems such as the Oculus BIOM, Topcon Resight or Volk Merlin can make a massive difference to the peripheral vitrectomy. I have no experience of using the Eibos system so I do not know if the same advice applies. There are three principals, but the process is iterative and involves all four limbs at once, a bit like flying a helicopter! I am assuming that the lens is correctly focussed.
First, the lens must be close enough to the eye. Ensure that the edge of the iris cannot be seen in the surgeons view; if anything other than an iris edge is visible, the lens is not close enough. For fine tuning then, move the suspended lens down further until a grey patch appears in your view; then, back off just enough to have a full field again. That gives maximum intraocular field. (Unfortunately, with some lenses and systems, there can be corneal lens contact before the grey patch can be seen.)
Second, it is important to roll the eye as far as you can using both the cutter and light pipe; this involves quite a push. One then ‘catches up’ with the wide angle viewing system using the XY shift on the microscope. I find most trainees roll the eye into a position that matches the wide angle viewing system, not the other way around. Third, rolling the eye results in it sinking in the orbit; to compensate, the microscope needs to be lowered further in order to recapture lost field. The reverse of this is that you have to retract the microscope when rolling the eye back to the primary position.
Practising these results in a better view and faster, better surgery.
D. Alistair H. Laidlaw, Dept of Ophthalmology, St Thomas Hospital, London, UK
2.3.9 Removing the Vitreous
Fig. 2.13
A typical vitreous detached from the back of the eye but still attached at the vitreous base
Keep the fingers light on the instruments to ease any tension and to improve manoeuvrability. Use the wrist rests. The surgeon can apply forces to the sclerotomies via the instrument shafts to rotate and manoeuvre the globe into position for maximal visualisation of the peripheral retina (a technique which is lost with the use of some flexible small gauge instruments). The light pipe shines onto the active instrument or behind it to retroilluminate.
Note: Be aware of where the light pipe is in the eye. Ignoring the position of the light pipe is a common reason for touching the lens. Also, any drift into the eye could result in a macular injury because the instruments are pointing at the macula.
As with any surgery, perform the easiest moves first so that if a complication arises from a difficult part of the operation, the effects on subsequent manoeuvres are minimised. Therefore, when removing the vitreous, excise centrally first to clear some space in the vitreous cavity. Keep the cutter orifice in view during the vitreous clearance but also angled towards the vitreous you are removing. Then take the ‘easy’ vitreous on the same side of the eye as the cutter and away from any hazards, for example, a bullous retinal detachment. Finally, remove vitreous from the hazardous areas.

Fig. 2.14
At the commencement of the PPV, remove the central vitreous to create space for the instruments
Fig. 2.15
Gradually work towards the peripheral gel, then remove this as close to the vitreous base as possible
The vitreous cutter should be moved only minimally in the eye. Try keeping it in one place letting the vitreous come to the tip, which the gel will do especially if it is detached. Remember the vitreous is anchored at the vitreous base so that just posteriorly to the base is a good place to have the cutter tip. Work around the periphery systematically so that the same areas are not gone over twice. In a phakic eye, you may proceed from 2 to 6 o’clock. Change the instruments over to the opposite hands (a good vitreoretinal surgeon is able to use both hands with ease), and do the other side from 10 to 6 o’clock. The 2 to 10 o’clock vitreous can be taken from either side.
Note: Think of the space around the periphery of the lens as a circular channel in which it is safe to pass instruments. The walls of the channel are the posterior bulge of the lens and the pars plana.
This avoids the risk of a ‘lens touch’ which is an indentation on the posterior capsule and cortex of the lens from contact with the shaft of an instrument (in pseudophakic and aphakic eyes you do not need to change hands). Keep away from the back of the lens by passing the cutter around the periphery and letting the vitreous come anteriorly towards the tip. Be aware of the position of the light pipe; it is too easy only to concentrate on the cutter and forget about the light pipe.
Note: Avoid a ‘lazy’ right foot, that is, make sure you actively use the XY control of the microscope to maximise your view during the surgery.
You should become good enough that the maximum vacuum and cut rates are used throughout (‘left foot flat to the floor’); slower vacuum is only required when close to mobile and detached retina.
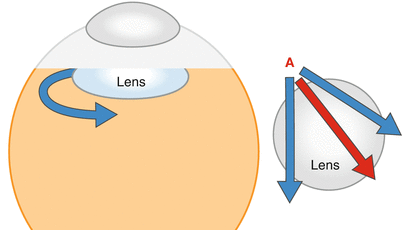
Fig. 2.16
The surgeon can go more anteriorly in the circular ‘channel’ around the periphery of the lens than is possible across the posterior of the lens. Therefore, from sclerotomy (A), instruments can be safely passed across the periphery of the lens (blue arrows) but not across the middle (red arrow)
Remember, in eyes with attached gel (e.g. macular holes, see Chap. 8), you will need to induce a vitreous detachment, and often these eyes have more vitreous volume to remove (therefore, more time is required for vitreous removal) than an eye with a shrunken detached gel (e.g. rhegmatogenous retinal detachment). Take as much vitreous as possible especially at the sclerotomies and the infusion site to minimise the chance of problems such as:
1.
Vitreous incarceration into sclerotomies or the infusion cannula which precedes retinal incarceration. Too much vitreous left around the sclerotomies allows the vitreous to be drawn into the sclerotomy by the flow of infusion fluid. This causes traction on the retina and can pull retina into the sclerotomy especially if the retina is detached near the sclerotomy.
2.
Non-penetration of instruments through the vitreous base during insertion running a risk of giant retinal tear. By pushing the vitreous base into the centre of the eye, the traction on the retina can tear the retina causing a giant retinal tear.
3.
Clogging of flute needles during aspiration procedures, for example, when draining subretinal fluid from a retinal break. If too much vitreous is left near a retinal break, it enters the flute needle preventing SRF drainage. Excise the vitreous with the cutter and continue the drainage with the cutter or the flute.
4.
Minimising the risk of postoperative entry site breaks. Incarcerated vitreous in the sclerotomies may gradually contract causing retinal traction and retinal break formation postoperatively.
The next stage is to perform the vitreoretinal procedures explained elsewhere in the appropriate chapters.
2.4 Vitrectomy Cutters
Most cutters work by guillotine action either driven by electric motor or by pneumatic action with a spring return. An electric motor in the hand-piece tends to be bulky; a pneumatic spring return system produces small hand-pieces, but surgery is reliant on a compressed gas cylinder which may run out of pressure in the middle of surgery.
Conventionally, to increase the flow rate of the vitreous (the volume of vitreous extracted per unit of time) through the cutter, slower cut rates (more time for the vitreous to enter the cutter tip), higher vacuums and larger ports (the orifice on the cutter) are required. This will produce large bites of vitreous at each cut. Large bites however allow a larger transfer of forces to the gel and may secondarily cause forces on the retina. Therefore, equipment has been designed to allow smaller bites at higher speed to maintain flow rates of vitreous and to overcome the reduction in gauge of many new instruments. With high-speed cutting, there is not enough time to engage the vitreous. Therefore, higher vacuums are required, but multiple small bites = less action on retina. This in turn may lead to less tractional retinal tears. The movement of the vitreous becomes smoother and more predictable allowing cutting closer to the retina. One paper has described less GFAP upregulation, a sign of Muller cell ‘stress’, with high-speed cutters in an animal model (Wallenten et al. 2008).
Gauge (Sato et al. 2008) | Diameter (mm) | Inner tube areas (mm2) | Port areas (mm2) |
|---|---|---|---|
20 | 0.9 | 0.350–0.352 | 0.254–0.306 |
23 | 0.6 | 0.169–0.196 | 0.122–0.173 |
25 | 0.5 | 0.128–0.129 | 0.066–0.125 |
The position of the port has been moved nearer to the end of the shaft with modern cutters allowing alterations in surgical technique. The efficiency of the cutter depends on the duty cycle D = τ/T where τ is the duration that the function is active and T is the period of the function. Modern cutters maintain their duty cycles even at high cut rates, thereby maintaining vitreous flow rates (Magalhaes et al. 2008; Fang et al. 2008; DeBoer et al. 2008). Different settings can be used, but I find proportional vacuum satisfactory although I will reduce the cut rate of some high-speed cutters because their duty cycles are not efficient at the higher settings, for example, reduce from manufacturer’s claimed cut rate of 2,500 to 1,800 rpm.
Common vitrectomy cutter settings with increased pedal pressure | Cut rate | Vacuum |
|---|---|---|
Proportional vacuum | Constant | Increased |
Dual linear | Increased | Increased |
3D vitrectomy | Reduced | Increased |
Fig. 2.17
The white line shows an elevated ridge of retina. This indicates traction on the retina from the vitreous during cutting with the vitrector
2.5 Handling the Light Pipe
The natural tendency is for the surgeon to let the instruments drift into the eye during periods of loss of concentration. Remember the maxim ‘if in doubt pull out’. Damage is unlikely from inadvertently removing an instrument from the eye but possible if it goes too far in and contacts the retina. This is especially important when waiting for a change of instrument to be handed by the assistant when the light pipe is still in the eye; therefore, developing the habit of always pulling back on the instrument during any delays in the procedure is recommended.
The light pipe does not need to be pointed at the active instrument; in fact, illumination is often more satisfactory if the light is shone onto the posterior pole of the eye. A beginner’s tendency to want to shine straight onto the instrument tip rotates the light pipe anteriorly bringing the shaft dangerously close to the lens.
Insert the light pipe only far enough to provide illumination, minimising the presentation of the bare fibre optic into the view. This avoids glare especially with tapered fibre-optic tips.
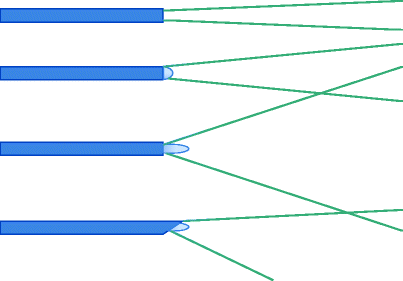
Fig. 2.18
Different configurations of light pipe provide different widths and direction of illumination. A non-protruding fibre optic provides a narrow beam; the width of illumination is increased as the fibre optic protrudes from the sleeve. The bottom example has the sleeve extended at one meridian to prevent glare from the light pipe towards the surgeon whilst illuminating the retina
Note: Avoid light toxicity by removing the light pipe periodically or at least by pointing the illumination away from the macula. Experimentally, the likelihood of toxicity increases severely after 13 min. Ten minutes is a rough amount of maximal exposure of the retina during surgery after which illumination of the retina should cease for a period of 30 s.
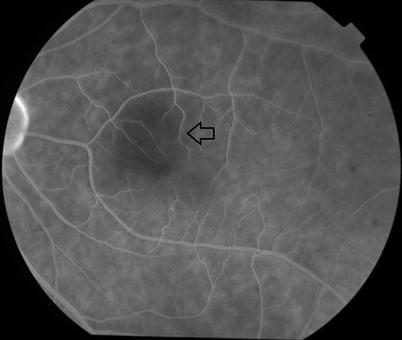
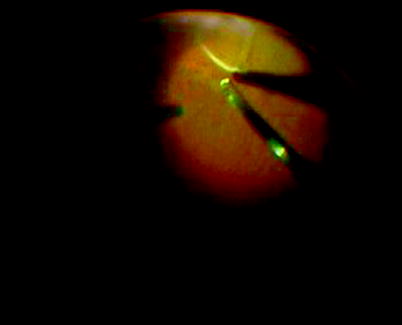
Fig. 2.19
A suspected area of light toxicity (arrow) from endo-illumination. Be particularly wary of xenon light sources which decay as the bulb ages. The surgeon therefore needs to increase the power of the illumination with time. If the bulb is changed, the light settings must be reduced or the illumination can reach excessive levels
Note: Occasionally, the tapered light tip (fibre optic protruding from end of sheath) will cause glare, for example, when the eye is air filled. In this case, cut the protruding end of the fibre optic off with scissors to minimise the exposed fibre optic.
2.6 Use of Sclerotomy Plugs
These are used with the intention of preventing peroperative hypotony. They are unreliable devices which often disinsert (if you lose one, first check in the superior conjunctival fornix), and it is better to use self-sealing sclerotomies for fluid control or self-sealing trochars as in 23 and 25 G. There are some bullous superior retinal detachments in which the retina could easily incarcerate where plugs must be used. In these cases, it is useful to insert a small quantity of heavy liquid into the vitreous cavity to stabilise the retina and keep it away from the sclerotomies. If peroperative hypotony occurs, use plugs. Otherwise, rely on small tight sclerotomies or well-designed trochars. It is important that the vitreous has been removed around the incision to avoid vitreous incarceration which in RRD patients can encourage retinal incarceration. In patients with flat retinae and those with RRD away from the sclerotomies or shallow RRD, plugs are not always necessary. As long as the infusion fluid pressure (as controlled usually by the infusion bottle height) is high enough, the potential for fluid entry into the eye is greater than its egress and the IOP will be maintained. In practice with trochars without valves, you can leave one trochar free flowing but will need to block the other one with an instrument or a plug.
2.7 The Internal Search

Fig. 2.20
Searching the retina by indentation should be routinely performed in all PPVs
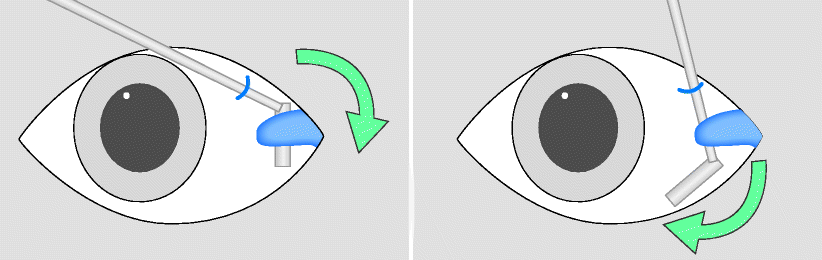
Fig. 2.21
If the conjunctiva has been opened over the sclerotomy superiorly, allowing access to the subconjunctival space, a squint hook can be passed into the sub-Tenon’s space behind the insertion of the rectus muscle and down towards the 6 o’clock position (arrow). This is very useful on the nasal side where the shortened conjunctival fornix may make transconjunctival indentation less adequate
This is one of the most crucial parts of the vitrectomy and will be required in almost all patients. The IVS makes this part much more attainable but still requires some development of technique. The aim is to see the entire retina not directly visible, that is, up to the ora serrata. In rhegmatogenous retinal detachment, the search is for the detection of pre-existing breaks, and so the procedure is performed early in the operation. In all other conditions, the search is performed at the end of the operation to check if a retinal break has been created during a manoeuvre, for example, tearing the retina during surgical peeling of the posterior hyaloid membrane. The search gives the opportunity to fix the mistake whilst still in the eye. Never ignore a problem. In vitreous surgery, the surgeon will not get away with it. Always ‘check and treat’ if a problem has been created. It does not feel good to have a straightforward macular procedure return with a detached retina 2 weeks later.
Again a systematic approach should be followed. For the nasal side, insert a squint hook under the conjunctiva and Tenon’s layer through the superonasal incision (if the conjunctiva has not been opened, see the technique described later in the chapter for small gauge surgery). Pass the hook around the eye up under the inferior rectus and pull anteriorly to commence indentation at 6 o’clock and at the ora serrata. For the temporal side in most patients, you can indent on the surface of the conjunctiva. Apply gentle pressure in towards the centre of the eye to produce a ridge that can be seen internally with the IVS. This brings the peripheral retina into view. Observe the retina on the ridge whilst moving the hook posteriorly and watch for any abnormalities whilst moving around the clock hours of the eye. Movements should be gentle and smooth. Inspect the retina during the movement of the ridge from the ora serrata to just posterior to the equator. Most breaks appear at the posterior border of the vitreous base, but some may be more posterior, for example, retinal scrapes from instruments or operculated holes. Be wary of anatomical variations; in some patients, the posterior attachment of the vitreous is abnormally far back, for example, some myopes. As the retina moves dynamically, there is a good chance to spot a problem. Work up to 12 o’clock and then examine the other side of the eye. Overlap at 12 and 6 o’clock to make sure the entire retina has been seen.
2.8 Endolaser
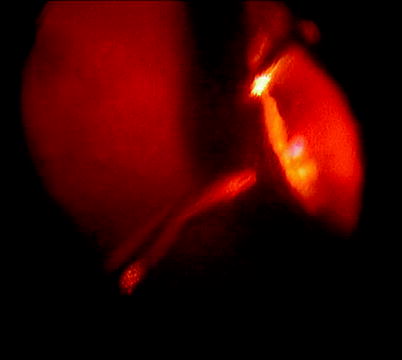
Fig. 2.22
Laser can be applied peripherally by asking the assistant to indent the eye
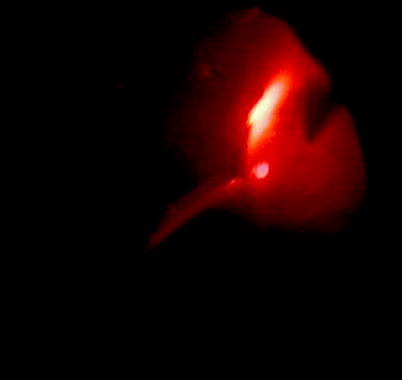
Fig. 2.23
Alternatively, the fibre optic can be placed externally to the eye and used to indent and transilluminate the retina for peripheral laser application
This is applied via a fibre optic internally during the PPV for retinopexy or for retinal ablation in diabetes (Peyman et al. 1981). Argon lasers (514-nm wavelength), double frequency YAG lasers (532 nm), dye lasers (577–630 nm), diode-pumped solid state lasers (532 nm) and diode lasers are available. Argon provides wavelengths in the blue and green spectra but has been recently superseded by others such as double frequency YAG laser (producing a 532-nm wavelength from a YAG tube, normally 1,064 nm), partly because manufacturers can produce smaller more portable equipment of higher reliability. In the green spectrum, a thermal burn is produced in the retina, easily identified by a whitening of the retina. It is therefore easy to adjust the dosage to produce the minimum burn necessary for adhesion of the retina without damaging superficial retinal nerve fibres causing further visual loss. Yellow lasers (561 nm) are available which may have advantages around the macula because of reduced absorption by Xanthophyll. Diode lasers are available which produce a wavelength of 810 nm (infrared); these burn deep into the retina and choroid without a visible burn on the retina until a large burn has occurred in the choroid. Care must be taken when using diode lasers that choroidal ischaemia is not created.
The adhesion of the retina from laser has been described as early as 24 h after application (Folk et al. 1989). Use a curved endolaser probe in phakic eyes to avoid the shaft of the laser contacting the lens. The curve can also be used to aid application of laser to the pre-equatorial retina as the tip can be kept more perpendicular to the retinal surface. Straight probes must approach some peripheral retina at an oblique angle risking a scrape of the retina. Standard settings are 200 mW, 0.1 s burn duration and 0.1 s interval between burns on repeat. Continuous burns are used by some surgeons, but this runs the risk of an excessive burn during delays in change of direction of the laser probe. It is hard to keep the rate of movement of your instrument constant over the retina. If the instrument is slowed down, for example, during a change of direction, you will increase the burn in that area. Short, rapid repeated burns avoid this problem (Fig. 2.24).
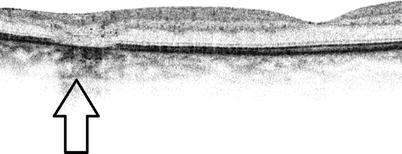
Fig. 2.24
A laser burn (arrow) showing fusion of the layers of the retina
Table 2.2
Absorption of laser wavelengths
Chromophore | Laser wavelength | ||
|---|---|---|---|
Green (514–532 nm) | Yellow (560–580 nm) | Red (620–676) | |
Melanin | High | High | Moderate |
Oxygenated haemoglobin | High | High | Low |
Reduced haemoglobin | High | High | Moderate |
Xanthophyll | Minimal | Negligible | Negligible |
Increase the intensity of the burns by:
1.
Increasing the power.
2.
Increasing the duration.
3.
Going closer to the retina.
Avoid lasering onto preretinal, retinal or subretinal haemorrhage if possible. Lasering haemorrhage causes a burn in a layer of the retina that is undesirable and may not produce the adhesion between retinal and RPE and choroid that is necessary or the destruction of ischaemic outer retina that is desired.
Always check and recheck the position of the macula if you are applying panretinal photocoagulation (PRP) so that you do not drift into that area. Put a line of laser on the temporal edge of the macula to indicate the posterior extent of PRP in that meridian.
2.9 Using a Contact Lens
For certain moves which require good depth perception, high magnification, and are not restricted by a reduced visual field of view, a contact lens (e.g. Machemer lens) to negate the refraction to the cornea can be used (Machemer et al. 1972). Disposable lenses are available which can be placed on the cornea with some methyl cellulose to provide adherence. For certain difficult macular procedures such as the commencement of internal limiting membrane peel, these can be useful as the membrane can be discriminated from the nerve fibre layer more easily. The field of view is much reduced and the view no longer inverted. Be careful when inserting the instruments; it is a long time before they come into view compared with the IVS. If you are using angled instruments, take care that you know where the heel of the instrument is in the eye. It is possible to touch the retina with it whilst watching the tips of the forceps. In addition, there is a tendency to have the light pipe closer to the retina risking light toxicity.
2.10 Maintaining a View
Stop and examine all elements in the system.
2.10.1 Microscope
Make sure each portion of the microscope is correctly attached and orientated, for example, laser filter, stereo inverter, illumination.
2.10.2 IVS
Inspect the alignment of the IVS and that it is securely attached. Check all the lenses are clean. Condensation can develop on the IVS lens especially if the drape does not adhere to the skin around the nose. This allows exhaled air to escape and contact the lens. Replace the drapes if necessary. Cold lenses are more prone to condensation which is more likely to happen when close to the cornea. Move the lens further from the eye until it gradually warms to room temperature. Wiping the lens clears the condensation temporarily.
2.10.3 Cornea
Fig. 2.25
To clear a view from corneal oedema, debride the epithelium with a blunt knife
In some patients, the corneal epithelium will become oedematous, especially if the surgery is prolonged and also in diabetic patients who have poor epithelial function. Debriding the epithelium with a broad blade restores clarity. Thereafter, corneal drying during the surgery will be more rapid. Hydroxymethylcellulose (HPMC) can be used to moisturise the cornea preventing drying. Rarely, the corneal stroma will develop a feathery opacity at the commencement of intraocular infusion. This will clear after a few minutes and does not require intervention.
2.10.4 Blood in the Anterior Chamber
If the IOP has dropped during surgery, blood can enter the anterior chamber from the trabecular meshwork. Alternatively, patients with severe vitreous haemorrhage may have a trickle of haemorrhage into the anterior chamber from the vitreous cavity. Perform a paracentesis and wash out the blood with balanced salt solution. If the haemorrhage is recurrent, viscoelastic can be inserted to displace the blood from the pupillary aperture. Remember to remove the viscoelastic later on.
2.10.5 Condensation on an Intraocular Lens Implant
Fig. 2.26
Condensation occurs on lens implants when a posterior capsulotomy has been performed. This can compromise the view during surgery when air is inserted
Fig. 2.27
By gently wiping the posterior surface of the lens with the blunt instrument, fluid can be passed over the lens and the view restored. Should the condensation return, some viscoelastic can be placed on the back of the lens and wiped which will retain the view
If the posterior capsule has been removed and gas is in contact with the IOL, condensation may occur on the back of the IOL. First, wipe the back of the lens with a flute needle to add a layer of fluid onto the lens. This is usually enough. If recurrent condensation occurs, add a small droplet of viscous fluid HPMC or viscoelastic onto the posterior surface of the IOL and wipe again.
2.10.6 Cataract Formation
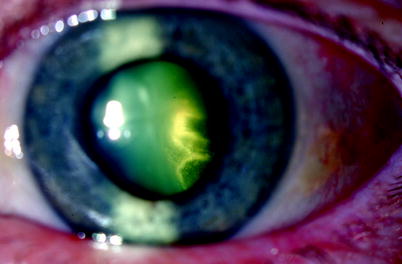
Fig. 2.28
Flow of fluid close to the lens has caused localised lens opacity
This will only occur peroperatively if the surgery is very prolonged so that the first rule is safe but quick surgery. Preoperatively judge the lens clarity; if there is pre-existing cataract, this should be removed by phacoemulsification and lens implantation at the commencement of the surgery. An already cataractous lens is much more at risk of worsening during surgery than a clear lens. In the rare event of a lens clouding, such that the posterior segment is compromised, stabilise the posterior segment (fluid filled) and perform a phacoemulsification cataract extraction and PCIOL insertion and then continue the posterior segment surgery.
2.10.7 Pupillary Dilation
The modern IVS allows visualisation through surprisingly small apertures, but if a larger pupil is desired, here are some methods:
1.
Using a sub-Tenon’s LA injection will produce pupillary dilation.
2.
An irrigation into the anterior chamber of 0.1 ml of 1 % Phenylephrine (one part of Phenylephrine 10 % with nine parts of balance salt solution) or 0.1 ml of 2.5 % Phenylephrine can be used.
3.
Make sure posterior synaechiae have been divided by viscoelastic.
4.
If the pupil remains constricted, use iris hooks to expand, but watch out for a postoperative fibrinous reaction.
2.11 Closing
Always close the superior sclerotomies first and the inferior infusion sclerotomy last as this controls the IOP. When utilising gas tamponade, close one sclerotomy, keep the air pump on and attach the syringe with the gas to the three-way cannula, close off the air pump and then exchange the long-acting gas by injecting through the infusion cannula. Inject at least 35 ml of the gas to flush out the air in eyes with 25 mm or less axial length. In eyes bigger than this, the theoretical volume to achieve 97 % saturation of the gas mix in the syringe in the eye is more than 35 ml; therefore, two syringes should be used or use a 100ml syringe.
Axial length (mm) | 21.5 | 23.5 | 25 | 26.5 | 28.5 | 30 | 31.5 |
|---|---|---|---|---|---|---|---|
Pseudophakic vitreous cavity volume (ml) | 4.06 | 5.44 | 6.64 | 8.02 | 10.13 | 11.93 | 13.94 |
Flush to 97 % saturation (ml) | 25 | 31 | 36 | 44 | 64 | 68 | 77 |
The volume of gas required to flush the vitreous cavity to achieve 97 % according to the axial length of the eye (Shunmugam et al. 2011).
Close the second sclerotomy. Keep some gas in a syringe (15 ml) to allow a top up of gas if some gas leaks during the disconnection of the infusion at the end of the operation.
Note: With small gauge surgery, remove both the superior trochars and check if they are sealed, then use a 28-gauge needle inserted into the pars plana to vent. This has the advantage that the superior sclerotomies can be checked for leaks whilst the air pump is still available before the exchange of gas. If you wait until after the exchange, there is only 15 ml of gas left in the syringe to sort out a leaking sclerotomy.
Note: Take care with the use of the three-way tap. Do not turn the tap so that the air and the gas syringe are in connection because air will enter the syringe and dilute your injection of gas.
Check the intraocular pressure with your finger tip (using the finger’s Pacinian corpuscles to assess the pressure!) aiming for 10 mmHg (your finger tip is a better pressure sensor in my view than pressing the eye with an instrument).
Always remove the infusion last. If the globe is soft, check for leaks from the sclerotomies, resuture if necessary. To elevate the IOP, add BSS to the anterior chamber via a paracentesis, or, if gas-filled, inject gas through the pars plana using a 30-gauge needle. Check the pressure again.
Full concentration fluorescein dropped onto the conjunctiva will indicate a fluid leak (the leaking fluid dilutes the fluorescein changing its colour from orange to green) and is especially useful when checking small gauge surgery wounds.
2.12 Peroperative Complications
2.12.1 Iatrogenic Breaks
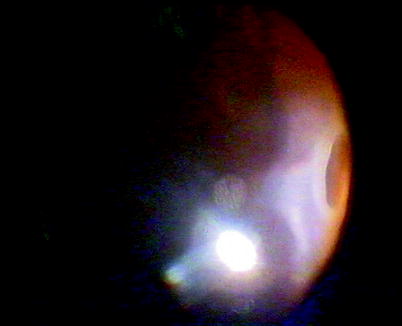
Fig. 2.29
A postoperative detachment has been caused by an entry site break
These must be identified and treated to avoid postoperative retinal detachment. Apply retinopexy and gas tamponade. Overall, peroperative iatrogenic retinal breaks have been described in 10 % of vitrectomy patients (Carter et al. 1990), 5.5 % of patients operated upon for macular hole (Sjaarda et al. 1995), 20–33 % of those with diabetic tractional retinal detachment (Han et al. 1994) and 7.3 % of those with complex retinal detachment surgery (Afrashi et al. 2004). The complication is commoner in phakic patients and those without posterior vitreous detachment preoperatively (Dogramaci et al. 2012) and is a risk factor for postoperative retinal detachment in diabetic surgery (Gupta et al. 2012).
Stay updated, free articles. Join our Telegram channel

Full access? Get Clinical Tree


