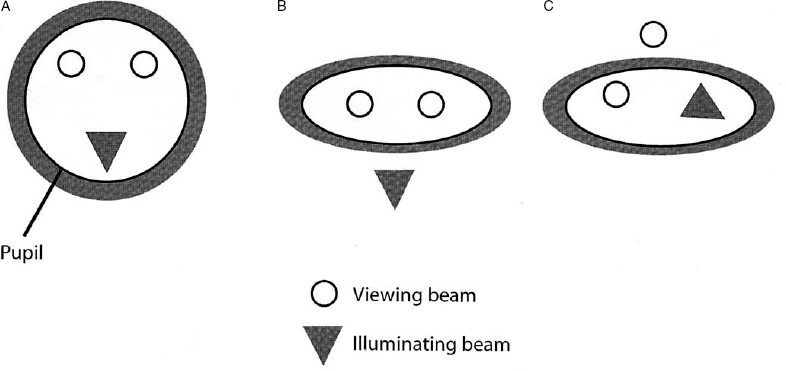
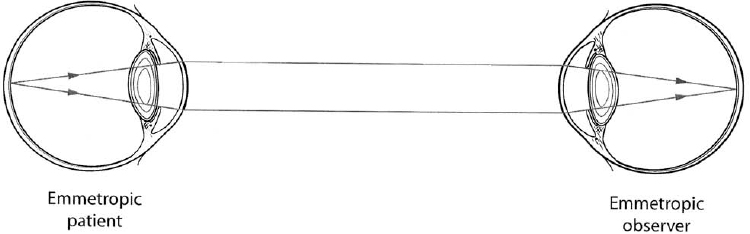
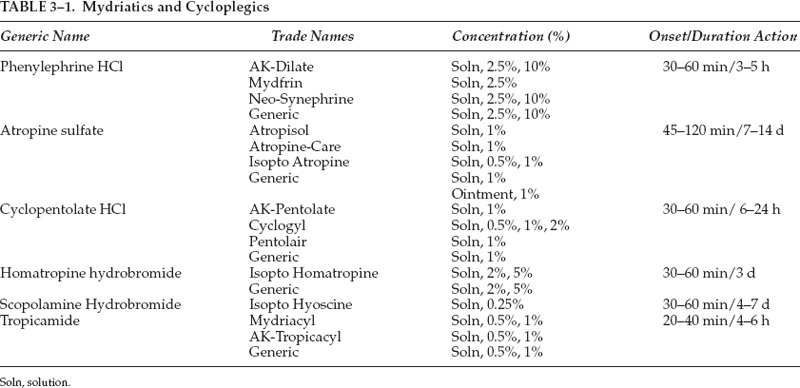
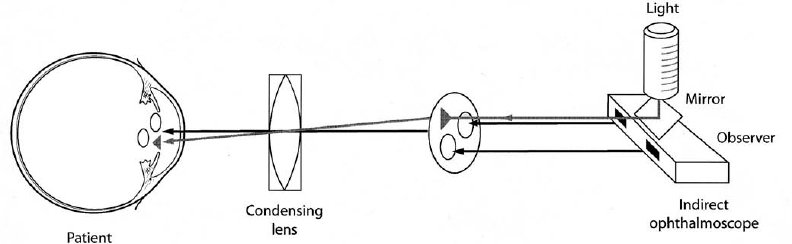
3 Examination of the posterior segment of the eye is a technically demanding and challenging task. To examine these structures—the vitreous, retina, subretinal layers, pars plana, and optic nerve—one must combine excellent observational skills, clinical experience, and a facility with the instruments and lenses used to illuminate and magnify the posterior structures of the eye. The basic principle of ophthalmoscopy is focusing light rays from the patient’s fundus onto the examiner’s fundus (Fig. 3–1). This chapter reviews the various methods of ophthalmoscopy as well as the many types of tools used to examine the posterior ocular structures. Diagnostic imaging techniques of the posterior segment of the eye, such as ultrasonography, optical coherence tomography, and angiography, are discussed in Chapter 4. Examination of the entire posterior segment requires pupillary dilation. Dilation of the pupil permits adequate illumination of the vitreous and retina and allows one to examine the peripheral retina. Standard pupillary dilating drops are 1% tropicamide (Mydriacyl) and 2.5% Neo-Synephrine (or Mydfrin) drops, which are instilled into an eye anesthetized with topical proparacaine hydrochloride 0.5% (Ophthetic) (Table 3–1). Dilation is generally achieved within 15 or 20 minutes and is often more rapid in eyes with light-colored irides. Darker irides may require a second set of dilating drops. There are three main methods of ophthalmoscopy: direct ophthalmoscopy, indirect ophthalmoscopy, and slit-lamp contact or noncontact lens biomicroscopic ophthalmoscopy. Historically, direct ophthalmoscopy was performed using candlelight. The examiner viewed the fundus monocularly through a small peephole. Purkinje first described the technique of ophthalmoscopy in 1823. Subsequently, in 1850, Von Helmholtz first introduced the direct ophthalmoscope. Since that time, illuminating sources for direct ophthalmoscopy have evolved from candlelight to gaslight to external and finally built-in electric light. Direct ophthalmoscopy is the simplest way to examine the fundus and is the method most commonly used by nonophthalmologists. It is the least technically demanding form of ophthalmoscopy, although it does require practice. Modern direct ophthalmoscopes are often portable and afford various levels of illumination along with green, red, blue, or other filters. The light source illuminates the patient’s fundus through the pupillary axis, and an upright and virtual image of the retina is produced with approximately 15 times magnification for the emmetropic eye. If a patient is myopic, the eye has effective plus power and the ophthalmoscope requires a minus neutralizing lens. This resultant lens system is a Galilean telescope that thus increases the magnification of fundus details. The opposite is true for hyperopic eyes whereby the size of the image of the fundus structures may be reduced. The observer creates a crisp image by using neutralizing lenses that are present on the headpiece of the instrument. Although the direct ophthalmoscope is relatively inexpensive and portable and can be used without pupillary dilation, indirect and slit-lamp biomicroscopic ophthalmoscopy are generally favored by ophthalmologists because they offer a wider field of view and superior resolution of posterior segment details. FIGURE 3–1. Conjugate retinal points are shown with an emmetropic observer and emmetropic patient, but inadequate illumination precludes visualization of posterior segment detail. One major limitation of direct ophthalmoscopy is that only a small field of view is produced. It is important to position the direct ophthalmoscope very close to the patient’s eye to maximize the limited field of view. It is analogous to peering into a room through a key-hole: The closer one gets to the aperture or keyhole, the wider the field of view. As in most forms of ophthalmoscopy, it is helpful to have the patient use the opposite eye to fixate on an object to reduce wandering-eye motion. The peripheral retina is not well visualized because of the restricted field of view. Another limitation of direct ophthalmoscopy is that only a monocular image is produced. In contrast, indirect ophthalmoscopy and slit-lamp biomicroscopic ophthalmoscopy permit stereoscopic viewing of the retina, which is very important in the examination of the retina and subretinal layers. Finally, significant media opacities, such as cataract, will limit resolution of the image with this instrument. FIGURE 3–2. Indirect ophthalmoscopy is performed with a handheld condensing lens, which produces a real and inverted 30-degree image on the observer’s side of the condensing lens. Schepens first introduced his binocular indirect ophthalmoscope in 1947, and since then the binocular indirect ophthalmoscope has become a standard ophthalmic instrument for examining the posterior structures of the eye. The binocular indirect ophthalmoscope is portable, particularly with a mobile energy source, although it is not as small as the direct ophthalmoscope. Traditionally, it has comprised an illuminating headpiece and modified oculars, although recently more portable eyeglass-style indirect ophthalmoscopes have become available. Examination of posterior segment structures requires a handheld condensing lens, most commonly 20 diopters in power, placed in front of the dilated eye (Fig. 3–2). The traditional headpiece incorporates an illuminating light source as well as condensing optics, which effectively narrow the inter-pupillary distance, thereby affording binocular images of the posterior segment (Fig. 3–3). This also permits stereoscopic viewing of the fundus through a dilated pupil with a typical field of view of 30 degrees or more, depending on the type of condensing lens placed in front of the eye. Indirect ophthalmoscopy adheres to Gullstrand’s principle, whereby illuminating and viewing beams must be totally separated through the cornea, pupillary aperture, and lens (to avoid reflections) but must coincide on the retina to permit viewing. The viewing oculars of an indirect ophthalmoscope reduce the effective interpupillary distance, thereby permitting illuminating light and binocular stereoscopic views through a dilated pupil. An indirect ophthalmoscope permits adjustments in the position of the illuminating light beam as well as the effective interpupillary distance. FIGURE 3–3. A binocular indirect ophthalmoscope effectively narrows the observer’s interpupillary distance, thus permitting placement of the illuminating and viewing beams within the patient’s pupillary aperture. Further narrowing of the effective interpupillary distance on the headpiece of an indirect ophthalmoscope allows the examiner to perform funduscopy through a smaller pupil; however, the proximity of the illuminating and viewing beams increases distracting reflections. Increasing the effective inter-pupillary distance improves stereopsis, whereas decreasing this distance has the opposite effect. A pinhole light diaphragm can produce a narrower beam of light, which can reduce reflections. Neutralization of a patient’s refractive error is achieved by moving the condensing lens toward or away from the examined eye or accommodation by the examiner’s eyes. The indirect ophthalmoscope produces a real inverted image for the observer, which can be disorienting for the novice because the field of view is upside down and backward. To use this instrument properly requires considerable practice and experience. Simulating model eyes are available to practice the examining adjustments required to use the indirect ophthalmoscope properly. To use the indirect ophthalmoscope properly, the headpiece and the eyepieces first must be adjusted. The knob that adjusts the location of the illumination should be set such that the light fills the superior part of the field of view. The examiner checks the alignment of each ocular by closing one eye at a time. The condensing lens should be held 2 to 3 inches from the patient’s eye, with its most convex side facing the examiner (white line on the lens toward the patient) between the thumb and the first finger. The examiner’s other hand may be used to hold open the patient’s eyelids because the intense illuminating light elicits a natural response to close the eyelids. The observer then systematically examines the retinal periphery and finally the posterior pole. The examiner orients his or her eyes with the condensing lens and the patient’s retina in each field of gaze such that an imaginary straight line could be placed between the point midway between the eyepieces, center of the condensing lens, center of the pupil, and area of the retina to be examined. This alignment then allows one to view the retinal area of interest. For example, to examine the superior nasal quadrant of the right eye, the physician first should tell the patient to look up and to the left. The observer then should orient his or her eyes with the lens and the patient’s retina to obtain a clear image of this region by moving the condensing lens slowly toward or away from the patient’s eye to allow the entire retinal image to fill the lens. The examiner also may change the distance between the headpiece and the condensing lens to achieve the same effect. Because the bright illuminating light is disorienting, it may be helpful to give the patient an object of regard to look at with the eye not being examined, even the patient’s own outstretched hand, to help the patient maintain the direction of gaze. A major advantage of the binocular indirect ophthalmoscope is that it allows one to view the peripheral retina. To increase the field of view of the peripheral retina, it is often helpful to pivot the base of the condensing lens slightly in the direction of the patient’s gaze as well as to turn one’s head so that the axis between the examiner’s eyes is aligned with the patient’s direction of gaze. Turning the head results in the image being monocular and not stereoscopic, but it permits illumination and viewing of peripheral structures (Fig. 3–4). In this way, one can often observe the ora serrata without further manipulation of the well-dilated eye. If the peripheral retina is not visualized using this lens and head-tilt technique, one can perform scleral depression to evaluate completely the peripheral retina. Traditionally, scleral depression is performed using a handheld metal instrument with a dilated end. The scleral depressor indents the eye to bring the peripheral retina into view while performing indirect ophthalmoscopy. Other objects, such as cotton-tipped applicators or wire paper clips, are also often used as scleral depressors. It is helpful to apply topical anesthesia, although this is not essential. A depressor may be placed on the eyelid to indent the globe or may be used directly on the surface of the globe when topical anesthesia is administered. The external aspect of the globe corresponding to the peripheral retinal area of interest is gently depressed inward by using the scleral depressor. Excessive pressure is not necessary and should be avoided to avoid patient discomfort. The examiner should move the depressor around the eye for 360 degrees and observe each area using indirect ophthalmoscopy. This is done with the patient in the supine position, and the examiner often moves around the patient to perform ophthalmoscopy with scleral depression. Scleral depression requires considerable skill and practice.
How to Use the Instruments for Examination of the Posterior Segment
Methods of Ophthalmoscopy
What Are the Advantages of Direct Ophthalmoscopy?
What Are the Limitations of Direct Ophthalmoscopy?

What Are the Unique Aspects of Indirect Ophthalmoscopy?
What Is the Most Effective Way to Use the Indirect Ophthalmoscope?
What Are the Key Points to Know for Scleral Depression?
Ento Key
Fastest Otolaryngology & Ophthalmology Insight Engine