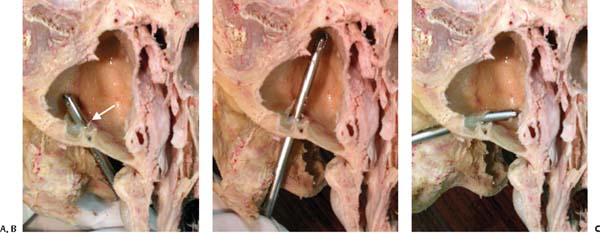
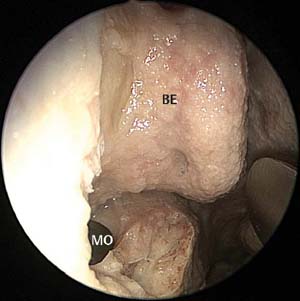
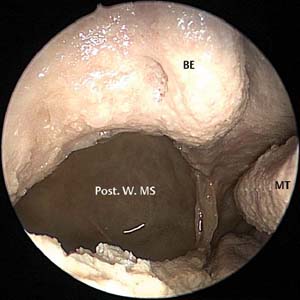
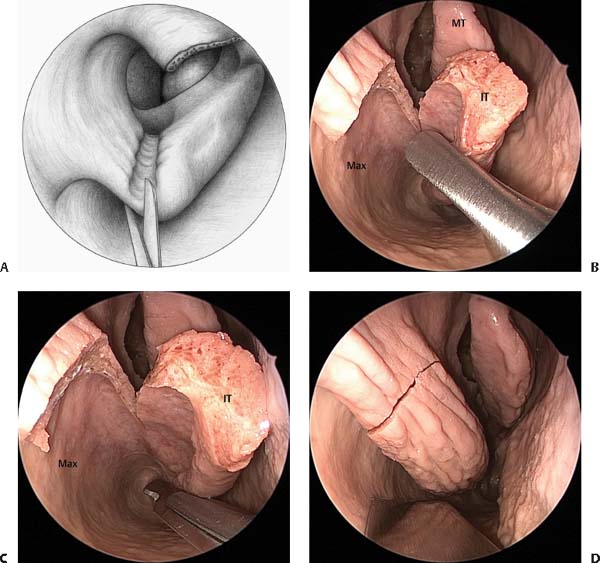
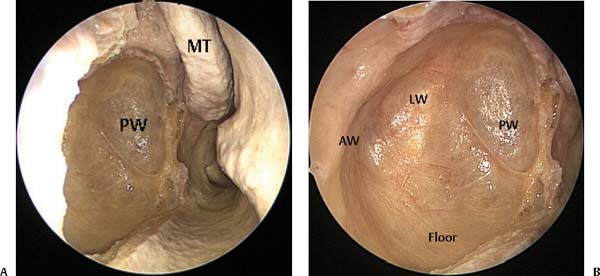
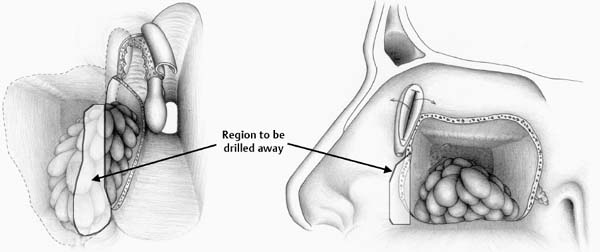
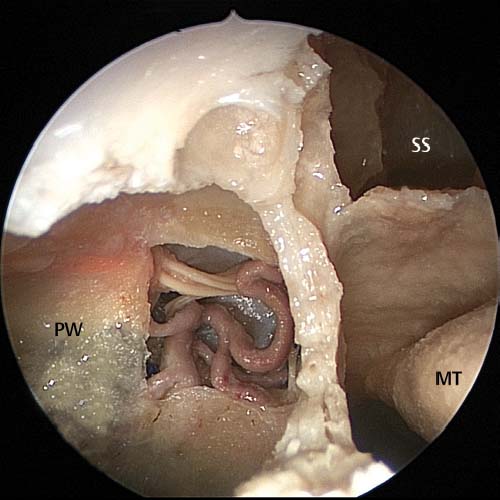
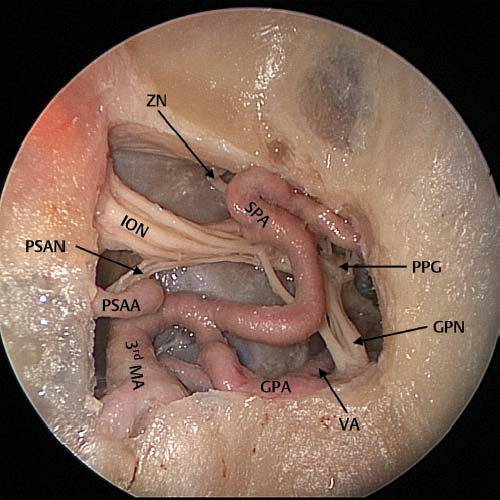
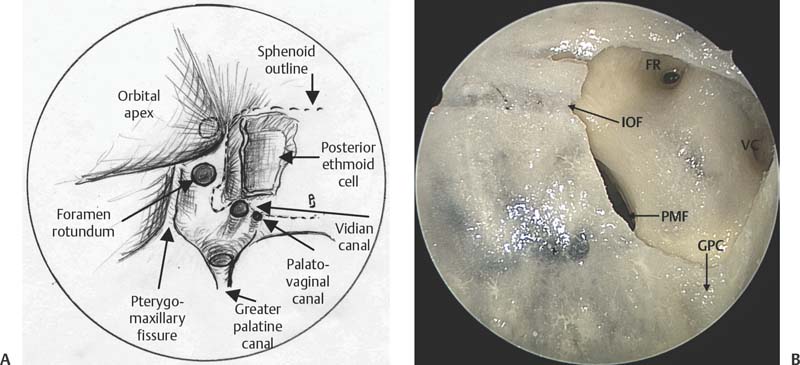
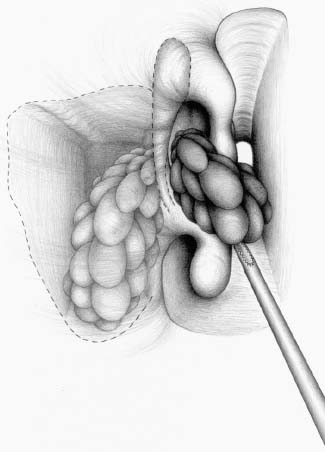
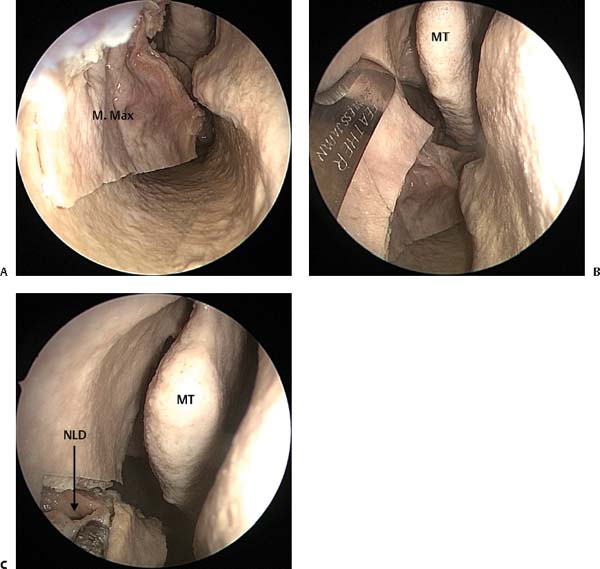
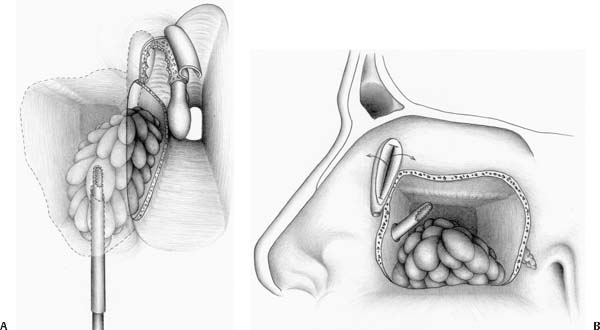
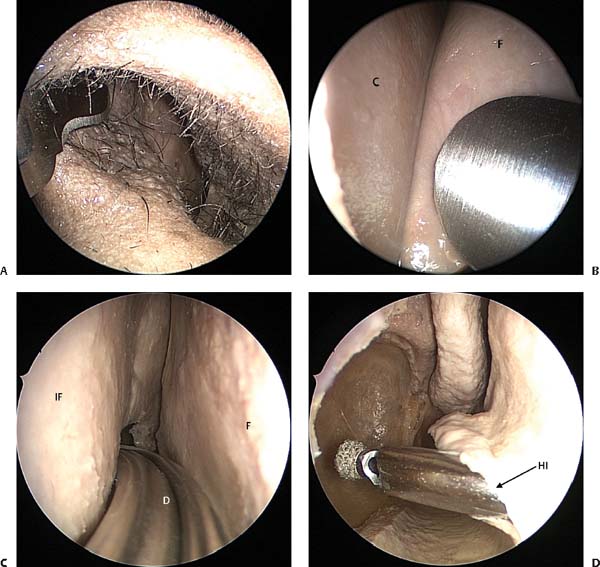
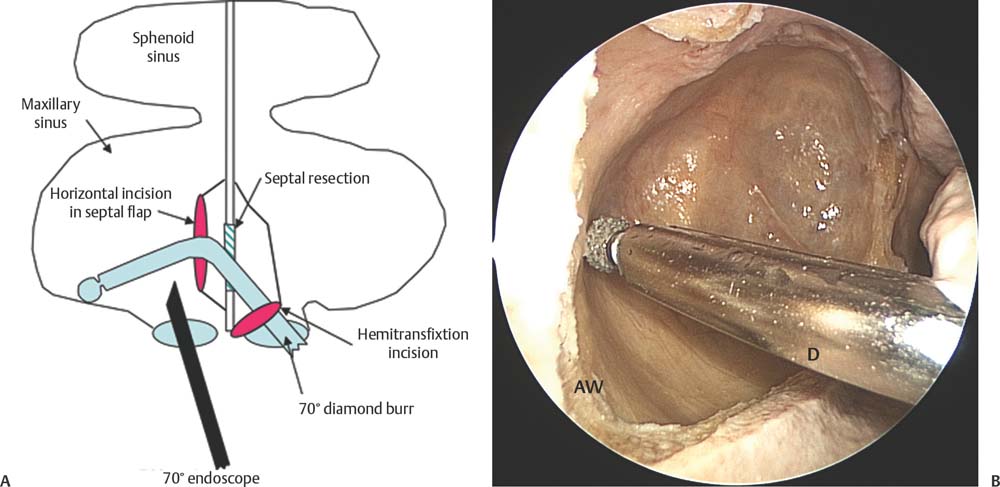
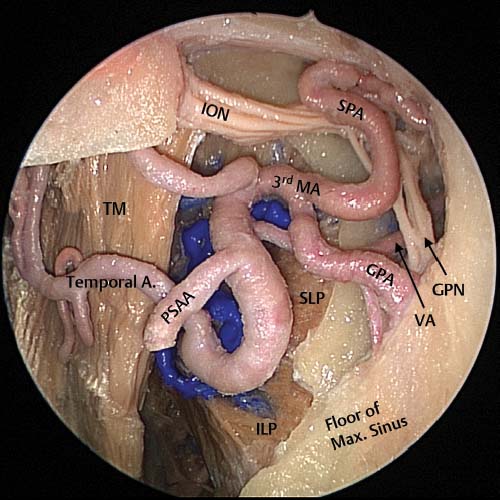
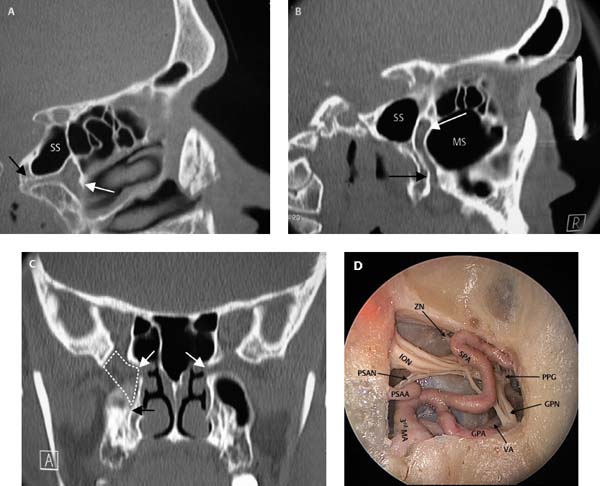
16 As endoscopic sinus surgery (ESS) has progressed over the last 10 years, new techniques have been introduced to aid with the resection of tumors in regions which traditionally have been difficult to access.1 In general the approaches described in this chapter are more suitable for benign tumors but, as techniques and adjuvant therapy develop, these techniques will be increasingly applied to the resection of malignant tumors. To assess the endoscopic resectability of a tumor, both computed tomography (CT) and magnetic resonance imaging (MRI) scans are required.2–4 Using both these modalities the surgeon can determine if sinuses that are opacified on the CT scan contain retained secretions or tumor.2,3 By being able to accurately define the extent of the tumor, resection can then be carefully planned. Endoscopic resection of the medial maxilla is useful to access the anterior, posterior, and lateral walls of the maxillary sinus.3,5,6 Tumors that involve the medial wall, anterior floor, or anterior or anterolateral wall of the maxillary sinus cannot be accessed through a maxillary antrostomy irrespective of how large this is made. It is necessary in these patients to provide an alternative route of access. Although this can be achieved through an inferior meatal puncture, placement of a 4–mm microdebrider blade through the inferior meatal antrostomy tends to destabilize the inferior turbinate as the blade is moved within the maxillary sinus. This is because the nasal vestibule provides a fulcrum around which the blade is rotated, causing significant disruption of the second fulcrum which is the inferior meatal port. In addition, this route of access does not give access to the anterior and medial compartments of the maxillary sinus. The best port is provided by the canine fossa trephine as described in Chapter 5. As there is only a single fulcrum around which the blade rotates, good access is provided to the medial and lateral walls, and the floor of the maxillary sinus (Fig. 16.1). However, canine fossa trephine is not suitable for tumors originating from or with extensive attachment to the anterior wall of the maxillary sinus as the trephine will be placed through tumor attachment. The nasal cavity is prepared by placing cocaine- and adrenaline-soaked neuropatties in the nasal cavity. The lateral nasal wall and septum are infiltrated with 2% lidocaine and 1:80 000 adrenaline. A pterygopalatine fossa block is placed via the greater palatine canal using 2 mL of lidocaine and adrenaline (see Chapter 2). This helps to reduce bleeding during the dissection of the medial wall of the maxilla and pterygopalatine fossa. The first step in endoscopic medial maxillectomy is to remove the uncinate process and perform a large middle meatal antrostomy (Fig. 16.2). The maxillary antrum is enlarged posteriorly up to the posterior wall of the maxillary sinus (Fig. 16.3). This provides visualization of the medial orbital wall and allows removal of the residual medial maxilla without endangering the orbit. Most large tumors of the maxillary sinus and/or pterygopalatine fossa will involve the posterior ethmoids and sphenoid. In these patients an axillary flap is performed and the frontal recess dissected with exposure of the frontal ostium. The bulla ethmoidalis is removed and a posterior ethmoidectomy and sphenoidotomy is performed. The skull base is clearly identified. Any tumor extension into the anterior and posterior ethmoids can be assessed and, if necessary, biopsies or frozen sections of the mucosa from these regions can be sent for examination. This helps ensure complete tumor clearance. Fig. 16.1 (A–C) An axially cut right maxillary sinus of a cadaver illustrating the access that can be achieved within the maxillary sinus (lateral, floor, and medial) through a canine fossa trephine. The white arrow indicates the trephination port in the anterior face of the maxillary sinus. To perform the medial maxillectomy, the inferior turbinate is medialized. A Tilley’s packing forceps is used to crush the turbinate just distal to the junction of the anterior end of the turbinate and the lateral nasal wall.5 If there is a large intranasal component of a soft nonvascular tumor, the tumor is debulked (Fig. 16.4). If the tumor is very vascular or firm then it can be pushed superiorly or partially debulked. Because of the posterior location of angiofibroma, debulking is usually not necessary. Turbinectomy scissors are used to cut along the crushed region of the inferior turbinate up to the point where the turbinate inserts into the lateral nasal wall (Fig. 16.5). A scalpel is used to make mucosal incisions from just below the orbit, through the cut inferior turbinate onto the floor of the nasal cavity.5 This incision is continued along the floor of the nose to the posterior region of the inferior turbinate (Fig. 16.5). Here the mucosal incision is turned vertically toward the posterior region of the maxillary sinus antrostomy. A sharp chisel is used to cut the bone under the mucosal incisions following the mucosal incision (Fig. 16.5). The posterior vertical cut needs to enter the maxillary sinus adjacent to the posterior wall of the maxillary sinus and into the large antrostomy5 (Fig. 16.5). Fig. 16.2 Cadaveric image following a right sided uncinectomy. BE, bulla ethmoidalis; MO, maxillary ostium. Fig. 16.3 Maxillary ostium enlargement to the posterior wall of the maxillary sinus. Post. W. MS, posterior wall of the maxillary sinus; BE, bulla ethmoidalis. Fig. 16.4 Inverting papilloma originating in the maxillary sinus is partially debulked with a microdebrider to establish the region of origin of the tumor. Fig. 16.5 (A) The inferior turbinate is crushed and cut up to the insertion of the turbinate on the medial wall of the maxilla. (B) Cadaveric image demonstrating the inferior turbinate (IT) has been cut up to the insertion on the medial wall of the maxilla (Max). MT, middle turbinate. (C) This incision is continued along the floor of the nose to the posterior region of the inferior turbinate. (D) A sharp chisel is used to cut the bone under the mucosal incisions following the mucosal incision. Once the bone forming the medial maxillary wall is mobilized, the nasolacrimal duct will tether the bone anteriorly and the duct will be visualized (Fig. 16.6). The duct should be transected with a scalpel (Fig. 16.6). At the end of the operation, the dacryocystorhinostomy (DCR) spear knife* (Medtronic ENT, Jacksonville, FL) is used to open the lower half of the sac creating anterior and posterior flaps which are then rolled out.5–7 This prevents postoperative stenosis of the sac.5,6 The edges of the resected portion of the maxilla are trimmed with the microdebrider. If a 70–degree telescope is used, the entire maxillary sinus should be able to be visualized5 (Fig. 16.7). This includes the anterior wall and floor of the maxillary sinus (Figs. 16.7 and 16.8). Tumor can now be removed from the maxillary sinus under direct visualization. If additional access is required and the tumor does not attach to the anterior wall of the maxillary sinus, a canine fossa puncture can be performed. This allows instruments or an endoscope to be introduced through the anterior wall of the maxillary sinus which can be useful to access areas within the sinus that may be otherwise difficult to access. Malleable suction dissectors* (both curette and Freer elevator; Medtronic ENT) are also very useful as these instruments can be bent to the required angle for dissection in difficult areas such as the anterior wall or anterolateral region of the maxillary sinus. Fig. 16.6 (A) Cadaveric image demonstrating the mobile segment of the medial maxillary wall (M. Max); however, it is still tethered to the nasolacrimal duct (NLD). (B) Scalpel incision to the nasolacrimal duct anteriorly. (C) Cut end of the nasolacrimal duct. Fig. 16.7 Cadaveric images demonstrating the exposure following a medial maxillectomy of the maxillary sinus taken with a (A) zero-degree and (B) 70-degree endoscope. PW, posterior wall; LW, lateral wall; AW, anterior wall; MT, middle turbinate. Fig. 16.8 (A) After endoscopic medial maxillectomy as viewed with a zero-degree endoscope. (B) The view of the maxillary sinus with a 70-degree endoscope. Note the microdebrider blade that has been placed through the canine fossa trephine. If the anterior face of the maxillary sinus cannot be well seen or, if better access to the anterior face is required for a tumor that attaches extensively to the anterior face of the maxillary sinus, further resection of the anteromedial wall and frontal process of the maxilla can be performed (Fig. 16.9). In such cases a canine fossa trephine is not thought to be suitable due to the small risk of seeding the tumor into the soft tissues of the cheek. Although seeding is unlikely to occur, this risk is thought to be greater if the entry point into the maxillary sinus is through tumor rather than through normal mucosa. If access is still difficult and the anterior wall of the maxillary sinus is not fully accessible, a transseptal route provides a better angle of approach to this region. This access is achieved by performing a hemitransfixion incision in the opposite nasal vestibule (Fig. 16.10A) and then removing a small horizontal area of cartilage and/or bone opposite the region of the anterior maxillary sinus (Fig. 16.10B). The instrument can then be passed through the hemitransfixion incision, through the cartilage window (Fig. 16.10C) and then through the horizontal mucosal incision in the opposite nasal cavity (Fig. 16.10D), giving greater access to the anterior wall of the maxillary sinus (Fig. 16.11B). This approach significantly improves the angle of approach and usually allows complete access to the entire anterior maxillary wall (Fig. 16.11A). This region is best approached using either a 60-degree microdebrider blade or a 70-degree diamond burr (Medtronic ENT). Fig. 16.9 Region of the frontal process of the maxilla that should be drilled away if direct access to the anterior wall of the maxillary sinus is needed. Fig. 16.10 (A) Cadaveric dissection image demonstrating a hemitransfixion incision anteriorly in the left nostril (contralateral side to the tumor dissection). (B) A mucoperichondrial flap is elevated. C, cartilage; F, flap. (C) A cartilaginous septal window has been removed and a horizontal incision is performed through the mucoperichondrial flap on the ipsilateral side (IF). This allows the passage of a 70-degree diamond tipped drill (D). (D) The endoscope has been placed within the right nasal cavity demonstrating the working tip of the drill passing into the right maxillary sinus through the left hemitransfixion incision and through the horizontal septal flap incision (HI). Access to the pterygopalatine fossa is achieved by removing the posterior wall of the maxillary sinus. In most cases a medial maxillectomy is unnecessary as most of the pterygopalatine fossa can be accessed through a large middle meatal antrostomy. If necessary this antrostomy can be taken through the inferior turbinate to the floor of the nose by partial inferior turbinate resection. The mucosa from the posterior wall of the maxillary sinus is elevated and preserved. This exposes the bone and removal of this bone is necessary to expose the pterygopalatine fossa. To remove this bone it is necessary to expose the sphenopalatine artery (SPA) as described in Chapter 10. The artery is cauterized with suction bipolar forceps. A Hajek-Kofler punch or 45-degree through-biting Blakesley forceps is used to remove the bone anterior to the SPA. The punch is introduced into the sphenopalatine foramen and the bone anterior to the foramen removed until the posterior wall of the maxillary sinus is reached (Fig. 16.12). Further removal of this bone can be done either with the punch or with a 45-degree through-biting Blakesley. Bone is removed until the contents of the pterygopalatine fossa are exposed (Fig. 16.13). Fig. 16.11 (A) Illustration of the septal incisions necessary to achieve good access to the entire anterior wall of the maxillary sinus for tumors either originating from this region or with a significant anterior wall attachment. (B) Cadaveric image demonstrating the access to the anterior wall (AW) of the maxillary sinus with a 70-degree diamond drill (D). Fig. 16.12 Cadaveric dissection demonstrating the contents of the right pterygopalatine fossa as viewed through a maximal maxillary antrostomy. PW, posterior wall of maxillary sinus; SS, sphenoid sinus; MT, middle turbinate. Fig. 16.13 Cadaveric dissection image taken from within the maxillary sinus on the right side. This image demonstrates the contents of the pterygomaxillary sinus following fat removal. PPG, pterygopalatine ganglion; GPN, greater palatine nerve; VA, vidian artery; GPA, greater palatine artery; SPA, sphenopalatine artery; ZN, zygomatic nerve; ION, infraorbital nerve; PSAA, posterior superior alveolar artery; PSAN, posterior superior alveolar nerve; 3rd MA, third division of the maxillary artery. Fig. 16.14 Cadaveric dissection image following the removal of the lateral wall, floor, and posterior wall of the right maxillary sinus. This image reveals the temporalis muscle (TM) located superficial to the lateral wall of the maxillary sinus. The superior (SLP) and inferior (ILP) heads of the lateral pterygoid muscle can be seen where they attach and cover the superficial surface of the lateral pterygoid plates. GPN, greater palatine nerve; VA, vidian artery; GPA, greater palatine artery; SPA, sphenopalatine artery; ION, infraorbital nerve; PSAA, posterior superior alveolar artery; 3rd MA, third division of the maxillary artery. To access the infratemporal fossa, all of the bone of the posterior and lateral wall of the maxillary sinus needs to be removed. Most of the bone can be removed through the same nostril as the tumor using either the Hajek-Kofler punch or through-biting Blakesley. For complete access the bone should be removed from the roof to the floor of the maxillary sinus (Fig. 16.14). Bone removal can continue until the anterior wall of the maxillary sinus is reached by inserting the punch or Blakesley forceps through the opposite nostril via a septal port. The septal port for the infratemporal fossa is very similar to that used to access the front wall of the maxillary sinus. This angle of approach allows the instruments to be advanced up to the anterior maxillary sinus wall as described under “Maxillary Sinus Access.” The greater palatine canal and the pterygopalatine fossa are continuous (Figs. 16.15 and 16.16). The pterygopalatine fossa is similar to an inverted cone and the bottom of this cone forms the greater palatine canal. The pterygopalatine fossa contains the distal branches of the maxillary artery, namely the SPA and the greater palatine artery (Fig. 16.13). In addition the vidian nerve enters the posterior aspect of the fossa before moving laterally to end in the pterygopalatine ganglion which is suspended from the maxillary nerve (Fig. 16.13). The pterygopalatine fossa narrows gradually as it opens laterally into the region of the infraorbital fissure and pterygomaxillary fissure before widening into the infratemporal fossa (Figs. 16.14, 16.15, and 16.16). The roof of the pterygopalatine fossa is formed by the greater wing of the sphenoid bone and the infraorbital fissure, foramen rotundum, and the maxillary nerve coursing from the foramen rotundum from medial to lateral across the roof of the fossa just below the orbital apex (Figs. 16.15 and 16.16). The medial wall is formed by the palatine bone, sphenopalatine foramen, and SPA (Fig. 16.17), whereas the floor is formed by the greater palatine canal and the lateral wall is formed by the pterygomaxillary fissure (Figs. 16.13 and 16.16). In Fig. 16.18 the relationships between the foramina that enter the posterior wall of the pterygopalatine fossa—namely, the palatovaginal canal, the vidian canal. and the foramen rotundum—are demonstrated. In addition the infraorbital fissure and pterygomaxillary fissure are seen (Fig. 16.16). If the anatomy of this region is viewed endoscopically and each layer removed so that the underlying layer can be appreciated, a good understanding of the anatomy can be achieved. The first fact to be appreciated is that the pterygopalatine fossa forms a relatively small part of the total area behind the posterior wall of the maxillary sinus (Fig. 16.12). Second the first structures to be encountered when entering the fossa are the blood vessels (Fig. 16.13). The neural structures all lie deep to this plexus of arteries (Fig. 16.13). Further dissection in the roof to the fossa allows the maxillary nerve to be seen just below the orbit in the roof of the fossa. If this nerve is followed posteromedially the foramen rotundum can be seen (Fig. 16.19). If we now remove the major blood vessels from the fossa we can identify the vidian nerve entering the fossa posteriorly. The other relationship that is important to understand is how the pterygopalatine fossa and infratemporal fossa relate to the infraorbital fissure. It is through this fissure that tumors can extend from the infratemporal fossa and pterygopalatine fossa up toward the orbital apex. Additionally, tumors may follow the infraorbital nerve and maxillary nerve to enter the pterygopalatine fossa and move posteriorly toward the cavernous sinus and carotid artery. As the orbital apex and sphenoid is approached, the inferior portion of the lamina papyracea thickens. The lateral wall of the fissure is formed by the medial wall of the middle cranial fossa. The infraorbital nerve can consistently be seen in the infraorbital fissure and it is around this structure that tumor can insinuate to reach the orbital apex and then expand into the space between the lateral sphenoid wall and middle cranial fossa (Fig. 16.19). Significant expansion can occur so that the tumor may reach the cavernous sinus and even the carotid artery. Fig. 16.15 (A) Parasagittal CT scan showing the pterygopalatine fossa is cone shaped (white arrow). The vidian canal can be seen entering the posterior wall of the pterygopalatine fossa (black arrow). (B) The pterygopalatine fossa (white arrow) is seen to sit between the maxillary sinus (MS) and the sphenoid sinus (SS). The pterygopalatine fossa is continuous with the greater palatine canal (black arrow). Note it narrowing as it becomes the pterygomaxillary fissure before it expands into the infratemporal fossa. (C) Coronal scan where the cone shape of the fossa is outlined by a broken white line and the sphenopalatine foramina are indicated with the white arrows. (D) The cadaver picture demonstrates the contents of the pterygopalatine fossa on the right side following removal of the posterior wall of the maxillary sinus. GPN, greater palatine nerve; VA, vidian artery; GPA, greater palatine artery; SPA, sphenopalatine artery; ION, infraorbital nerve; PSAA, posterior superior alveolar artery; 3rd MA, 3rd division of the maxillary artery. Fig. 16.16 (A) The relationships of the structures entering the posterior region, roof, and floor of the pterygopalatine fossa. The medial wall with the sphenopalatine foramen is not depicted. (B) This dry bone image has been taken with a zero-degree endoscope placed within the maxillary sinus. The posterior wall of the maxillary sinus has been removed in the region of the pterygopalatine fossa and we can visualize the pterygoid process and several important surrounding structures. The foramen rotundum (FR), vidian canal (VC), and the infraorbital fissure (IOF) can be appreciated, along with the pterygomaxillary fissure (PMF). Note how the pterygomaxillary fissure and the infraorbital fissure are continuous with each other. GPC, greater palatine canal.
Endoscopic Resection of Tumors
Involving the Maxillary Sinus,
Pterygopalatine Fossa, and
Infratemporal Fossa
 Surgical Techniques for Access to the Maxillary Sinus, Pterygopalatine Fossa, and Infratemporal Fossa
Canine Fossa Trephination for Access to the Maxillary Sinus (Videos 8 and 9)
Endoscopic Medial Maxillectomy for Access to the Anterior Wall of the Maxillary Sinus and Infratemporal Fossa5,6 (Videos 41 and 42)
Access to the Pterygopalatine Fossa (Videos 41 and 42)
Access to the Infratemporal Fossa (Videos 41 and 42)
 Endoscopic Anatomy
Endoscopic Anatomy of the Greater Palatine Canal and the Pterygopalatine Fossa
The Endoscopic Anatomy of the Infraorbital Fissure
Stay updated, free articles. Join our Telegram channel

Full access? Get Clinical Tree


