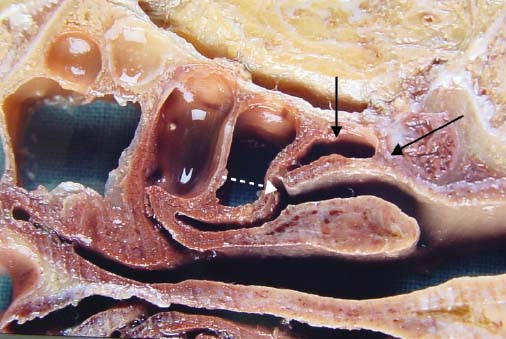
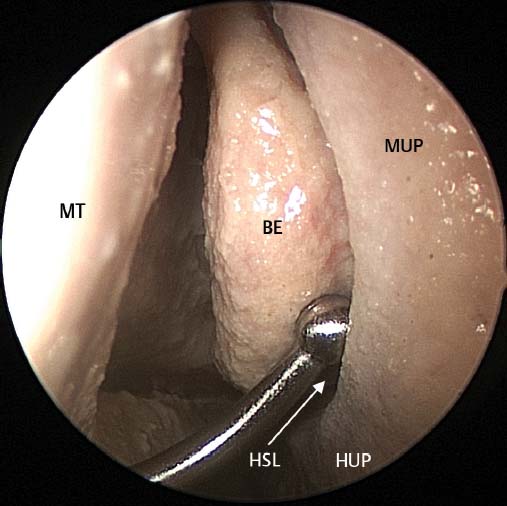
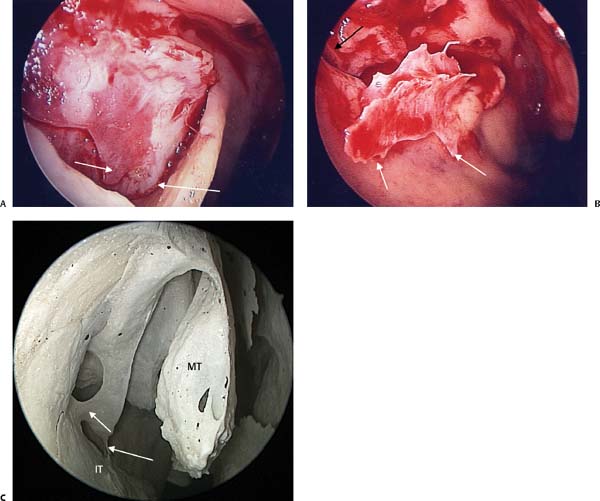
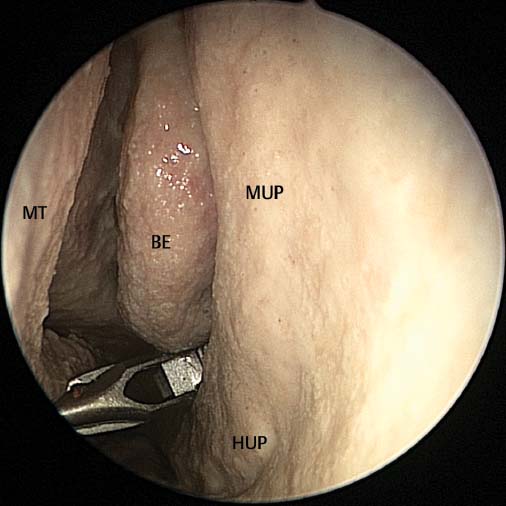
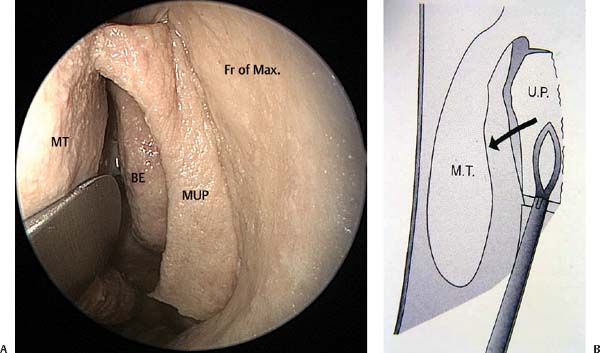
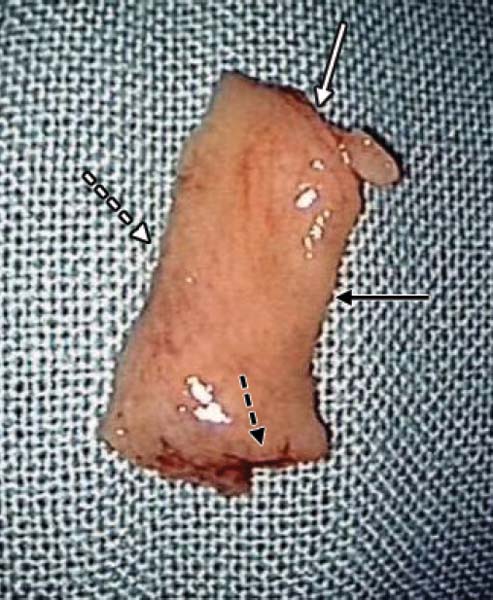
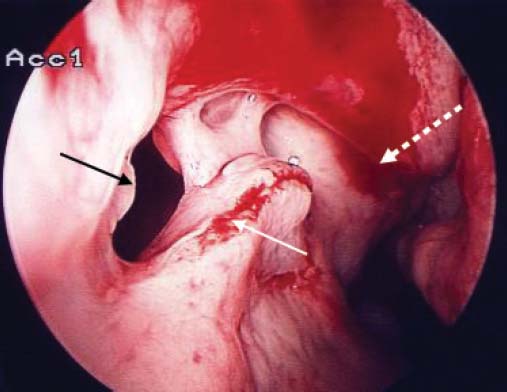
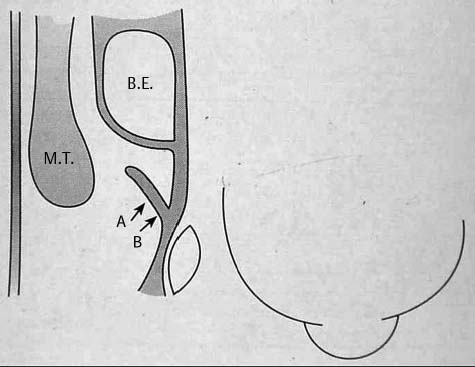
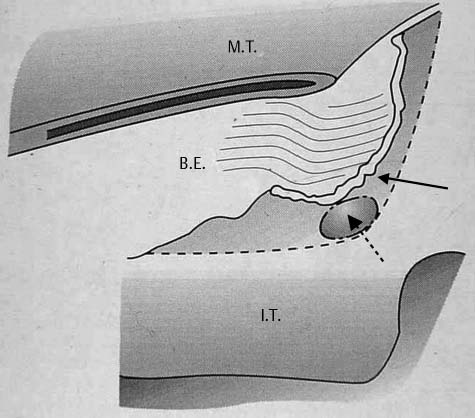
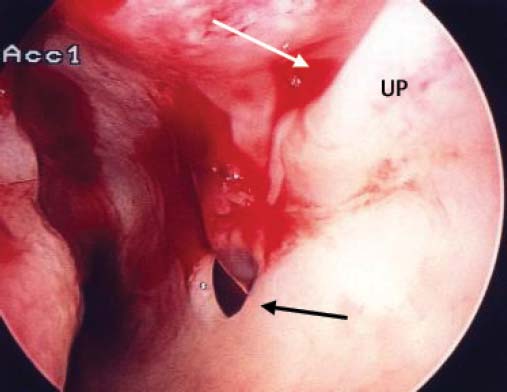
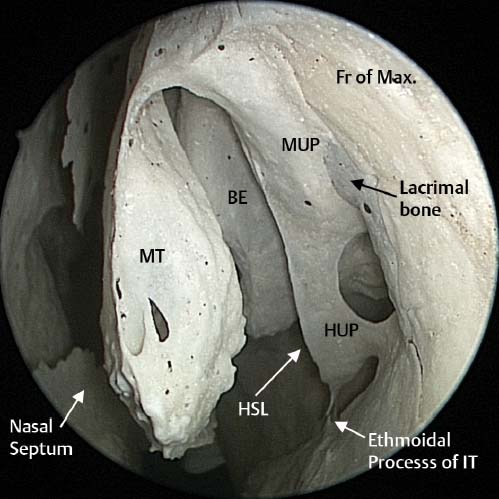
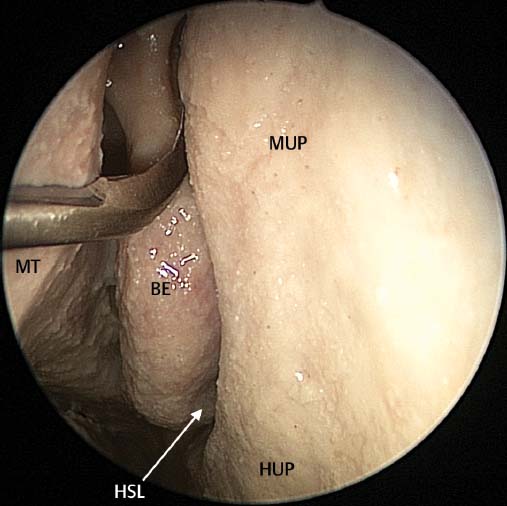
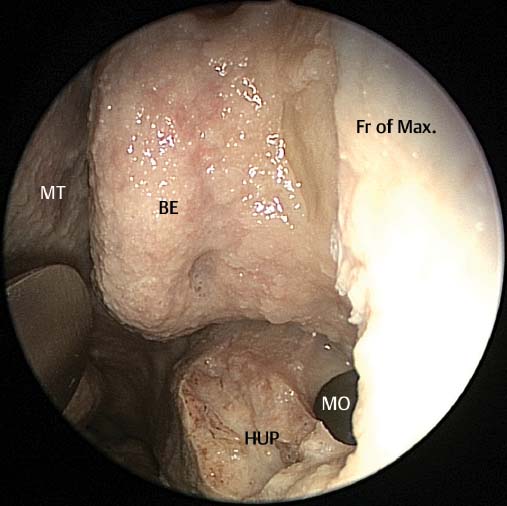
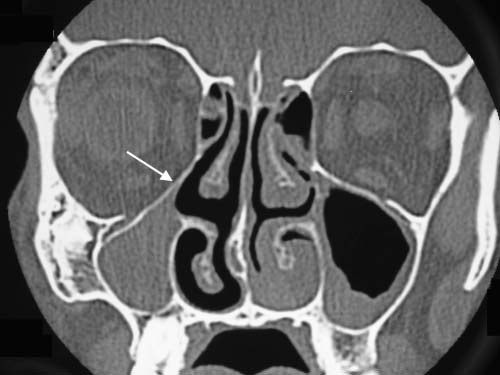
5 Uncinectomy is the first step undertaken during endoscopic sinus surgery (ESS). If poorly performed it may result in failure of the ESS procedure1–3 and may result in orbital or lacrimal complications.4,5 It is important that the anatomy of the uncinate and ethmoidal infundibulum are properly understood. The uncinate is a sickle-shaped bone extending from the frontal recess superiorly and attaching to the inferior turbinate inferiorly. If the uncinate is viewed in the parasagittal plane, the upward extension of the uncinate into the frontal recess cannot be seen. The middle and horizontal portions of the uncinate form a sickle-shaped bone attaching to the lacrimal bone and the ethmoidal process of the inferior turbinate and lying below the bulla ethmoidalis (Fig. 5.1). The middle third of the uncinate arises from the lacrimal bone and frontal process of the maxilla.6 It projects posteriorly forming a gutter (the infundibulum) on its lateral aspect. It has a free edge which creates a space between this free edge and the bulla ethmoidalis.6 This space is known as the hiatus semilunaris as it is crescent shaped (Fig. 5.1). Figure 5.2 illustrates the orbital attachment of the uncinate process, the infundibulum, and the hiatus semilunaris. When viewed with an endoscope only the medially projecting middle portion of the uncinate can be visualized (Fig. 5.3). The superior portion of the uncinate which extends into the frontal recess is considered in detail in Chapter 6. The attachment of the horizontal portion of the uncinate to the ethmoid process of the inferior turbinate is by a series of feet. This can clearly be seen in Fig. 5.4 where the horizontal portion of the uncinate has been dissected free. Posteriorly it may have a free end or it may attach to the palatine bone. This technique was devised in an attempt to achieve a complete removal of the midsection of the uncinate process and in so doing expose the natural ostium of the maxillary sinus. If there is doubt about the position of the free edge of the uncinate, a ball-tipped right-angled probe can be used to palpate its free edge confirming its position (Fig. 5.3). The mid part of the uncinate is incised superiorly and inferiorly. The superior incision is performed with a sickle knife just under the axilla of the middle turbinate (Fig. 5.5). The tip of the sickle knife cuts the soft bone of the uncinate from its posterior free edge until the tip of the knife can be felt to strike the hard bone of the frontal process of the maxilla. In this area the uncinate attaches directly to the hard bone of the frontal process of the maxilla usually above the lacrimal bone (Fig. 5.1). It is highly unlikely that this incision will penetrate the lacrimal sac or lamina papyracea and expose orbital fat. The pediatric backbiter is passed into the middle meatus and opened (Fig. 5.6). It is gently wriggled into the hiatus semilunaris so it engages the free edge of the uncinate process. It is easier to introduce the backbiter about midway up the middle portion of the uncinate before it is slid down the free edge until it comes to rest on the transition of the middle and horizontal parts of the uncinate. The uncinate is cut using sequential bites of the backbiter.4 Usually (depending on the length of the uncinate and the size of the tooth of the backbiter) two to three bites are necessary. If the backbiter can still palpate residual uncinate, then a final bite is made. The backbiter should be turned upward to an angle of 45 degrees before this final bite is made. This brings the tooth of the backbiter medial to the nasolacrimal duct and protects it from injury. In patients with a lateralized uncinate, care needs to be taken that the tooth of the backbiter does not penetrate the lamina papyracea during positioning of the tooth on the uncinate. In these patients the proximity of the uncinate and lamina papyracea can result in the tooth penetrating the lamina papyracea as the tooth is opened and, while open, it is pulled anteriorly to engage the uncinate. To avoid this, the tooth is used to gently medialize the uncinate before the tooth is pulled anteriorly to engage the uncinate. Fig. 5.1 Endoscopic image taken from a dry skull on the left side demonstrating the middle (MUP) and horizontal (HUP) portions of the uncinate attaching to the lacrimal bone and ethmoidal process of the inferior turbinate (IT). The uncinate lies beneath the bulla ethmoidalis, and the hiatus semilunaris (HSL) can be visualized between the free edge of the uncinate process and the bulla ethmoidalis (BE). MT, Middle turbinate; Fr of Max, frontal process of maxilla. Fig. 5.2 This cadaver dissection specimen of the left nasal cavity is cut in the axial plane with the anterior aspect of the specimen on the right. The black solid arrow indicates the uncinate attachment, the black arrow the infundibulum, and the broken white arrow the hiatus semilunaris (entrance to the infundibulum). Fig. 5.3 This photo is taken in the left nasal cavity within the middle meatus. The middle (MUP) portion of the uncinate and horizontal (HUP) of the uncinate is visualized. The ball probe has been placed within the hiatus semilunaris (HSL), and lies between the free edge of the uncinate and the bulla ethmoidalis (BE). Next a right-angled ball probe or curette is slid through the inferior incision behind the uncinate process fairly closely to the uncinate’s insertion into the lateral nasal wall. The probe is pulled anteriorly and the uncinate is fractured at its insertion to the lateral nasal wall (Fig. 5.7).4 The posterior blade of a 45-degree upturned through- cutting Blakesley forceps is placed through the inferior cut in the uncinate and the forceps pushed against the lateral nasal wall bringing the forceps hard up against the frontal process of the maxilla. The middle section of the uncinate is then removed flush with the lateral nasal wall (Fig. 5.8). In most circumstances the mid portion of the uncinate can be removed in one piece. In Fig. 5.9 the superior, inferior, and anterior cuts as well as the free edge are labeled. Several surgeons describe removal of the middle third of the uncinate with a microdebrider blade. This is NOT advocated as the lamina papyracea that lies directly behind the uncinate is the thinnest part of the medial orbital wall. Turning the microdebrider blade laterally and working onto the lamina with limited visualization of the lamina may end with inadvertent penetration of the lamina with the microdebrider with significant orbital complications. The zero-degree endoscope is changed for a 30-degree endoscope. This allows better visualization of the middle meatus and greater precision in the dissection. The next step is to dissect the horizontal portion of the uncinate bone out from between its two mucosal layers (Fig. 5.10). The double right angled ball probe is used to elevate the mucosa off the medial aspect of the uncinate (Fig. 5.10). The bone is then fractured medially and the ball probe used to elevate the mucosa over the lateral aspect of the bone. Removal of this bone allows the mucosa covering the natural ostium to be delicately trimmed downward with the microdebrider exposing the natural maxillary ostium (Fig. 5.11). Note that the microdebrider blade here is positioned inferiorly so that it is working away from the orbit toward the nasal floor. Using the microdebrider allows these edges to be trimmed so that they lie directly opposed to each other without exposed bone separating these edges. This results in these mucosal edges healing by primary intention without scarring (Fig. 5.11). Fig. 5.4 The uncinate bone is displayed in situ (right nasal cavity) with the medial mucosal flap dissected away from the bone in picture (A). (B) The horizontal portion of the uncinate has been removed from between the two layers of mucosa. (C) Feet-like process in a dry skull specimen. The feet-like attachments are indicated with white arrows. These feet attach to the ethmoidal process on the inferior turbinate (IT). MT, middle turbinate. If there is any doubt as to the location of the natural ostium, the right angled ball-probe or right-angled olive tip suction can be placed directly behind the cut edge of the middle portion of the uncinate in the ethmoidal infundibulum. The probe or suction is slid down this natural gutter as it must enter the natural ostium of the maxillary sinus. In this way the natural ostium of the maxillary sinus should always be able to be located. As part of the study comparing the swing-door and traditional techniques of uncinectomy, we examined the results of 636 consecutive swing-door uncinectomies. There were no orbital penetrations with fat exposure and all natural ostia of the maxillary sinuses were identified. However, there were four patients where the nasolacrimal duct was exposed and not opened and one patient in whom the nasolacrimal duct was opened. The important outcome was the ability of the surgeon to identify the natural ostium of the maxillary sinus in all 636 uncinectomies. To compare the swing-door technique with the traditional technique of uncinectomy, a further 636 uncinectomies were performed using the traditional technique described later.7 The traditional technique for uncinectomy starts with the identification of the uncinate’s free edge. While the free edge is palpated, the surgeon attempts to gauge the site of the uncinate’s insertion into the lateral wall of the nose. This decision is critical. If the surgeon starts too close to the uncinate insertion, the first incision may penetrate the lamina papyracea with a resultant prolapse of orbital fat. Surgeons tend to allow for such an error and tend to leave a few millimeters of uncinate behind incising distal to its insertion (Fig. 5.12). Fig. 5.5 Cadaver dissection on the left side. Superior incision of the middle portion of the uncinate process (MUP) is made with a sickle knife placed directly under the axilla of the middle turbinate (MT). BE, bulla ethmoidalis; HUP, horizontal portion of the uncinate; HSL, hiatus semilunaris. Fig. 5.6 A pediatric backbiter is introduced and the lower cut is made. BE, bulla ethmoidalis; MUP, middle portion of the uncinate; HUP, horizontal portion of the uncinate; MT, middle turbinate. Fig. 5.7 (A) Insertion of a curette or ball probe behind the uncinate has allowed the middle portion of the uncinate (MUP) attachment to the lateral nasal wall to be fractured anteriorly in a swing-door technique for uncinectomy. (B) The 45-degree through-biting Blakesley used to cut the uncinate flush with the lateral nasal wall. UP, uncinate process; MT, middle turbinate; BE, bulla ethmoidalis; Fr of Max, frontal process of maxilla. Fig. 5.8 Removal of the middle third of the uncinate process reveals the natural maxillary ostium (MO), with the remaining horizontal portion still in place. Fr of Max, frontal process of maxilla; MT, middle turbinate; HUP, horizontal portion of the uncinate; BE, bulla ethmoidalis. Fig. 5.9 The middle section of the uncinate with superior (white arrow), inferior (broken white arrow), anterior cut edges (black arrow), and free edge (broken black arrow) labeled. Fig. 5.10 A double right-angled ball probe dissecting the bone of the horizontal portion of the uncinate process (HUP). MT, middle turbinate; MO, maxillary ostium; BE, bulla ethmoidalis. Fig. 5.11 Intraoperative picture of the right maxillary ostium (black arrow) after removal of the horizontal portion of the uncinate with apposition of the mucosal edges (white arrow). The final common drainage pathway is indicated by the broken white arrow. If too much uncinate remains, the ostium may remain hidden behind this residual uncinate. In this situation the ostium should be sought behind the anteroinferior residual uncinate (Fig. 5.13). In 636 consecutive traditional uncinectomies we were unable to locate the natural ostium of the maxillary sinus in 42. There were six cases of orbital fat exposure and no cases of nasolacrimal duct injury. In our hands the swing-door technique was more reliable to identify the natural ostium of the maxillary sinus and was less likely to result in penetration of the orbit. The two areas at risk during uncinectomy are the orbit and the nasolacrimal duct.4,5 To date penetration of the orbit has not occurred with the superior horizontal incision of the middle part of the uncinate. This is due to the insertion of this part of the uncinate on the thick bone of the frontal process of the maxilla (Fig. 5.1). The traditional technique of uncinectomy has a higher risk of orbital penetration. This is due to the knife penetrating the orbit during the anterior incision made into the uncinate at its insertion onto the lateral nasal wall.4 This may result in the prolapse of orbital fat. Frequent palpation of the globe should be performed throughout the surgery. If inadvertent entry into the orbit or removal of the lamina papyracea has occurred, palpation of the globe will either cause a prolapse of orbital fat or cause the orbital periosteum to move. If orbital periosteum is exposed, care should be taken in this region during the rest of the surgery. If penetration of the orbit has occurred and orbital fat prolapse is seen, this should be left alone and not manipulated. The microdebrider should not be used in an area where orbital fat has prolapsed as it can be sucked very rapidly into the blade with rapid removal of fat and damage to the medial rectus muscle. Damage to the nasolacrimal duct is less likely with the traditional technique than the swing-door technique as there is less utilization of the backbiter and therefore less risk to the nasolacrimal duct. If the nasolacrimal duct is opened, any small bony pieces are removed and the opening left as it is. Normally no symptoms will result as the duct has not been obstructed. A crush injury of the duct has a worse prognosis as this may result in scar tissue formation within the duct with subsequent obstruction of the duct. Fig. 5.12 In this axial diagram the surgeon will often have difficulty deciding exactly where the uncinate attaches to the lateral nasal wall and will usually make the incision into the uncinate as indicated by the A arrow as this gives a margin of safety when compared with the incision in the region of the B arrow which may traverse the lamina papyracea and expose orbital fat. Fig. 5.13 After the uncinectomy has been performed, 2 to 3 mm of residual uncinate remains (solid black arrow). This obscures visualization of the natural ostium (broken black arrow) and may not be located by the surgeon. This may result in a posterior fontanelle ostium being created. MT, middle turbinate; BE, bull ethmoidalis; IT, inferior turbinate. The surgeon should also be aware that collapse of the uncinate onto the lamina papyracea (so-called atelectatic uncinate) puts the orbit at greater risk of damage.8 This occurs with complete opacification of the maxillary sinus with absorption of all gas within the sinus and resultant negative pressure sucking the uncinate laterally onto the lateral nasal wall. If this is long-standing, expansion of the orbit may occur with enophthalmos: the so-called silent sinus syndrome (Fig. 5.14). Anterior incisions into an atelectatic uncinate will result in a high incidence of orbital penetration and should not be used. The retrograde removal of the uncinate (swing-door technique) is preferred. Fig. 5.14 Computed tomography scan of a patient with a right atelectatic uncinate (white arrow). The uncinate is plastered against the lamina papyracea over a considerable length. An accessory ostium is located within the posterior fontanelle of the maxillary sinus behind the natural ostium. Cadaveric studies have shown that 10% of the general population have an accessory ostium.9 In addition, failure of the surgeon to locate the natural maxillary sinus ostium at surgery may result in the creation of a posterior fontanelle ostium. This is a common cause for ESS failure.1–3 The presence of an accessory or posterior fontanelle ostium may result in the circular flow of mucus from the natural ostium of the maxillary sinus into the posterior fontanelle ostium with resultant recurrent chronic sinusitis symptoms (Fig. 5.15). Patients who present with recurrent symptoms of sinusitis after ESS should have an endoscopic examination and, after appropriate medical treatment, a computed tomography (CT) scan. On clinical examination the presence of a posterior fontanelle and circular flow of mucus should be sought. This can often be seen on endoscopy with a 30-degree endoscope. In addition, the CT scans of the patient should be closely scrutinized for presence of a natural ostium and a posterior fontanelle ostium or accessory ostium (Fig. 5.16). If a posterior fontanelle ostium or accessory ostium is identified, this should be surgically joined to the natural ostium to prevent ongoing circular flow of mucus. This can be done by inserting a backbiter into the accessory ostium and coming forward to the natural ostium. After creating this tissue edge, the microdebrider is used to trim away excessive tissue. Fig. 5.15 Mucus draining from the natural ostium (white arrow) behind the uncinate process (UP) into an accessory ostium (black arrow).
Uncinectomy and Middle Meatal
Antrostomy Including Canine Fossa
Puncture/Trephine
 Uncinectomy
The Swing-Door Technique4 (Videos 3, 4, and 5)
Removal of the Middle Part of the Uncinate
Removal of the Horizontal Portion of the Uncinate (Videos 3, 4, and 5)
Results with the Swing-Door Technique4

Complications of Uncinectomy
 Posterior Fontanelle or Accessory Ostium
Stay updated, free articles. Join our Telegram channel

Full access? Get Clinical Tree


