5 5.3 Corneal diameter, pupil and lid aperture measurement 5.5 Determination of contact lens power 5.6 Preliminary slit-lamp biomicroscopy and tear film assessment 5.8 Selecting a spherical trial lens 5.9 Assessment of spherical soft lens fit 5.11 Presbyopic soft lens fitting 5.12 Fitting RGP contact lenses 5.13 Patient instruction for contact lens care Contact lenses are preferred over glasses by some patients because of perceived improvements in appearance, ability to wear for certain sports and various convenience issues (e.g., can wear off-the-shelf sunglasses, they don’t fog up like glasses, can see better in rain, etc).1 There is a relatively high discontinuation of contact lens wear (~16% US, ~30% Europe), but patients are more likely to be successful if you manage their expectations, fit them with lenses that suit their eyes and lifestyle and achieve better compliance with lens care.2,3 Worldwide, the majority of new lens fits are soft lenses but it is important to maintain RGP lens skills because they remain the first choice lens for a proportion of patients and account for around 8% of new fits (e.g. 2% UK, 4% Canada, 11% New Zealand, 21% Netherlands) and a significantly higher proportion of refits.4 It is not uncommon to fit a patient with more than one lens type, e.g. RGP lenses for day-to-day use with a small supply of soft single-use lenses for swimming and other sport. Some of you may wish to develop your skills further to offer more specialist care to those requiring complex lenses for therapeutic purposes, corneal irregularity, orthokeratology, etc. However, discussion of such lenses falls outside the scope of this book. The purpose of the preliminary contact lens fit examination is to: 1. Quantify ocular parameters to aid selection of the first trial lens. 2. Confirm the normality of the ocular tissues and to record for future reference any acceptable abnormality (such as a corneal scar resulting from a historical eye injury). 3. Discover issues that potentially preclude or limit contact lens wear, (and manage or refer if necessary), or issues that indicate the need for a particular type of contact lens. 4. Allow the recording of baseline data against which to judge possible contact lens induced changes. 1. A pre-fit case history to determine what the patient wants from contact lenses, what they know about them and to help determine whether they are suitable. 2. Measurements to help determine lens parameters: Horizontal visible iris diameter, pupil diameter (average and mesopic), palpebral aperture and lid position, corneal curvature and regularity and subjective refraction (unless a recent refraction has taken place). 3. Assessments to help determine suitability for lens wear: Anterior eye health and tear film quality. Examination of the posterior segment is only included in the pre-fit examination if any new symptoms or signs indicate that further investigation is warranted or if there has been a significant time period since the last assessment. 4. Choose the trial lenses: After the preliminary assessment, you need to summarise your findings and discuss how they influence the choice of lens type. There may be a clear indication for a particular type of lens, such as single-use lenses for a patient who only wants to wear lenses 2–3 times a week; or there may be a range of possible options and you should discuss the pros and cons of each lens type (including cost and impact of lens care use) with the patient, so that they can make an informed decision. 5. Post-trial assessment: Assess the performance of the trial lenses in terms of fit, compatibility with the eye/tear film and visual acuity (a) It may be necessary to trial more than one lens to meet the patient’s needs. (b) Remove the lenses and check the eyes using the slit-lamp. 6. Teach the patient to handle and care for the lenses: Ensure the patient fully understands the dos and don’ts of lens wear and the importance of lens and lens case maintenance. 7. Final check of trial lenses: Allow the patient to trial the lenses for a few days. Undertake the first follow-up check up with the lenses in situ and if everything is satisfactory, order the final lenses and provide the patient with a copy of their contact lens specification. Further changes to the lens and an extended trial may be required before the fitting can be considered complete, particularly for some toric, multifocal or complex lens fits. Many of the issues covered in section 2.1 also apply during a contact lens examination, such as the importance of communication and putting the patient at ease. Trying contact lenses for the first time can be a very daunting process for some patients; a common worry is that the lenses will cause pain when they are placed on their eyes. Assure them that at worst the sensation is similar to having an eyelash in their eyes and at best they are simply not aware the lens has gone in. Spending sufficient time fully understanding a patient’s wants with respect to contact lenses, determining what they know about them, explaining the issues and managing their expectations are important to limit contact lens drop outs.5 Make it clear from the start that a successful fit may require more than one appointment, particularly in the case of toric, lenses for presbyopia or more complex lenses, and that regular aftercare is essential. It is often useful, in the case of the potential wearer, to combine questions to the patient with a tutorial approach embracing areas such as lens types, hygiene, wearing times, etc., thereby exchanging information. The information gained should be considered to determine patient suitability and motivation. Suitability may be determined by clinical, social or financial constraints. Motivation may depend on social, occupational, sports, refractive, visual or psychological factors.6 1. Start with a general observation of the patient. Particularly note the patient’s ability to speak and articulate, intellectual capacity, emotional state, cleanliness, length of fingernails, use of eye make-up, size of fingers, roughness of skin and dexterity. 2. Age and gender information allows you to think about the most likely contraindications or challenges to contact lens wear, and their association with these factors, for example, older females are more likely to have poorer tear quality, indicating careful lens material selection and perhaps the use of ocular lubricants. 3. Ask the following questions: (a) Why do you want to wear contact lenses? Start by finding out what has sparked an interest in contact lenses. Any previous history of contact lens wear should be investigated thoroughly to determine the types of lenses worn, and any reasons for discontinuing lens use. Don’t be afraid of refitting a patient who has failed to wear contact lenses successfully in the past as many contact lens drop-outs are due to poor compliance, or associated with older lens designs and materials, rather than a lack of patient suitability.7 (b) What would you like to wear the lenses for? This will range from a complete replacement for spectacles through to occasional social wear. Others may want to sleep in their lenses for convenience or practical reasons (e.g. travelling abroad, antisocial working hours). If they don’t want to sleep in their lenses overnight, are they likely to occasionally nap in their lenses, for example, on the train home from work? Dumbleton et al. reported over 60% of single use soft lens wearers had napped or slept in their lenses.8 (c) What do you know about lenses? This is an opportunity to explain the different types of lenses and the pros and cons of each. This could be an opportune time to introduce the cost of the different types of lens. For those that wear their lenses four or more days a week, monthly or fortnightly disposable lenses are more cost effective than daily disposable lenses.9 It is important that the patient understands from the start the cost of the lenses, fitting and aftercare appointments, along with the importance of regular aftercare to maximise healthy and successful contact lens wear. Explain that there are some risks involved in contact lens wear but if they follow instructions carefully, these are exceedingly small. Direct them to an independent website that provides unbiased, generic information on contact lenses, such as the British Contact Lens Association, American Academy of Optometry, the Cornea and Contact Lens Society of Australia or Contact Lens Update. (d) How do you feel about inserting lenses and touching your eye? Patients can be very motivated but those that cannot bear to hold their lids apart will generally not succeed. Usually females are more comfortable touching their eyes as they are used to applying cosmetics. If the patient is nervous, demonstrate how they can gently touch the conjunctiva in the lower fornix with their finger, while they look up and suggest they do this a couple of time over the next few days, prior to the fitting visit. This will give them confidence. (e) Are you willing to clean the lenses after each wearing episode, or is convenience a major factor? You will have to outline what is involved in lens care as they may have preconceived ideas having watched a family member cleaning their lenses inadequately. 4. Medical and ocular history. If the patient has recently undergone an eye examination in your practice, check all the points mentioned on their record card, record them again on the contact lens record and ask open questions to ensure nothing has changed since the eye examination. For those who attend for a contact lens fit with a spectacle prescription from elsewhere, a full history routine is required, as for a standard eye examination but modified to take account of previous or potential contact lens wear. Questions should cover: (a) General health including whether the patient suffers from cold sores that may impact on contact lens handling at times. The medical history may reveal contraindications to contact lens wear, or the need for a particular type of lens or more regular aftercare check-ups (e.g. diabetes). Include a question about smoking as it is known to increase the risk of contact lens inflammatory events and would therefore direct you away from extended wear lenses.10 (b) Use of systemic medication particularly long-term treatment, e.g. steroids, beta-blockers, psychotropic agents (anti-depressants), regular use of over the counter pain medication. The main way in which medication can affect contact lens is through changes to the tear film. (c) Ocular history indicates whether the patient has had previous ocular treatment or surgery, or contact lens problems in the past. A history of an ocular abnormality directs you to look for the manifestations of the disorder that may impact on suitability for contact lenses, or channel you towards a particular type of lens (e.g. RGP for an irregular cornea associated with a previous corneal injury). Previous surgery may dictate the lens type to be used, for example, RGP lenses post corneal refractive surgery. Are they prone to styes or chalazion that might be associated with recurrent blepharitis? Is the patient’s refraction stable? If not, they should be advised that frequent changes to their contact lenses may be needed with financial implications depending on the type of lens. (d) Family history information determines if there are any hereditary ocular and/or medical conditions that may be relevant. (e) Information regarding the patient’s occupation and hobbies is very useful, particularly when the patient is presbyopic as you need to ensure the lens chosen will give them good vision for the required working distances. Patients who spend a lot of time looking at a display screen are more likely to suffer from dryness associated with a reduced blink rate.11 You should ask specifically about water sports as the patient may require additional, single use lenses if they swim regularly, and should be advised regarding the use of goggles.12 Contact sports also require careful lens selection with single use soft lenses most commonly providing the best option. (f) Environmental factors include regular exposure to a smoky atmosphere, an environment that is dusty, contains fumes, is of low humidity (associated with heating or air conditioning), or is unhygienic in some other way. Both positive and negative patient responses must be recorded. Remember that from a legal viewpoint, if the response was not recorded the question was not asked. Use standard abbreviations (Table 2.1) and avoid personal ones. Using the patient’s own words, recorded in quotation marks, can be useful. An example is given below. RFV: Wants CLs for rugby and occ. social use. Girlfriend wears SCL which she cleans daily. Happy to clean lenses. No previous CL wear. Happy c Rx for work. Good DV and NV with Rx. No HA. No other Sxs. OH: Wears Rx constantly. This Rx 2 yrs old. Blunt rugby injury to RE 1/12 ago, seen by HES – all clear. No other OH. LEE: 1/12, Mr Brown, Smith’s Opticians, Manchester. FOH: none. GH = OK, occ. cold sores, no meds. No allergies. LME: 4 yrs, Dr Patel, Didsbury. FMH: mat grandfather has Type II DM. Hobbies: rugby (no Rx worn), hiking, swimming 1/7. Uses PC ~ 4 /24, 6/7. Driver. Selecting the most suitable lens modality, replacement schedule and lens type depends on: • The patient’s requirements including lifestyle. • The patient’s ocular characteristics. • The financial position of the patient. • The lenses you have available in your clinic. 3–4 types of single use lenses covering a range of materials and prices is useful. Interpretation of the case history example in section 5.2.2 suggests that the patient wants lenses for occasional use only, specifically for contact sports (rugby), and therefore a single use lens would be the best option if available in his prescription. This will avoid the issue of lenses sitting in solution for extended periods between wearing episodes. In addition, mud in the eye and lens loss are common in rugby and therefore single use lenses are preferred for hygiene reasons. Regular swimming is yet another indicator for single use lenses, and tight fitting goggles over the top will reduce the risk of complications from swimming in lenses. The patient will need to be advised not to wear their lenses when they are suffering from a cold sore or at least to take extra precautions in terms of hygiene before handling the lenses. This patient may need more time spent with them for insertion/removal training due to their large fingers and possible squeamishness. 1. Not gaining a full understanding of what the patient wants from contact lenses. 2. Not recording all information obtained from the patient. 3. Assuming the same information is still current from the last eye examination. 4. Not applying all the information gathered to the selection of trial lens. 5. Agreeing to undertake a contact lens fit when the patient does not have a valid spectacle prescription (within recall date). Palpebral aperture (PA) height is the vertical distance in millimetres between the upper and lower lid margins at the widest point. Horizontal visible iris diameter (HVID) is a surrogate measure of the actual corneal diameter. HVID aids the selection of lens total diameter for both an RGP and soft lens. PA in relation to lens size determines whether an RGP fit will be interpalpebral or lid attached, and has an influence on the stability of soft toric lenses.13 Pupil size has an impact on the selection of presbyopic lens options and determines the size of the back optic zone diameter of an RGP lens. Palpebral aperture height, HVID and pupil size are most commonly measured using a contact lens rule (Figure 5.1), with direct measurement of PA height and by matching the semicircles to the visible iris or pupil. Semi-circular templates and mm rules are equally accurate in estimating pupil size and measurements can be made in average and dim office illumination, but are not possible in scotopic illumination.14 Pupillometers are an expensive alternative and can provide pupil measurements at very low light levels, but the accuracy at higher light levels is similar to simple rulers and they are generally restricted to refractive surgery clinics, where pupil diameter measurements under controlled scotopic conditions are important.14 1. Ask the patient to remove any spectacles. 2. Ask the patient to look directly at your dominant eye or an object held just below your eye. 3. Measure the palpebral aperture height using the mm rule on the contact lens rule held vertically, with the zero line aligned with the lower lid margin. Read off the average position of the upper lid with the patient looking in the primary position of gaze. 4. Position the contact lens rule on their forehead so that the semicircles are facing downwards and the rule bisects the iris. Move the rule horizontally until the semicircle on the rule and the visible semicircle of the iris match in size and create a continuous circle. It is often easier to judge when the diameter is slightly too large and slightly too small and take the HVID value as the reading in between. 5. For pupil measurement, ask the patient to fixate an unlit distant object. Ensure that you do not get in the way of this fixation. 6. Measure the pupil size using the contact lens rule, similar to point 4. 1. For maximum pupil size: To measure under low illumination, a Burton lamp on the blue light setting is useful for providing sufficient illumination to view the pupil without causing significant pupil constriction, as the crystalline lens fluoresces under the UV light. 2. Minimum pupil size: Additional local lighting directed towards a near reading chart, can be used to measure the minimum pupil size at near, which is of interest when considering lens options for a presbyopic patient. The average HVID value is 11.6 mm with a range of 10.2 mm to 13.0 mm.15 The rule-of-thumb for calculating corneal RGP total diameter is at least 2 mm smaller than HVID and for soft lenses is at least 2 mm greater than HVID. It is also useful to consider the corneal diameter when selecting the first soft trial lens as lens fit is most closely related to the sagittal height of the cornea, which is dependent on a number of factors including curvature and diameter. Larger corneas generally need a flatter base curve and smaller corneas, a steeper base curve.16 The angle of the lids, both in the stationary position and with a blink, should also be noted as this can influence the rotation of toric soft and front surface toric RGP lenses. An eye with oblique lid alignment or an unusual lid movement on blink is more likely to suffer from rotational instability if fitted with a soft toric lens.13 The traditional method to assess corneal topography was using a keratometer. This is an instrument that projects a symmetrical image onto the corneal apex, using it as a reflective surface and applying the optical principles of a convex mirror to estimate the radius of curvature at two assumed perpendicular principal meridians. When more information is needed an instrument called a corneal topographer or videokeratographer or videokeratoscope is used. To collect more data points from the corneal surface these instruments project a Placido image (series of concentric rings) onto the cornea (Figure 5.2) and the reflected image is captured by a high resolution CCD camera and the data are processed by a computer. In addition to providing more detailed information, the area covered by these projected rings is wider than that of a keratometer, up to 10mm compared to 3.0 to 3.5 mm. Topographers will also calculate nominal primary meridian values for the two principal meridians for RGP lens fitting, negating the need to use a keratometer as well as a topographer. The increased accuracy and information obtained with a corneal topographer and their lowering price tag mean the days for keratometers are numbered. Anterior segment optical coherence tomography (OCT; section 7.11) provides valuable information about the real sagittal height of the cornea which is more predictive of soft contact lens fits than either keratometry or topography measurements.17 Knowledge of the profile of the corneo-scleral junction is helpful when fitting gas permeable scleral and semi-scleral lenses, both of which are seeing a resurgence in use for both irregular and regular corneae. OCT is likely to become more widely used in contact lens practice in the future. 1. Explain the procedure to the patient: ‘I am going to measure the shape of the front of your eye, the cornea.’ You may add: ‘… so that I will know which contact lens to fit’, etc. 2. Ask the patient to be seated in front of the topographer and to remove their glasses or contact lenses. If a contact lens wearer keeps their lens on, then you will measure the topography of the contact lens. 3. Most topographers hold patient information on their self-contained database, so complete these details before measurements begin. 4. The instrument’s next prompt screen will have a selection of options; to review existing data or to collect data. Once you have selected collect new data the camera will turn on and the Placido rings will illuminate (Figure 5.2). 5. Ask the patient to place their chin on the chin rest at this point. This avoids unnecessary photophobia as the rings are already illuminated and the patient will have adjusted to the light levels. Either you adjust the instrument to align the camera with the cornea or it is automatic. The fine focusing to align the alignment targets will allow you to capture the image, either manually (pressing the button) or automatically. Before the image is captured ask the patient to blink a few times and then to hold from blinking. 6. Switch eyes, again this may be automatic or manual; usually the instrument moves, not the patient. Align and focus the targets and capture the image of the second eye. 7. The patient can now rest their head back while you confirm the captured images are acceptable and the instrument processes the data and generates the colour maps. 1. Seat the patient comfortably in front of the keratometer, and ask them to remove any spectacles. Sit opposite the patient, across the instrument table, and dim the room lighting. 2. Explain the procedure to the patient: ‘I am going to measure the shape of the front of your eye, the cornea’. You may add: ‘… so that I will know which contact lens to fit’ or ‘… so that I can tell whether the contact lens is changing the shape of your cornea.’ 3. Adjust the eyepiece of the instrument by directing the telescope to a distant object (such as the cubicle wall), turning the eyepiece anti-clockwise as far as it will go and then turning the eyepiece clockwise until the black cross hair just comes into sharp focus. 4. Adjust the height of the patient’s chair and the keratometer to a comfortable position for both you and the patient. Ask the patient to lean forward and place their chin in the chin rest and forehead against the headrest. Occlude the eye not being tested by swinging the keratometer’s occluder into place. Then adjust the chin rest so that the outer canthus aligns with the headrest marker. 5. Ask the patient to look at the reflection of their own eye in the centre of the keratometer and to open the eye wide after a full blink. If a high refractive error prevents the patient seeing their own eye, then ask them to look down the centre of the keratometer. Make vertical adjustments of the keratometer if the patient is unable to see into the centre or shine a pen torch through the observation eyepiece on to the patient’s face – adjust the keratometer’s height until the light shines on their eye. 6. Align the keratometer so that the lower right mire image is centred on the crosshairs, and lock it into place. 7. Adjust the focusing of the keratometer by turning the focusing knob until the mires are clear and the lower right mire is no longer doubled. You will need to keep one hand on the focusing knob and constantly adjust it to exclude doubling of the lower right mire. 8. Measure the principal meridian that is closest to the horizontal first. Rotate the instrument so that the plus signs are set ‘in step’ (Figure 5.3) and the minus signs are parallel. This ensures that the instrument is aligned precisely on a principal meridian. This is easier to judge when the mires are adjusted to be relatively close to the end point. Use one hand to adjust the focusing knob to ensure a single, clear plus sign. Note that you will need to constantly adjust the keratometer’s position to maintain image focus, so keratometric measurements are always a two-handed operation. Note the radius of curvature (or dioptric power) and orientation of this meridian. Fig. 5.3 Alignment of the mires on a Bausch and Lomb keratometer. (a) The view when the mires are off the principal meridians. (b) The view when the mires are on the principal meridians. (c) The view when the plus and minus signs are overlapping to measure the ‘horizontal’ and ‘vertical’ radii of curvature/equivalent power. 9. Measure the second principal meridian, which is theoretically 90° to the primary one. Adjust the focusing knob to give the best focus for the minus signs and then adjust the vertical alignment wheel until the minus signs are superimposed (Figure 5.3). Note the radius of curvature (or dioptric power) and orientation of this meridian. On a toric cornea, the plus signs will be out of focus and not superimposed, but this does not matter as you have completed your measurement of the near horizontal principal meridian. 1. Set up the patient and the instrument as described in steps 1–8 above. 2. Move the telescope forward by adjusting the focusing knob or joystick appropriately. You may need to make minor adjustments both horizontally and vertically to centre the mire images and achieve a view as depicted in Figure 5.4. If the blocks and staircase are in step (Figure 5.4a), then the orientation of the instrument arc is aligned to one of the two principal meridians and you can now proceed to step 4. Fig. 5.4 The mire images as seen on the Javal-Schiotz keratometer. (a) Aligned mire images along the horizontal. (b) Mires from ‘a’ touching with no overlap. (c) Non-aligned mire images. (d) Mire images from ‘c’ brought into alignment along an oblique meridian. (e) Mires from ‘d’ touching with no overlap. 3. If the mires you see are similar to Figure 5.4c, where the blocks and staircase are out of step, then the angle of the instrument arc is not aligned along a principal meridian. Move the arc slowly until the staircase and block mires are in step and are able to be brought into contact by turning the knurled knob situated below the arc as in Figure 5.4d. This is easier to judge when the mires are relatively close together. 4. Ask the patient to blink and then keep their eyes as wide open as possible. Turn the knurled knob situated below the arc until the staircase and block mires are just touching. You must simultaneously adjust the instrument position with your other hand to maintain focus of the mire images. If you turn the knob too much and the mires overlap, a yellow/white area of overlap will be seen. Adjust the position of the mires until they are just touching with no overlap. If the hair wire does not pass through the middle of the touching mires, make final horizontal and vertical adjustments to achieve this. 5. Read off the angle of the arc from the degree scale of the instrument and the radius of curvature along this meridian from the mm scale. 6. Turn the arc through 90° and make adjustments as in steps 4 and 5 to achieve a picture similar to Figure 5.4b or 5.4e. Note the reading off the scales. This is the corneal radius along the other meridian. Topography results are usually printed and attached to the records (Figure 5.5). Many topographers display the corneal curvature data in a variety of ways: The @ nomenclature can be replaced by ‘along’ or ‘al’. A degree sign ( ° ) should not be used after the axis direction. It is possible for the ° to be confused with a 0, so that 15 degrees could become 150 degrees. If the mires are distorted, this must be recorded. Corneal topography: This has the advantage of showing the corneal height over a wide range of locations, making it easier to differentiate between symmetrical astigmatism and asymmetrical astigmatism. This can be easily observed by viewing the colour map. Astigmatism is represented on the map by the appearance of a bow-tie pattern. For symmetrical astigmatism this bow-tie pattern is seen as even bows on both sides (Figure 5.5). As the asymmetry increases, the disparity in the size of the bows increases. Increasing asymmetry in the pattern could be an indicator for correcting this astigmatism with soft toric lenses rather than RGP lenses, which may decentre due to the profile asymmetry. A pattern indicative of early keratoconus has an apex that is decentred inferior nasal (Figure 5.6). However, kerataconus can produce a range of different topographical patterns. Large changes in the degree of astigmatism within a short time can be indicative of keratoconus, lid neoplasms, pterygium, or a chalazion. Large changes in spectacle astigmatism without corneal astigmatic changes in the elderly are likely due to cortical cataract. Corneal curvature measurements can also be used to help indicate whether ametropia is refractive or axial. For example, a patient with increasing myopia but no change in corneal curvature probably has axial myopia. An anisometrope with different curvature readings probably has refractive anisometropia, while an anisometrope with similar curvature readings probably has axial anisometropia. 1. Poor centration: not aligning the visual axis with the instrument’s camera. 2. Poor focusing of the corneal reflection resulting in blurred ring edges. 3. Misaligning the alignment target, which displaces the Placido ring image. 4. Not getting the patient to keep their eyes wide apart so that the Placido ring image is obscured by the shadow from the lids. To minimise error and reduce unnecessary chair time during the fitting of contact lenses, it is prudent for the patient to have undergone a recent eye examination prior to contact lens fitting, so they should attend with a copy of their spectacle prescription, which can be used as the starting point. If the visual acuity is similar in the two eyes and the patient is binocular, a binocular refraction is a quick way of confirming the prescription (section 4.12). Prescriptions greater than ±4.00 DS will require a correction for back vertex distance before selecting a trial contact lens power. Wavefront aberrometry allows the higher-order optical errors of the eye to be measured in addition to sphere and cylinder. In eyes with corneal irregularity as a result of keratoconus, for example, higher-order aberrations have a much more significant impact on visual quality. Wavefront aberrometry is likely to play a more prominent role in custom contact lens fitting in the future as lenses capable of correcting some higher order aberrations become available for keratoconic patients.18 For spectacle refractions of >±4.00 D, a correction for back vertex distance (section 4.12.3) is required. The power of the required contact lens FCL is given by the equation: FCL = Fsp/(1−dFsp), where Fsp is the back vertex power of the spectacles and d is the vertex distance in metres. Spectacle prescription: bvd 12 mm (0.012 m) e.g., RE, FCL = Fsp/(1−dFsp) = −6.00/[1−(0.012× −6.00)] = −6.00/1.072 = −5.60. When fitting a spherical RGP lens to an eye with corneal astigmatism, the toric tear lens trapped between the lens and the eye neutralises the astigmatism, and therefore the trial lens power should be that of the spectacle sphere power alone, rather than the mean spherical error. In the above example, the trial lens power would be −2.00 DS. The slit-lamp examination prior to lens fitting serves a number of purposes: 1. To examine the health of the anterior portion of the eye and adnexa. 2. To look for issues that potentially preclude or limit contact lens wear, or indicate the need for a particular type of contact lens. 3. To allow the recording of baseline data against which to judge changes over time, contact lens induced or otherwise. The tear film and the way it interacts with the lens surface is very important in successful contact lens wear. A large proportion of contact lens drop-outs cite discomfort and symptoms of dryness as reasons for ceasing lens wear.19 A thorough assessment of the tear film and how it impacts on the ocular surface allows you to select a more suitable lens material, such as one with low water content (to limit dehydration) and high lubricity (to minimise friction). It also allows better management of the patient’s expectations. For a detailed description of slit-lamp examination and tear film assessment, see sections 7.2 and 7.3. This section describes the procedures for assessing the tear film, which are generally undertaken as an additional component in the slit-lamp biomicroscopy examination. The tests shown to best predict contact lens induced dry eye in new wearers are symptoms, such as late in the day dryness. These symptoms can be reliably quantified using questionnaires.20,21 The signs useful as predictors are non-invasive tear break up time and grading of lid parallel conjunctival folds.22 It is useful to record and grade everything seen to provide baseline information. For example, grade 1 papillae on the lateral margins of the superior lid (online video 5.1) Patients will be anxious about lenses being applied to their eyes for the first time and you need to try to put the patient at ease (section 2.1). Patients need to be comfortable and feel part of the process, this must involve an appropriate informed consent process, where explaining what you do at each stage and answering any questions they may have is key. 1. Wash your hands thoroughly as per the World Health Organization (WHO) guidelines (www.who.int/gpsc/clean_hands_protection/en/): rub both sides of the hands, in between the fingers and the finger tips. Rinse thoroughly and dry with a lint free towel. 2. Check the lens specification on the container and expiry date. 3. Remove the lens from the container, place on your index finger (finger next to the thumb) tip and check whether the lens is inside out or the correct way round by:
Contact lens assessment
5.1 Contact lens fitting
5.2 Pre-fitting case history
5.2.1 Procedure for pre-fitting contact lens case history
5.2.2 Patient records
32-year-old Px. Caucasian, teacher
5.2.3 Interpretation
5.2.4 Common errors
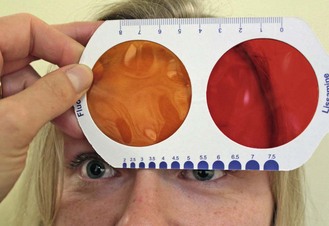
5.3 Corneal diameter, pupil and lid aperture measurement
5.3.1 Comparison of tests
5.3.2 Procedure for PA height, HVID and pupil size measurement
5.3.3 Adaptation for pupil size measurement
5.3.4 Interpretation
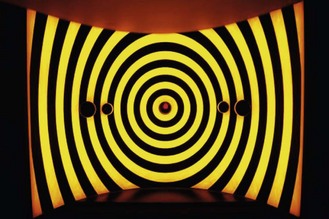
5.4 Corneal topography
5.4.1 Comparison of tests
5.4.2 Procedure: corneal topography
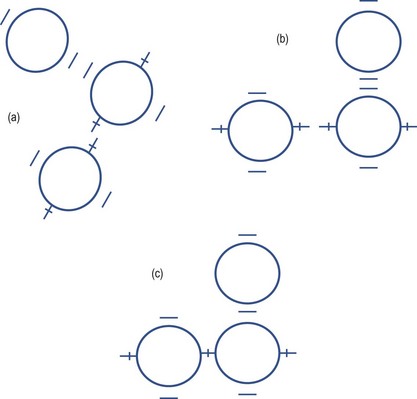
5.4.3 Procedure: Bausch and Lomb one-position keratometer
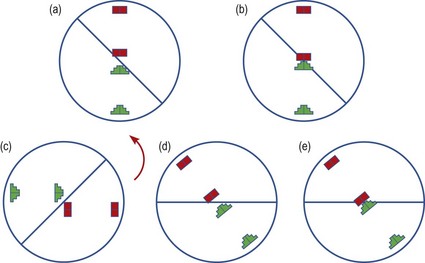
5.4.4 Procedure: two position variable doubling type keratometer
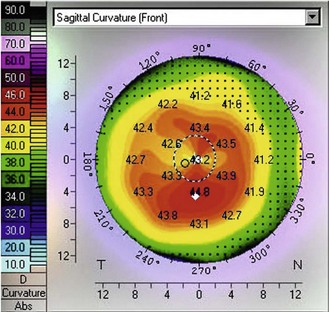
5.4.5 Recording
Keratometry results
e.g.
OD: 42.00 @ 175/43.75 @ 85, −1.75 × 175, mires distorted.
OS: 43.50 @ 180/44.25 @ 90, −0.75 × 180, mires clear.
5.4.6 Interpretation of corneal curvature measurements
5.4.7 Most common errors
5.5 Determination of contact lens power
5.5.1 Comparison of tests
5.5.2 Determination of power for a correction greater than 4.00 DS
5.5.3 Determination of power for a soft contact lens
5.6 Preliminary slit-lamp biomicroscopy and tear film assessment
5.6.1 Procedure for preliminary slit-lamp and tear film assessment
5.6.2 Recording
 would not be considered abnormal but it is invaluable to note this prior to contact lens fitting. A number of grading scales are available but the most commonly used scales are from the Brien Holden Vision Institute (www.contactlensupdate.com/wp-content/uploads/2011/05/Grading_Scales_web.pdf) and the Efron grading scales, which are standardised images of common complications at different levels of severity.23 Try to use just one grading scale, as this will improve your grading accuracy and repeatability over time. The detection of clinical differences can be improved by recording findings in 0.1 steps as these scales are generally quite coarse.23
5.7 Soft contact lens fitting