Chapter 28 Although cochlear implantation began in earnest in the early 1970s, it was not until December 1984 that the Food and Drug Administration (FDA) approved a single-channel device for implantation in postlingual adults. Since then, dramatic improvements in speech processor design and sound quality have led to significant improvements in quality of life for many implanted patients. This chapter presents specific details relating to cochlear implantation surgery. For both children and adult patients, the standard otologic position is used: supine with the head placed on a foam doughnut and turned away from the operated ear. Surgical preparation should always include review of the computed tomography (CT) scans or magnetic resonance imaging (MRI) to determine the cochlear anatomy and whether the cochlea is filled with fluid, fibrous tissue, or neoossification. With the wide array of available cochlear implant electrode designs, it is particularly important to be certain that the appropriate electrode array has been ordered and is available in the operating room. Over the years, several variations of scalp and skin incisions have been utilized in cochlear implant surgery. Although several flaps have been utilized with consistently good results, two fundamental principles must be adhered to: first, the blood supply of the flap must be ample for survival of the flaps; and second, the skin incisions must not overlie the cochlear implant itself. With this evolution in flap design has also come changes in philosophy regarding the amount of hair that must be shaved. Fig. 28–1 shows a commonly utilized skin and scalp incision design that is used by most cochlear implant surgeons. The only hair shaved is that necessary to allow draping of the field around the incisions. The postauricular incision is designed to be at the hairline and is thereby camouflaged. The posterior scalp extension length can be varied depending on the implant design, and because the internal magnet and receiving coil can be placed lateral to the skull for the Nucleus Contour device (Cochlear Corp., Melbourne, Australia) and the HiRes 90K Bionic Ear device (Advanced Bionics Corp., Sylmar, CA), shorter scalp incisions are required for these devices, thereby permitting a minimally invasive approach. A pocket can be developed beneath the existing scalp flap to receive these portions of the device. For the CII Bionic Ear and Med-El C40’/(Medical Electronics AB, Innsbrück, Austria) devices, the entire ceramic receiver portion of the device must be inset into the skull, and therefore the scalp incision must be somewhat longer. This issue is of no functional consequence and does not produce additional morbidity in patients. Moreover, this scalp incision is placed within the patient’s hair and is not seen once the incision is healed and the hair has regrown. There are differences in the soft tissue approach used for adults and that used for children. For young children the incisions are carried through the skin, pericranium (periosteum), and temporalis muscle, directly down to the bone. The soft tissue flaps are elevated en bloc, and subperiosteal elevation is completed to expose the sites of bone work necessary to accomplish cochlear implantation. Important points to consider and accomplish during this aspect of the surgery are adequate exposure of the external auditory canal and zygomatic root, and ample elevation of the soft tissue necessary to protect the soft tissue from the surgical drill. FIGURE 28–1 Common design for skin incision used during cochlear implantation. With adults and older children, it is possible and desirable to develop two tissue planes. The first is in an avascular subgaleal plane lateral to the pericranium, and temporalis fascia and mastoid periosteum superiorly and anteroinferiorly, respectively. Once these flaps are elevated, incisions through the periosteum are made, first along the temporal line superiorly with a perpendicular extension down to the mastoid tip. The superior limb of this incision is carried posteriorly over the skull, and a periosteal flap is then elevated. These flaps are used to close the wound in two layers, which further helps in protecting the receiver portion of the cochlear implant and thereby minimizes the risk of extrusion. Several pieces of temporalis fascia or pericranium are then harvested and kept sterile in the moist gauze sponge on the back table and are used for sealing the cochleostomy, placing fascia between the facial nerve and electrode array, and in helping to retain the electrode array at the juncture of the trough housing the electrode array and the mastoid cavity. Once hemostasis has been achieved either with the bipolar electrocautery or with the mono-polar cautery, it is at this point that the monopolar cautery is taken off of the operative field and turned off within the operating room. Once the cochlear implant has been opened and placed on the opera-tive field, it is necessary to remove the monopolar cautery to prevent current-induced damage to the internal device. For both adults and children, the elevated soft tissue flaps are protected with 1 × 3-inch cottonoids or moistened gauze sponges (Kendall Vistec sponges, TYCO Healthcare Group LP, Mansfield, MA) and retracted from the bone with dural fish hooks (DermaHooks, Weck Closure Systems, Research Triangle Park, NC) and rubber bands. Alter-natively, after placement of the cottonoids and/or moist Vistec sponges, self-retaining retractors can be used. Preparation of the receiver bed begins by selection and design of the placement. It is important to place the receiver bed posterior enough to accommodate the ear level hook or behind-the-ear speech processor. Placement of the receiver bed in a position that is too far anterior is a common mistake made by inexperienced cochlear implant surgeons. The consequence of this misplacement is extrusion of the receiver following skin erosion due to the ear hook or behind-the-ear speech processor placing pressure on the skin overlying the receiver. Another consideration in designing the position of the receiver bed is the anticipated position of a hat band, should the patient frequently wear hats or wish to wear hats. Each device manufacturer provides templates that are used in designing the shape of the receiver bed and these accurately represent the size of the receiver. The CII Bionic Ear device also utilizes a plastic template that is of the size and shape of the internal device. There are specific differences in how the receiver bed is designed and these will be described in separate subsections of this portion of the chapter; however, general techniques are described first. Although it is possible to inset the receiver in some adult patients, virtually all young children and the majority of older children and adults require a craniotomy that extends down to the dura and allows the insetting of the receiver. The technique for accomplishing this includes completing a craniectomy of the dimensions necessary for accommodating the receiver. The outer cortex and diploic layers are removed and the inner cortex of the skull is thinned until the dura is visible through the bone. Next, the craniotomy is performed using a 2-mm coarse diamond bur and is carried down to the dura without violating this layer. The surrounding bony edges are then smoothed to remove any rough edges, and conformation of the template to the craniotomy is completed to be certain that the receiver fits in the created space. It is estimated that 6 months are required for the bone to regrow across this gap and provide stable bone beneath the cochlear implant receiver; however, this important issue has not been systematically studied using CT imaging.1 This is an important consideration when making a decision for a patient with a cochlear implant in place to undergo an MRI, and consequently should be performed prior to MRI scanning. For young children a small (usually 2.5 or 3 mm in diameter) cutting bur is used to remove the outer cortex and diploic layer, whereas for older children and adults a 5-mm cylinder burr is helpful because it allows perpendicular walls to be created around the receiver site while simultaneously dissecting bone with the cutting flukes located on the tip of this cylinder bur. FIGURE 28–2 shows the two methods available to create the tie-down suture holes through the bone. Four sites for suture tie-downs are created so that two separate 3-0 nylon sutures can be used to secure the cochlear implant receiver. Bone wax is useful in controlling hemostasis, and if there is epidermal bleeding, placement of strips of Surgicel (Ethicon Inc., Somerville, NJ) are placed into the epidural space to achieve hemostasis and prevent postoperative epidural hematoma formation. Specific details necessary to create the receiver beds for the Nucleus Contour device, the Clarion CII and HiRes 90K devices, and the Med-El C40’/device are described below. The Nucleus Contour device has two options regarding creation of the receiver bed. The first is to create the cylindrical well to receive the deepest portion of this cochlear implant. It is common in very young children to require a craniotomy down to the dura and creation of the bony island as described above. For the majority of adults and older children, this is not necessary and a craniectomy is all that is required. The remaining portion of the internal device is placed lateral to the skull, and, in particular, the magnet and loop antenna have a very low profile and are barely palpable beneath the scalp flap. The remaining rectangular portion of the internal device/receiver is palpable, and for this reason it is especially important for this device to be placed well posterior to the position that will be occupied by the behind-the-ear speech processor. Another option for this device is to create a receiver bed that will accommodate most of the volume of the Nucleus Contour receiver. This is done in the same manner as described above and the advantage of this is that it allows a more integrated placement of the internal device, but it does require creation of a complex bony island and craniotomy, which requires additional surgical time. FIGURE 28–2 Securing the internal receiver-stimulator to the skull requires (A) four holes drilled through the skull into the bone bed (Med-El C40’/or CII Bionic Ear), or (B) eight channels drilled in pairs (Nucleus Contour or HiRes 90K Bionic Ear). The internal device for the CII Bionic Ear is the largest of the internal devices made by the three companies presently in the United States marketplace. The depth of this device is 6 mm; consequently, virtually all patients receiving this device require a craniotomy to inset it. The special consideration in preparing the receiver bed for this device is principally related to the fan-tail that allows the electrode array to leave the internal receiver device. Accommodation for this structure is critical to avoid excessive pressure or bending of the electrode array. It is important to dissect the bone underlying the fan-tail down to the same level that the floor of the receiver bed will be placed into. A 2-mm cutting bur is used to create the trough that accommodates the electrode array. The Clarion devices have the ground electrode built into the primary electrode array, and therefore a second electrode carrier containing the ground electrode is not used with these devices. The trough utilizes a cantilevered segment of the bone on either the superior or inferior aspect of this trough, and is helpful in keeping the electrode array from becoming exteriorized on the lateral aspect of the skull (Fig. 28–3). FIGURE 28–3 The trough created between the bone bed and the mastoidectomy site is cantilevered to facilitate retention of the electrode array beneath the surface of the skull. The HiRes 90K Bionic Ear has a Silastic carrier surrounding the components and has a position for a replaceable internal magnet within the center of the loop antenna. The issues specific to the HiRes 90K Bionic Ear receiver bed are similar to those described in the Nucleus Contour device. The design of the HiRes 90K Bionic Ear differs from the Nucleus Contour device principally in the midportion of the internal device between the magnet and loop antenna and the electrode array. The design allows for a more tapered device, which theoretically results in fewer problems with extrusion and skin erosion than are experienced with the Nucleus Contour device. Thus, it is possible to create the smaller internal well, relative to the CII Bionic Ear device, to accommodate the most medial aspects of this device while allowing the remainder of the device to be positioned lateral to the skull. It is also possible to create a larger complex receiver bed that would accommodate this entire component, as has been described in the Nucleus Contour device subsection. The trough to accommodate the electrode array is the same as is necessary to accommodate the CII Bionic Ear electrode array. The biggest difference in the receiver bed for the Med-El C40+is that the electrode array and ground electrode emanate from the side of the cochlear implant instead of from the proximal end of the cochlear implant, as is the case with the Nucleus Contour, CII Bionic Ear, and HiRes 90K Bionic Ear devices. Accommodation for this design feature requires that the bony trough begins at the side of the implant internal device and must be positioned so that one of the holes necessary to secure the implant can be placed. Because the depth of the Med-El C40+is 3.9 mm, some of the adult patients do not require a craniotomy down to the level of the dura, and creation of a bone island. This is necessary, however, in virtually all children and in many adults. The same principles described in earlier sections apply with this device, both in terms of creation of the bony island and the trough necessary to accommodate the electrode array. The ground electrode is separate and is placed beneath the temporalis muscle, as is the case with the Nucleus Contour device. During the creation of the craniotomy and bone island necessary to accommodate the receiver-stimulator, inadvertent dural injury may occur. If this violation is small, placement of fascia is done through the opening, so that tissue remains both medial to and lateral to the dura in a dumbbell-shaped manner, and the hole is easily sealed. It is also important to determine that no parenchymal injury has occurred in this clinical setting. The important point in considering the mastoidectomy for placement of a cochlear implant is that this is much smaller than that utilized for chronic ear disease. In contrast to the standard method of saucerizing the mastoid cavity, this is not performed in cochlear implant surgery. There are two areas that need to be skeletonized, and the single most important one of these is the bony external auditory canal. If the bony external auditory canal is not thinned appropriately, then the angle through the facial recess and the size of the posterior aspect of the mastoidectomy become much more difficult and much larger, respectively. It is important to skeletonize the bony external auditory canal, but not to violate the integrity of this structure. Should this occur, the greatest postoperative risk is that of the electrode array extruding through the skin of the external auditory canal. Consequently, it is necessary to reinforce this area with either a graft composed of thick AlloDerm (LifeCell Corp., Branchburg, NJ) or a bone graft harvested from the cortex of the skull. The second area that needs to be skeletonized is that of the tegmen mastoideum. This allows greater ease in completing the facial recess and developing the cochleostomy. An additional advantage is that of providing better exposure and consequently better light delivery, which results in better visualization within the facial recess and middle ear. It is also important to continue this action forward into the zygomatic root for the same reasons (Fig. 28–4). In contrast, the posterior as well as inferior aspects of the mastoidectomy are not saucerized. It is also important to create bony overhangs in these inferior and posterior aspects of the mastoidectomy cavity that are helpful in retaining the electrode array, which is ultimately coiled into the mastoid. These differences in the mastoidectomy technique also facilitate performance of cochlear implantation in very young children (6 to 12 months of age). For those individuals who have undergone a canal-wall-down mastoidectomy procedure in the past and require cochlear implantation to rehabilitate their hearing loss, a two-stage procedure is required. First, mastoid obliteration with removal of all epithelium, oversewing the external auditory canal, and filling the resulting dead space with abdominal fat is performed. Three to 6 months later, cochlear implantation can be undertaken. If no active disease is present, a one-stage procedure may be considered; however, this is not recommended due to the risk of bacterial contamination. Once the mastoidectomy has been completed, the facial recess dissection is performed. The size of the facial recess is the same for individuals of any age, and based on the anatomic measurements of human temporal bones, the facial recess is of adult size at by at least 2 weeks of age.2
COCHLEAR IMPLANT SURGERY
PATIENT POSITIONING AND PREPARATION
SOFT TISSUE INCISIONS AND APPROACH
RECEIVER BED AND ELECTRODE ARRAY TROUGH
NUCLEUS CONTOUR
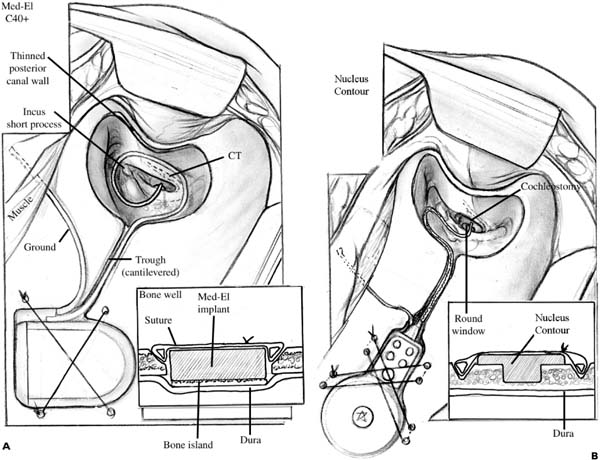
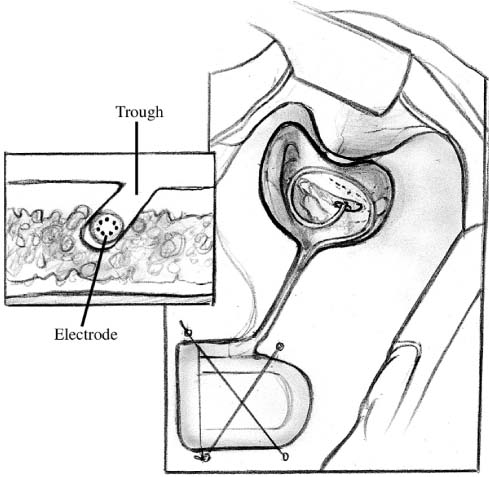
CLARION CII AND HIRES 90K BIONIC EAR
MED-EL C40+
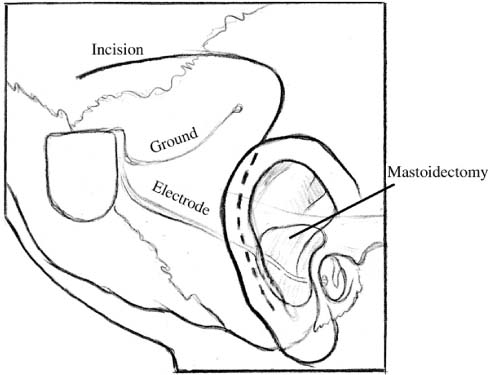
MASTOIDECTOMY, FACIAL RECESS APPROACH, AND COCHLEOSTOMY TECHNIQUES
MASTOIDECTOMY
FACIAL RECESS APPROACH
![]()
Stay updated, free articles. Join our Telegram channel

Full access? Get Clinical Tree


