and Yi Ning J. Strube2
(1)
Wright Foundation for Pediatric Ophthalmology and Adult Strabismus Medical Center, Los Angeles, CA, USA
(2)
Queen’s University, Kingston, Ontario, Canada
Keywords
InfectionLimbal incisionFornix incisionSwan incisionMuscle dissectionSuturingLocking biteWright grooved hookScleral needle passCentral muscle sagLoose pole sutureForced duction testing10.1 Setup and Exposure
Adequate surgical exposure is the key to any operation. Good exposure starts with proper positioning of the patient. The top of the head should be positioned at the very end of the surgical table, placing the neck in an extended position so the chin is higher than the forehead (Fig. 10.1). Extending the neck lowers the superior orbital rim and eyebrow, improving exposure of the eye.
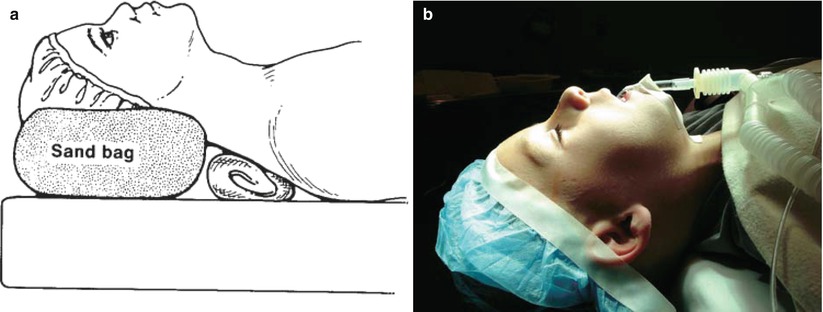
Fig. 10.1
(a) A towel roll under the shoulders extends the neck, placing the chin higher than the forehead so the patient looks back toward the surgeon. Two sandbags on each side of the head are used to stabilize the head. Do not use a thick doughnut under the head, because it will elevate the head and reduce the neck extension. (b) Appropriate head position with the head gently stabilized with tape. Note that the breathing tube is flat so the surgical drapes will lie flat and out of the way
Surgical exposure is also facilitated by keeping the eye proptosed during surgery. Unknowingly, the eye may be pushed posteriorly while being rotated in an attempt to provide exposure. This reduces the exposure, forcing the surgeon to work in a “hole.”
Holding the instruments away from the tips keeps the surgeon’s and assistant’s hands out of the surgical field. If the instruments are grasped close to the tips, the surgeon’s view is blocked.
10.2 Preventing Infection
Although rare in strabismus surgery, postoperative infection, especially endophthalmitis, can be a devastating outcome. Therefore, preventive measures should be taken to limit exposure to potential pathogens during and after surgery. Meticulous prepping of the patient’s eyelids and the surgical field with povidone-iodine, including cleaning the eyelashes well and instilling a drop of povidone-iodine in the eyes, is routine; some surgeons, including the authors, also instill a drop of a broad-spectrum fourth-generation fluoroquinolone (e.g., moxifloxacin, Vigamox®) into the eyes before surgery and at the end of surgery. Careful draping of the eyelids and lashes with a transparent film dressing, such as a Tegaderm Film™ adhesive dressing, keeps eyelashes out of the surgical field and reduces contact with the surgical instruments and sutures. In adult patients, cotton rolls can be placed in the nares to prevent nasal secretions from entering the surgical field, which can happen with the extended neck positioning, especially when the drapes are removed at the end of the case. The authors soak all sutures used to secure the muscles in povidone-iodine prior to use, a procedure that has been shown to significantly reduce the bacterial load on the suture material during surgery [1]. Postoperative routines for strabismus surgery vary by region but usually involve a combination antibiotic/steroid drop and ointment, such as tobramycin/dexamethasone (TobraDex®), for a few days to weeks after surgery. Finally, patients and their families need to be informed of the importance of close follow-up after surgery; they should be informed of the signs and symptoms of a possible infection and instructed to contact the surgeon as necessary.
10.3 Incision Options
There are four basic incisions for strabismus surgery: limbal, fornix, Swan, and combination fornix-Swan. Table 10.1 lists incision options for strabismus surgery.
Table 10.1
Incision options
Incision | Muscle surgery |
|---|---|
Limbal | Rectus muscles at any age |
Fornix | Rectus muscles <40 years of age |
Oblique muscles at any age | |
Swan | Vertical rectus muscles at any age |
Combination Fornix-Swan | Vertical rectus muscles at any age |
Rectus muscles reoperation at any age |
10.3.1 Limbal Incision
The limbal incision provides a large field of exposure and is probably the most popular worldwide. It consists of fornix wing incisions on one or both sides of the muscle and a limbal incision in front of the muscle (Fig. 10.2). Patients who are more than 40 years of age have thin, friable conjunctiva, and the limbal incision permits exposure without pulling or tearing the conjunctiva. Much has been said about the role of conjunctival recession in augmenting rectus muscle recession. Conjunctival recession increases the effect of the recession only if the conjunctiva is tight and is causing a restriction. In most pediatric strabismus cases, there is no conjunctival restriction, so conjunctival recession is rarely needed. In older patients with long-standing large deviations, the conjunctiva may be tight (e.g., a tight, contracted conjunctiva over the lateral rectus muscle in a large exotropia). In these patients, a conjunctival recession is indicated. Limbal incisions are essential if the conjunctiva is to be recessed because of tightness that is causing mechanical restriction of eye movement.
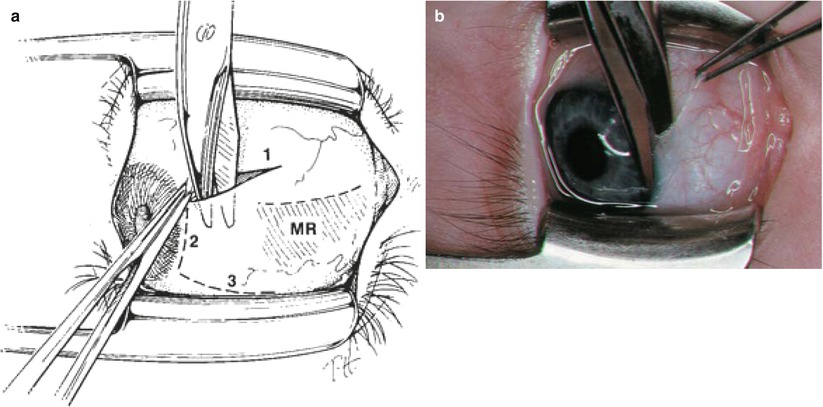
Fig. 10.2
(a) The three steps of a limbal incision. First, make a radial wing incision in the fornix and extend it to the limbus. Second, perform a limbal peritomy right on the limbus in front of the muscle. Third, make a second radial wing incision above the muscle. The second wing incision is optional, depending on the need for posterior exposure. (b) Photograph of step two, a limbal peritomy performed with Westcott scissors
The limbal incision is preferred for horizontal rectus muscle surgery performed under topical anesthesia, as it provides good exposure without pulling on the muscle. Disadvantages of the limbal incision include the possibility of a visible scar or dellen formation, and more conjunctival scarring and discomfort than with fornix surgery. See Chap. 11 for details regarding surgical technique.
10.3.2 Fornix or Cul-de-Sac Incision
The fornix incision was developed by the late Dr. Marshall Parks. He summed up fornix surgery best by stating that “fornix surgery is more difficult for the surgeon, but better for the patient.” The incision is made between the rectus muscles in the fornix (Fig. 10.3). Some call it peek-a-boo surgery because the incision is small and requires stretching the conjunctiva to gain exposure. The advantages of fornix surgery include patient comfort, the small incision scar (which is hidden under the eyelid), the speed with which it can be performed, minimal scarring, and access to rectus and adjacent oblique muscles through a single incision in cases of A and V patterns. In reoperations, the fornix incision is excellent, as it gives the surgeon posterior exposure, facilitating muscle hooking and isolation without having to dissect the anterior conjunctiva off the sclera. The fornix incision is preferred for oblique muscle surgery, as it provides excellent exposure. The fornix incision is the authors’ incision of choice for horizontal rectus muscle surgery in patients less than 40 years of age, and for oblique muscle surgery in patients at any age. The disadvantages include inadvertent conjunctival tears and the relatively limited exposure for rectus muscles. See Chap. 11 for details regarding surgical technique.
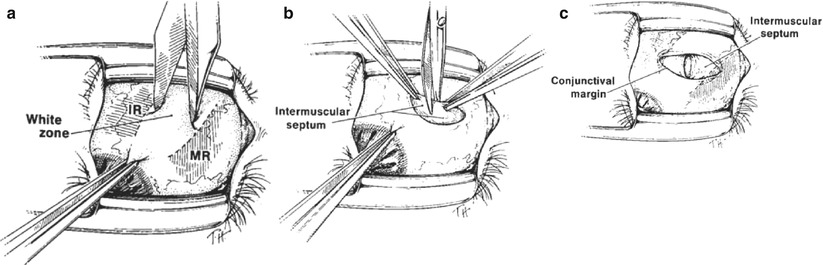
Fig. 10.3
The fornix incision has two steps: (1) conjunctival incision and (2) intermuscular septum (anterior Tenon’s capsule) incision. (a) An inferior nasal fornix conjunctival incision between the inferior and medial rectus muscles with a blunt Westcott scissors. Note that the incision is parallel to the lid speculum. (b) An incision through the intermuscular septum (anterior Tenon’s capsule). Note that this incision is perpendicular to the conjunctival incision. (c) The fornix incision opening, with the intermuscular septum incision perpendicular to the conjunctival incision
10.3.3 Swan Incision
Dr. Kenneth Swan from Portland, Oregon, developed this incision, which is made directly over the rectus muscle (Fig. 10.4). The Swan incision provides excellent exposure and is very useful for reoperations, as it avoids manipulation of the scarred anterior conjunctiva. The problem with the Swan incision is its tendency to scar to the scleral insertion site if it is not closed well, thereby causing a cosmetic blemish. This problem can be a concern for horizontal rectus muscles, but not for the vertical rectus muscles, which are covered by the eyelid. Meticulous conjunctival closure is important when using the Swan incision. This photograph in Fig. 10.4 shows a Swan incision over the medial rectus muscle, used in a patient with previous strabismus surgery. Keep the incision anterior to the plica.
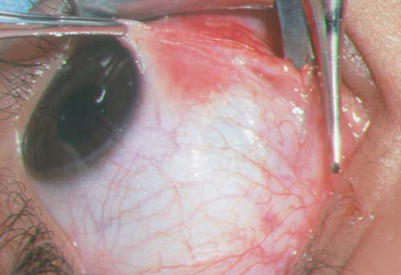
Fig. 10.4
A Swan incision over the medial rectus muscle 2 mm anterior to the plica
10.3.4 Combination Fornix-Swan Incision
The authors’ preferred incision for vertical rectus muscles and reoperations with severe anterior scarring is a combination of fornix and Swan incisions. The incision starts at the fornix and goes down to the bare sclera; the muscle is then hooked. Once the muscle is hooked, the conjunctival incision is extended over the muscle insertion (Fig. 10.5). This incision is particularly useful for surgery on patients who have had previous retinal detachment surgery with a scleral buckle, and for large recessions, to gain posterior exposure. Careful conjunctival closure is important with this incision.
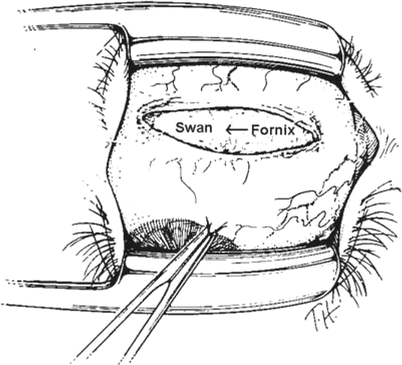
Fig. 10.5
The combination fornix-Swan incision over the inferior rectus muscle
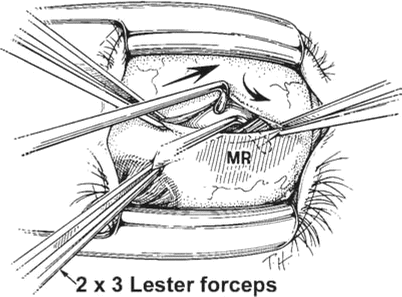
10.4 Hooking a Rectus Muscle
The surgeon uses a 2 × 3 Lester forceps to grasp the conjunctiva at the limbus, to retract the eye and expose the scleral quadrant between the muscles. The key to easy hooking of a rectus muscle is to gain access to bare sclera and the space beneath the intermuscular septum. Placing the hook on top of the intermuscular septum will keep the hook from passing under the muscle. One must stabilize the eye with the 2 × 3 Lester forceps. If the eye is free to move, hooking of the muscle will be more like bobbing for apples. Once bare sclera is identified, place the Stevens hook on the quadrant between the rectus muscles and orient the hook pointed down perpendicular to the sclera (Fig. 10.6). Pass the hook posterior and then rotate the hook underneath the border of the rectus muscle. Starting with the hook perpendicular to the sclera ensures that the tip of the muscle hook will remain in contact with the sclera and slide under the muscle. Once the muscle is hooked with the small hook, the 2 × 3 Lester forceps are released and a large Jameson hook is passed under the muscle to replace the Stevens hook (Fig. 10.7). Make sure to keep the tip of the Jameson hook against the sclera and parallel to the muscle insertion, to avoid splitting the muscle.