and Yi Ning J. Strube2
(1)
Wright Foundation for Pediatric Ophthalmology and Adult Strabismus Medical Center, Los Angeles, CA, USA
(2)
Queen’s University, Kingston, Ontario, Canada
Keywords
Sliding noose techniqueMuscle advancementLimbal approachFornix approachBow-tie techniquePostoperative driftPreventing late overcorrectionThe adjustable suture technique allows for changing the muscle position in the immediate postoperative period, while the patient is awake. Therefore, this technique has the theoretical advantage of allowing fine tuning of ocular alignment. Unfortunately, fine tuning must be done within the first 24–48 h after the procedure, when the muscle function has not completely returned and the patient may still have residual effects of anesthesia. Muscle adjustment requires pulling on the muscle and is often uncomfortable for the patient. Another shortcoming of adjustable sutures is the lack of direct scleral fixation and late changes in muscle position. Ludwig and Chow [1] described stretched scar as a cause of late overcorrection after rectus muscle recession (see Sect. 13.6, at the end of this chapter). Alternatively, large recessions (especially on the lateral rectus) can result in an undercorrection, as the muscle will creep forward. For most “normal” rectus muscles, the most you can hang back a muscle on an adjustable suture is 6 mm. A “tight” muscle, however, can retract back for large recessions. Because of these concerns and the success of the fixed suture technique, the authors prefer using a fixed suture with direct scleral fixation. It is important to note that the late Dr. Marshall Parks did not use the adjustable suture technique throughout his great career.
Even though adjustable sutures have a limited role in our practices, there are situations in which they can be helpful. Some of the most important indications for an adjustable suture are complicated strabismus cases, including paralytic strabismus and large-angle strabismus. In these situations, the standard tables for surgical measurements do not apply, and results with the fixed suture technique may be unpredictable. The adjustable suture, as described below, is used exclusively for rectus muscle recessions.
13.1 Patient Selection
Patient selection is crucial for successful implementation of the adjustable suture technique. The adjustment procedure is somewhat uncomfortable and can evoke substantial anxiety. There is no specific age limit for the use of adjustable sutures, but patients younger than 15 years are often anxious about medical procedures, so the procedure should be limited to cooperative adult patients unless a child is exceptional.
The Q-tip test is a simple and accurate way of identifying patients who will be suitable for the adjustment procedure. This test consists of touching a cotton swab to the medial or lateral aspect of the bulbar conjunctiva. If the patient is able to tolerate manipulation of the bulbar conjunctiva without topical anesthesia, then the patient should do well with the adjustment procedure. It is important to advise patients that the adjustment procedure will be uncomfortable, and avoid patients who are fearful of the procedure or who fail the Q-tip test.
13.2 Initial Anesthesia Considerations
The initial surgery and suture placement can be performed under local or general anesthesia. When local anesthesia is used, avoid long-acting agents like bupivicaine (Marcaine) because the akinesia can last for 12 h or longer, possibly interfering with the adjustment procedure. Local injection of lidocaine, with hyaluronidase and without epinephrine, is preferred because lidocaine akinesia lasts approximately 2–3 h. Wait for at least 4–5 h after the initial surgery before performing the adjustment, to be sure the effects of the lidocaine have completely worn off.
13.3 Surgical Techniques
The operation is performed in two stages. In the first stage, surgery is performed under general or local anesthesia, and the muscle is placed on a suture in such a way that the muscle position can be adjusted later. The second stage, or adjustment stage, is performed when the patient is fully awake or after the local anesthetic has worn off and the muscle’s function has returned to normal. During this stage, the muscle is adjusted to properly align the eyes, and the suture is permanently tied in place.
13.3.1 Limbal Versus Fornix Approach
Limbal surgery provides broad exposure, facilitating suture adjustment. Unless the fornix incision is your procedure of choice, learn the limbal adjustment surgery first. Also, beware of using the fornix technique on patients more than 40 years of age, because older patients have friable conjunctiva that may tear during the stretching maneuvers associated with fornix surgery. Advantages of the fornix approach include an incision hidden beneath the lid, patient comfort, and minimal scarring.
13.3.2 Limbal Approach: Sliding Noose Technique
Figures 13.1, 13.2, 13.3, 13.4, 13.5, and 13.6 illustrate the surgical technique when the sliding noose technique with a limbal approach will be used for left lateral rectus recession (surgeon’s view).
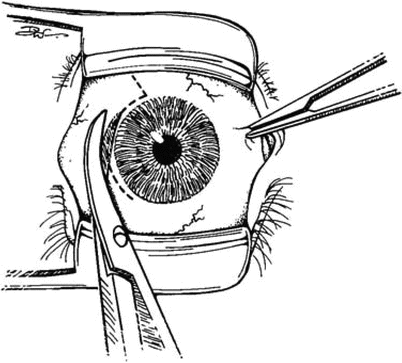
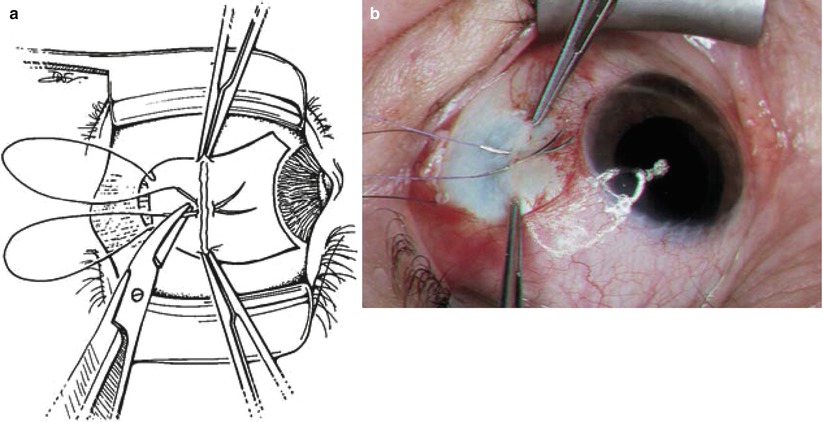
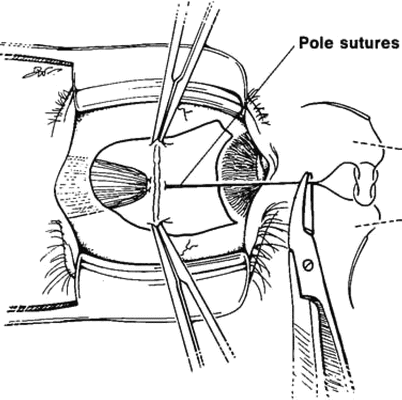
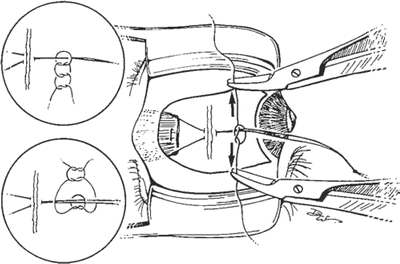
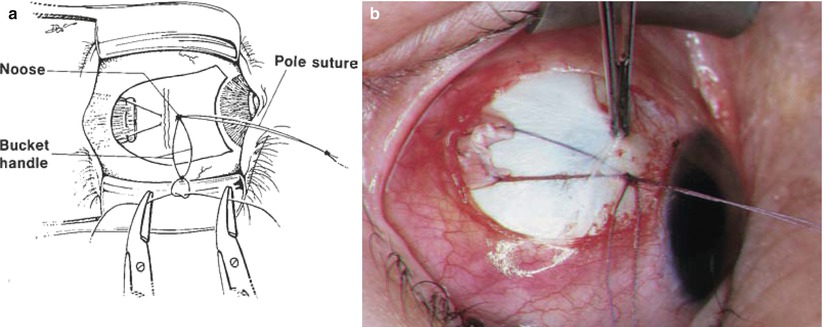

Fig. 13.1
A limbal incision is made. The muscle is secured and disinserted from sclera in the routine fashion. Make the incision directly in front of the muscle, with either a single or double wing incision. This drawing shows a single wing incision in the inferior temporal quadrant. The following figures demonstrate the adjustable suture technique from this point
Fig. 13.2
(a) The insertion is identified and grasped with two 0.5 Castroviejo locking forceps. Spatula needles from the double-arm sutures are passed perpendicular to the scleral insertion line through half-thickness sclera, securing the muscle to the sclera. The scleral bites are centered on the insertion line. The first needle should be left in place while the second needle is directed with a slight slant toward the first, so they exit the sclera touching (i.e., crossed-swords technique). (b) The photograph shows the crossed-swords technique with the needles directed perpendicular to the scleral insertion line (Note: 6-0 Vicryl is preferred for the sliding noose technique as it leaves a smaller knot than 5-0 Vicryl after “tie-off” at the end of the case)
Fig. 13.3
The needles are removed from the sclera, and the sutures are pulled up so the muscle is drawn anteriorly to abut the scleral insertion. A needle holder is clamped across the two sutures approximately 7 mm off the sclera, and the two sutures are tied together in a square knot over the needle holder. This maneuver places the sutures at equal length; these joined sutures are called the “pole sutures.” The muscle can be advanced or recessed by pulling or releasing the pole sutures
Fig. 13.4
A stop is needed to secure the pole suture to a desired position and to keep the muscle from retracting posteriorly. The stop is created by tying a separate piece of 6-0 coated Vicryl suture (approximately 5 cm long) around the pole sutures with a square knot of three single overhand throws (upper inset). This knot forms a noose around the pole sutures. It must be extremely tight, because friction from the noose provides the force that holds the muscle in the desired location. Avoid a loose noose by tying an extremely tight single overhand knot as the first throw. A double throw places too much suture around the pole sutures, which prevents adequate tightening of the first knot. A modification that helps to ensure a tight noose is the double-sided square knot (lower inset). Each throw is a single overhand knot, but the second and third throw of the knot are on the opposite side of the pole suture from the first throw. The double-sided square knot is the senior author’s (KWW) preference because it provides a consistently tight noose, preventing inadvertent slippage of the noose
Fig. 13.5
(a) The ends of the noose suture are tied together to provide a bucket handle for manipulation of the noose during adjustment. (b) The photograph shows a muscle slung back, with the noose acting as a stop against the sclera
Fig. 13.6
The amount of recession can be measured by releasing the pole sutures and rotating the eye away from the recessed muscle, so that the muscle retracts posteriorly, stopping as the noose contacts the sclera. A single-arm 6-0 Vicryl suture (a piece cut from the pole suture) on an S-29 spatula needle can be placed intrascleral near the limbus, to be used as a traction suture during the adjustment procedure (inset)
After the surgery is completed, the sutures are folded over the upper lid, stuck down with ophthalmic ointment, and covered with a patch to protect them from inadvertently being pulled. The patch eliminates preadjustment diplopia and has the advantage of covering the sutures so the patient does not inadvertently pull them, mistaking the suture for a hair. An alternative is to place Steri-Strips over the sutures and tape them to the forehead or cheek; this procedure is useful if bilateral adjustable sutures are employed, to avoid patching both eyes.
Stay updated, free articles. Join our Telegram channel

Full access? Get Clinical Tree


