Vision Therapy for the Very Young Patient
Carl Gruning
David E. FitzGerald
Robert H. Duckman
When an optometrist thinks of vision therapy, the patient is typically a school-aged child and, on occasion, an adult. In fact, many vision therapy (VT) clinics in schools of optometry are also known as pediatric clinics. Vision therapy has typically begun with first graders and older children. This is primarily because these children (a) might be able to attend; (b) may be able to follow directions, albeit minimally; (c) understand or know the alphabet, numbers, colors, shapes, and maybe even concepts of bigger, smaller, closer, and farther. Also, this age group has a considerably higher level of receptive and expressive language compared with the preschool child. The typical preschooler (and certainly the nonverbal infant or toddler) has limited or no concept of distinguishing such terms as single versus double, closer versus farther, 3-D or popping out, how many, and certainly not clear versus blurry.
So why should preschool vision therapy be part of any vision therapy practice?
It is fun, albeit challenging!
Results or outcomes are generally very good.
Early intervention or remediation may be easier and less costly (i.e., an intermittent esotropia versus constant ET with anomalous retinal correspondence.
Early application of lenses, prisms, and occlusion can be very successful.
Lots of the work can be done by a well-trained therapist (i.e., Certified Optometric Vision Therapist).
Who else offers these services? And if not offered, the void will be filled by others such as occupational therapists (OT) or physical therapists (PT) and educators.
The conditions most commonly treated, both in clinics and in private practice include
Strabismus
Intermittent esotropias (ET), exotropias (XT), divergence excesses (DE)
Constant (noncongenital) ET, XT, or hyper-tropias (HT)
Amblyopia
Anisometropias
Oculomotor or visuomotor dysfunction
This category is composed of developmental delays and the exceptional population, including pervasive developmental delays (PDD), autism, Down syndrome, cerebral palsy, chromosomal disorders, and other neurologically based problems (1).
Referral sources usually are (a) OTs, (b) PTs, (c) nursery school teachers, (d) other doctors of optometry (ODs), (e) parents of children previously treated, and on rare occasions, (f) the child’s pediatrician.
This chapter addresses activities that can be used for very young children to improve or enhance visual function. These activities will be grouped by category and will include objectives, step-by-step instructions for the parent, caregiver, or assistant and a list of necessary materials and resources and where to obtain them. Keep in mind the level of receptive (and expressive) language, as well as cognitive abilities of the preschool vision therapy patient. These factors can be vastly different from those of the school-aged child.
Additionally, duration of office- or clinic-based therapy sessions will often be significantly shorter than those for a child in second grade. Oftentimes, multiple brief encounters (10 minutes) may be necessary because of the limited attention span of the youngster. At times, it is better to work just with the parent or guardian and demonstrate the procedures for home use or practice before commencing with office-based treatments. Subsequent office visits can then be both progress evaluations to determine what has been accomplished and also to provide the parent or guardian with more advanced home therapy procedures.
Procedures for Amblyopia
The two most common causes of amblyopia encountered with the preschool population are anisometropic amblyopia and strabismic amblyopia (2). Other forms that might be encountered include (a) deprivation (congenital cataract), (b) nutritional, and (c) isoametropic amblyopia.
Until recently, patching regimens have included full-time direct occlusion of the nonamblyopic or nonstrabismic eye (3). This was done to treat the amblyopia, eliminate suppressions, and, in the case of strabismus, to reduce the chance for anomalous correspondence. More recent findings indicate that, for moderate amblyopia, full-time direct occlusion is not really necessary and that 2 to 3 hours per day of occlusion of the sound eye is adequate (4). Additionally, the use of atropine drops or ointment has been recommended in the sound eye in cases of poor compliance or cooperation with patching, or concern (parental) regarding the cosmesis or stigma when wearing a patch (5). Recent studies of moderate amblyopia have shown that occlusion and pharmacologic penalization are equally effective (5). Additionally, weekend atropinization has yielded comparable acuity gains to full-time penalization (6). Lens-prescribing guidelines are covered in Chapter 20 of this text.
For maximal success in treating amblyopia, Krumholtz and FitzGerald (7) recommend the following three-part process:
Optimal spectacle prescription
Appropriate patching regimen
Active vision therapy
The following procedures are for both office- and home-based treatment and are done with total occlusion of the nonamblyopic eye. The method of feedback should be appropriate for the depth of amblyopia. In more severe cases, tactual methods should be used before visual feedback is used.
FLASHLIGHT TRACKING: This activity is done with two flashlights. The parent shines a light on a wall. The patient, with the other flashlight, shines its light on top of the parent’s light. The parent then moves the light slowly, while the child keeps his or her light on top such that it always appears as if there is only one light. Having colored filters over the lights makes it easier for children to monitor their movements. Younger children may have manipulative issues with standard flashlights, so smaller ones are recommended.
FLASHLIGHT TAG: Again, this activity requires two flashlights. This time the parent shines a light on the wall, then quickly moves it to another spot. The child moves his or her light to “tag” the parent’s light, such that there is one light viewed. To have the child search for the light, the parent should stand behind the child. When this activity is done as a binocular activity with anaglyphic glasses, younger children may have difficulty with accurately directing the flashlight. If so, the parent should be the
cat (i.e., placing the light on top of the targeted light, the child’s) and the child should be the mouse.
PIE TIN ROTATIONS: This activity is done with an aluminum pie tin and various sizes and weights balls (e.g., marbles, beads, ping-pong balls). The child places one of the balls in the pie tin. Holding the tin in both hands, the child rolls the ball around in the tin. The path of the ball must be followed by the child’s eye accurately, without head movement. The child should note differences between different size and weight balls.
BROWNIE TIN ROTATIONS: This activity is the same as pie tin, except a square or rectangular container is used, and the ball is to be kept along the sides, stopping briefly at each of the four corners.
COLORING IN LETTERS: Using letters large enough to be seen, have the child color in all the letters that have openings (e.g., A, B, D, O, P). Use colored pens or pencils so it is easier for the child to see. These activities should be guided by age and skill level. Larger pictures and crayons may be needed for the younger child, whereas the older preschooler may be able to have the demand increased by using a finer target (picture or letter) and a more sharpened pencil point. The parent can vary the demand by buying a regular coloring book and creating their own number coloring book by making lined sections within a picture.
SHOELACE SEWING: Punch small holes in a piece of paper, cardboard, or felt. Using a shoelace, the child should thread the lace through the holes. If possible, have the child keep the lace from hitting the sides of the holes. The hole size should match the performance level, such that large holes may be used initially. As the performance improves, the holes and threading instrument can gradually be made smaller. Various size sewing needles and yarn and matching size holes are ideal for this technique.
STRINGING CHEERIOS (or buttons, fruit loops): The child takes Cheerios or buttons and slips them, one by one onto a string with a knot at the end. Cheerio placing books, in which the child places Cheerios in designated areas of the book, are commercially available.
TWEEZERS AND RICE: Cover a cup with a piece of paper. Make a small hole on top to form an opening. Put some rice or beans on the table. Using the tweezers, the child must pick each piece up, one at a time, and place it in the opening without touching the sides of the opening. To make it more difficult, decrease the size of the opening through which the child must place the rice. If the child is too young to manipulate the tweezers, the child can use fingers. A pincer grip is preferred.
TOOTHPICK AND HOLE: Make a hole in a piece of paper. The child must place a toothpick through the center of the hole, without touching the sides. To increase the level of difficulty, gradually make the hole smaller.
SPEARING RAISINS: Place raisins on the table. Using a toothpick, the child must spear the center of the raisins, one at a time. The child may be allowed to eat the raisins if parent has no objections.
SORTING SPRINKLES: Buy a jar of assorted colored sprinkles and pour some onto a flat surface. Have the child then make piles of same colored sprinkles.
PENNIES IN A CUP: Make a slot in a paper cup turned upside down. The child must place pennies through the slot, without touching the sides of the slot. Gradually make the slot narrower to increase the level of difficulty.
MAZES: “Homemade” or commercially available books that the child can trace through visually or with a marker.
MICHIGAN SYMBOL TRACKING (large to small): The child is to perform as directed, crossing out the consecutive
letters in the alphabet, or picture sequences.
HIDDEN PICTURES: Many workbooks with hidden pictures can be purchased. The child is to find the appropriate hidden pictures on the page. Once the picture is found, the child can color in the picture using an age-appropriate marker, crayon, or finely sharpened pencil.
DOT TO DOT with markers or felt-tipped pens: Make a series of dots or circles on the paper and ask the child to bring a colored felt-tipped pen down from a few inches away and put a dot in the center of the circle or on top of the dot. Simple dot patterns or the dot-to-dot games can also be used as techniques.
CONNECT THE DOTS: Many workbooks can be purchased, or patterns can be made, such that, by connecting the dots by consecutive numbers, will produce a picture. Once the picture is completed, the child is asked to carefully color it in. It is necessary for the child to have number and counting concepts to do this activity.
SCRUB THE LINE: Make a series of zigzag lines on paper and ask the child to scrub them (i.e., continuously make lines back and forth over (and perpendicular to) the lines on the paper. The child should keep the point oscillating as rapidly as possible and make scrubs that are equal on either side of the drawn lines.
FOLLOW THE PATH: Make paths with two parallel lines (road) drawn closely together. The child is to draw a line inside the path with a different colored pencil or pen, trying not to hit the parallel lines. Reducing the road opening and increasing the number and sharpness of the curves can increase the demand. To make the task more interesting, for example, we have drawn a picture of an ice cream truck at the start and a picture of the child outside his or her house waiting for the delivery on the other end.
CUT OUTS: Have the child cut out pictures from a coloring book, newspaper, or magazine, working on improvement of accuracy.
PENNIES GAME (Fig. 23.1): Get a few dozen pennies, some new and shiny and others old or worn so features of details on both sides are not easily seen. Have two paper or plastic cups. Place half the pennies with face up (face or man side) and half with face down (house side). Scatter randomly on a table. Ask child to rapidly sort pennies with face up into one cup and with faces down up into the other. Check for accuracy. Initially, all shiny pennies may be needed. As the child improves, all tarnished pennies can be used.
STICKER TRACKING: Obtain a half dozen tongue depressors or popsicle sticks. Purchase sheets of small stickers in a novelty toy or stationery store and affix a sticker on both sides of top and bottom. Holding the stick about 10 inches from child’s face, ask the child to identify the sticker and follow it with the amblyopic eye. The stick can be rotated for a new picture and rotated 180° for two new pictures. Having a half dozen sticks will allow for 24 different stickers or pictures.
PUPPET SACCADES: Obtain two or more different finger puppets. Separate them by 10 to 20 inches and call out the name of the puppet. The child must find it. Expect to see significant head movement with the preschool child.
CROSS-OUT ALL SAD FACES: Using 8.5 × 11 inch sheets of a mixture of very small happy  faces and sad
  faces, have the child circle, X out, or dot with felt marker all the sad faces. Size of faces can be enlarged for deep amblyopia and reduced as VA improves.
LITE BRITE (Toys “R” Us) and SPARKLE BRITE (Ohio Art or J. C. Penney catalog and online) using red and green glasses and just one color peg, seen by amblyopic eye (red sees red, green sees green).
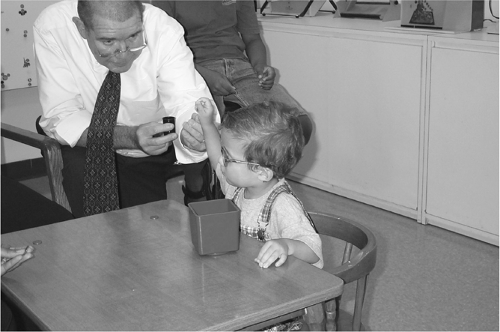 Figure 23.1. A small child plays the Pennies Game with his optometrist. |
Once amblyopia becomes shallow (i.e., 20/40 or better), we can now commence with procedures without total occlusion but where both eyes are open and the target is seen only by the amblyopic eye. These procedures are known as monocular fixation in a binocular field (MFBF). These are often achieved via polarized targets and filters, or anaglyphic targets and filters. In MFBF, the ground is seen by both eyes and serves as a binocular lock. More advanced MFBF procedures will utilize two monocular targets, one seen by each eye. At this point in treatment, VAs need to be fairly equal and no deep suppressions present. Now, both red and green pegs and filters are used.
Antisuppression/MFBF Procedure
LITE-BRITE
Purpose
Antisuppression, monocular fixation in binocular field, eye–hand coordination, and monocular fixation amblyopia training.
Materials
Lite-Brite Game, red/clear or red/green filters
Procedure
For antisuppression, MFBF, and eye–hand coordination, Lite-Brite is used the same way as Sparkle Lights. Without the templates, Lite-Brite is a light box with holes for pegs to go into and, as such, can be used similarly to accomplish antisuppression training, MFBF, and eye–hand coordination, except the background is clear instead of black. As with Sparkle Lights, in the case of amblyopia, you can use red or clear filters with green pegs where the red filter goes over the nonamblyopic eye.
Using monocular fixation, patch the nonamblyopic eye. Place a Lite-Brite picture pattern onto the light box. Have the patient place the appropriate colored peg into each marked hole until the pattern is completed.
Resource Materials
Available at most toy stores, this product is from Milton Bradley Co.
Note: Remember that cancellation is opposite on the clear background than on the black background. On the clear background, the red peg will be seen by the eye with the green filter and vice versa. On the black background, the red peg will be seen by the eye with the red filter and vice versa.
SPARKLE LIGHTS
Purpose
Antisuppression training (use red and green pegs)
Monocular fixation in binocular field (use red, green and crystal pegs)
Eye–hand coordination and fine motor skills
Materials
Red and green (R/G) glasses, Sparkle Lights game
Procedure
Place R/G glasses on patient. Place R/G pegs on the board in patterns or randomly. Have patient touch all the pegs the child sees with one finger.
Place R/G glasses on patient. Place R/G pegs in a row. Have patient put a peg above or below all the pegs on the board.
Place R/G glasses on patient. Place R/G pegs in a pattern on the board (e.g., circle, square, line). Have the patient make the same pattern somewhere else on the board.
Place R/G glasses on patient. Place R/G pegs in a pattern on the board (e.g., circle, square, triangle). Have the patient make a matching outside border around your pattern.
Can also be done with red and clear filters with just green pegs for monocular fixation in a binocular field for amblyopia (red lens on the nonamblyopic eye).
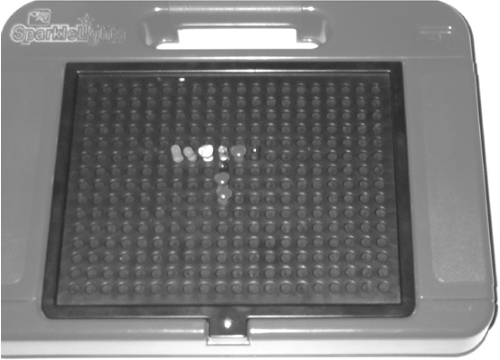
Figure 23.2. Sparkle Lights light box for the placement of red, green, and clear crystal pegs. (See color well.)
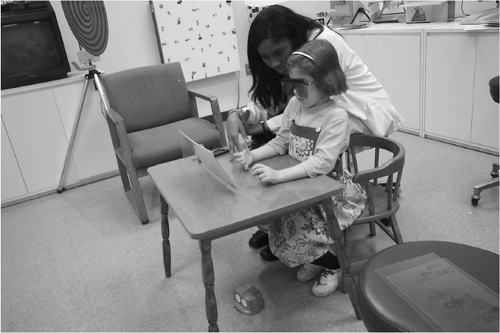
Figure 23.2. Child with red/green glasses interacting with anaglyphic stimulus for antisuppression training.
As above, adding clear pegs that can be seen by both eyes (Fig. 23.2).
Place R/G glasses on the patient. Place pegs that can only be seen with the normally suppressing eye (e.g., if the left eye is the suppressing eye and the green filter is on the left eye, use green pegs). Slowly introduce pegs seen by the normally fixating eye (red pegs) and have the patient try to keep all the pegs on. Patient is instruct to touch each peg in an order (e.g., from right to left, from up to down).
All of the above utilize E/H components, but do not require the R/G filters for the eye-hand part.
Resource Materials
Manufactured by Ohio Art Company, Bryan, Ohio. Also sold at J. C. Penney and on the Internet.
Note: Best if done in dim or darkened room conditions. The advantage over Lite-Brite is that the black background is permanent and does not have to be replaced after each use. Lite-Brite pegs illuminate more brightly when used in Sparkle Lights box. Lite-Brite pegs are easier to insert and remove.
ANAGLYPHIC MAZE GAMES
Purpose
Antisuppression during a visuomotor activity
Materials
R/G glasses, white paper, black pen, and red color pencil (carmen red and vermillion red from Venus Company cancel well) (Fig. 23.3)
Procedure
Place the R/G glasses on the child. Have the child walk the red pencil through the black line maze from Start to Finish. Encourage the child to always stay inside the path. Have plenty of mazes available, ranging from very easy to complex. Ask the child to report if the maze disappears or goes away. In the case of an amblyopia, the red filter goes in front of the better eye and the green filter goes in front of the
amblyopic eye. Good illumination should be used.
To increase difficulty, make the mazes narrower, longer, and more complex. Next, make the mazes with red pencil and the child “walks”/draws pencil (#2) through the red maze. Ask the child if anything disappears, “goes away.”
THE HUNDREDS CHARTS WITH ANAGLYPHIC OVERLAYS AND FILTERS
Purpose
Antisuppression training
Amblyopia training
Saccadic fixations
Eye–hand coordination.
Materials
Hundred Charts are teaching tools to help children learn numbers from zero to one hundred. They are produced in various sizes and each can be presented in black on a white background or red on a white background, and R/G glasses. (Red cancels very well with red filters, therefore, the eye with the green filter will see the numbers).
Procedure
Place R/G filters on the child and place one of the charts at distance or at near. Point to a number and have child tell you what the number is. After several trials, reverse the position of the filters.
Using a green pencil or pen that cancels well, put green shapes around some of the red numbers. Call out a number and have the child tell you the shape OR have the child tell you all the numbers that are in squares, triangles, and so on.
Using a red filter over the normally fixating eye and transparent filter over the amblyopic eye, have child tell you which numbers you are pointing to OR cross out any number you call out.
Place the larger chart (red side) on the wall at a distance of about 7 to 10 feet and have the child read the numbers at the beginning and end of each line, second and next to the last number on each line, first and third number, and so on.
Place a clear piece of plastic over one side of the chart. Have the child draw circles around all the odd numbers or even numbers.
Resource Material
Available from Media Materials, Baltimore, MD.
BEAD AND STRING GAMES
Purpose
Can be used for antisuppression; monocular fixation in a binocular field; E/H coordination; and monocular acuity improvement for amblyopia.
Materials
Black string or black shoelace (about 2 feet long), assorted red, green, and black beads, which cancel appropriately through red or green filters, black felt (2- or 3-foot square piece needed).
Procedure
Place R/G filters on the patient. Have the child hold the string and tie a large enough knot at one end so that the beads will not fall off. Spread beads out on a piece of black felt and tell the child to look for the beads. The child should then pick up ONE bead at a time and put the end of the black string through the hole in the bead. The child should attend to both the string and the bead while doing this. If done accurately, have the child pull the string through so that the bead slides down the string. If done inaccurately, have the child start over on the same bead. Continue until all the beads are strung.
Resource Information
Red and green wooden beads are available through most arts and crafts stores.
Note: Be sure to check cancellation through the R/G filters. Full room illumination is necessary.
Variations
Make up different random bead configurations on several pieces of string. Place one of your configurations on a piece
of black felt. Give the patient a black string and have the patient take beads from a box and string beads onto another string so that the patient’s configuration matches yours so that when the two are laid next to each other they are exactly the same.
Take one of your prepared strings and lay it onto the black felt. Have the patient count how many red beads are on the string, how many green beads are on the string, and how many black beads are on the string. You can have the child touch each bead while counting.
Place red, green, and black beads randomly on the black felt. Have the child sort all of them into three piles of black, red, and green beads.
FLASHLIGHT TAG while wearing red/ green filters with one white light and one color filter; same color over amblyopic eye (projected light).
TV TRAINERS using a red or green acetate filter over a TV screen and opposite color (green or red) in front of nonamblyopic eye.
MONOCULAR ACCOMMODATIVE FACILITY (rock) in a binocular field: Red Michigan symbol tracking with green filter on amblyopic eye; begin with ±1.00, gradually increase powers. Single spirangle or split spirangle with Polaroid’s and ± flippers (or Bozo). Sherman rotator with anaglyphic discs, red/green filters and ± flippers.
BROCK POSTURE BOARD MAZES
RED-GREEN-BLACK BEAR GAMES
Purpose
Antisuppression, monocular fixation in a binocular field, and eye–hand coordination.
Materials
R/G glasses; red, green, or black bears, large piece of black felt (good use for an old tangent screen)
Procedure
Spread out black felt on a flat surface. Place red and green bears on the felt randomly in two rows such that for each item in one row a matching item is in the other row (Fig. 23.4). Place R/G glasses on the patient. Have the patient take one item from the back row and place it in front of a matching item in the front row.
Place bears on black felt. Wearing R/G glasses, have the child count how many bears there are. Tell the child to touch each item while counting it and name the color.
Drape felt on a horizontal surface but also create folds so that there are a few “valleys.” Place bears randomly (by color) on both the horizontal surface and in the valleys, trying to make some easy to see and others more difficult to see (partially behind a fold in the felt). Have the child localize the bears and identify the color of each one selected.
Resource Materials
The bears are available through A. C. Moore craft stores. This a chain of craft stores in the northeastern United States, but they sell on the Internet at www.acmoore.com
Note: This should be done in good illumination. Because the background is black, the red bears are seen through the red filter and the green bears are seen through the green filter.
Clinical Pearl: The difference in amblyopia treatment between prescribing and passive patching, versus active VT, is hands on (i.e., the tactile, kinesthetic, or proprioceptive feedback from either manual input or bimanual input seems to significantly improve acuity.
Clinical Pearl: Most monocular amblyopia procedures, besides addressing acuity improvement, also enhance or develop:
Improved fixation (maintenance of fixation)
Improved oculomotor skills (pursuits, saccades, and eye hand coordination)
Greater accommodative accuracy, once accommodation “kicks in” (VA is 20/40 or better)
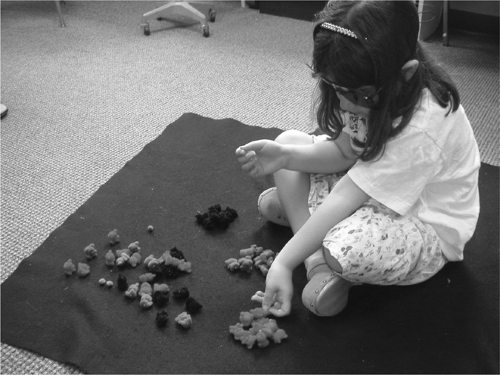 Figure 23.4. Red/green bears on black felt material for antisuppression training. (See color well.) |
Once acuities are approximately equal and no deep suppressions exist (i.e., nonstrabismic amblyopic patients), it is critically important to establish and solidify binocularity and stereopsis to ensure no regressions or drop in acuity.
The following procedures are either MFBF where each eye sees a target via Polaroid or anaglyphic filters, or stereopsis is created via disparity with the same filters.
LITE-BRITE with red, green, and clear crystal pegs. In an ideal world, the crystal pegs are seen as yellowish or reddish-green.
MAZES with red plastic sheet, white paper with red pencil mazes, and penlight—using R/G filters. Here, red light is seen by red filter and red maze on white paper is seen by green filter. Complexity of mazes can go from simple to complex as the child’s binocular coordination vision improves. This also develops or improves eye hand coordination.
KEYSTONE ANAGLYPHIC FUSION GAMES using anaglyphic 8.5 × 11 inch targets with pediatric appropriate pictures. Vergence demands vary from card to card and also within many of the cards. The clinician can determine whether the child appreciates float, localization, and parallax. Available from Keystone View—Reno, NV; Bernell Corp.—Mesha- waka, IN.
KEYSTONE BASIC BINOCULAR TESTS. Although designed to evaluate a number of binocular areas (e.g., posture, suppressions, stereo), these anaglyphic pictures are also excellent to use along with the fusion games. R/G filters are used to achieve the binocular response. Available: Keystone View—Reno, NV; Bernell Corp.—Meshawaka, IN.
VECTOGRAMS and Polaroid filters. These variable demand targets are excellent for young children and often easily elicit float, localization, and parallax. In addition, smooth vergence ranges of
binocular vision can be measured at each session.
OPTOMATTER CARDS
Purpose
Antisuppression training
Materials
OPTOMATTERS cards, R/G glasses
Procedure
Different cards, which are utilized in similar ways
Stay updated, free articles. Join our Telegram channel

Full access? Get Clinical Tree


