Techniques of Scleral Buckling
George A. Williams
Thomas M. Aaberg Jr.
Scleral buckling is an effective surgical technique for the repair of rhegmatogenous retinal detachment. The scleral indentation achieved with scleral buckling can be accomplished by a variety of techniques and materials, each of which has inherent advantages and disadvantages. By adopting a flexible approach that incorporates the advantages and benefits of different techniques, the surgeon can maximize the rate of anatomic success in reattaching the retina while minimizing potential complications. This chapter discusses the basic principles of scleral buckling surgery, with an emphasis on the techniques the authors favor. Alternative methods of retinal detachment repair, such as vitrectomy, pneumatic retinopexy, and temporary inflatable balloons, are discussed elsewhere in this text.
ANESTHESIA
Scleral buckling can be performed with the patient under either local or general anesthesia. Selection of anesthetic technique often becomes a function of surgeon preference, the patient’s emotional and physical state, and the availability of quality general anesthesia. The increasing frequency of outpatient scleral buckling surgery has decreased the use of general anesthesia at many centers. The majority of scleral buckling procedures are performed under local anesthesia.
The advantages of local anesthesia include shorter operating time, quicker postoperative recovery, and possibly decreased morbidity and mortality in select cases. However, retrobulbar placement of local anesthetic is not without risk to the eye or the patient’s general health. Perforation of the globe, particularly in myopic patients, and damage to the optic nerve may result in permanent visual loss after retrobulbar injection.1,2,3 Respiratory arrest and grand mal seizures have also been reported.4 Damage to rectus muscles, typically the inferior rectus, may occur after retrobulbar injection causing diplopia.5 These complications can be minimized but not eliminated by use of either a subconjunctival or peribulbar technique of anesthetic administration.6 Subconjunctival infiltration with lidocaine allows a limbal peritomy and dissection of Tenon’s capsule. Additional lidocaine and bupivacaine then can be administered via retrobulbar irrigation with a blunt cannula. This avoids the passage of sharp needles and diminishes the risks of ocular perforation and intravascular or intraneural injection.7 The authors use this technique to supplement general anesthesia and diminish postoperative pain and nausea.8
A peribulbar approach may be employed for anesthesia during scleral buckling. This technique also reduces the risk of ocular perforation compared with retrobulbar injections. A 1:1 mixture of 2% lidocaine and 0.5% bupivacaine is injected at the junction of the temporal and central thirds of the inferior orbital rim beneath the globe and just medial to the supraorbital notch. No attempt is made to enter the retrobulbar space. A total of 7 to 10 mL of anesthetic is injected, with two-thirds of the mixture delivered inferiorly and one-third given superiorly.9
The major disadvantage of local anesthesia is inadequate analgesia.10 Using a retrobulbar approach, 0.45% bupivacaine and 1.6% lidocaine provides superior anesthesia as compared with lidocaine alone.11 Either retrobulbar or peribulbar anesthesia may be supplemented during the procedure with a sub-Tenon’s capsule irrigation or local infiltration of additional anesthetic. This can be administered via a flexible catheter12 or with a blunt cannula.13 Intravenous sedation with propofol or narcotics such as morphine and fentanyl or neuroleptics such as droperidol may also be helpful. These agents may cause respiratory depression and therefore require close monitoring by skilled personnel.14
BASIC SURGICAL TECHNIQUE
After induction of either general or local anesthesia, the operative field is prepared for surgery. Careful use of antisepsis can minimize the risk of postoperative infections. The lashes and lid margins are major sources of bacterial contamination,15 so particular care is directed to this area. Preoperatively, the lashes are clipped flush with the lid margin. At the time of surgery, the lash margins are scrubbed with antiseptics. Povidone-iodine solution is an excellent antiseptic that also is nontoxic to the cornea and conjunctiva.16 The authors place a drop of 5% povidone-iodine solution in the conjunctival sac during the sterile field preparation. Other antiseptics, such as soaps, alcohol, and hexachlorophene, are also effective but are toxic to the cornea.
Copious irrigation of the conjunctival sac with sterile saline effectively washes away most debris from the conjunctival surface. Despite irrigation, the conjunctiva usually is colonized by a variety of bacteria. Staphylococcus epidermidis can be cultured in 37% to 70% of patients before scleral buckling.15 More virulent pathogens, such as Staphylococcus aureus or gram-negative bacteria, including Proteus and Pseudomonas, are present in 5% to 9% of routine preoperative cultures. The presence of these pathogens preoperatively increases significantly the incidence of postoperative buckle infections, even with preoperative topical antibiotic treatment for 1 to 2 days.15 Although some surgeons use preoperative topical antibiotics, such as fluoroquinolones, there is no compelling evidence that infection rates are diminished.
After irrigation, the skin surface is dried with sterile gauze. This is particularly important when disposable adhesive drapes are used. The goal of surgical draping is to isolate and protect the surgical field from contamination. Common sources of contamination are the oral and nasal cavities.17 When properly applied, adhesive drapes can effectively seal off these areas from the operative field.
Surgical Anatomy of Conjunctiva, Tenon’s Capsule, and Extraocular Muscles
Conjunctival opening can be performed either at the limbus or 4 to 8 mm posterior to the limbus.18,19 Because of the considerable manipulation the conjunctiva undergoes during scleral buckling, radial relaxation incisions are necessary to prevent tearing of the conjunctiva. If a lateral canthotomy is performed, the relaxing incision should be made away from the horizontal meridian to prevent symblepharon formation. The authors routinely use a limbal peritomy and believe this approach allows both better exposure of the sclera and better coverage of the buckle with less postoperative irritation than with a posterior peritomy. In patients with filtering blebs or recent limbal wounds, the peritomy can be extended posteriorly to avoid the area of concern.
Conjunctival opening at the limbus can be facilitated by spreading with scissors beneath Tenon’s capsule just posterior to the limbus, thereby avoiding the fusion of conjunctiva and Tenon’s capsule, which occurs at the limbus. Once the space between Tenon’s capsule and the sclera is entered, conjunctiva and Tenon’s capsule can be elevated from the sclera easily and then cut flush at the limbus. With a limbal incision, conjunctiva and Tenon’s capsule can be retracted together, usually with less bleeding. If only one or two quadrants are to be buckled, a 360° opening of conjunctiva is not necessary. Conjunctiva and Tenon’s capsule can be reflected in the required quadrants only and the appropriate muscles isolated, as described later.
Tenon’s capsule is a fascial tissue that invests both the globe and extraocular muscles. Anteriorly it fuses with conjunctiva at the limbus, and posteriorly it ends at the optic nerve sheath. Between Tenon’s capsule and the sclera is the interfascial space of Tenon, or simply Tenon’s space. Entering this space allows complete exposure of the scleral surface. The extraocular muscles pass through Tenon’s capsule, entering Tenon’s space to insert on the sclera. At the site of penetration by the individual extraocular muscles, Tenon’s capsule reflects posteriorly around the muscles for 10 to 12 mm to form the muscle sheaths. The muscle sheaths are connected by the intermuscular membrane, which, in turn, is connected to the orbital wall by complex fascial arrangements. The retinal surgeon is most concerned with the extraocular muscles after they pass through Tenon’s capsule (Fig. 1). At this point they do not possess a muscle sheath but, rather, are invested by episcleral tissue that fuses with the muscle. This tissue forms the falciform folds that fan out from the edges of the muscle to the overlying Tenon’s capsule (Fig. 2).
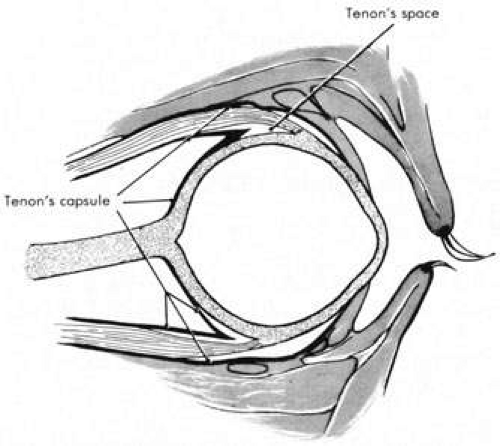 Fig. 1. Anatomy of Tenon’s capsule and extraocular muscles. |
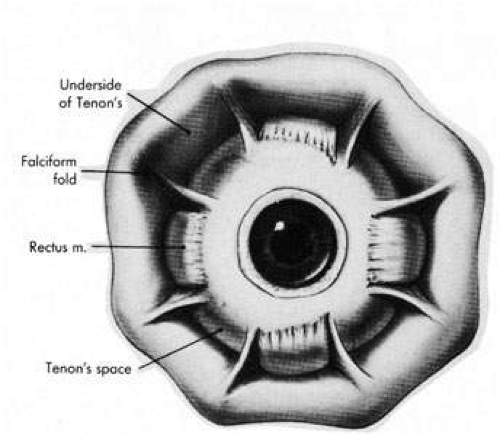 Fig. 2. Relationship of falciform folds to Tenon’s capsule and extraocular muscles. |
After the peritomy, the space between Tenon’s capsule and sclera is entered in the quadrants between the rectus muscles with closed, blunt scissors. Opening the scissors lyses the episcleral fascial connections between Tenon’s capsule and sclera. The muscle insertion is then engaged with a muscle hook. The muscle hook should be placed on the sclera and slid posteriorly to the muscle insertion in a circumferential direction. It is then brought anteriorly to engage the insertion. When in the proper space, the muscle hook should glide along the sclera and beneath the muscle with ease. Significant resistance to passage usually means the muscle hook is not on the scleral surface and should be repositioned. The muscle is best engaged by staying anterior to the equator. This also avoids endangering the vortex veins. Once the muscle insertion is engaged, the connections to Tenon’s capsule can be identified and separated from the muscle. This is done either by stripping the muscle with a cotton-tipped applicator or with sharp dissection using scissors. When the vertical rectus muscles are isolated, care should be taken not to strip too posteriorly to avoid damaging the levator muscle superiorly or the inferior oblique muscle and Lockwood’s ligament inferiorly. After isolation of the muscle is complete, a traction suture is placed around the muscle using either a fenestrated muscle hook20 or a reversed needle; 2-0 black silk is an effective traction suture. All four rectus muscles can be isolated in this manner.
The superior rectus muscle requires additional care to avoid the superior oblique muscle tendon, which inserts 3 to 5 mm posterior to the lateral margin of the superior rectus insertion. Passing the muscle hook from the nasal side anterior to the oblique muscle insertion best avoids engaging the superior oblique muscle tendon. A second method is to rotate the eye inferiorly and grasp the superior rectus muscle insertion with a toothed forceps. The muscle hook then can be passed just posterior to the insertion, thereby avoiding the tendon of the superior oblique (Fig. 3). After the suture is placed around the superior rectus muscle, an inspection for evidence of incarceration of the oblique muscle is made by sweeping posteriorly along the lateral and medial margins of the superior rectus muscle. When incarcerated, the oblique muscle tendon appears as a white band that is pulled anteriorly by the suture.
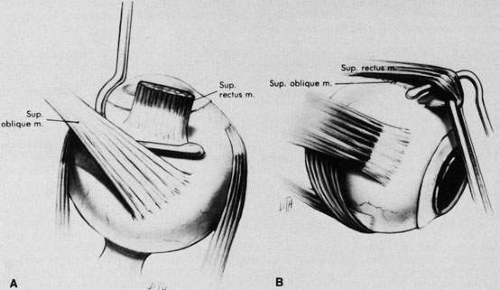 Fig. 3. A. Correct position of muscle hook for securing superior rectus. B. Globe rotated inferiorly to facilitate placement of muscle hook behind superior rectus. |
After all rectus muscles are isolated, the surface of the sclera is inspected in each quadrant for evidence of thinning, staphyloma, or anomalous vortex veins, and the location of any abnormalities is noted before scleral depression or marking of retinal breaks. Scleral thinning may appear as a gray-blue area, sometimes associated with obvious ectasia. Less prominent thinning may appear as radial gray lines. Although scleral thinning may occur anywhere, it is most common superotemporally.21
Isolation of the four rectus muscles usually allows adequate access to all areas of the sclera necessary to perform scleral buckling. Rarely, however, a muscle must be removed to adequately expose an area. This usually occurs with breaks beneath muscles or in eyes with tight or small orbits. After the muscle has been isolated, it is elevated with a muscle hook, and a double-armed absorbable synthetic 5-0 or 6-0 suture is passed through the body of the muscle parallel to the insertion and just posterior to the hook. A central knot may be placed. The suture is then passed in a single or double loop through the end of the muscle to occlude the anterior ciliary arteries. With both the suture and hook used for traction, the muscle is elevated from the sclera and cut, leaving a small portion of insertion intact on the sclera. The arms of the suture are secured, and the muscle is allowed to retract posteriorly. A 4-0 silk traction suture is placed through the insertion with at least two passes. After completion of scleral buckling, the muscle is repositioned to the insertion with the double-armed suture (Fig. 4).
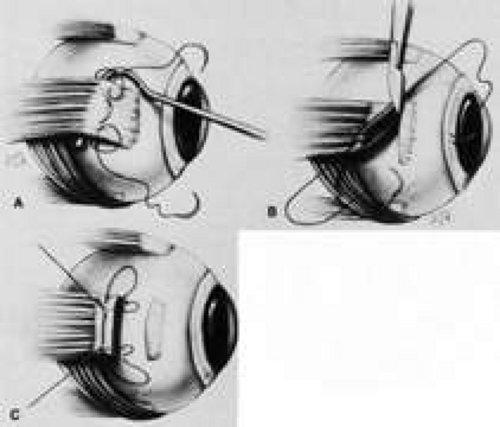 Fig. 4. A to C. Technique for removal and replacement of rectus muscle. |
After isolation of the rectus muscles, the sclera is exposed and accessible for suturing everywhere except beneath the superior oblique muscle and the inferior oblique muscle. Because of its anterosuperior location and wide insertion, the superior oblique muscle more commonly overlies retinal breaks than does the inferior oblique muscle. When this occurs, fibers of either oblique muscle tendon can be cut to expose the underlying sclera. Of course, care should be taken not to entirely disinsert the muscle and also to avoid any underlying vortex veins. Partial resections of the oblique muscle tendons are well tolerated and do not result in motility disorders.
LOCALIZATION
No aspect of scleral buckling is more critical than accurate placement of the buckle on the sclera. This requires precise localization of retinal breaks on the scleral surface. Several instruments for localization and for marking the sclera have been described.22,23,24 Other surgeons prefer to use the wooden end of a cotton-tipped applicator or a diathermy probe. When the sharper scleral markers are used for localization, it is important to inspect the sclera thoroughly. Sharp localizers and diathermy probes should be avoided if the sclera is thin. The authors prefer the O’Connor localizer, which places a 1-mm circular mark on the sclera with mild indentation (Fig. 5).24 This instrument also has a smooth surface 90° to the marking surface to allow for exploratory depression before final positioning of the probe. Once the proper site is located, the probe is rotated 90° and the sclera marked with mild indentation pressure for approximately five seconds. The scleral mark is then enhanced with a sterile pen, cautery, or both.
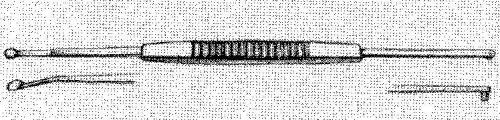 Fig. 5. O’Connor localizer. |
Regardless of which technique or instrument is used for localization and scleral marking, accurate placement of the marks with respect to the intraocular pathology is crucial. For small flap tears or atrophic holes, a single mark on the posterior edge of the break is sufficient. Larger flap tears and nonradial tears require localization of both the anterior and posterior extent of the break (Fig. 6). This anteroposterior orientation is particularly important when radial elements are employed. In areas with multiple, closely spaced tears, it is not necessary to mark each break. Marking the most posterior extent and the circumferential extent of the breaks is adequate (Fig. 7). This approach is also sufficient for marking a retinal dialysis. The circumferential extent of the dialysis is marked anteriorly at the edges of the dialysis, and then the most posterior extent is marked (Fig. 8).
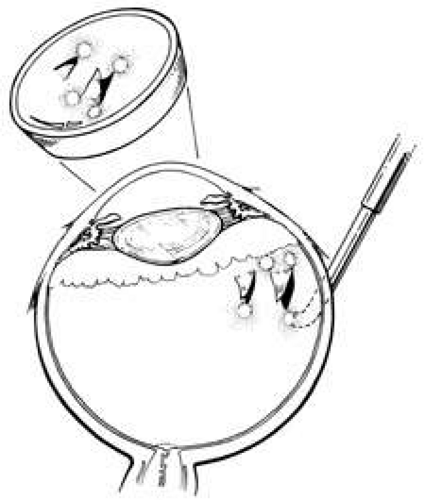 Fig. 6. Scleral marking technique for small and larger flap retinal tears. |
 Fig. 7. Scleral marking technique for multiple breaks. |
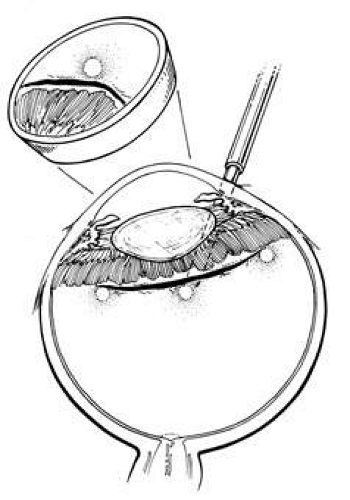 Fig. 8. Scleral marking technique for retinal dialysis. |
If the retina is bullously detached, accurate localization of retinal breaks is difficult. Bullously elevated breaks appear to lie more posteriorly than their true location because of parallax (Fig. 9). This can result in unnecessarily large and posterior buckles. Inaccurate localization can be minimized by first marking the break at its least elevated margin, usually anterior, and then marking the more elevated margins. Other clues, such as the presence of pigment epithelial changes underlying the break and the location of the ora serrata in relation to the break, may be helpful. Rarely, it may be necessary to drain subretinal fluid to flatten the retina before localization; however, this softens the eye, usually necessitating a saline solution injection to restore volume. It also makes further drainage difficult, presumably because of choroidal swelling secondary to hypotony.
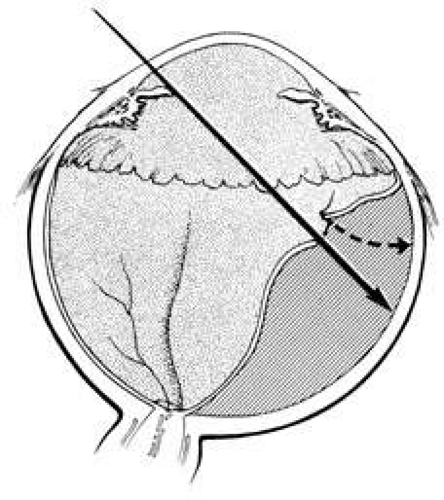 Fig. 9. Apparent posterior location of bullously elevated retinal break caused by parallax. |
TREATMENT OF RETINAL BREAKS
The rationale for the treatment of retinal breaks is to create an adhesion between the retinal pigment epithelium (RPE) and the retina. This is accomplished by inducing a thermal injury with one of three energy sources: diathermy, cryotherapy, or laser. The morphologic and cellular response of the retina and pigment epithelium to each of these energies is essentially similar.25 Two weeks after application, all three methods show comparable effects on retinal adhesive force.26 However, there are significant differences in retinal adhesion immediately after application.26 Photocoagulation increases retinal adhesion within 24 hours of application. Cryopexy reduces retinal adhesion for 1 week after application. Also, there are significant differences in the response the sclera and choroid have to these modalities and in their methods of administration.
Diathermy
Diathermy is produced by high-frequency, 13.56 MHz, alternating electrical current that generates heat because of the impedance (resistance) of the tissue through which it is passed. The heat created by the diathermy energy coagulates tissues. The histologic picture seen after diathermy depends on the intensity with which it is applied and on whether the retina is attached or detached. When the retina is attached and low-intensity diathermy applied, pigment epithelial migration into the inner retina occurs.27 If the retina is detached, however, low-intensity diathermy treatment results in pigment epithelial proliferation between Bruch’s membrane and the external limiting membrane following retinal reattachment.12 High-intensity diathermy treatment in areas of detached retina causes rupture of Bruch’s membrane, resulting in fibroblastic proliferation between the choroid and retina when the retina is reattached. The highest-intensity diathermy applications actually rupture the sclera, choroid, and Bruch’s membrane, resulting in scar tissue formation across the entire ocular wall.27
Although diathermy produces an effective RPE adhesion, it also induces immediate scleral shrinkage and subsequent scleral necrosis.12,28 This scleral shrinkage results in increased intraocular pressure during diathermy application. The necrosis induced by diathermy weakens the strength of the sclera both immediately after application and over the long term. This weakening complicates reoperation and also may increase the incidence of scleral abscess formation.29 In addition, penetration of diathermy through intact sclera to the retina depends on the scleral thickness. Thus, variations in scleral thickness result in nonuniform and unpredictable transmission of energy to the retina, which can cause choroidal and retinal bleeding and retinal holes.12
The problems of diathermy administration associated with scleral necrosis, shrinkage, and thickness can be minimized by applying it through lamellar scleral flaps, which are discussed later. Transscleral and transconjunctival diathermy without scleral flaps may be administered with a modified diathermy electrode, which causes less scleral damage than conventional diathermy.30 However, because of the full-thickness damage that occurs with diathermy, vortex vein ampullae and long posterior ciliary arteries and nerves must be avoided, even with scleral flaps.12,31 Techniques of diathermy application are discussed in the section on implants.
Cryotherapy
Cryotherapy (cryopexy) produces an effective pigment epithelial–retinal adhesion without the scleral complications that characterize diathermy. This provides cryotherapy with significant advantages: (a) retinal pathologic conditions can be treated without the need for scleral dissection, and (b) retinal breaks can be treated regardless of their location in relation to vortex veins or long posterior ciliary vessels or nerves.
The histologic response following cryotherapy depends on whether the pigment epithelium alone or the pigment epithelium and the overlying detached retina together are frozen.32 The ability to treat detached retina is another significant advantage over both diathermy and photocoagulation. If only the pigment epithelium is frozen without freezing the overlying retina, the pigment epithelial–retinal adhesion that forms once the retina is reattached shows pigment epithelial hyperplasia and loss of retinal outer segments. Therefore the normal microvillous interdigitations seen between retina and pigment epithelium are missing. If both the pigment epithelium and overlying retina are frozen, the adhesion that results after reattachment demonstrates cellular connections between the retina and pigment epithelium consisting of desmosome formation between retinal glia and pigment epithelium or direct contact between retinal glia and Bruch’s membrane.
Current cryotherapy instrumentation employs expansion of high-pressure nitrous oxide at the tip of a probe generating temperatures as low as 89°C. The temperature effect is confined to the tip of the probe by an insulating sleeve. A probe 2.0 to 2.5 mm in diameter usually is used for retinal work. Treatment of retinal breaks and pathologic conditions requires accurate placement of the cryoprobe tip. The surgeon must be certain that the indentation visualized with the indirect ophthalmoscope is the tip of the probe and not the shaft. Confusion between the tip and the shaft of the cryo-probe can cause inadvertent posterior freezes.33 To minimize the possibility of this complication, the surgeon must indent only with the tip of the cryoprobe (Fig. 10). It is also helpful to perform the first freezes at the most anterior aspect of the area requiring treatment to assess both location and intensity of treatment.
 Fig. 10. A. Inadvertent posterior placement of cryoprobe tip caused by visualization of cryoprobe shaft. B. Correct placement of cryoprobe tip. |
The goal of treatment is to surround all retinal breaks with 1 to 2 mm of contiguous treatment. When possible, treatment should include freezing of the overlying retina, because this results in a stronger adhesion than does treatment of the pigment epithelium alone.25 To avoid the damage of refreezing, treatment should not significantly overlap. The treatment end point is retinal whitening without ice crystal formation.34 Slight whitening of the retina because of retinal edema is noted several minutes after freezing, which helps to assess the adequacy of treatment. If retinal treatment is impossible because of bullous retinal elevation, treatment of the pigment epithelium alone may be performed, or treatment can be deferred until after drainage of subretinal fluid.
For flap retinal tears, treatment is performed contiguously around the tear and then extended anteriorly to the ora serrata. Care is taken not to freeze bare RPE in the bed of the retinal break where there is no overlying retinal tissue. Small retinal breaks and atrophic retinal holes can be treated with single freezes centered on the retinal break (Fig. 11).
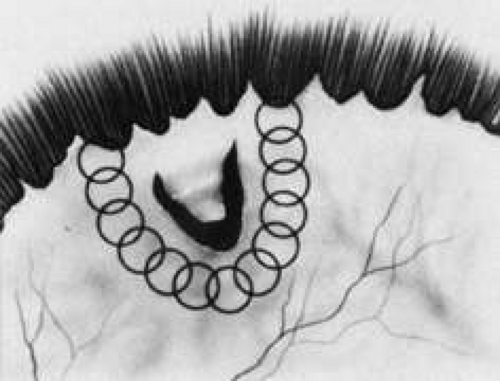 Fig. 11. Placement of cryotherapy around flap retinal tear. |
One potential disadvantage of cryopexy is dispersion of pigment epithelial cells, which can result in subretinal pigmentary changes after reattachment.35,36 Also, dispersion of viable pigment epithelial cells capable of causing proliferative vitreoretinopathy has been demonstrated following cryopexy.37 The clinical relevance of cryopexy-induced pigment epithelial cell dispersion in the pathogenesis of proliferative vitreoretinopathy following scleral buckling is controversial. Some retrospective analyses suggest that cryopexy is a risk factor for the development of postoperative proliferative vitreoretinopathy (PVR),38,39 whereas other studies do not show an association between cryopexy and PVR.40 Accordingly, it seems prudent to minimize cryotherapy-induced pigment epithelial cell dispersion by not over treating and by avoiding unnecessary scleral depression of treated areas, which enhances dispersion of viable cells.41 Therefore localization and examination with scleral depression should be performed before cryopexy.
In addition, although cryopexy does not permanently damage the choroid, it does induce choroidal congestion and hyperemia,27 which may complicate drainage of subretinal fluid through treated areas. Finally, cryopexy causes breakdown of the blood–ocular barrier,42 and its use has been implicated as a cause of postoperative cystoid macular edema and exudative detachments after scleral buckling.43 Despite these potential problems, cryopexy remains the choice of most retinal surgeons for the intraoperative treatment of retinal breaks during scleral buckling.44
Photocoagulation
Photocoagulation is another means for creating pigment epithelial–retinal adhesion. Laser delivery systems coupled to an indirect ophthalmoscope allow retinal surgeons to use photocoagulation during scleral buckling.45 Laser photocoagulation can also be applied postoperatively after retinal reattachment.46 The pigment epithelium is the primary chromophore for energy uptake with photocoagulation. Therefore the area of retina to be treated must be either attached or placed in juxtaposition to the pigment epithelium by scleral depression. As a result, treatment of bullously elevated retinal breaks or areas with atrophic or attenuated pigment epithelium may be difficult. Intraoperative transpupillary photocoagulation also requires optimal visualization. Miosis, corneal opacification, cataract, and vitreous hemorrhage may preclude transpupillary photocoagulation.
Transscleral diode laser photocoagulation also may be used to treat retinal pathology.47 The long wavelength (810–840 nm) of the diode laser penetrates the sclera and is absorbed by the pigment epithelium. Placing the detached retina in juxtaposition to the pigment epithelium with scleral depression allows treatment of retinal pathology. The desired end point is a gray to gray-white burn. Potential complications include rupture of Bruch’s membrane and the pigment epithelium, which may result in choroidal bleeding. Mild thermal effects on the sclera may be evidenced by blue-gray discoloration of the sclera. A potential advantage of transscleral diode photocoagulation over other methods is the ability to treat through preexisting scleral buckling components.48 A disadvantage of both transscleral and transpupillary photocoagulation is that photocoagulation is more time consuming and requires more individual treatment spots than cryopexy.
Photocoagulation has several desirable features. It can be delivered with great precision, both in terms of location and intensity. Compared with diathermy and cryopexy, it causes less breakdown of the blood–ocular barrier.42 The thermal effect of photocoagulation is confined predominantly to the retina and pigment epithelium, with little or no effect on the choroid or sclera.49 Finally, photocoagulation induces an adhesive effect between the retina and pigment epithelium within 24 hours.50
METHODS OF SCLERAL BUCKLING
A variety of buckling techniques and materials may be employed for retinal reattachment surgery.
EXPLANT TECHNIQUES
Scleral buckling, or indentation, was popularized by Ernst Custodis in 1953.51 He described placement of a polyviol explant that was sutured to the sclera overlying any retinal break. The explant indented the sclera against the retina and closed the retinal break. Although the precise mechanism by which scleral buckling works remains uncertain, it was Custodis’ observations that led to current explant scleral buckling. Lincoff and colleagues further refined Custodis’ procedure and introduced cryotherapy as a substitute for diathermy.52,53 Over the ensuing years, explant techniques and materials have continued to evolve.34,54
Explant techniques allow accurate and relatively easy placement of scleral buckling material to support retinal pathology. The development and refinement of cryotherapy were major steps in the evolution of explant techniques.53 The ability to treat retinal pathologic conditions effectively without the need for scleral dissection has resulted in explant surgery becoming the procedure of choice for most retinal surgeons.
Buckling Materials
Explants are made of solid silicone rubber or silicone sponges and come in a variety of sizes and shapes. Medical-grade silicone rubber, consisting of cross-linked polydimethyl Siloxane is the most common buckling material used. This solid silicone rubber material was originally described by Schepens and colleagues55 for use as scleral implants.
Solid silicone rubber is produced in a variety of sizes and shapes. Three basic shapes are available: straight, symmetric tire, and asymmetric tire. All three shapes can be grooved to accommodate placement of an encircling band. Unlike the straight implants, the tire implants have radii of curvature that approximate the shape of the globe (Fig. 12). The asymmetric tires also provide increased buckle height posteriorly. For many detachments, the authors prefer an asymmetric tire, which allows effective buckling of the ora serrata while minimizing anterior displacement of the encircling band because of its posteriorly placed groove (Fig. 13). This advantage is negated if the tire completely encircles the eye. The thinner anterior edge of this element may also minimize the chance of anterior extrusion. Solid silicone meridional implants can be used as explants. These elements can fit beneath either encircling bands or tires. When radial elements beneath circumferential buckles are indicated, the authors prefer solid silicone meridional elements (Fig. 14).
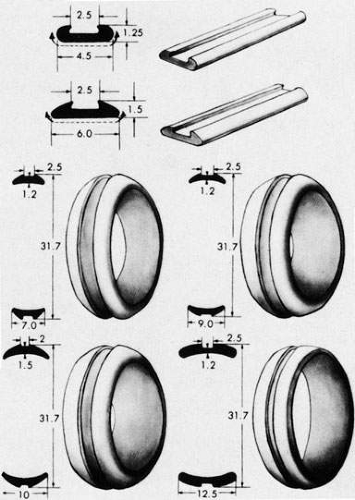 Fig. 12. Drawings and dimensions of strips and symmetric tires. |
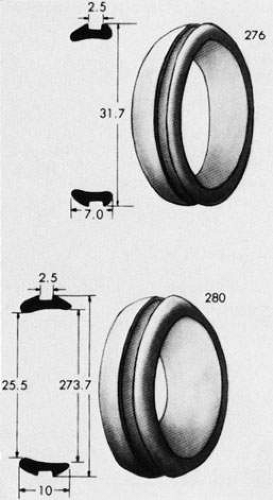 Fig. 13. Drawing of shape and dimensions of 7- and 10-mm asymmetric tires. |
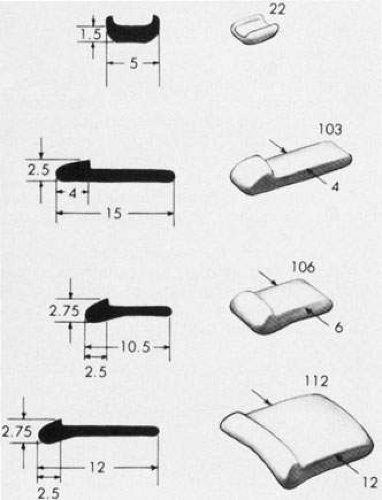 Fig. 14. Drawing of shape and dimensions of meridional elements. |
Silicone sponges also are made of silicone rubber but have many small air-filled pockets that give the sponge great compressibility and elasticity. Unlike true sponges, however, their absorption capabilities are minimal.56 Sponges are made in varying sizes and shapes, from 3 mm circular sponges to 5 × 7 mm oblong sponges. They may be grooved or have a central tunnel for anchoring of an encircling band.57
Biologic materials, including fascia lata, preserved human sclera,58 and gelatin,59 also have been used for scleral buckles. Currently, these are rarely used and are discussed primarily for historical interest. Of these, gelatin is the most versatile. As it hydrates, gelatin gradually swells, providing increased buckle height a few days after surgery. Over 3 to 6 months, the gelatin, which is predominantly hydrolyzed collagen, is broken down, and the buckling effect is lost. Gelatin can be used as either an implant59 or explant.34
The Miragel implant (Mira, Inc., Waltham, MA) is a nonbiologic hydrogel made of a hydrophilic copolymer of methyl acrylate with 2-hydroxy ethyl acrylate cross-linked with ethylene glycodiacrylate. It was used as an explant from 1981 until 1996, when the manufacturer stopped its distribution. Although no longer available, this buckling material must be familiar to ophthalmologists because of its late-onset complications. Although Miragel implants were reported to be tolerated well in both short- and long-term evaluation,60,61 complications such as extrusion, fragmentation, limitation of ocular motility, and intrusion of the implant have been reported to occur between 7 and 11 years after implantation.62,63,64,65 Consequently, patients who received this buckle material must be monitored closely over the long term. Often the buckle material must be removed. Indications for removal include buckle exposure, infection, motility disturbance, or intrusion. Intrusion of the buckle may be heralded by recurrent vitreous hemorrhage. Removing the hydrogel is difficult because of the friability of the material. The material must be gently “milked” from the sub-Tenon’s location with a muscle hook, extracted with a cryoprobe, or carefully aspirated with small-gauge suction. There have been reported cases of scleral rupture and retinal incarceration during removal of the buckle material. Consequently, extreme care should be taken when traction is applied to the rectus muscles or when exploring the subconjunctival and sub-Tenon’s space for buckle fragments.62,63
Scleral Suture Technique
Explants are secured to the sclera with partial-thickness scleral sutures. When bands, tires, or sponges are used, these sutures are placed in a mattress fashion parallel to the long axis of the element being supported. To support solid silicone meridional elements beneath tires or bands, the surgeon places the mattress suture perpendicularly to the long axis of the meridional element (Fig. 15).
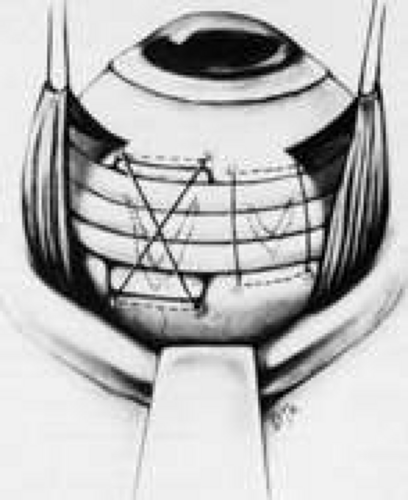 Fig. 15. Suture placement for both tire and meridional element. |
Accurate and effective suture placement is critical to the success of explant procedures. After identification and localization of all retinal breaks and other retinal pathology requiring support, the surgeon selects an appropriate explant. For most detachments, the actual element selected is not as important as the accurate localization and proper placement of the element with respect to the retinal breaks. Proper placement of the element requires effective suturing technique. A spatula needle with a 5-0 nonabsorbable suture such as polyester, nylon, or polypropylene is used.
When suturing, the surgeon must firmly fixate the globe. This is best done by grasping a muscle insertion with a toothed forceps. Magnification with loupes or the operating microscope facilitates suture placement. The suture is passed through the sclera at one-half to three-fourths depth over a distance of 3 to 5 mm, usually in a horizontal mattress fashion. A combination of adequate depth and length is necessary for maximum suture strength.66 Once the proper scleral depth has been obtained, the suture should be passed at that level. Uneven passage of the needle induces buckling of the sclera, which may lead to perforation. After the needle has been passed through the sclera and the tip brought out, the needle is released from the needle holder and the tip is grasped. It is important to complete passage of the needle along the arc of the needle, avoiding posterior pressure or dragging on the hub of the needle, which may perforate through the remaining underlying sclera (Fig. 16).
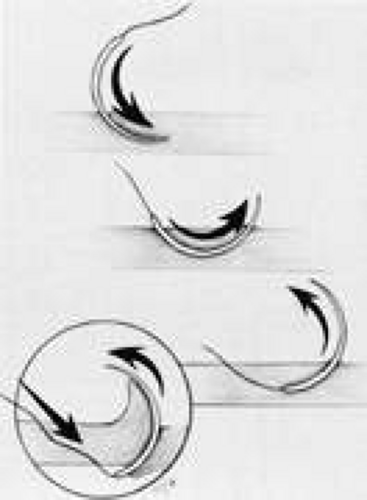 Fig. 16. Passage of spatula needle through sclera. It is important to complete passage of the needle along the arc of the needle, avoiding posterior pressure or dragging on the hub of the needle, which may perforate through the remaining underlying sclera (inset). |
Usually sutures are placed a minimum of 2 mm farther apart than the width of scleral contact for a given element (e.g., 9 mm apart for a 7-mm element). To ensure that the most posterior edge of the retinal break is supported, the surgeon places the posterior suture a minimum of 2 to 3 mm posterior to the scleral localization mark. For encircling elements, placement of the mattress suture in the same meridian as the retinal break or breaks provides additional height beneath the breaks (see Fig. 15).
When one is suturing posteriorly, the vortex veins and their tributaries must be avoided. This sometimes requires straddling a vortex, as seen in Figure 17. Thin sclera also presents problems, and sometimes long suture passes are not possible. In this case, several short bites in areas of thicker sclera may be effective. The use of cyanoacrylate adhesive to support suture bites in thin sclera has been described.67 Currently, in eyes with very thin sclera, the authors perform primary vitrectomy techniques for retinal detachment repair.
 Fig. 17. Suture placement to avoid intrascleral passage of vortex vein. |
Some surgeons prefer silicone sponges for explants. Sponges provide a rounded buckling contour, the height of which is easily adjusted by varying the distance between the mattress suture bites. The buckle height obtained with segmental sponge explants persists for at least 3 years.68 Sponges are easily trimmed and thus are quite adaptable. They are effective for support of radial tears and are particularly useful for posterior radial tears.69
Based on the size of the tear, an appropriate sponge is selected. Sutures are placed 2 to 3 mm beyond the circumferential and posterior extent of the tear as determined by localization (Fig. 18). Usually one or two mattress sutures are placed, and the buckling effect is carried anteriorly to the ora serrata. The anterior suture is usually a simple horizontal mattress; the posterior suture may be either a crossed or simple mattress. Often it is difficult to pass a suture from posterior to anterior when one is working posterior to the equator. A crossed mattress alleviates this problem but does not provide as effective posterior support, as does a simple mattress. Thus the buckle may need to be extended farther posteriorly. When necessary, crossed mattress sutures can be converted to simple mattress sutures (Fig. 19).
 Fig. 18. Placement of sutures for radial sponge. |
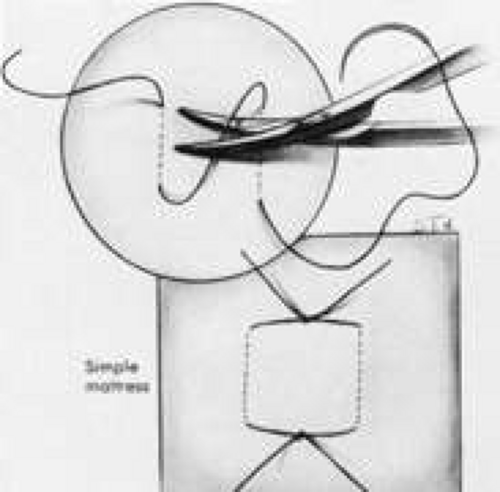 Fig. 19. Technique for placement of posterior mattress suture. |
Segmental versus Encircling Buckles
Placement of explant material can be either segmental or encircling. Segmental buckles usually are reserved for detachments with single or closely spaced retinal breaks less than one clock hour in total extent or with posterior breaks. These breaks can be effectively closed using radial sponges or segmental placement of circumferential solid silicone elements. The primary advantage of segmental buckles is the relative ease of placement; another advantage is minimal change in refractive error induced by segmental buckles. For posterior breaks, segmental elements allow closure of the break while avoiding the side effects of large posterior encircling elements. However, for most large posterior breaks and all macular holes, the authors prefer closure with gas and vitrectomy techniques.
Although segmental buckles effectively close isolated tears, they do not provide retinal support elsewhere. Specifically, other areas of vitreoretinal traction away from the segmental element are not supported, which may result in the formation of new retinal breaks. Because of the limited support offered by segmental buckles, the authors prefer encircling procedures when possible. Encircling procedures are particularly indicated in: (a) cases with multiple breaks in different quadrants, (b) aphakia, (c) pseudophakia, (d) myopia, (e) diffuse vitreoretinal pathologic conditions, such as extensive lattice degeneration or vitreoretinal degenerations, and (f) proliferative vitreoretinopathy of grade B or greater.34,54,70 Either sponges or solid silicone rubber can be used as encircling elements. Because of their compressibility, encircling sponges tend to result in a variable undulating contour to the buckle unless multiple sutures are placed in each quadrant. The authors prefer solid silicone elements for encircling procedures.
The anteroposterior position of the encircling element depends on the location of the vitreoretinal pathology to be supported. When retinal breaks in detached retina are associated with traction, the buckle should be positioned so that the posterior edge of the break lies on the posterior crest of the buckle. The buckling effect should extend for 30° on either side of the tear and extend anteriorly to the ora serrata (Fig. 20). If the encircling element is supporting pathologic conditions in attached retina, such as a retinal break, lattice degeneration, or prominent vitreoretinal adhesions, the most posterior aspect of the condition needs to be supported by the encircling element. If no specific pathologic factor is to be supported, the encircling element should support the posterior margin of the vitreous base.
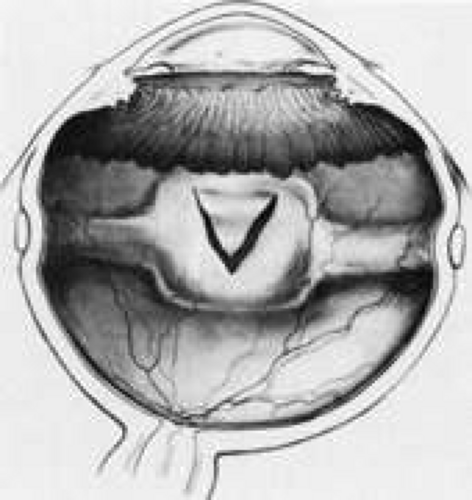 Fig. 20. Correct position of buckle for flap retinal tear. |
The vitreous base eccentrically straddles the ora serrata, extending more posteriorly on the nasal side. The exact location of the vitreous base sometimes can be determined with indirect ophthalmoscopy and, when this is possible, the vitreous base can be marked on the sclera to ensure accurate placement of the encircling element. If the vitreous base cannot be identified ophthalmoscopically, it can be assumed to lie approximately 3 mm posterior to the ora serrata nasally and 2 mm posterior to the ora serrata temporally (Fig. 21).
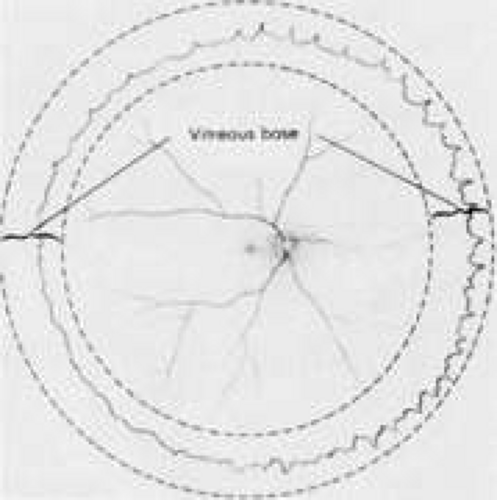 Fig. 21. Position of vitreous base in relation to ora serrata. |
A solid silicone band 2.5 mm wide often is used to support the vitreous base or vitreoretinal pathologic condition in attached retina. The encircling band is secured to the sclera with either mattress sutures or through scleral tunnels to prevent migration of the band once it is shortened. It is not necessary to place the band around the greatest curvature of the eye. The ends of the band can be secured with a clove hitch nonabsorbable suture,34 or silicone sleeve.71 The authors prefer the silicone sleeve because it allows easy adjustment of the band throughout the surgery (Fig. 22).
 Fig. 22. Technique for silicone sleeve placement. |
One result of circumferential encircling scleral buckles is fish-mouthing of retinal breaks.72,73 This is caused by the relative circumferential shortening of the sclera and choroid induced by the buckle in relation to the retina. This relative excess of retinal surface causes the retina to lie in radial folds over the buckle. These folds, in conjunction with vitreous traction, can result in the failure of retinal breaks to settle over the buckle. The breaks may form an elongated oval configuration in the anteroposterior meridian over the buckle, resembling the open mouth of a fish (Fig. 23). Persistent elevation of the retina resulting from the fishmouth phenomenon can result in surgical failure and therefore needs to be addressed.
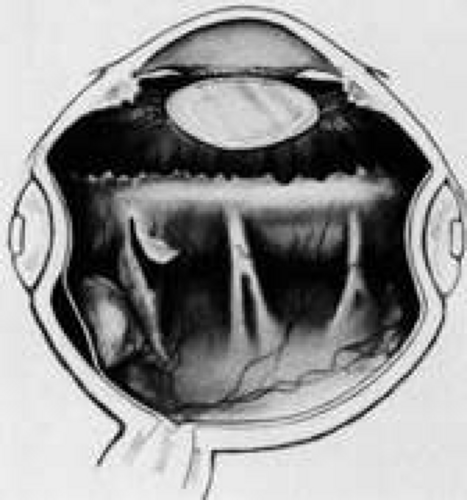 Fig. 23. Fishmouth appearance after circumferential buckle. |
There are three basic techniques in the management of fishmouth retinal tears. The easiest is to decrease the height of the circumferential buckle. This usually is effective only if buckle height is excessive. Placement of a radial element beneath the circumferential element effectively closes most fishmouth tears.69 The radial element increases the surface area of the pigment epithelium and choroid beneath the break, thereby decreasing the disparity between the retinal surface area and the surface area of the bed of the buckle (Fig. 24).73 Injection of an intravitreal gas bubble, combined with appropriate positioning, also effectively closes fishmouth tears. The gas is injected through the pars plana under direct visualization with the indirect ophthalmoscope. During the injection, care must be taken to avoid formation of multiple small bubbles, which may then pass through the tear into the subretinal space. This can be prevented by injecting into the most superior aspect of the vitreous cavity. With accurate positioning, a bubble of 0.3 mL is adequate to close retinal breaks of up to one clock hour.74 The use of expansile gases, such as sulfur hexafluoride or perfluoropropane, can increase the intraocular volume of gas. Intraocular gases are discussed in greater detail in Chapter XX.
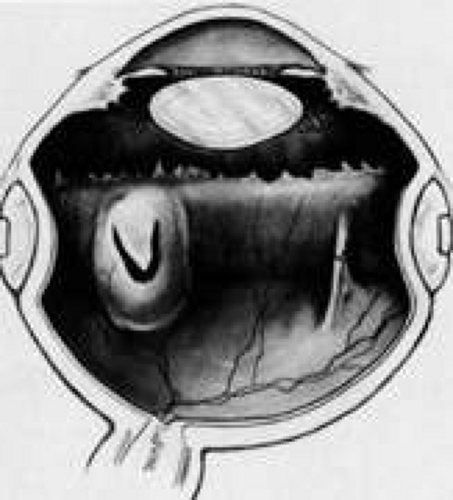 Fig. 24. Radial element beneath tear alleviating fishmouth phenomenon. |
For encircling elements, buckle height can be obtained in two ways. For thin encircling elements, such as solid silicone bands, the explant can be shortened in relation to the circumference of the globe. The best method of determining how much to shorten the band is a visual assessment of the buckle height created by the band.34,75 The band is shortened only the amount necessary to create the desired buckle height. This helps to avoid the complications of excessive buckle height, such as anterior segment necrosis.76 The height and breadth of the scleral indentation obtained are a linear function of the amount the encircling element is shortened.77 However, this leads to circumferential shortening of the globe in relation to the retina, predisposing to radial folds on the buckle and the fishmouth phenomenon.59,73 Increased axial elongation of the globe also occurs.75,77
The second method of obtaining buckle height is by suture placement without shortening of the element in relation to the ocular circumference. This technique is used with wider and thicker explants such as tires and sponges. The farther apart the bites of the mattress suture are placed, the greater the height of the buckle when the sutures are tightened. This effect requires two sutures per quadrant but provides excellent buckle height by shortening the sclera in an anteroposterior direction rather than circumferentially. With this technique, axial length actually decreases.77
IMPLANT TECHNIQUES
The current era of scleral buckling using implant techniques for rhegmatogenous retinal detachment began in 1960 with Schepens and colleagues’55 description of scleral dissection, intrascleral placement of silicone buckles (implants), and diathermy. Subsequent modifications and refinement of the technique have been described.12
Scleral Dissection
After localization of all retinal breaks requiring support, a lamellar scleral undermining or scleral dissection is performed. The extent of dissection depends on the size of the intended buckle. It is recommended that the lamellar scleral dissection extend 3 mm posterior, 2 mm anterior, and 3 to 4 mm circumferentially beyond the retinal breaks.12 The dissection is begun with an incision parallel to the limbus at the posterior edge of the retinal breaks. The depth of the incision is considered appropriate if a thin gray layer of sclera remains over the choroid. The lamellar dissection is performed using a blunt dissector with traction on the reflected scleral flaps. Care is taken when dissecting posteriorly to the equator to avoid severing the vortex veins. Modifications of the posterior scleral flap often are necessary to avoid the vortex veins. The size of the scleral dissection is designed to accommodate the width plus the height of the desired implant (Fig. 25).
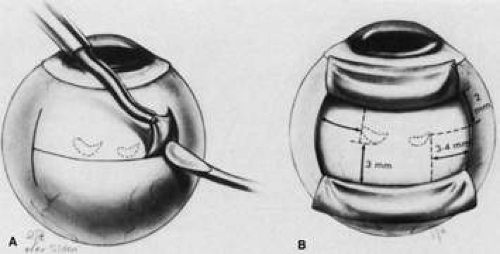 Fig. 25. A. Technique for scleral dissection. B. Recommended extent of scleral dissection for implant placement in relation to retinal breaks. |
Diathermy
After completion of lamellar scleral dissection, diathermy is applied. The use of diathermy is the primary reason that lamellar scleral dissection is performed. When diathermy is applied to full-thickness sclera, energy transmission is irregular and unpredictable. Diathermy through full-thickness sclera also induces scleral necrosis and shrinkage.28,53 These problems are minimized by placing diathermy through the surgically thinned sclera.
Diathermy is applied for 3 to 5 seconds using a blunt conical electrode on the dried scleral surface. The intensity is assessed ophthalmoscopically and then adjusted as required. The diathermy burns leave a 1-mm mark on the thinned scleral surface and are spaced about 2 mm apart in staggered rows parallel to limbus. Treatment is started posteriorly and proceeds anteriorly (Fig. 26). If a stronger than usual chorioretinal adhesion is desired, the intensity of burn, not the number of burns, should be increased.12 However, excessive intensity may result in retinal holes if attached retina or choroidal hemorrhage are being treated. When diathermy is placed, the long posterior ciliary arteries, nerves, and vortex veins should be avoided. Transillumination viewed through the thinned scleral bed is helpful in identifying these structures.78
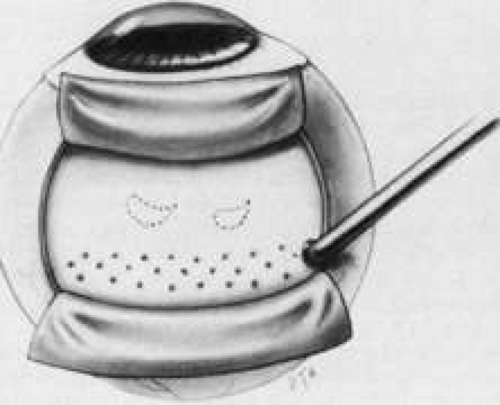 Fig. 26. Distribution of diathermy placement in bed of scleral dissection. |
Buckle Implantation
After placement of diathermy, the silicone implant is trimmed to fit beneath the scleral flaps, and nonabsorbable 4-0 mattress sutures are placed in the scleral flaps. The flaps then are closed with temporary suture ties. An encircling band may be placed through the groove of the implant, beneath the scleral flaps and around the globe.
The band is anchored with scleral tunnels or mattress sutures. The ends of the band are joined with a tantalum clip, nonabsorbable suture, or silicone sleeve (Fig. 27). Drainage of subretinal fluid usually is required and is described later.
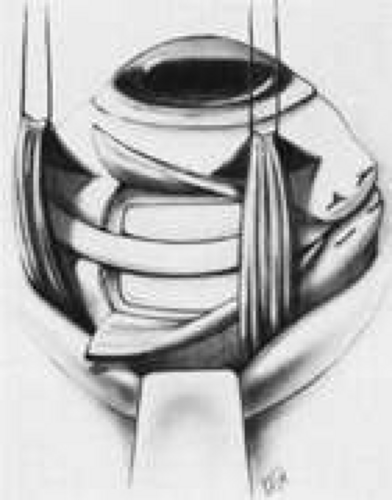 Fig. 27. Placement of implant in scleral dissection and closure of scleral flaps. |
If 360-degree buckling with a silicone implant is required, Schepens12 recommends that this be performed as a two-step procedure. He suggests that a scleral lamellar undermining be made for 220 to 270 degrees and that the implant placed with an encircling band. If this fails to reattach the retina, the remaining sclera is undermined and buckled with a second procedure 2 to 6 weeks later. This apparently diminishes the complications associated with 360-degree scleral dissection, such as anterior segment ischemia and choroidal detachment.
Stay updated, free articles. Join our Telegram channel

Full access? Get Clinical Tree


