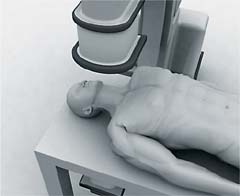
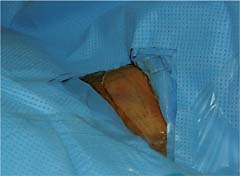
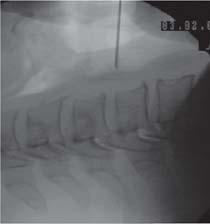
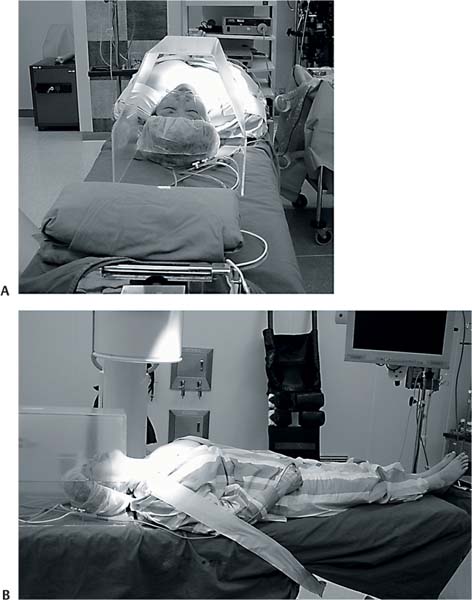
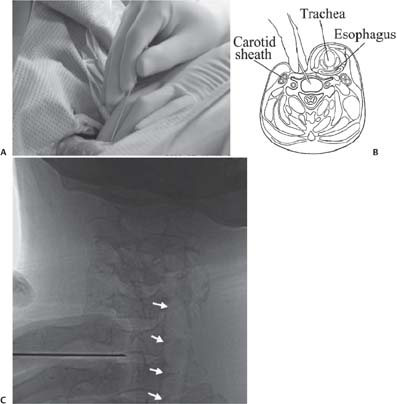
7 Surgical Techniques in Percutaneous E ndoscopic Cervical Diskectomy The successful use of percutaneous endoscopic cervical diskectomy has been reported by several authors.1–3 The techniques used are summarized in this chapter. • Performed under local anesthesia • Neuroleptanalgesia (intravenous injection of fentanyl, 50 mg, and intramuscular injection of midazolam, 3 mg) along with 1% lidocaine • Supine on radiolucent table • The neck is slightly extended by placement of a towel roll under the shoulder blade. • The head can be stabilized by applying a plaster tape across the forehead. • A plastic tent is placed over the patient’s face to prevent a feeling of suff ocation and also for ease of communication during the procedure. • The shoulders are pulled down and the arms are fixed to the sides of the table for better viewing (Figs. 7.1 and 7.2). • The level and midline are marked with the help of a Carm fluoroscope (Fig. 7.3). • For lower cervical levels the C-arm may have to be tilted obliquely for better visualization. • The anterior cervical skin is painted and draped. • Lidocaine (1%) is infiltrated into the skin and subcutaneous tissue at the entry site. • For foraminal disk herniation approach from the contralateral side is preferable, whereas for a midline disk herniation entry from the right side is better for a right-handed surgeon. • The carotid pulse is palpated by the left hand. • The tracheoesophageal complex is then pushed by the fingernail while the anterior part of the cervical vertebra is felt (Fig. 7.4). • The anatomy of the tracheoesophageal complex helps in retracting both esophagus and trachea together. • The shift of the complex is confirmed under fluoroscopy. • An 18-gauge needle is inserted into the interval created. • Further advancement of the needle past the skin, subcutaneous tissue, and up to the anterior margin of the disk space is done under fluoroscopic guidance (Figs. 7.5 and 7.6). • The disk is penetrated between the longus colli m uscles. • This helps prevent bleeding and any sympathetic injury because the sympathetic chain is located medially in the lower cervical segments (Fig. 7.7). • The stylet is advanced up to the center of the disk, then diskography is performed with 0.5 mL of a mixture of radiopaque dye, normal saline, and indigo carmine dye in the ratio 2:2:1. • Diskography helps to confirm the disk space and to identify the stained herniated nucleus pulposus during diskectomy (Figs. 7.8 and 7.9). • Then a guide wire is passed through the needle and the needle is withdrawn. • While the needle is withdrawn, the guide wire should be firmly held to prevent slippage of the wire; otherwise the steps may have to be repeated (Figs. 7.10 and 7.11). • A 5-mm transverse incision is placed on the skin and underlying subcutaneous tissue. • Serial dilators are passed over the guide wire from 1 to 4 mm until final placement of the obturator (Fig. 7.12). • If the space between the tracheoesophageal complex in the middle and the carotid artery on the lateral side is wide, the obturator can be directly passed over the guide wire. • A 5-mm working cannula is passed over the obturator and the obturator is removed; the final position is determined depending on the pathology (Figs. 7.13, 7.14, and 7.15). • For central disk herniation the tip of the working cannula should be in the midline on the anteroposterior (AP) view, • For foraminal herniation the tip should be directed toward the respective foramen in the AP view (Figs. 7.16, 7.17, 7.18, 7.19, and 7.20). Fig. 7.1 The patient’s position is shown using the plastic tent and stabilization of both the shoulders after pulling down. (A) Cranial view. (B) Lateral view. Fig. 7.2 The patient is positioned supine with slight neck extension. Fig. 7.3 Skin markings are done under fluoroscopy. Fig. 7.4 (A) The trachea and esophagus are moved gently by the surgeon. (B) Illustration showing safe needle insertion into the created interval. (C) C-arm view showing the insertion of the needle while pushing the tracheoesophageal complex toward the opposite side; one can confirm this movement by looking at the tracheal air shadow moving away (arrows) as it is being pushed by the surgeon’s fingers. Fig. 7.5
Surgical Technique
Anesthesia
Position
Procedure
![]()
Stay updated, free articles. Join our Telegram channel

Full access? Get Clinical Tree


