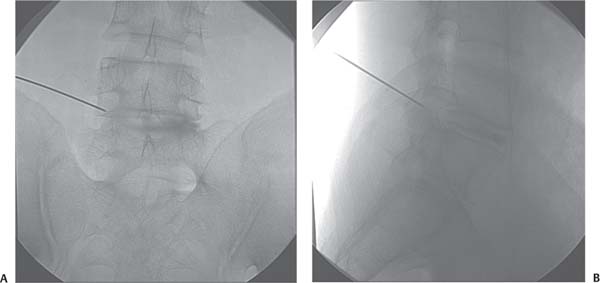
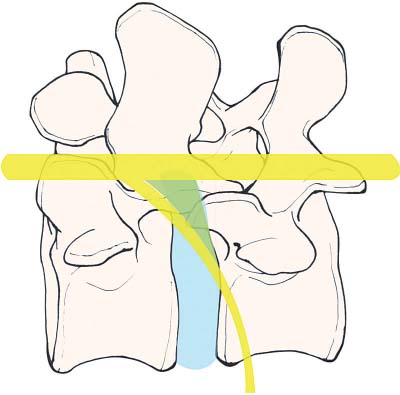
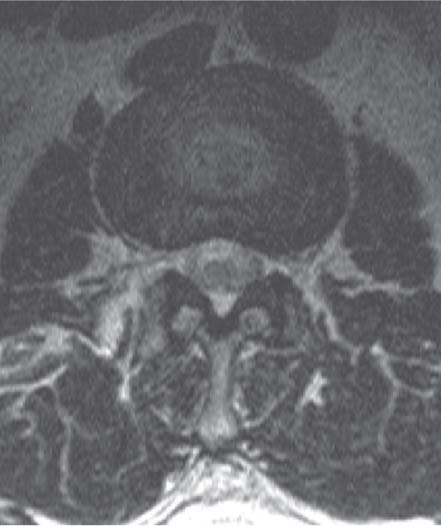
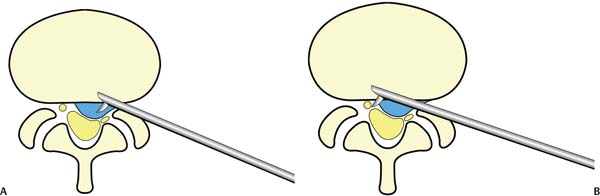
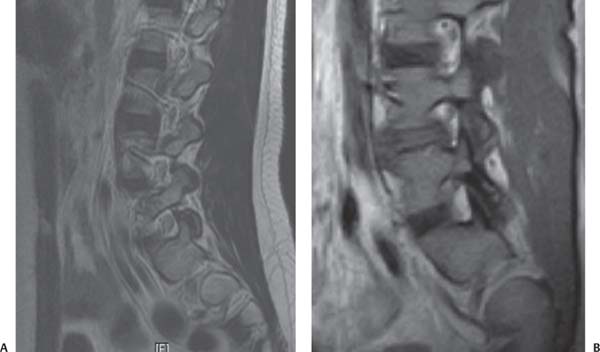
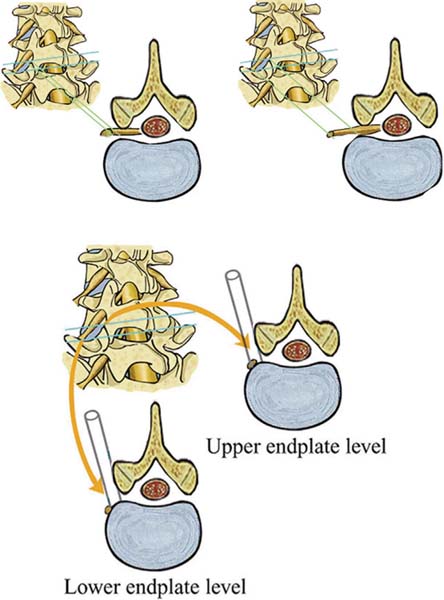
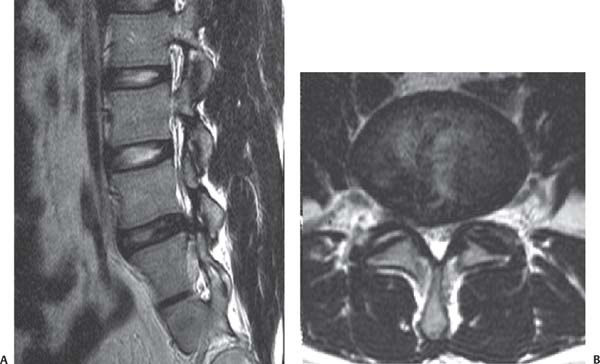
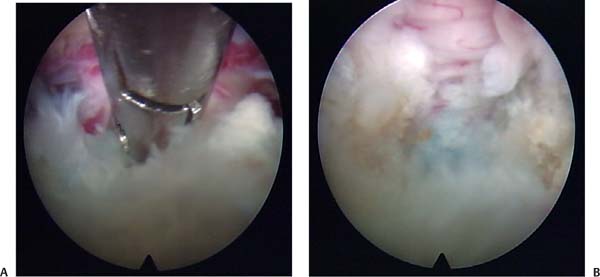
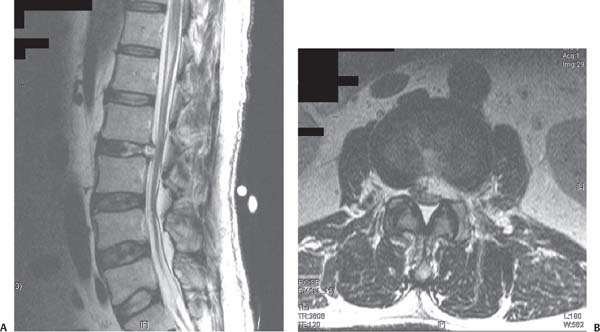
20 Complications in Percutaneous Endoscopic Lumbar Diskectomy Although endoscopic spine surgeries are relatively low-risk procedures, and performing most of these procedures under local anesthesia further reduces the risk, some complications typical to keyhole procedures can still arise. • Complications of percutaneous endoscopic spinal surgeries can be divided into categories of immediate, early, and delayed, based on the time of onset. • Immediate complications — Intraoperative injury to neural and vascular structures — Perforation of the peritoneal sac and abdominal contents — Missed fragments/failure of surgery — Exploration of the wrong level or wrong side — Instrument breakage • Early complications — Psoas hematoma — Postoperative hematoma formation — Postoperative dysesthesia — Cyst formation — Postoperative infection, abscess formation, and so forth • Delayed complications — Recurrence of disk herniations — Any possible instability • The most important structure that can be injured by the advancing spinal needle during the initial part of the procedure is the exiting nerve root at that level. • This can be avoided by inserting the needle very gradually under frequent image intensifier control in both antero-posterior (AP) and lateral views while aiming the needle tip at the lateral aspect of the facet joint (Fig. 20.1). • During initial needle insertion, it is always wise to take frequent C-arm images instead of aiming the needle directly at the facet joint first. • Once it is touching the facet, the needle is slightly withdrawn and grazed along the facet to enter into the foramen. Fig. 20.1 C-arm AP (A) and lateral (B) views showing the needle tip at the facet joint. Fig. 20.2 Note the difference in position of the nerve roots in the foramen on MRI at the parasagittal location. (A) On the left side, the nerve root is lying very low in the foramen, thus limiting the possibility of a working cannula through the foramen in such a case. (B) On the right side, the nerve root is located at a superior position in the foramen, thus providing enough space for insertion of the working cannula; also note the occupancy ratio of the nerve roots inside the foramen. • This way, the exiting nerve root can be easily avoided, especially when one is dealing with the lower lumbar levels. • Slow advancement of the needle also helps in obtaining feedback from the patient and an opportunity for the surgeon to change the needle trajectory. • Feedback is very important when the surgeon is advancing the needle correctly as per anatomical landmarks but the patient feels unbearable pain along the nerve root. • This may signify some anatomical abnormality such as a conjoined nerve root. • Therefore, it is very important to analyze the preoperative magnetic resonance images (MRIs) for the possibility of conjoined nerve roots and also the available space in the foramen with respect to the location of the neural tissue to avoid this complication (Fig. 20.2). With a central disk herniation, the skin entry point is kept more lateral.1 • The risk of exiting nerve root injury is even greater under such circumstances, and due care should be taken to advance the needle first up to the facet and then glide under it. • Similarly, during percutaneous endoscopic lumbar diskectomy (PELD) for extraforaminal herniations, the exiting nerve root is displaced posteriorly and may come in the needle path. • We recommend a relatively medial skin entry point and the target point for disk penetration to be situated at the midpedicular line at the level of the superior end plate of the caudal vertebra to avoid this risk (Fig. 20.3). • The other neural structures at risk are the traversing nerve root of the affected segment or the dural sac that can get injured by wrong needle placement or indiscriminate use of bipolar probe, laser, or grasping forceps. • All these implements should be used with caution and preferably under constant visual guide of the endoscope. • The Kambin triangle has been traditionally considered to be the safe haven for the transforaminal approach. However, if we aim the initial needle tip in the most medial and lower aspect of the triangle, we believe it gives an additional margin of safety. This is especially true when the neural anatomy has been changed in the presence of disk herniation (Figs. 20.4, 20.5, and 20.6). • The risk of a dural tear or traversing root injury is even greater with upper lumbar herniations due to the peculiar anatomy of the upper lumbar segments. • Because the upper lumbar disks are bean shaped with their posterior surface having an anterior concavity, the dural sac comes to lie more anteriorly (Fig. 20.7). Fig. 20.3 The relationship of the exiting nerve root with the upper and lower end plates. Note the space available for the needle and cannula insertion is relatively closer to the level of the lower end plate. Fig. 20.4 Schematic illustrations of the oblique view of the foramen under normal circumstances; the foramina zone and the Kambin triangle look like an obtuse triangle. Fig. 20.5 When there is a disk herniation, it pushes the traversing nerve root posteriorly, thus increasing the dimensions of the safe working zone to allow a more medial needle insertion as close to the base of the herniation as possible. This is the key for successful removal of even large herniations. Fig. 20.6 (A,B) In case of axillary herniation, careful attention is needed for traversing root injury. • Under such circumstances, the posterior margin of the vertebral body as seen on fluoroscopy may not be the safe edge. • If the herniated disk is adherent to the dural sac, a dural tear may result from grasping the herniated fragment with the forceps as we experienced in one such case (Figs. 20.8). • In addition, because of the high canal occupancy and relatively more neural tissue packed compactly inside the thecal sac, the available cerebrospinal fluid (CSF) buffer is relatively lessened. Therefore, one should try to keep the heat-producing instruments (laser and radiofrequency probe) situated further anteriorly to avoid injury to the dura (Figs. 20.9 and 20.10). • Sometimes, while removing a large central herniation, one may have to use the bigger grasping forceps under C-arm control. • This may sound dangerous to the uninitiated but considering the altered neural anatomy due to disk herniation, this may be a safe maneuver if done carefully (Fig. 20.11A). • There are some precautions that can help avoid complications in such cases. — The jaw of the forceps should first be opened toward the two end plates of the disk and then gradually rotated toward the epidural space to grab the herniated fragment under C-arm control. Fig. 20.7 Axial MRI showing the L1-L2 disk space. Note the bean shape of the disk and the close relation of the thecal sac to the posterior border of the disk. Also note the high canal occupancy of the thecal sac as well as the tightly packed neural tissue inside the thecal sac with minimal cerebrospinal fluid buffer. Fig. 20.8 (A) The herniated disk at the upper lumbar level being grasped with the forceps; note the pink-colored dura being pulled along because it was adherent to the disk. (B) The torn edge of the dura and multiple rootlets — Here again, one should look for the pain response of the patient after grabbing the fragment but before pulling it. — A gentle tug of the forceps should not induce any radicular pain if the forceps is grabbing the herniated fragment. If it does, it implies that the structure under the grip of the forceps is neural tissue and it should be immediately released. — The other precaution to be taken under such circumstances is that one should do this step under constant C-arm guidance in the anteroposterior (AP) as well as lateral views and the forceps tip should not cross into the epidural space, especially at a location where there is no fragment in the spinal canal (Fig. 20.11B). Fig. 20.9 Preoperative sagittal (A) and axial (B) MRIs of a patient suffering from L2-L3 central and left paramedian disk herniation; note the bean-shaped posterior border of the disk space. Fig. 20.10 Postoperative sagittal (A) and axial (B) MRIs of the same patient showing dural injury. This injury occurred as a result of excessive use of the laser, which should be avoided at upper lumbar levels. The patient developed a foot drop due to multiple nerve root injuries that did not recover. (The patient did not feel much pain during lasering of the neural tissue but experienced frequent twitching in the lower limb muscles that could have served as a warning signal.) • During interlaminar PELD, the advancing needle or cannula can pierce or pinch the dura or the nerve root. • Performing an epidurogram to confirm the needle placement and gentle sequential dilation with serial dilators are some of the safeguards to avoid this complication. • Use of laser without prior confirmation of the visualized tissue can also lead to this complication and should be avoided. • Another precaution to be taken is the amount of indigo carmine injected during diskography. If excessive, being a contrast stain, it can deposit in the pits on the surface of the dura or nerve root and may make distinction between the herniated fragment and neurological structures difficult.2,3 Fig. 20.11 Use of a large fluoroscopic forceps to remove a large herniated fragment. (A) The traversing nerve root and dural sac have been pushed further posteriorly by the herniated fragment. Removing the disk with fluoroscopic forceps can be safe if done under constant C-arm guidance, especially in the AP view. Epidural location of the forceps tip can be checked in the lateral view. (B) the tip of the forceps, if advanced further, can cross the midline. If one does not check the position of the forceps tip in the AP view at this juncture and opens the jaw of the forceps to remove disk tissue, it will most likely grab and hurt contralateral neural tissue as shown here. • Under the usual circumstances, while performing transforaminal or interlaminar PELD one does not put any major vascular structures at risk. • Transforaminal PELD, especially for extraforaminal disk herniation, where the skin entry point of the needle is more medial and the angle of approach is steeper, inadvertent push of the needle beyond the anterior disk margin can lead to injury of the major abdominal vessels. • Constant and frequent use of the intraoperative C-arm to watch for the needle position can help avoid this serious complication. • Inadvertent slippage of any instrument anteriorly can also lead to vascular injury. • Schreiber reported a sigmoid artery injury caused by slippage of the internal cannula during percutaneous nucleotomy due to the difficult access;4 the larger cannula pushed the thinner cannula too far ventrally because the latter had been bent. • Vascular injury can also occur if an attempt is made to remove the whole of the disk tissue even when using the transforaminal approach as we experienced in one such case. • The patient was planned for a percutaneous diskectomy and interbody fusion. While trying to remove the whole of the disk tissue, the left common iliac vein was injured by the grasping forceps. • The bleeding was recognized immediately during the surgery. The patient was turned supine, and emergency laparotomy was done to repair the injured vessel.
Immediate Complications
Injury to Neural Structures


Injury to Vascular Structures
Stay updated, free articles. Join our Telegram channel

Full access? Get Clinical Tree


