Surgical Approaches to the Craniofacial Skeleton
John F. Hoffmann
There have been three principal advances that have revolutionized the management of craniofacial trauma over the last several decades. These are advanced imaging, sophisticated internal fixation technology, and aesthetic surgical approaches. Modern computed tomography scanning allows for visualization of the craniofacial skeleton in multiple perspectives as well as in three dimensions. This enables the clinician to precisely identify fracture patterns and anatomy. Sophisticated internal fixation plating systems have evolved to allow the surgeon to precisely and rigidly fixate craniofacial fractures so that normal anatomy can be restored and stabilized against the forces of mastication. Contemporary surgical approaches to the craniofacial skeleton have also advanced to allow one to expose facial fractures in a way that provides optimal visualization for fracture reduction and placement of fixation hardware while minimizing soft tissue damage and scarring. In some instances, surgical incisions for aesthetic facial surgery have been adapted to the exposure of the craniofacial skeleton. An example would be the lateral upper lid crease incision that has been adapted from blepharoplasty procedures. The surgeon should be familiar with the relaxed skin tension lines of the face and neck and place elective incisions within these whenever possible, thereby minimizing the visibility of the final scar. Meticulous and gentle soft tissue handling techniques are paramount to obtaining rapid healing with minimal scarring. Similarly, the use of electrocautery should be judicious especially in areas of thin soft tissues and around hair follicles. Intimate knowledge of the location and course of critical nerves—such as the facial and trigeminal nerves—is essential. This chapter discusses the various options for exposing the craniofacial skeleton from the frontal sinus to the mandible. Endoscopic approaches have gained some popularity in the management of orbital, frontal sinus, zygomatic arch, and mandibular condyle fractures. These techniques are beyond the scope of this chapter, however.
UPPER FACIAL SKELETON AND FRONTAL SINUS
The workhorse approach for the upper facial skeleton is the hemicoronal or full coronal incision. This classic surgical approach enables the surgeon to expose the upper frontal and parietal skull all the way inferiorly to the superior orbital rims, orbital roof, and nasoethmoid region as well as the entire zygomatic arches (1). The coronal approach also can be employed in those instances in which cranial bone grafts will need to be harvested. In cases of unilateral fracture, a hemicoronal approach extending from the midline down to the ipsilateral pinna may be considered. It must be remembered, however, that a hemicoronal flap will have more limited inferior exposure compared to a full coronal flap due to the reduced inferior rotation of the flap. Coronal flaps typically have robust blood supplies and can be designed to include pericranial tissues as well. In the instances where the posterior table of the frontal sinus is fractured and the risk of cerebrospinal fluid (CSF) leakage is high, the surgeon should be very careful to preserve the vascularity of the pericranial tissue as a pericranial flap may be very helpful in these cases to repair dural injuries.
The coronal incision has classically been described as a straight-line incision extending from just above the pinna, coursing several centimeters behind the anterior hairline across to the contralateral side as needed. Typically, the incision is made several centimeters behind the hairline (Fig. 79.1). In men, one may need to locate the incision more posteriorly to accommodate male pattern baldness. One disadvantage of the straight-line incision, however, is that it may be more visible. This is particularly true when the hair is wet as it may part away from the incision making it very visible (Fig. 79.2). Alternatives to the straight-line incision include a curvilinear incision or a “sawtooth” design (Fig. 79.3) (2). These modifications are intended to help camouflage the parietal portion of the
coronal incision. As these incisions are more irregular, wet hair will be far less likely to part away from the incision in a straight line and thereby make it less visible. A sawtooth design, however, may predispose the points of the sawtooth to some alopecia, thereby making the incision more visible. Regardless of which incision design is selected, the incision should be made parallel to the hair follicles, thereby minimizing the risk of injuring the follicles. It is also advisable to minimize the use of electrocautery along the incision line as this also may widen the area of alopecia and potentially lead to more hypertrophic scarring. Raney clips or compression sutures may be used along the
edges of the incision to aid hemostasis, but these also may lead to more alopecia due to pressure injury of the follicles. The lateral extent of the incision is normally at the apex of the ear. In cases where exposure of the zygomatic arch is anticipated, the incision may be extended inferiorly in a preauricular crease down to the tragus. Centrally, the flap may be elevated in a subgaleal or in a subperiosteal plane. If the flap is raised initially in the subgaleal plane, then a transition will need to be made through the pericranium above the fracture site itself. The surgeon must anticipate the potential need for a pericranial flap early in the flap design and plan accordingly. A pericranial flap may be developed separately or dissected off of the galea once the flap has been raised (Fig. 79.4). In the parietal and temporal aspects of the flap, the typical dissection plane is in the loose areolar tissue beneath the temporoparietal fascia and just superficial to the deep temporalis muscle fascia. Blunt dissection over the temporalis fascia allows for rapid inferior elevation of the flap in a relatively bloodless plane. One must, however, sharply release the fascia along the anterior temporal line as it is firmly affixed to the periosteum here. As will be discussed below, the lateral blunt dissection must be stopped several centimeters above the zygomatic arch in order to avoid injury to the frontotemporal branches of the facial nerve.
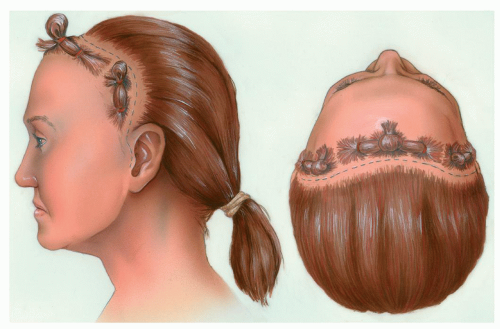 Figure 79.1 Typical coronal incision location for women and men with no significant baldness. In men with baldness, the incision is moved posteriorly as needed. (From Ellis E, Zide MF. Surgical approaches to the facial skeleton, 2nd ed. Philadelphia, PA: Lippincott Williams & Wilkins, 2006, with permission.) |
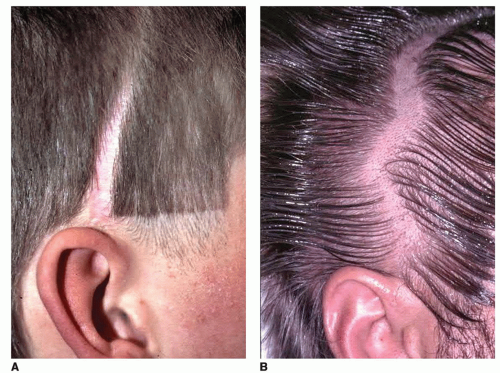 Figure 79.2 Coronal incision scarring. A: Highly visible strait scar, especially noticeable when the hair is wet and falls away from the scar. B: Intraoperative design of a curvilinear coronal incision. C: Postoperative appearance of a curvilinear incision, which is hidden since hair tends to not part in a straight line. |
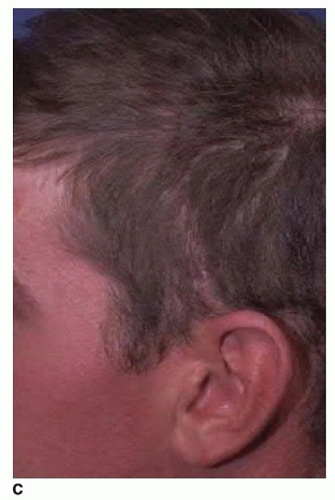 Figure 79.3 Sawtooth design alternative for a coronal incision. This may lead to alopecia at the tips of the triangular incision points. |
As the flap elevation proceeds inferiorly, the surgeon should carefully identify and preserve the supraorbital neurovascular bundles. The supraorbital structures may emerge from the orbit via a notch in the superior orbital rim or from a complete bony foramen usually at the junction of the medial and central thirds of the orbital rim (3). In order to fully visualize the superior orbital rim and to extend dissection into the nasoethmoid region or the orbital roof, the supraorbital structures must be mobilized. If the flap has been raised in a subgaleal plane, then a transition through the pericranium is made several centimeters above the supraorbital rims. If the supraorbital bundles are within a notch, then the careful subperiosteal elevation will release them. If, however, these structures exit through a foramen, then an osteotomy may be necessary to fully mobilize them (Fig. 79.5). Once the supraorbital structures are released, the dissection can proceed inferiorly to expose the nasal root, the medial canthal region, the nasal ethmoid complex, and the orbital roof. The surgeon should be careful during exposure of the medial orbital wall and nasoethmoid region to not detach the medial canthal tendon from the bone as this would lead to soft tissue telecanthus, which can be quite difficult to correct. The coronal incisions will also provide excellent exposure of the lateral orbital rim and the frontozygomatic junction, a site frequently involved in facial fractures. Again one should be cautious to not detach the lateral canthal tendon during subperiosteal dissection as well to prevent postoperative malposition of the lateral canthus.
The coronal approach also provides an ideal surgical exposure of the zygomatic arches (4). Exposure of the arches may be necessary either in severely comminuted and displaced zygomaticomaxillary-orbital fractures or in LeFort III fractures. With exposure of the arches, however, the surgeon must alter his dissection plane in order to avoid injury to the frontotemporal branches of the facial nerve. Below the level of the zygomatic arch, the facial nerve travels beneath the superficial musculoaponeurotic system (SMAS) layer. At the level of the zygomatic arch, however, the fascial planes coalesce and the facial nerve branches pass over the zygomatic arch where they are quite
vulnerable to surgical injury. Once above the zygomatic arch, the facial nerve lies within the temporoparietal fascia on its way to the corrugator and frontalis muscles. In order to avoid injury to the facial nerve as it passes over the zygomatic arch, the surgical dissection plane must change. If dissection were to continue along the surface of the deep temporalis muscle fascia, then the facial nerve would be damaged at the level of the arch. To avoid this, the dissection plane should change several centimeters above the zygomatic arch (Fig. 79.6). An incision should be made through the superficial layer of the deep temporalis fascia, and then dissection should continue inferiorly on the undersurface of this fascia. This space contains the temporal fat pad, and one should minimize disruption of the fat pad during dissection to help minimize postoperative atrophy. Atrophy of this fat pad can lead to hollowing within the temporal fossa, which is aesthetically displeasing and is difficult to correct. The zygomatic arch should be approached along its superior border at which point the periosteum is incised and elevated. The facial nerve branches will then be contained within the soft tissues of the flap. The arch can then be exposed along its entire length from its origin at the temporal bone to its attachment to the malar eminence (Fig. 79.7). At the conclusion of the procedure, it is critical to resuspend the soft tissues to avoid ptosis of the malar tissues (5). This is typically done by suturing the mobilized fascia back to the temporalis fascia, taking care while placing the sutures to not injure the facial nerve.
vulnerable to surgical injury. Once above the zygomatic arch, the facial nerve lies within the temporoparietal fascia on its way to the corrugator and frontalis muscles. In order to avoid injury to the facial nerve as it passes over the zygomatic arch, the surgical dissection plane must change. If dissection were to continue along the surface of the deep temporalis muscle fascia, then the facial nerve would be damaged at the level of the arch. To avoid this, the dissection plane should change several centimeters above the zygomatic arch (Fig. 79.6). An incision should be made through the superficial layer of the deep temporalis fascia, and then dissection should continue inferiorly on the undersurface of this fascia. This space contains the temporal fat pad, and one should minimize disruption of the fat pad during dissection to help minimize postoperative atrophy. Atrophy of this fat pad can lead to hollowing within the temporal fossa, which is aesthetically displeasing and is difficult to correct. The zygomatic arch should be approached along its superior border at which point the periosteum is incised and elevated. The facial nerve branches will then be contained within the soft tissues of the flap. The arch can then be exposed along its entire length from its origin at the temporal bone to its attachment to the malar eminence (Fig. 79.7). At the conclusion of the procedure, it is critical to resuspend the soft tissues to avoid ptosis of the malar tissues (5). This is typically done by suturing the mobilized fascia back to the temporalis fascia, taking care while placing the sutures to not injure the facial nerve.
 Figure 79.4 Pericranial flap elevated in conjunction with coronal incision. This may be needed to help seal CSF leakage in severe frontal or nasoorbital fractures. (From Ellis E, Zide MF. Surgical approaches to the facial skeleton, 2nd ed. Philadelphia, PA: Lippincott Williams & Wilkins, 2006, with permission.) |
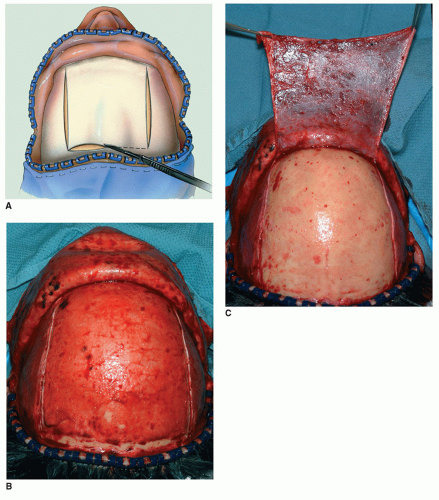 Figure 79.5 Coronal flap exposure frontal skeleton. A: Mobilization of the supraorbital neurovascular pedicles with osteotomies. B: Intraoperative photo of coronal flap with mobilized supraorbital structures seen bilaterally. C: Intraoperative photo of fixation hardware in place for repair of comminuted frontal sinus fracture. (Part A from Ellis E, Zide MF. Surgical approaches to the facial skeleton, 2nd ed. Philadelphia, PA: Lippincott Williams & Wilkins, 2006, with permission.) |
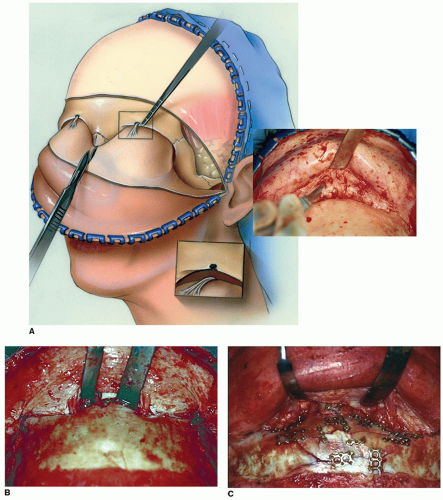 Figure 79.6 Exposure and dissection planes in temporal region and zygomatic arch. A: Tissue planes and location of frontal branch of facial nerve over the zygomatic arch. B: Dissection plane over zygomatic arch to avoid injury to the facial nerve branches. Above the arch the plane of dissection passes through the deep temporal fascia into the temporal fat pad. The periosteum in incised along the superior border of the arch and is elevated deep to the facial nerve. (From Ellis E, Zide MF. Surgical approaches to the facial skeleton, 2nd ed. Philadelphia, PA: Lippincott Williams & Wilkins, 2006, with permission.) |
A suction drain may or may not be required and can be used at the surgeon’s discretion. The scalp incision is then carefully closed in a layered fashion. All tension on the wound should be borne by sutures placed within the galeal layer, and cutaneous closure should only be done to realign the epithelium correctly. Excessive skin closure tension will possibly lead to increased scarring and alopecia. Complications of the coronal approach include bleeding or hematoma, temporary or permanent numbness of the forehead tissues, injury to the frontal branches of the facial nerve, and excessive scarring or alopecia. Patient should be counseled that some degree of numbness is inevitable posterior to the incision.
Another alternative for exposure of fractures of the upper facial skeleton exists when there is a large laceration. This most commonly occurs in fractures of the frontal sinus as direct blows to this region will often cause lacerations. Another common location of lacerations is along the lateral brow, and occasionally these can be used to expose the frontozygomatic area and the lateral orbital wall. One should be cautioned, however, to avoid significantly lengthening a laceration to obtain appropriate
exposure of fractures. This could easily lead to unsightly scarring or possible nerve injury. In general, one should avoid the historical eyebrow or “gullwing” incision. This routinely leads to unsightly scarring and a deformity of the eyebrows (Fig. 79.8). There is significant propensity for chronic edema in this dependent flap as well as extensive numbness of the forehead. For these reasons, a coronal flap should be employed as it provides unparalleled access and a far more pleasing aesthetic result. This is true even in patients with baldness.
exposure of fractures. This could easily lead to unsightly scarring or possible nerve injury. In general, one should avoid the historical eyebrow or “gullwing” incision. This routinely leads to unsightly scarring and a deformity of the eyebrows (Fig. 79.8). There is significant propensity for chronic edema in this dependent flap as well as extensive numbness of the forehead. For these reasons, a coronal flap should be employed as it provides unparalleled access and a far more pleasing aesthetic result. This is true even in patients with baldness.
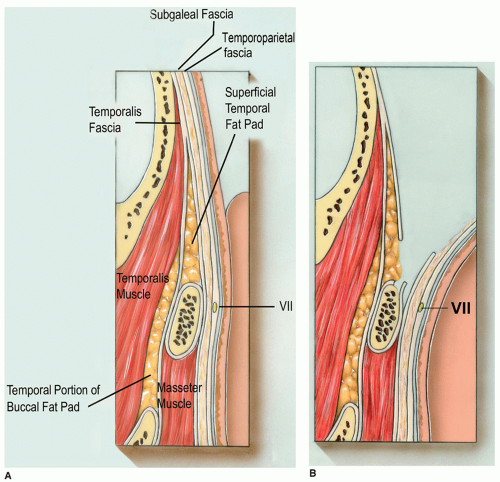 Figure 79.7 Intraoperative exposure and plating of zygomatic arch in a LeFort III fracture. Temporalis muscle is retracted to the right of the picture. |
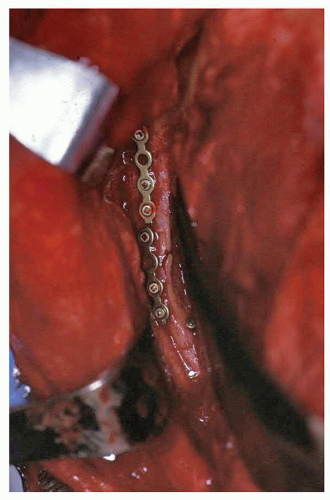 Figure 79.8 “Gullwing” brow incision. Note chronic edema of flap above the incision and the highly visible scar. |
MIDFACIAL SKELETON
Orbit
The lateral orbital wall and frontozygomatic area can be easily approached via upper eye lid crease incisions. In essence, this type of incision is a limited lateral blepharoplasty incision. Historically, incisions adjacent to or within the lateral brow were advocated. However, these incisions frequently leave unsightly scars or may cause permanent hair loss in the eyebrow and do not offer any exposure advantage over the lid crease incisions (Fig. 79.9). Instead, placing the incision within the lateral upper eyelid crease is far more preferable aesthetically and also provides improved exposure of the lateral orbital rim and medial aspect of the lateral orbital wall. The technique is very straightforward (Fig. 79.10). The lateral aspect of the lid crease is marked prior to the injection of local anesthetic. The incision is made through the skin and the underlying orbicularis fibers are bluntly separated. The periosteum of the lateral rim is incised and elevated as needed for fracture exposure and implant placement. It is frequently beneficial to extend the subperiosteal exposure posteriorly along the lateral orbital wall. This allows the surgeon to visualize the displaced fractures and provides another perspective to evaluate accurate anatomic reduction of fracture segments. Following fracture repair, the periosteum is closed and the incision is closed in a layered fashion. It is not typically necessary to drain this incision. Although one may see some temporary orbicularis weakness postoperatively, permanent lagophthalmos should be very rare. Healing is usually rapid with an excellent aesthetic result (Fig. 79.10D).
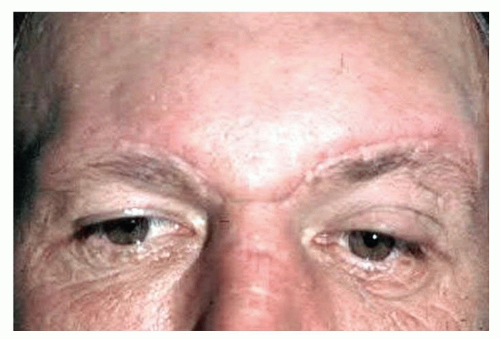 Figure 79.9 Left lateral brow incision. This scar can be very visible and cause permanent loss of eyebrow hairs and has more limited exposure of the lateral orbit and should be avoided. |
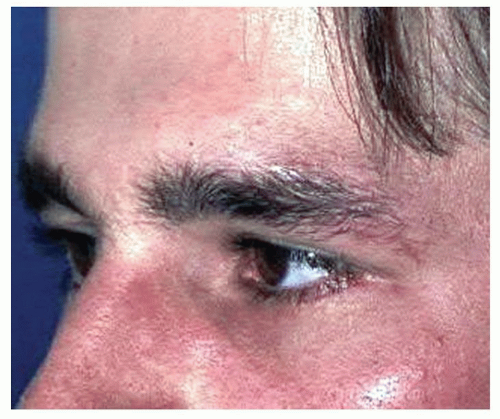 Figure 79.10 Lateral lid crease (upper blepharoplasty) approach. A: Incision is placed in natural supratarsal lid crease as shown and extended laterally within the crease as needed. B: Periosteum of lateral wall is incised and elevated to expose bone above and below the fracture to allow reduction and fixation hardware placement. The orbital aspect of the lateral wall should be exposed and visualized for accurate fracture reduction. C: Intraoperative photo showing hardware placement. D: Postoperative photo following ORIF of right malar complex fracture with inconspicuous incision healing. (Part B From Ellis E, Zide MF. Surgical approaches to the facial skeleton, 2nd ed. Philadelphia, PA: Lippincott Williams & Wilkins, 2006, with permission.) |
Inferior Orbital Rim, Floor, and Medial Wall
The inferior orbital rim, orbital floor, and medial orbital wall are most commonly approached through the various lower eyelid incisions. These incisions may either be transcutaneous or transconjunctival (Fig. 79.11). Both of these approaches have been long advocated in the literature, and when carefully designed and executed, both approaches will yield excellent results (6). Transconjunctival approaches have several potential advantages, however (7). Obviously, there is no visible scar unless a short lateral canthotomy incision is incorporated. A transconjunctival approach lends itself very well to extended medial exposure for fractures involving the medial orbital wall. In addition, transconjunctival approaches are completely posterior to the orbicularis muscle of the lower eyelid and therefore preserve an important structural support of the lower lid. As a result, postoperative lower lid malposition or ectropion may be less common with a transconjunctival approach (8, 9). Furthermore, a transconjunctival approach can be done in some cases without any division of the lateral canthal structures and thus weaken lower lid support even less.
Transconjunctival Lower Lid Approaches
The lower eyelid transconjunctival approach is begun with an incision placed in the inferior fornix. A corneal shield can be employed if desired but may impede exposure somewhat. If a shield is used for a long case, such as a complex nasoethmoid or LeFort fracture, one should
remove the shield periodically and reapply ocular lubricant to reduce the risk of corneal compromise or abrasion. Initially, the lower lid is retracted gently, and the incision is typically made several millimeters below the tarsal plate. Limited orbital floor fractures may be repaired with this incision alone without any lateral canthotomy incision. One should try and avoid a lateral canthotomy if possible as these approaches heal with the lowest incidence of lid malposition (7). If, however, the orbital floor fracture is large, the lid has little laxity, or if one anticipates the need to explore the medial orbit, a lateral canthotomy and cantholysis may be necessary (Fig. 79.14


remove the shield periodically and reapply ocular lubricant to reduce the risk of corneal compromise or abrasion. Initially, the lower lid is retracted gently, and the incision is typically made several millimeters below the tarsal plate. Limited orbital floor fractures may be repaired with this incision alone without any lateral canthotomy incision. One should try and avoid a lateral canthotomy if possible as these approaches heal with the lowest incidence of lid malposition (7). If, however, the orbital floor fracture is large, the lid has little laxity, or if one anticipates the need to explore the medial orbit, a lateral canthotomy and cantholysis may be necessary (Fig. 79.14
Stay updated, free articles. Join our Telegram channel
Full access? Get Clinical Tree
