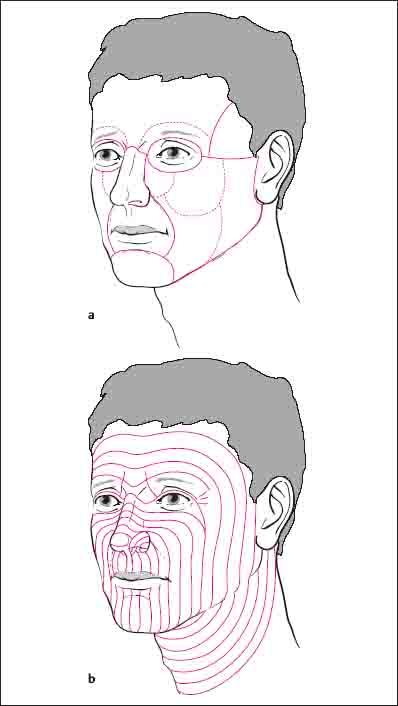
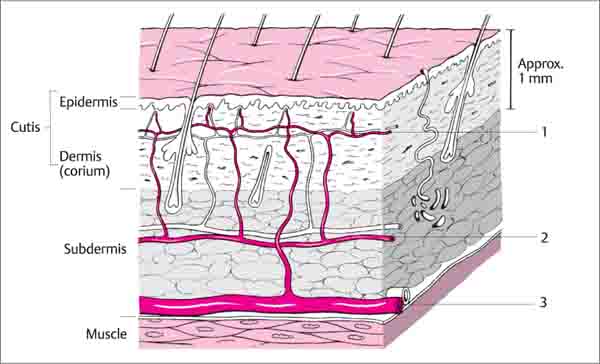
5 Reconstructive Plastic Surgery of the Face Plastic surgery of the face has two main objectives: it should correct dysfunctions and restore or improve the aesthetics of the face. Apart from addressing malformations, plastic reconstructive procedures are required to revise scars, resurface skin and soft-tissue defects, or correct deformities after trauma or tumor surgery. Operations to maintain or improve function are not feasible without incisions and the subsequent formation of scars. Sometimes function and aesthetics contradict each another in reconstructive plastic surgery. It requires experience, detailed knowledge, and careful planning to achieve the intended improvement of function with a minimal loss of aesthetics. Obviously, aesthetics play an essential role, especially when the face is involved. Before undertaking plastic surgery of the face, therefore, the following general rules should always be kept in mind: Adhering to these rules will help avoid many disappointments. Nevertheless, results that are not completely satisfactory are unavoidable in certain cases, even for experienced surgeons; the dynamic processes involved in wound healing and scar formation are only partially predictable and are subject to individual variation. Achieving results that are largely predictable requires a detailed knowledge of the basic principles of the procedures used in plastic surgery and of established operative techniques for the face. Plastic surgery of the face is, in the first instance, surgery of the skin. Figure. 5.1 depicts the topographic architecture of the skin. The skin (cutis) is made up of two layers: the epidermis and the dermis (corium). The epidermis consists of a superficial keratinized layer and a deep nonkeratinized layer, which is responsible for the color of the skin as a result of its content of melanocytes. The dermis bears the vascular and nerve supply of the skin and is rich in elastic and collagen fibers. This fiber content is responsible for the elasticity of the skin and its ability to retract. Both types of fibers are reduced in advanced age, which is why aged skin is loose and prone to form wrinkles. The superficial part of the dermis is interdigitated with the epidermis (papillary bodies), rendering horizontal movement of these two layers with respect to one another impossible. Any shifting of the skin, therefore, always takes place at the level of the subcutaneous fat layer (subdermis), which separates the skin from the underlying structures (muscle, bone). The subdermis is well developed in some areas of the face, thus giving shape to these areas (e. g., the cheek), but is completely lacking in others (e. g., the eyelids or the anterior surface of the ear). Hairs, sebaceous glands, and sweat glands are found as skin appendages, partly in the subdermis and partly in the dermis. It is important in plastic surgery to bear in mind that the epithelial components of the dermal appendages run through both epidermis and dermis. The hairs of the head and the eyebrows grow at an oblique angle to the skin surface. This should be kept in mind when directing the scalpel (the plane of incision should be parallel to the hair follicle). Wound healing may be influenced by, among other things, the content of sebaceous glands in the skin. Visible scars may develop around sutures in areas rich in sebaceous glands (above all on the nose, and in adolescents in general) as a result of epithelialization of the puncture marks by injured glands. Fig. 5.1 Surgical anatomy of the skin. As a rough size comparison, the thickness of the cutis is given as 1 mm. 1 Vascular plexus in the papillary layer of the dermis. 2 Vessel coursing in the subcutaneous layer. 3 Axial artery over the muscular fascia. Fig. 5.2a, b Aesthetic units (see text for explanation of illustration) (a) and relaxed skin tension lines (b). Knowledge of the vascular supply of the skin is of fundamental importance for reconstructive plastic surgery, especially in designing skin flaps for defect coverage. The vascular plexus within the papillary body of the dermis may be supplied by two routes (Fig. 5.1): Aesthetic units are defined regions of the face which should, whenever possible, be reconstructed in their entirety during reconstructive surgery. On the other hand, the restoration of a structure with the aid of adjacent tissue must not be undertaken at the expense of destroying the aesthetic unit of the donor site. The aesthetic units of the face are the frontal, supraorbital, orbital, infraorbital, nasal, zygomatic, buccal, labial, and mental units (Fig. 5.2a). Some regions, such as the nose, are further divided into subunits (see Fig. 5.35). When making incisions or revising scars on the face, it is essential to respect the “relaxed skin tension lines” (RSTL, Fig. 5.2b) and the wrinkle lines of the skin. Whereas the RSTL correspond to the spontaneous course of wrinkles after relaxation of the skin, the wrinkle lines are oriented perpendicular to the direction of the fibers of the facial muscles. RSTL and wrinkles lines are more or less identical, although they run differently in some regions (glabella, lateral epicanthus, lateral nasal wall). Incisions on the face should correspond to the direction of the RSTL (less wound tension, rapid wound healing, minimal scar formation) or, when creases are present, follow the wrinkle lines (“hide the scar within the skin crease”). Always consider the RSTL when making skin incisions on the face. If the wounds are predetermined, orientate the subsequent scars in the direction of the RSTL by advancement of the skin. The instruments must be adapted to the special requirements of plastic surgery. This means that the tips of forceps or the jaws of needle holders should be suitably small, although the handles must be large enough to be manageable. The following instruments have been proven useful: Only atraumatic needle/suture combinations are suitable for plastic surgery of the face. Absorbable braided suture materials based on polyglycolic and polylactic acid (e. g., Vicryl) are used for subcutaneous sutures. These have a half-life (time until reduction of the tensile strength to 50%) of 10–12 days. Polylactic acid is broken down into CO2 and H2O. Complete absorption, however, is only achieved after approximately 9 months. The absorption time of a thread is determined by its size, among other factors, so the times stated above are therefore average values. The required thickness of subcutaneous sutures depends primarily on the tension required to achieve approximation of the wound edges. Skin sutures are placed using monofilament, nonabsorbable synthetic strands made out of polyamide (e. g., Ethilon, Supramid) or polypropylene (e. g., Prolene). These sutures have a high tensile strength, skin irritation is minimal, and they have no “wick effect” (infiltration of bacteria into deeper skin layers). A suture size of 4/0 or 3/0 is usually chosen for subcutaneous sutures. Skin suturing for the face should be undertaken with a maximum suture size of 5/0, even better 6/0. The suture size is stated according to the American system (USP) or the European system (metric) (Table 5.1). Cutting needles of various lengths and forms are suitable. Needles in the form of an arc of a circle (e. g., ⅜ circle) are used for superficial sutures. Semicircular or even more strongly curved needles are used for deep sutures, especially for sites with restricted access. The various manufacturers use different terminology for the needle shapes, so there is no universally valid nomenclature. Wound healing proceeds in several phases. The wound surface is initially covered with a fibrin net, and after 24 hours the epidermis begins to close over the wound. Wounds that are surgically closed have already achieved epithelial coverage, preventing the infiltration of pathogens. This epithelial layer does not yet provide the wound with any tensile strength, however. The necessary stability is only achieved with the production of collagen fibers, mainly by dermal fibroblasts. Scar maturity as a result of increased collagen turnover (collagen production and breakdown) takes several months and is not complete for more than 1 year. The visible sign of this is the paling of the previously red scar.
Basic Principles
General Remarks
 Rules, Tips, and Tricks
 Before each operation: analyze the alteration exactly, document all findings, and undertake thorough planning.
 Provide the patient with comprehensive information; the use of photographs can be helpful.
 Avoid making any unduly optimistic statements about the planned procedure; carefully enquire about the patient’s expectations and weigh them up against what is technically possible.
 Never correct more than what has been stated in the informed consent.
 Take the patient’s age into consideration; given the increased rate of hypertrophic scar formation in children and adolescents, be cautious with operations that do not necessarily need to be undertaken at this age.
 Be patient when doing revision surgery: allow an adequate period of time to elapse after the previous operation, usually 9–12 months; do not yield to understandable pressure from the patient.
 Do not play down an aesthetically unsatisfactory result to the patient, given that an inadequate result is not necessarily the surgeon’s fault.
 Analyze residual deformities and discuss subsequent measures for improvement with the patient.
Surgical Anatomy of the Skin
 From the subdermal vascular plexus, which runs in the subdermis and is ubiquitous. Random pattern flaps are supplied by these vessels.
 From a specific artery (with accompanying vein). These arteries usually run over muscles, parallel to the surface of the skin, and give off vertical vessels (in addition to the vessels from the subdermal plexus) to the skin. It is possible to raise skin flaps on these arteries which are considerably longer than random pattern flaps. Owing to the special position of the artery along the axis of the flap’s pedicle, these flaps are known as axial pattern flaps or arterial flaps. Typical examples of such arteries are the superficial temporal artery (“temporal flap”) and the supratrochlear artery (“[para-]median forehead flap”, see Fig. 5.36).
Aesthetic Units and Relaxed Skin Tension Lines (RSTL)
 Rules, Tips, and Tricks
Instruments
 Needle holders: Instruments with flat jaw surfaces for holding the needle or suture are preferable. With textured jaw surfaces, the very fine suture material that is often used can either pass through the grooves, making it impossible to grasp, or be crushed and thus lose its tensile strength.
 Forceps: Adson or Adson–Brown forceps for plastic surgery have fine tips to allow tissue to be grasped precisely and securely. Nevertheless, despite this reduced tissue traumatization, only the subcutaneous tissue should be grasped, whenever possible.
 Scissors: One rounded and one pointed, curved pair of scissors are usually adequate.
 Hooks/retractors: Fine single skin hooks are very useful and can be inserted through the skin without leaving scars. This allows the skin to be moved or held without the crushing action of forceps. Retractors with more prongs are used for extensive mobilization, but should then only grasp the subcutaneous tissue.
 Scalpel blades: Usually a small, curved blade (No. 15) is used. For mobilization of larger skin areas to cover defects, especially in the area of the neck and chest, a correspondingly larger curved blade (No. 10) is used. For fine, angulated skin incisions, e. g., for scar revisions, a pointed blade (No. 11) is used.
 Bipolar coagulation forceps: Targeted bipolar coagulation is an essential guarantee for good hemostasis with minimal tissue damage. It is indispensable for plastic surgery of the face.
 Further aids: A ruler and a pair of dividers, as well as templates made of sterile material, are suitable for preoperative and intraoperative planning. In special cases, e. g., for sutures in the area of the free alar margin, the use of loupes is helpful.
Suture Material
Wound Healing and General Wound Management
Wound Healing
Average strand diameter (mm) | Size (metric) | Size (USP) |
0.07 | 0.7 | 6/0 |
0.1 | 1 | 5/0 |
0.15 | 1.5 | 4/0 |
0.2 | 2 | 3/0 |
0.3 | 3 | 2/0 |
 Wounds must
 not be under tension,
 not have any cavities.
If increased collagen production is induced by dehiscence of the wound edges, reduction of the wound surface by contraction will occur and the surface will be covered by a thin, functionally inferior, epithelial layer. This form of secondary healing results in considerable deformity of the surrounding tissue and should be avoided on the face.
General Wound Management
Wounds managed by suturing do not require any special covering, since—as stated above—the epithelial layer is closed after 24 hours. Exceptions are compression dressings required to avoid a subcutaneous hematoma after extensive undermining, or dressings to relieve tension. Larger epithelial defects, which are to be resurfaced at a later stage, may be managed temporarily with a synthetic or biological skin substitute. A compression dressing is often inadequate for hematoma prophylaxis of deep wounds. It is preferable in such cases to insert a soft drain or a suction drain.
Sutures on the face should be removed as early as possible, i. e., usually after 5–6 days. The timing depends on two factors:
 Location of the suture: In skin rich with sebaceous glands, such as the tip of the nose, epithelialization of the puncture hole occurs early from injured glands, resulting in unsightly scars. For this reason, sutures in this area should be removed by 5 days after surgery or even earlier.
 Wound tension: Skin sutures should never be placed under tension. The necessary relief of tension should always be achieved by subcutaneous sutures. In certain cases this may not be possible; if so, skin sutures should be left for a correspondingly longer time and possible cosmetically unfavorable scar formation must be accepted.
Suture Techniques
Standard Suture Technique
Primary wound closure usually involves a subcutaneous suture and a skin suture (Fig. 5.3). The subcutaneous suture is placed in such a way that the knot is buried in the depths of the tissue (Fig. 5.3a). The skin margins are then re-approximated with an interrupted suture (Fig. 5.3b, c).
 Rules, Tips, and Tricks
The prerequisites for correct suturing are as follows.
 The wound edges must be of equal length at skin level. “Dog-ears” develop from incongruities and can be removed by the excision of Burrow triangles or by other techniques (Figs. 5.4 and 5.5).
 Wound edges with differing depths may be brought to the same level by skin excision and skin advancement (Fig. 5.6).
 Entry and exit holes in the skin should lie at the same distance from the wound edge (Fig. 5.3b).
 The depths of the entry and exit holes of the suture in the area of the wound must be equal (otherwise distortion of the wound edge will result) (Fig. 5.3b).
 The skin knots must not be pulled too tight, otherwise scar constriction will develop (postoperative swelling of the wound must be taken into consideration).
 The ends of the sutures must be left long enough for their easy removal, but must be cut short enough to prevent them from interfering with the adjacent sutures.
 When suturing is completed, the wound edges should be checked. The epithelium should not be rolled in, but should be everted outward (Fig. 5.3c).
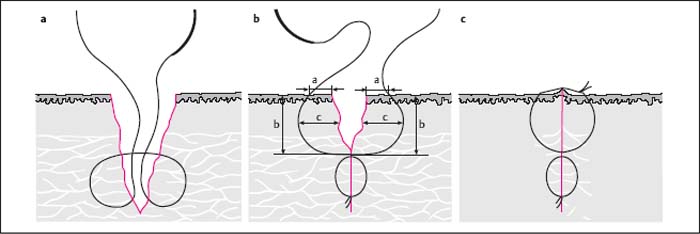
Fig. 5.3a–c Standard suture technique.
a Subcutaneous suture with buried knot.
b Suture in place
Note: Needle entry and exit holes must be the same distance from the wound edge (a), the depths of the entry and exit bites are the same (b). To achieve the desired eversion of the wound edges, the suture bites must grasp more subcutaneous tissue in the depths than at the surface (c > a).
c Wound closure completed.
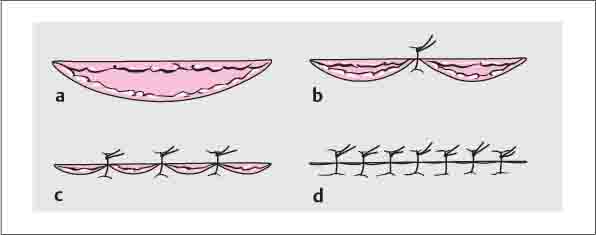
Fig. 5.4a–d Equalizing wound edges of differing lengths by “halving” (for differences in length up to ca. 5 mm).
a Short upper and long lower wound edge.
b First suture placed in the middle of the wound.
c Two further sutures, each at half the distance.
d Further sutures, each in the middle, distribute the excess skin equally along the whole length of the wound.
Special Suture Techniques
Subcuticular Suture
Surgical Principle
The special advantage of this suture is that usually only one entry and one exit hole are required. This avoids epithelialization of the puncture holes, especially in areas where the skin is rich in sebaceous glands.
Surgical Technique (Fig. 5.7)
The needle first enters the skin near one extremity of the wound and exits in the wound intradermally. The suture is then passed in a horizontal dermal plane at exactly the same level on alternating sides of the wound to the far end. The needle then exits the skin at the far end of the wound. The approximation of the wound edges is achieved by mild traction on the suture ends, which are then secured with sterile surgical tape to avoid inadvertent removal.
 Rules, Tips, and Tricks
 This technique should only be used for wound surfaces which are well adapted at the subcutaneous level.
 Good results are achieved above all in sites where the suture line lies in a natural skin line (e. g., a neck crease).
 With longer wounds, bring the suture out once though the skin after approximately 3–4 cm. If necessary, repeat after the same distance (removal of the suture is thus considerably facilitated).
 Longer suture lines with a potential risk of wound infection should be secured by transcutaneous interrupted sutures (the whole suture line will then not need to be opened up should fluid collection develop).
 This suture is less suitable for wounds with a significant curvilinear course, which would result in distortions.
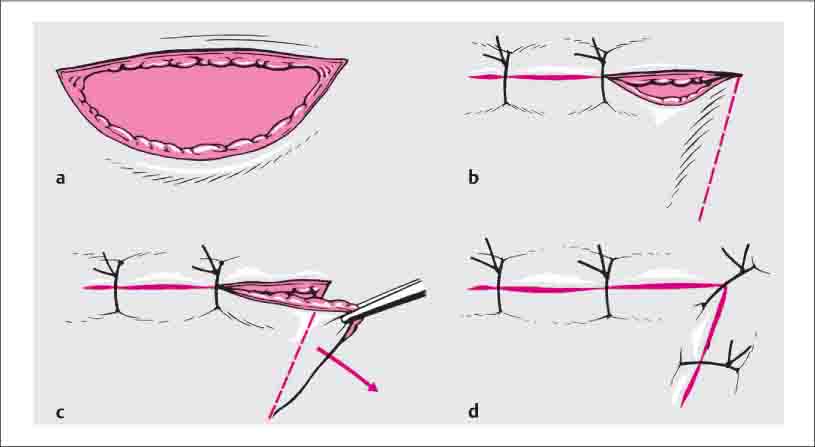
Fig. 5.5a–d Excision of a Burrow triangle (dog-ear) for differences in length >5 mm.
a Initial situation.
b Planning an auxiliary incision (broken line).
c Shortening the lower wound edge by creating an equilateral triangle and excision of the overlapping area of skin.
d Wound closure.
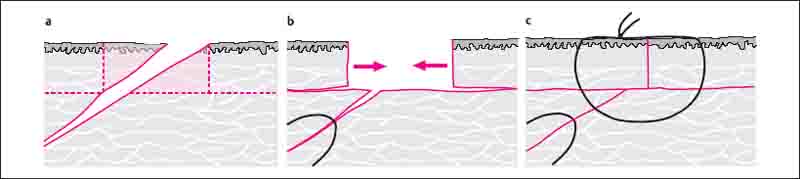
Fig. 5.6a–c Equalizing wound edges of unequal height.
a Oblique course of a laceration with a shorter and a longer wound surface. The parts of skin to be excised are marked, as is the area for undermining along the plane of subcutaneous fatty tissue.
b Closure of the subcutaneous wound and central advancement of the mobilized wound margins.
c Wound closure.
Vertical Mattress Suture (Donati Suture)
Surgical Principle
The advantage of the mattress suture is its safer re-approximation of wound edges with different depths, e. g., at the alar base or the nasolabial region. This suture everts the wound edges and helps avoid “furrowlike” scar formation (e. g., on the lip, see Fig. 5.38b). It also gives the suture additional stability.
Surgical Technique (Fig. 5.8)
The suture is inserted perpendicularly approximately 4 mm from the wound edge, carried down to the subcutis and then brought out of the wound on the opposite side at the same distance from the cut edge. It is then reinserted as a mattress suture 1 mm from the wound edge and passed intradermally across to the opposite side, where it is again brought out at the same distance from the wound edge. The stitch is pulled just tight enough to evert the wound edges slightly.
 Rules, Tips, and Tricks
Each one of these sutures can result in the production of four stitch marks. This technique should therefore only be used in the facial region when absolutely necessary. As an alternative, a modified half-buried (Allgöwer) mattress suture can be used (Fig. 5.9).
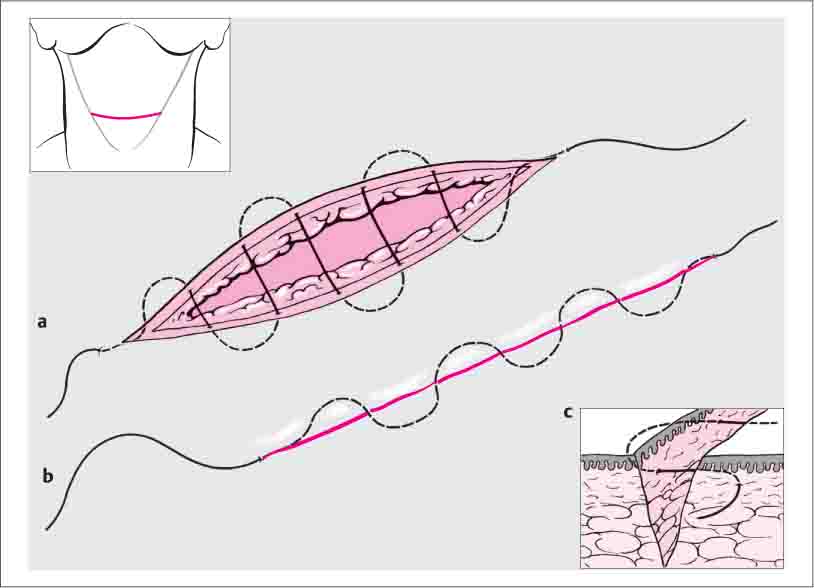
Fig. 5.7a–c Subcuticular suture (e. g., horizontal neck wound).
a Running subcuticular suture.
b Approximation of the wound edges after pulling tight the ends of the suture.
c Course of the suture within the level of the dermis.
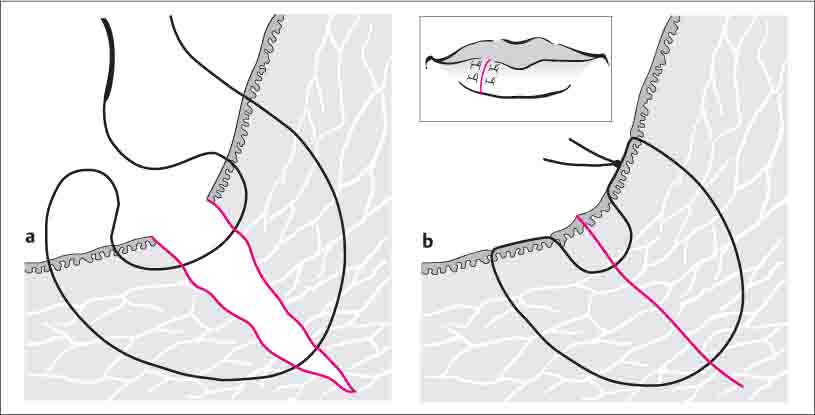
Fig. 5.8a, b Vertical mattress suture (e. g., lower-lip wound).
a Commence with entry and exit sites away from the wound (far–far technique) and continue with subcutaneous passage of the suture. The depths of the entry and exit holes must be equal.
b Wound closure.
Continuous (Running) Suture
Surgical Principle
The area of usage of this suture corresponds to that of the interrupted suture, but it can be sewn faster with longer wounds. Good results can be expected above all in areas of thin and readily mobile skin with few sebaceous glands. The eyelids in particular, and the skin of older people in general, have these properties.
Surgical Technique (Fig. 5.10)
After an interrupted suture has been placed and tightened, the thread is not cut but continued diagonally to the direction of the wound. Entry and exit holes lie exactly opposite one another. In the subcutaneous tissue, entry and exit passage must be made at exactly the same distance from the skin surface. Finally a knot is tied, as with an interrupted suture.
 Rules, Tips, and Tricks
The end of the suture should be held under slight tension by an assistant. On completion, the wound edges should be checked and, if necessary, everted.
Unlike the intracutaneous suture, this suture technique is also suitable for curvilinear wounds, in which case the stitches should be placed closer together.
Management of Soft-Tissue Injuries and Their Sequelae
Primary Management
The primary management of soft-tissue injuries of the face is decisive for later results. Wounds that are not adequately treated at this stage can be corrected later only with much time and effort, and then only to a limited degree.
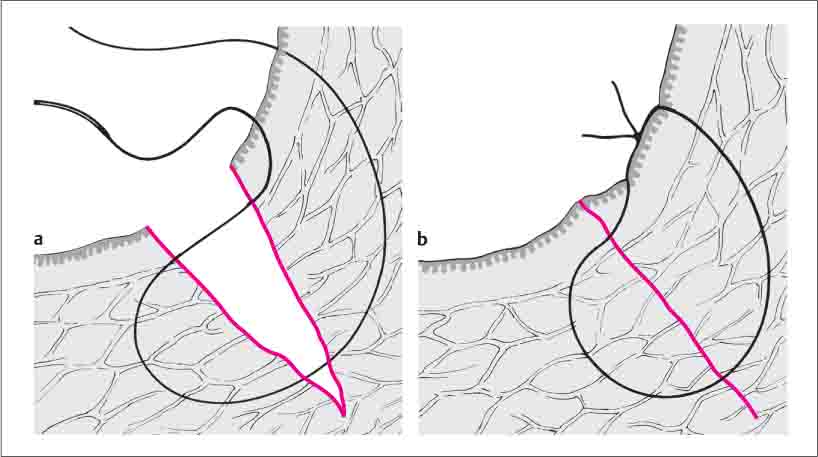
Fig. 5.9a, b Half-buried vertical mattress suture (Allgöwer stitch).
a The entry point is away from the wound, the suture passes in the depths of the wound to make an intracutaneous exit on the opposite side of the wound. Crossing back to the original side, the entry site is at the same intracutaneous level with a near exit site.
b Wound closure.
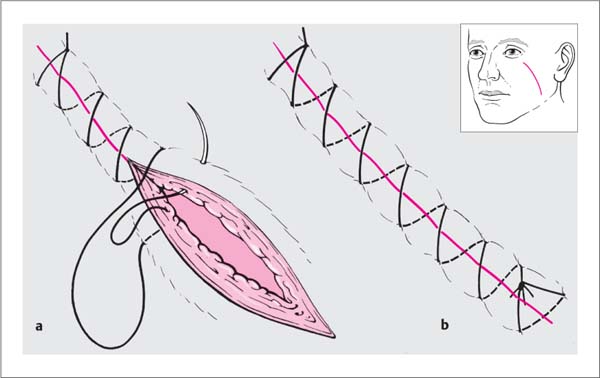
Fig. 5.10a, b Simple continuous over-and-over or running suture (e. g., cheek wound along RSTL).
a Passage of the suture after knotting at one end of the wound. Entry and exit sites are the same distance from the wound edge. The stitches are the same distance apart.
b Wound closure after knotting with the formation of a suture loop. Three suture ends remain after cutting the thread.
Primary Management of Facial Injuries
 Ensure adequate tetanus immunization.
 Check wounds for foreign bodies, consider cleansing and irrigation with physiological saline or hydrogen peroxide; remove embedded foreign bodies (“dirt tattoos”) with a brush.
 Make conservative use of bipolar coagulation.
 Sparingly straighten any jagged wound edges, conservative skin excision (no formal wound excision).
 Re-approximate superficially avulsed epithelium with fibrin glue in a mosaic fashion.
 When faced with full-thickness defects, do not insert any sutures under tension (apply plastic reconstructive measures using transposition flaps from the adjacent area).
 Accurate suturing is essential in the region of the mucocutaneous junctions of skin and mucosa (free alar margin, lip, eyelid margin).
With dog-bite injuries there are usually full-thickness defects, commonly in the region of the tip of the nose. If it is only a gaping wound, then it may carefully cleaned and primarily closed in layers. Attempts should be made to reconstruct such defects early (within 24 hours after sterile dressing) with appropriate plastic reconstructive measures. Scar contracture after secondary healing requires generous excision and undermining of wound edges, which can enlarge the defect considerably.
Scar Revision
Scar revision may be indicated for functional reasons if severe contractures and distortions are present. In most cases, however, scar revision is indicated for cosmetically disturbing scars, which are not rendered invisible but may be made less conspicuous by surgical means.
Questions to Ask in the Preoperative Assessment of Scars
 Is it retracted, or thick and raised?
 Is it adherent to the undersurface, or mobile?
 What is the position of the scar relative to the RSTL?
 Is there distortion of adjacent tissue or functional impairment?
 How old is the patient? (There is a risk of hypertrophic scars or keloid formation in children and adolescents.)
 How “mature” is the scar? (Only a scar that has become pale is ready for revision.)
Hypertrophic scars develop as a result of increased skin tension. A scar that does not run along the RSTL, or the increased retraction of wounds in children and adolescents, can cause an increased production of collagen, resulting in reddish, lumpy scars that lie above skin level but do not extend beyond the boundaries of the original wound.
Keloids, on the other hand, are genuine neoplasms, which extend laterally beyond the boundaries of the original wound and into healthy tissue. They are more common in adolescents and dark-skinned individuals. The tendency to form keloids is often inherited. Areas of predilection are, among others, the posterior surface of the ear and the neck region. Since inconspicuous scars, hypertrophic scars, and keloids can coexist in the same patient, the existence of a “normal scar” (e. g., an appendectomy scar) in a patient is no sure indication for the absence of a disposition to keloid formation.
Standard Operative Techniques for Scar Revision
Small retracted scars, e. g., acne scars, are either excised or the affected area of skin is subjected to abrasion using a suitable laser procedure (CO2, Er:YAG).
Slightly raised scars of less than 2 cm in length are planed down using a high-speed (up to 50 000 rpm) rotating brush or with a diamond fraise (dermabrasion). The operation is performed under local anesthesia and may be repeated at 4- to 6-week intervals.
Hypertrophic scars are excised, together with a margin of healthy tissue, if they do not regress spontaneously within 1 year. Wound tension, which is the cause of the increased production of collagen, must then be reduced. As a rule, the adjacent tissue must be widely undermined to make it possible to approximate the wound edges under minimal tension. The main tension must be taken up by absorbable subcutaneous sutures (see Figs. 5.11 and 5.12 for scar revision technique).
Management of Keloids
The management of keloids is problematic, given that they are neoplastic growths initiated by injury to the dermis. Any skin incision made for scar revision will therefore induce the formation of new keloid substance.
Surgical Principle
Excision and wound management without tension. Further measures are taken as prophylaxis against recurrence (see below).
Surgical Technique
Excision, if necessary leaving behind a fine keloid fringe, followed by wide subcutaneous undermining to approximate the wound edges without tension. Subcutaneous sutures are used to approximate the wound edges. Subcuticular skin sutures should be used, if possible.
 Rules, Tips, and Tricks
Before any scar revision, hypertrophic scars and keloids must be strictly distinguished. Intralesional injection of the revised wound with a steroid crystal suspension, followed by weekly repeat injections, has proved effective for keloids. In addition, pressure dressings should be applied for as long as possible (depending on the affected region). Postoperative radiotherapy is not generally used nowadays for these mostly adolescent patients. Should the resulting defect after excision of the keloid be too large for primary suture closure, then it may also be resurfaced with a full-thickness skin graft. Retro-auricular keloids (e. g., after otoplasty) in particular may be treated with a skin graft harvested from the groin.
The indication for the revision of keloid scars should be made with extreme caution and the patient should not be encouraged to be too optimistic about the prospects of success.
W-plasty
Surgical Principle
Converting a linear scar into a zigzag shape distributes the tensile forces in the region of the scar so that the scar line is optically “broken up.” With scars running perpendicular to the RSTL (e. g., scars in the region of the cheek, see Fig. 5.11), part of the newly formed scar is redirected in a parallel fashion. At the same time retracted scars are corrected by resection and undermining.
Indications
Linear course of the scar perpendicular to the RSTL, step-offs (“trap-door deformity”).
Surgical Technique (Fig. 5.11)
 Under local anesthetic, the zigzag skin incisions are marked with a pen, ensuring that the lines of either side interdigitate.
 The previously marked skin is scored with a pointed scalpel blade (No. 11). Blurring of the ink marks is then of no consequence.
 The scar is then excised with the scalpel, producing vertical incisional edges down to the subdermis.
 The area should be generously undermined and adapting subcutaneous sutures placed.
 The triangular skin flaps are repaired with fine sutures (6/0).
 A pressure dressing is applied for 1 week.
 Rules, Tips, and Tricks
The triangular skin flaps should not be cut too small and should be raised from unscarred skin. The area of undermining depends upon the resulting defect: it should at least equal the width of the defect on either side. This undermining of the skin is the simplest method for dealing with skin tension. A few skin sutures for approximation are helpful before placing the definitive skin suture, so as not to misjudge each corresponding flap and be left with a superfluous triangle of skin at the end.
Alternatives
Unlike the regular M- or W-shaped scar formation after Wplasties, the geometric broken-line technique results rather in a scar that is broken up and rendered less conspicuous. For this purpose the wound edges are excised in various geometric forms (triangles, squares, quadrangles) (Fig. 5.12).
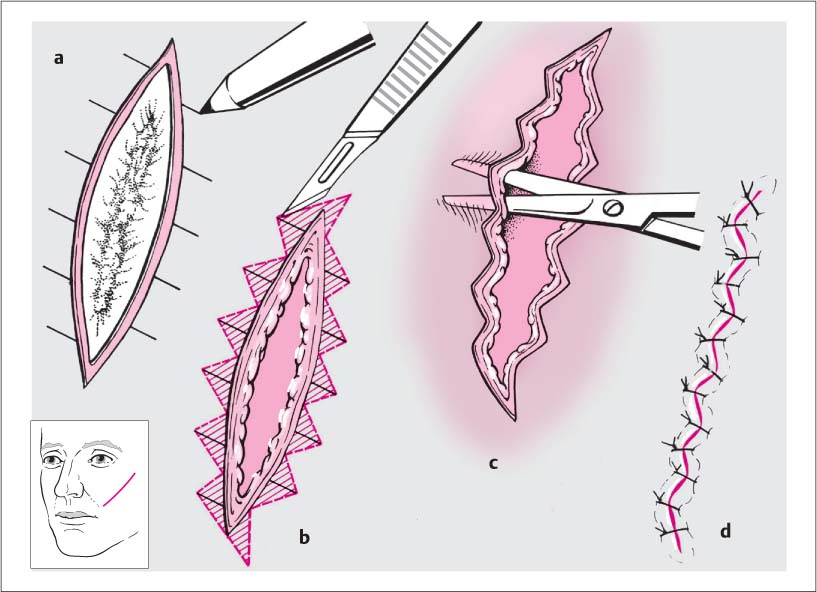
Fig. 5.11a–d Scar revision using W-plasty technique (e. g., cheek wound perpendicular to the RSTL).
a Elliptical incision around the contracted scar. Auxiliary lines indicate the tips of the zigzag line.
b The zigzag line is marked out and scored with the pointed scalpel. Note the incision along the wound edges where largely congruent surfaces are created. The scar has already been excised.
c Appearance after resection of the triangular areas. Undermining of the wound edges in the subcutaneous plane.
d Wound closure.
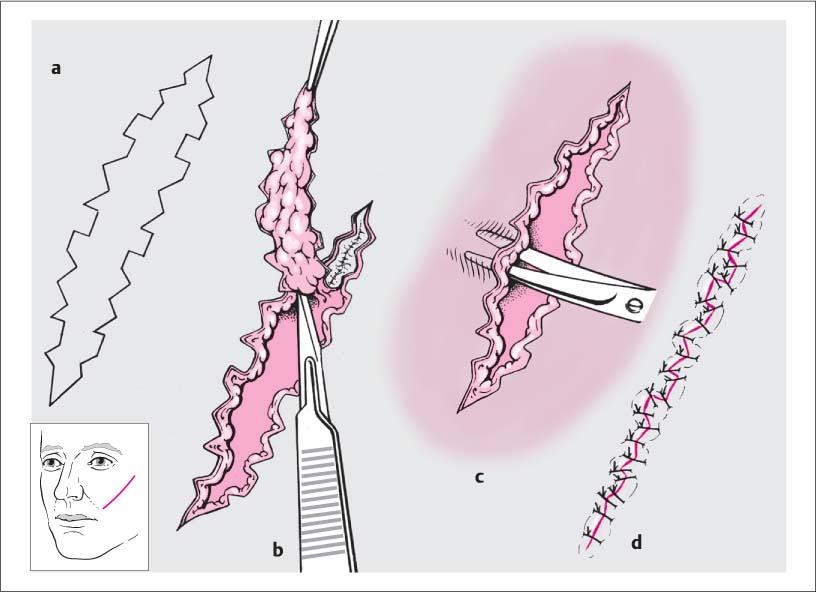
Fig. 5.12a–d Broken-line technique (e. g., cheek wound perpendicular to the RSTL).
a Marking the skin incision. Formation of identical geometric forms on either side of the scar (not mirror images).
b Excision of the marked skin areas down to the subdermis.
c Undermining of the wound edges.
d Wound closure.
Surgical Technique for Relieving Skin Tension
Z-plasty
Surgical Principle
A Z-plasty has three effects:
 Tension between the ends of the scar is relieved (a scar which is “too short” is lengthened).
 Two adjacent triangular skin flaps are exchanged.
 The original course of the scar is reorientated by up to 90°.
Indications
For any scar revision, it is above all the lengthening and transposition effect that is significant. The gain in length is achieved at the expense of the adjacent lateral tissue (see arrow in Fig. 5.13). Transposition is primarily desired when the original scar runs perpendicular to the RSTL (e. g., a vertical scar on the skin of the neck).
Surgical Technique (Fig. 5.13)
First, the existing scar is excised. Auxiliary incisions are placed to create lateral limbs at the end of the wounds and two triangles are elevated by undermining. The flaps are then transposed and inset by suturing in two layers.
 Rules, Tips, and Tricks
 Maximal gain in length with reorientation of the scar by 90° is only achieved if the length of the lateral limbs corresponds to the length of the scar and they are at an angle of 60° to the scar (formation of equilateral triangles). If the course of the primary scar is different, preference should be given to a “multiple W-plasty”).
 Undermining must be carried beyond the limits of the triangular flaps (shaded area in Fig. 5.13a) to allow suturing without tension.
 The mobility of the lateral skin should be taken into consideration when planning the operation (remember aesthetic units).
 The lateral limbs should lie more or less parallel to the prevailing RSTL.
V–Y Plasty
Surgical Principle
The technique achieves lengthening of the scar (without transposition) by linear advancement (e. g., ectropion of the lower eyelid, Fig. 5.14). The nomenclature comes from the initial V-shaped auxiliary incision and the subsequent Y-shaped suture closure. As with the Z-plasty, lengthening is achieved at the expense of the adjacent lateral tissue (see arrows in Fig. 5.14a and c).
Surgical Technique (Fig. 5.14)
Excision of the scar is followed by a V-shaped incision at one end of the wound (Fig. 5.14a). The lateral skin is undermined and the opposite end of the wound is placed under tension with a skin hook (Fig. 5.14b). The V-shaped incised flap is sutured in its new position to the lateral wound edges, thus achieving “lengthening” (Fig. 5.14c).
 Rules, Tips, and Tricks
No new distortions should appear in the lateral regions of the wound; if necessary, the undermining should be extended. As with a Z-plasty, the auxiliary incisions should lie in the RSTL. Any resulting linear scars can be additionally broken up with a W-plasty.
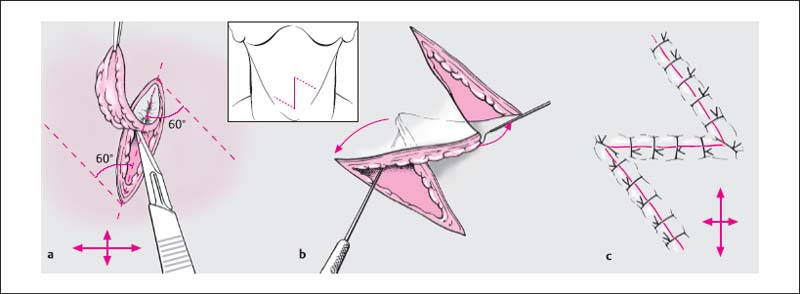
Fig. 5.13a–c Z-plasty (e. g., vertical scar on the neck).
a Scar excision; lateral limb incisions and area of skin undermining are marked.
b Transposition of the triangular areas of skin (generous undermining).
c Wound closure (crossed arrows indicate vertical lengthening at the expense of the adjacent lateral area.
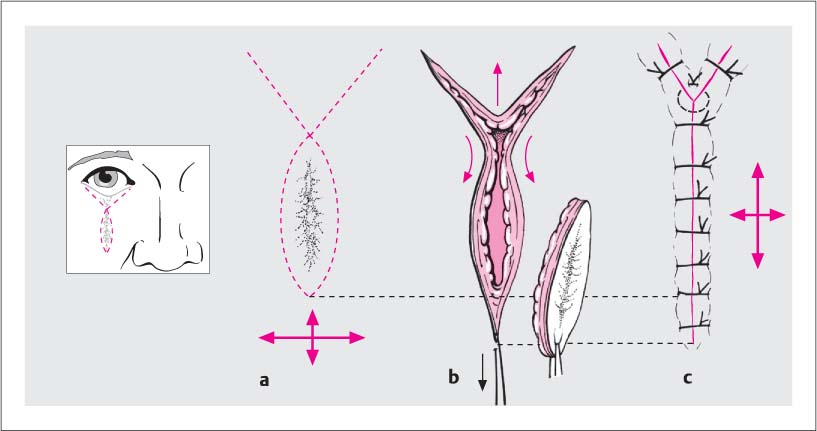
Fig. 5.14a–c V–Y plasty (e. g., ectropion of the lower eyelid caused by vertical scar contracture).
a Marking of the incision lines: elliptical incision around the scar, V-shaped auxiliary incision at one end of the wound.
b Resection of the scar area and undermining of the skin. The lower end of the wound is placed under tension.
c Y-shaped wound closure. The lengthening gained is marked by the dotted lines. (Crossed arrows indicate vertical lengthening at the expense of the adjacent lateral area.)
Stay updated, free articles. Join our Telegram channel

Full access? Get Clinical Tree


