The overlay, or lateral graft, tympanoplasty technique was established as a reliable method to reconstruct the tympanic membrane in 1961 when Storrs published the first series using temporalis fascia for the graft.1 This technique was then adopted by others, with a >90% graft take reported in subsequent years.2
24.2 Patient Selection
The main advantage of the overlay tympanoplasty technique is full visualization of the anterior tympanic sulcus in patients with total, subtotal, or anterior tympanic membrane perforations. The technique is advantageous in cholesteatoma surgery and in cases of severe tympanosclerosis when the tympanic membrane remnant is diseased, warranting complete resurfacing with fascia. The lateral graft tympanoplasty technique has a high graft success rate and can be utilized in every chronic ear scenario.
24.3 Surgical Technique
Although lateral graft tympanoplasty is feasible using local anesthesia, the majority of cases are done under general anesthesia to maximize patient comfort. The table is placed in a slight Trendelenburg position and rolled toward the surgeon to increase visualization of the posterior-superior quadrant of the tympanic membrane and ear canal where the vascular strip and ossicles are located. Under microscopic vision, the bony cartilaginous junction of the ear canal skin is injected in 4 quadrants with local anesthetic using 1% lidocaine with 1:100,000 epinephrine. The postauricular sulcus is also infiltrated with local anesthetic. The following eight steps provide the framework of the overlay tympanoplasty technique.3
24.3.1 Step 1: Transmeatal Incisions
After local anesthetic injection, transcanal incisions are made along the tympanosquamous suture line (anterior-superiorly) and the tympanomastoid suture line (posteriorly) using either a No. 1 knife (sickle) or a No. 64 Beaver knife (▶ Fig. 24.1a). A line extended from the short process of the malleus superiorly is a good approximation of the tympanosquamous suture line. These two suture lines demarcate the vascular strip portion of the ear canal skin, which is thicker and tends to swell to a greater degree after infiltration with local anesthetic (▶ Fig. 24.1b). A medial incision connecting the vascular strip using a No. 72 Beaver knife can be made but is not necessary.
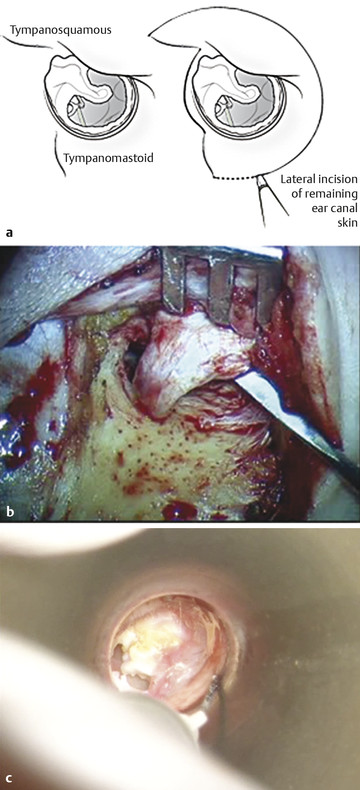
Fig. 24.1 Vascular strip. (a) Incisions along the tympanosquamous (TS) and tympanomastoid (TM) suture lines, which define the vascular strip, are depicted for a right ear. (b) Injection of local anesthetic into the vascular strip of a left ear. Characteristic ballooning of the thick vascular strip skin is observed. (c) Intraoperative photograph in a right ear, showing elevation of the vascular strip after postauricular exposure is obtained.
24.3.2 Step 2: Postauricular Exposure and Removal of Fascia
A standard incision is made in the postauricular sulcus and extended superiorly 1 cm above the level of the postauricular fold. The incision is carried inferiorly toward the mastoid tip at the level of the ear lobule. Skin flaps are raised anteriorly and posteriorly at the level of the temporalis fascia once the areolar tissue is dissected off the underlying true temporalis fascia. A No. 15 blade is used to incise the temporalis fascia 1 cm above the linea temporalis, and Metzenbaum scissors are used to harvest a 2 cm x 2 cm piece of fascia, which is then pressed and spread out. It is important to remove any adherent muscle or areolar tissue from the harvested graft, which is then set aside under a heat lamp to dehydrate.
Incisions are made through the soft tissue overlying the mastoid bone at the linea temporalis and extended inferiorly toward the mastoid tip just below the level of the ear canal. It is good practice to manually palpate the mastoid tip while making this incision to ensure the stylomastoid foramen is not in close proximity. The periosteum is elevated anteriorly using a Lempert elevator to expose the ear canal skin. A self-retaining retractor is placed to retract the auricle forward.
The canal skin is elevated using a narrow elevator until the transcanal incisions demarcating the vascular strip are encountered. The vascular strip is gently elevated off the canal bone and tympanic membrane and placed in the retractor (▶ Fig. 24.1c). A Perkins retractor can be useful to retract the auricle and the vascular strip anteriorly without traumatizing the ear canal skin.
24.3.3 Step 3: Removal of Canal Skin
With the retractor in place, a semilunar incision is made in the remaining ear canal skin using the No. 64 Beaver knife just lateral to the bony cartilaginous junction. Hair-bearing canal skin measuring 1–2 mm and lateral canal cartilage are included to ensure complete skin removal from the lateral bony ear canal. To accomplish this, the blade is beveled toward the bony portion of the ear canal to develop the correct plane of dissection (▶ Fig. 24.2a). Using a round knife, the periosteum and canal skin are elevated from the canal bone down to the annular ligament (▶ Fig. 24.2b). The tympanic annulus should be left in place anteriorly given that this structure will support the graft. Posteriorly, removal of the annulus has no consequence. Of special note in children, it is best to begin the lateral anterior canal skin incision posterior-inferiorly to avoid injury to their developing cartilaginous ear canal.
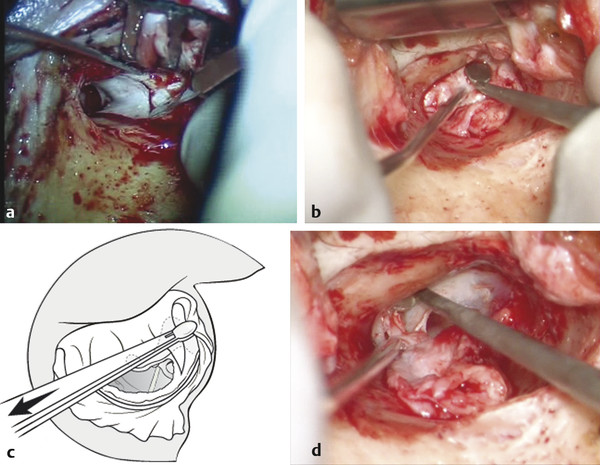
Fig. 24.2 Removal of canal skin. (a) The No. 64 Beaver knife is used to incise the remaining ear canal skin 1 to 2 mm lateral to the bony cartilaginous junction of the ear canal. Notice the blade is beveled toward the bony portion of the ear canal. (b) A round knife is used to elevate the ear canal skin medially toward the annulus. (c) Left ear; cup forceps are used to grasp the outer epithelial layer of the tympanic membrane just anterior to the short process of the malleus. Note the vector of force is directed parallel to the short process of the malleus. (d) Left ear; the round knife is positioned perpendicularly along both the annulus and the medial bony ear canal to peel the epithelial layer of the tympanic membrane off in continuity with the canal skin.
Once the ear canal skin is elevated down to the annulus, the tympanic membrane remnant is de-epithelialized in continuity with the canal skin. Only the outer epithelial layer of the tympanic membrane must be removed; the middle and inner fibrous layers are left in place. Using small cup forceps, the outer layer of the remnant tympanic membrane anterior-superiorly is grasped and gently peeled off the short process of the malleus. It is imperative that the vector of force is parallel to the short process of the malleus (▶ Fig. 24.2c). Once the plane between the outer epithelial layer of the tympanic membrane and the middle fibrous layer is developed, a round knife is positioned perpendicularly along the annulus and medial bony canal to continue the de-epithelialization anteriorly and inferiorly until the entire skin specimen is freed and can be removed (▶ Fig. 24.2d). The round knife should be kept in contact with the medial ear canal bone at all times to ensure complete skin removal. The periosteum and canal skin are set aside and kept moist in saline-soaked gauze.
24.3.4 Step 4: Enlargement of the Ear Canal; Canalplasty
Using a combination of four cutting and three diamond drill bits with continuous suction irrigation, the ear canal is enlarged by removing the anterior and inferior canal bulges. Removing the anterior and inferior bony overhangs is imperative to allow for complete 360-degree visualization of the tympanic annulus to ensure both complete de-epithelialization and optimal graft placement. Equally important is drilling medially to enlarge the acute angle, which exists anteriorly (▶ Fig. 24.3). Creating a more obtuse anterior sulcus will prevent postoperative blunting. This is best accomplished with a small diamond drill bit (2 diamond). Other than removing the spine of Henle posterior-laterally, there is usually no benefit to removing any canal bone posteriorly. Occasionally, posterior canalplasty is necessary to visualize the posterior annulus, but care must be taken to avoid injury to the vertical segment of the facial nerve.
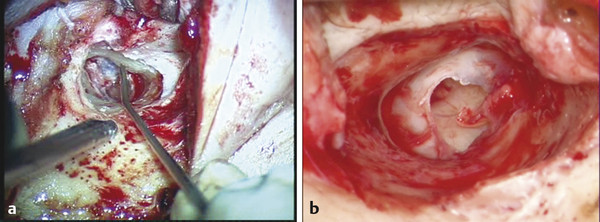
Fig. 24.3 Canalplasty. (a) Anteriorly, the superior and inferior aspects of the bony ear canal have been drilled away in a right ear, creating the classic “Mickey Mouse” ears. The Gimmick is pointing to the area of the temporomandibular joint that lies halfway between the superior and inferior troughs and halfway from medial to lateral (annulus to bony cartilaginous junction). (b) In a left ear, this is how the ear canal should appear after adequate canalplasty, removing the anterior overhang as much as possible without violating the temporomandibular joint. In this case, the temporomandibular joint slightly obscures visualization of the entire anterior annulus, but we have created an obtuse angle anterosuperiorly adjacent to the head of the malleus.
Stay updated, free articles. Join our Telegram channel

Full access? Get Clinical Tree


