Fig. 16.1
Main incision for trabectome surgery into the anterior chamber filled with 1 % lidocaine solution. (1) Entry is made 2 mm anterior to limbus and parallel to the iris in the left and right photos. Line diagrams showing how to position the blade for internal enlargement to the left (2) and to the right (3), allowing for better trabectome range without striae can be achieved by nicking Descemet’s membrane and slightly flaring the incision
The anterior chamber will not collapse as long as the keratome is kept parallel to the incision plane and no viscoelastic is needed for insertion. A small amount of fluid egress can induce temporary hypotony. This will allow blood to reflux into Schlemm’s canal and clearly outline the target structure (Fig. 16.2). Oftentimes the trabecular meshwork may not be pigmented or other pigmented structures are confusing. Misidentification and ablation of the wrong structure by beginning surgeons is the primary reason for arterial bleeding. Since the correct structure was not unroofed, the hyphema cannot exit the anterior chamber and the high persistent IOP will ensue.
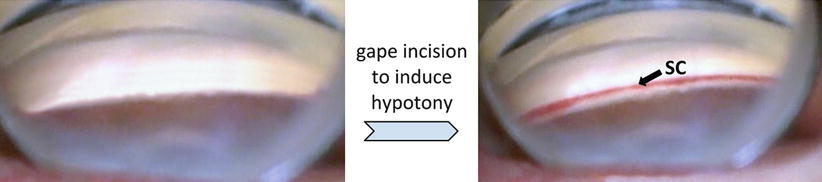
Fig. 16.2
Schlemm’s canal (SC, right) can be easily identified by gaping the main incision to induce hypotony and blood reflux from the collector channels. This is useful in nonpigmented TM but more generally to differentiate angle landmarks that may look similar (e.g., Sampaolesi’s line, TM, ciliary body band)
Following the main incision, the patient’s head is rotated about 30° away from the surgeon, while the microscope headpiece is tilted approximately 45° toward the surgeon. A direct Swan-Jacobs gonioscopy lens with proper handedness (Ocular Instruments, Bellingham, Washington) is placed to assure an adequate view of the trabecular meshwork after adjusting zoom and focus. The trabectome handpiece is then inspected under the microscope to assure the integrity of the tip. Continuous irrigation should be activated on the foot pedal but without activating electroablation which can damage the tip.
The irrigation bottle should be raised to near maximum height to deepen the angle and improve the view. The impact on visibility is manifold: surge is prevented, the iris root and peripheral iris are maximally displaced posteriorly resulting in an immediately apparent angle opening, and the cornea is forced into a stable spherical shape without striae. This also prevents reflux from the collector channels, while any pigment or bubbles are swiftly washed out through the main incision. The trabectome handpiece is inserted through the main wound. If the shoulder of the handpiece (19 gauge) cannot be inserted easily through the wound, a twisting motion with rotation along the long axis can be used as gentle but increasing pressure is applied at the wound. If this is inadequate, the upper lip of the corneal wound can be grasped and pulled anteriorly with forceps to offer less resistance to insertion. The insertion should be done quickly to avoid excess aqueous egress and anterior chamber collapse. The handpiece tip should be advanced to the center of the pupil before the goniolens is placed back onto the cornea. With the modified Swan-Jacobs lens, no coupling fluid is needed other than balanced salt solution (BSS). The goniolens should only gently touch the cornea: if striae are noted (first seen at the most superior aspect of the view), then too much downward pressure is being applied.
Identifying and Engaging Schlemm’s Canal, No Outward Pressure During Ablation
Without certain identification of Schlemm’s canal, this procedure can produce either no IOP effect when ablation occurs in the cornea or create arterial bleeding with large hyphemas and dangerous postoperative IOP. If the TM is nonpigmented, then induction of hypotony by wound gape is an effective means to visualize the TM (Fig. 16.2).
Under gonioscopic view, the trabectome tip is moved toward the trabecular meshwork (TM). It is easier to initiate ablation at a point that is more toward the left than exactly at the opposite site of the chamber. This offers a better angle of engagement because the tip is now pointed toward, and not parallel to, the TM (Fig. 16.3).
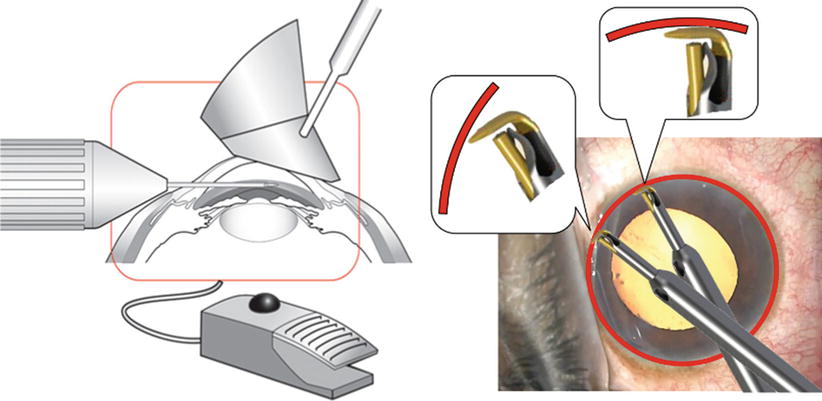
Fig. 16.3
Left: Sketch of trabectome, lens and eye. Right: If entry of Schlemm’s canal opposite of the main incision is difficult, the tip should be moved toward the left to allow a more pointed encounter
The TM is approached with the tip at a 45° angle aimed upward (Fig. 16.4), from just inferior to the TM at the scleral spur. The spur will keep the space open and resist collapse of Schlemm’s canal which occurs when the trabectome tip is held parallel and pushed outward when engagement is attempted directly across from the incision. Once the footplate is behind the TM, a slight inward pull should be exerted to counteract the tendency to push outward. This tenting of the TM changes the visibility of the ablation tip and confirms proper insertion. Ablation is started toward the surgeon’s nondominant hand.
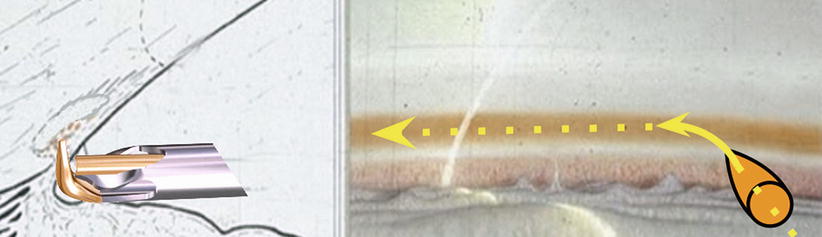
Fig. 16.4
Entry of Schlemm’s canal with the trabectome is easiest directly anterior to the scleral spur in a 45° angle because the space is maintained by it. If the trabectome is held parallel to the trabecular meshwork, Schlemm’s canal collapses
Ablation can be carried out starting at 0.8 mW and titrated up. Power should be decreased if visible blackening of the upper and lower edges of the TM occurs. This is possible although heat transfer through the footplate to the outer wall is only 1.2°C. As discussed, the bottle height should be at maximum. The trabectome foot pedal can be tapped (black ball switch) for continuous, gravity-fed irrigation, then depressed to position 1 for continuous, nonlinear aspiration and position 2 for continuous and constant ablation power. Aspiration has a maximum flow rate of 10 ml/min [2].
During ablation, it is pertinent to avoid any outward pressure, ideally preventing touching the outer wall entirely. The outer wall of Schlemm’s canal is lined with 50-μm orifices of the collector system that easily scar over when the lining endothelium is damaged (Fig. 16.5). Yet because beginning surgeons are focused on trying to enter Schlemm’s canal and engaging the TM, this mistake is extremely common leading to disappointing pressure results either early on or after several weeks as a response to endothelial damage.
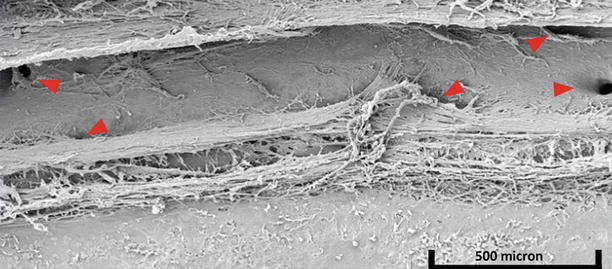
Fig. 16.5
Location of collector channel orifices. Many intakes are close to the upper (anatomic anterior) and lower (anatomic posterior) portion of Schlemm’s canal, providing a possible explanation why removal of TM with the trabectome might be superior to goniotomy which merely incises the TM allowing the remaining lips to roll inward and occlude those
Achieve 180° of Ablation
Aiming to ablate 180° of trabecular meshwork increases the chance of obtaining successful access to viable collector channels. Contrary to common belief, aqueous flow is not circumferential (Fig. 16.6). Studies ranging from injecting intracameral tracer [5] to anterior segment optical coherence tomography (OCT) [6] have shown that aqueous outflow through Schlemm’s canal is segmental, increasing near collector channels. For instance, Schlemm’s canal was shown to be 33 % wider nasally than temporally [7], and actual septae have been imaged in 2-μm resolution 3d micro-computerized tomography scans [8]. Adequate ablation can be confirmed by the white appearance of the outer wall of Schlemm’s canal. The first 60° can usually be ablated continuously without many adjustments. As visualization is turned to the remaining 30°, the goniolens is rotated in the same direction the ablation is occurring, and the eye is tilted closer to the endpoints to increase visibility (Fig. 16.7).
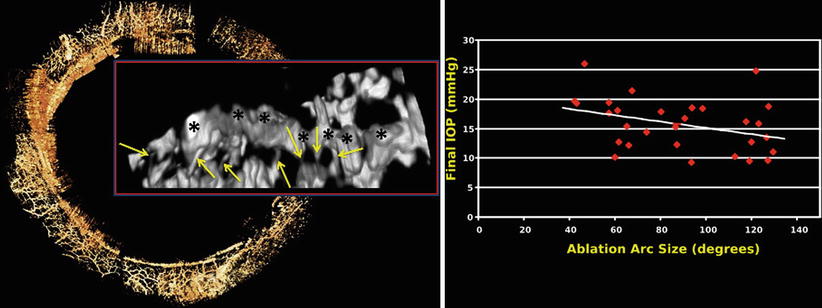
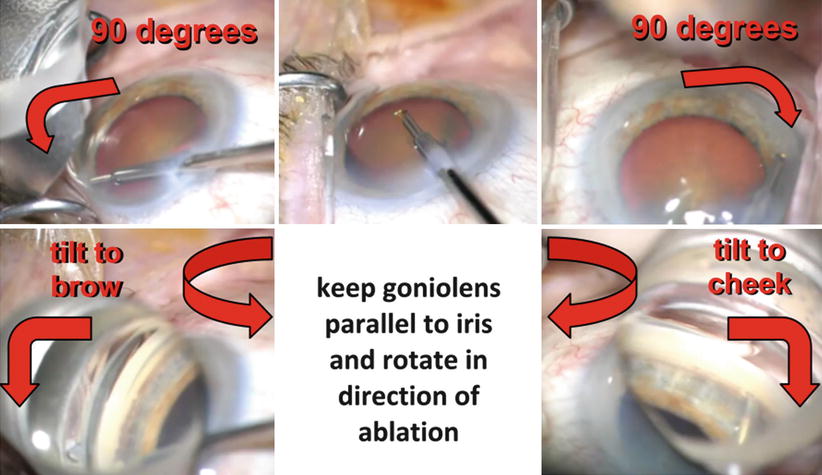
Fig. 16.7
A modified Swan-Jacob goniolens designed for trabectome surgery is placed on the cornea without compressing it. It is held parallel to the iris and rotated into the direction of ablation. The eye can be tilted upward or downward by lifting the trabectome up in the incision to increase visibility of the superior and inferior chamber angle and maximize the ablation arc to achieve near 180°. Gonioscopic prism power and angle view at these ablation endpoints is increased by lifting the distal part of the lens off the cornea to float in the pool of saline that forms during the procedure (lower left and right)
Although the goal should be to ablate a full 90°, the final 10–15° cannot always be visualized for ablation. Once the full extent of visualization is reached, the tip is retracted from Schlemm’s canal by pulling inward. It is rotated with one hand and under continuous gonioscopic view, tip down, by a full 180° and reinserted into Schlemm’s canal where the original ablation was started.
The handpiece is rotated between the index finger, ring finger, and thumb while the wrist is increasingly pronated during the ablation of the remaining 90° (Fig. 16.8). The metal sleeve of the trabectome can be rested firmly against the proximal, straight edge of the goniolens during the 180° rotation into the opposite direction. Visualization of the wall of Schlemm’s canal is confirmed as ablation continues. It is advisable not to force the tip ahead but instead stop and retract the tip. This will unwrinkle the TM or retract the tip from the outer wall and collector openings, and then ablation can be continued. After ablation is complete, the handpiece is withdrawn completely from the TM. The handpiece can then be removed from the eye.
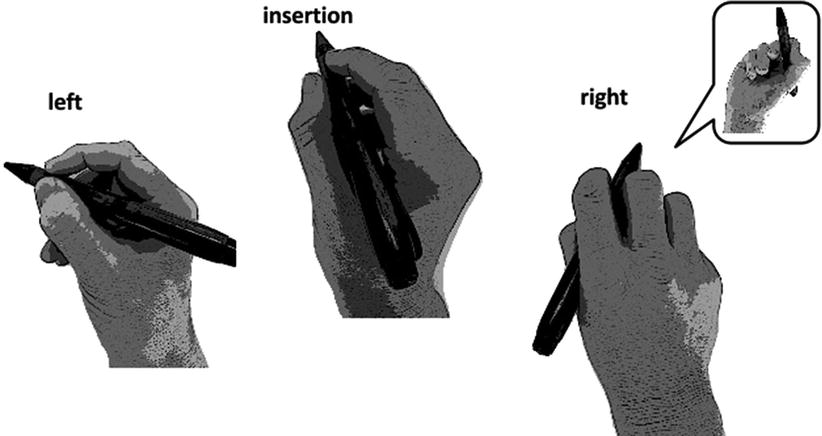
Fig. 16.8
Hand position during trabectome surgery. The trabectome handpiece is held like with phacoemulsification during insertion with the tip pointing toward the left (middle). As ablation continues toward the nondominant hand, the hand is increasingly supinated and more held like a pen (left). The handpiece is then rotated 180° under gonioscopic view and ablation continued toward the right while the hand is increasingly pronated (right; inset: finger position from below). The tip is rolled between the thumb, index finger, and ring finger to keep it parallel to Schlemm’s canal
Immediate Viscoelastic Tamponade of Ablated Canal, Chamber Pressurization
Once the ablation is complete, viscoelastic is injected directly along the ablation arc at the root of the iris. This will displace non-coagulated as well as coagulated blood and tamponade Schlemm’s canal and collector channels. We compared five different viscoelastic substances for this purpose and recommend a premixed viscoelastic with both cohesive and dispersive agents in one syringe (e.g., DiscoVisc, Alcon, Fort Worth, TX). The dispersive properties allow the viscoelastic to flow easily into the chamber angle including the orifices of the collector channels, while the cohesive properties allow to maintain the space and prevent displacement. The entire anterior chamber can be pressurized while the patient’s head is still rotated, or the head can be rotated back and the chamber then fully filled and pressurized with the remaining viscoelastic. The patient and microscope are now rotated back until they are again perpendicular to the floor.
To continue with cataract surgery, a standard keratome is partially inserted planar to the iris into the main incision (Fig. 16.9), the tip is carefully advanced past the inner lip of Descemet’s membrane, and then the heel is moved all the way down against the conjunctiva before the keratome is carefully inserted further, aided by small rotating movements around the axis of the handle if necessary. This will create a partial tri-planar incision that has a slight inverted U-shape like a scleral tunnel in ECCE and provide self-sealing features on the left and right aspects of the smaller, initial trabectome keratome incision. To conclude the enlargement of the incision, the blade is now held parallel to the iris again and the keratome moved forward to complete the incision.
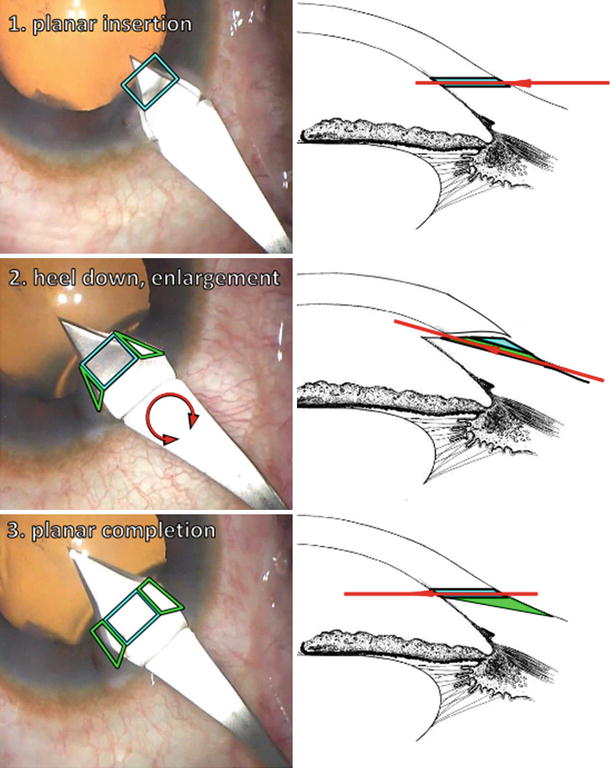
Fig. 16.9
Enlargement of the main incision (blue) to prepare for cataract surgery; tri-planar wings (green) are fashioned that allow a single self-sealing incision. This requires that in step 2 the heel of the keratome be almost flush on the conjunctiva while the keratome is gradually advanced with careful rotations. The red arrow in the drawing on the right represents the base of the keratome’s triangular blade
Capsulorrhexis and the remaining phacoemulsification steps are done in standard fashion. Just before lens insertion, viscoelastic is injected again to prepare the capsule for implantation, and a second viscoelastic crescent is injected directly along the root of the iris again with the goal to tamponade and displace refluxing blood. Following lens implantation, viscoelastic can be partially removed and the incision is hydrated. We recommend retaining at least 30 % of viscoelastic in the eye to create a positive pressure gradient from the anterior chamber to the outflow system. This will avoid postoperative hypotony and hyphema with better vision early on, and may also provide better early pressures by reducing the phacocytotic load on the remaining trabecular meshwork from red blood cells while minimizing blood clotting along the unroofed canal. It is especially important to maintain postoperative IOP because evidence suggests that fluctuations in IOP, even the brief hypotony induced following a blink, can lead to flow from the ocular surface through the clear corneal incision and into the anterior chamber [9, 10]. OCT has shown full-thickness gaping of a clear corneal wound when the IOP was at 5 mmHg [11]. The wound is hydrated but a suture is not needed and may in fact cause gaping hypotony and instant hyphema. Although the viscoelastic mentioned above has a tendency to cause considerable postoperative hypertension after regular cataract surgery if not carefully removed, the unroofing of Schlemm’s canal in trabectome surgery will allow for improved evacuation similar to glaucoma drainage device surgery.
The patient is seen the following day, at 1 week, at 1 month, and finally at 3 months. All glaucoma medications are discontinued the day of surgery. The postoperative regimen for the first week consists of a fourth-generation fluoroquinolone, prednisolone acetate 1 %, and pilocarpine 1 or 2 %, all of which are started four times daily on the day of surgery. The fluoroquinolone is continued for 7 days. The prednisolone is tapered weekly by one drop for a 4-week course. Pilocarpine is usually maintained at 4 times daily for about 4 weeks, then three times per day 4 more weeks. Flattening the iris out using pilocarpine is thought to reduce the chance of forming peripheral anterior synechiae [12]. If trabectome surgery is combined with phacoemulsification, then a proper refraction cannot be obtained until pilocarpine is stopped.
Results
The steps described above are designed to maximize visibility, facilitate identification of the correct structure, maximize the area that gains access to the outflow system, and reduce or eliminate hyphema. Our own results with this evolved technique in 192 trabectome surgeries that consisted of open-angle glaucomas and approximately one third of patients with uveitic, traumatic, angle-closure, or low-pressure glaucomas suggest that a 30 % IOP drop can be achieved from a relatively low preoperative IOP of 20 ± 8 to 14 ± 4 mmHg at year 1. The incision technique described above produces predictable astigmatism as any standard cataract incision which allows to implant toric lenses in the same session and deliver high quality of vision and satisfaction to glaucoma patients undergoing combined procedures.
The first retrospective series of 37 patients by Minckler et al., which were stand-alone trabectome cases, demonstrated a 42 % decrease in mean IOP, lowering the baseline IOP from 28 to 16 mmHg at 12 months. The series was later extended to 101 patients [1]. The larger series still demonstrated a 40 % IOP decrease. Eleven of those patients had follow-up for 30 months, and that group sustained a 33 % mean IOP decrease. A further report revealed a mean IOP decrease of 42 % after 36 months, although only five patients were still available at that time [13]. A series of 1,127 patients was composed of 738 patients who underwent stand-alone trabectome in addition to 366 cases combined with phacoemulsification [14]. This study retrospectively followed patients for up to 5 years and defined failure as either final IOP over 21 mmHg or demonstrating less than a 20 % decrease from baseline IOP and found a 55 % failure rate after 4 years. The published results of trabectome surgery are divided into stand-alone trabectome cases below in Table 16.1 and combined trabectome-phacoemulsification in Table 16.2. There are no published randomized trials involving trabectome. Longer follow-up is needed to elucidate the long-term success rates. The largest case series dating back to the first trabectome cases had 1,878 trabectome cases (alone or with phacoemulsification) recorded as of 2010 [20]. There was data on five patients who had been evaluated a full 6 years after the procedure and still maintained a 38 % mean IOP decrease.
Table 16.1
Review of published results with trabectome-only cases
Authors
Stay updated, free articles. Join our Telegram channel
Full access? Get Clinical Tree
 Get Clinical Tree app for offline access

|
|---|