Fig. 1
Tracheostomy Educational Checklist—this checklist summarizes the basic curriculum that is covered in training caregivers to be able to care for a child with a tracheostomy
There are several challenges in training family members. They have varied comfort levels in participating in their child’s care. Many have difficulty with the complexity of a tracheostomy or a gastrostomy tube, let alone the equipment that might be connected to it. Families are often apprehensive about learning their child’s care for fear of causing harm, especially if they and their children have gone through a difficult course in the ICU. Because of these and other factors, the primary and secondary caregivers may train at a different pace. Some “fear” is not necessarily a bad thing. Each caregiver will have a different comfort level with the new facts and terminology as well as varying levels of literacy. Lay caregivers, just like medical caregivers, also have different learning styles; some are more comfortable with reading about facts and tasks while others are more visual and “hands-on.” The varied comfort levels, backgrounds and learning styles require different approaches to education. We have found that it is important to appreciate these differences and adjust our teaching accordingly. Yet, there are families on the opposite end of the spectrum who seem to lack an appreciation of how important it is to learn and practice well the new skills required for their child’s care.
Although there are defined, discrete tasks and steps necessary to care for a technology-dependent child, we find that it is even more essential that the family learn how and when and why to combine individual steps and apply what they learn in the process of caring for their technology-dependent child. Our emphasis is not just to help them learn individual tasks but also help them understand how they fit in the whole algorithm of care. Often the best way for families to learn how to synthesize tasks and perform assessments is by doing care at the bedside. We find that the most successful families are the ones that can spend the most time at the bedside. They will have the best chance to render care in both ideal and non-ideal circumstances and will have the opportunity to do so with the safety net of our inpatient medical and nursing staff.
At the start of the education process, we provide the families with the “Breathe Easy” binder which includes all of the fundamentals that families need to learn to care for their child at home. The binder’s content has been translated and is available in Spanish. For families speaking other languages, we review the content with an interpreter. In some cases, this binder is distributed ahead of the tracheostomy procedure so the family can better understand why the procedure is being done and they get a sense of what to expect. The book is divided into several sections ranging in content from anatomy to discharge planning (Table 1). For consistent and standardized education practices, hospital-based and home care-based clinicians use this “Breathe Easy” binder and equipment manuals during teaching sessions. Many teaching sessions involve the use of the teach-back method.
Table 1
Contents of the “Breath Easy” binder
1. The basics | (a) Ventilator |
(a) Respiratory system | (b) Tracheostomy only |
(b) General tracheostomy information | (c) Safety |
• Learning about tracheostomies | 11. Managing Emergencies |
• Questions parents often ask about a tracheostomy | (a) Critical Airway |
2. Discharge Process | (b) Emergencies |
(a) Discharge Plan | (c) CPR |
(b) Teaching Plan | (d) Artificial Airway Bedside Card |
(c) Questions about classes | (e) Contact List |
(d) 24 Independent Stay | 12. Monitoring |
3. Assessment Skills | (a) Pulse oximeter |
(a) Taking a temperature | (b) Capnograph (ETCO2) |
(b) Fever | (c) Apnea monitor |
(c) Respiratory rate and breath sounds | 13. Prepare the Home/Home Safety |
4. Airway Clearance | (a) Preparing the Home |
(a) Chest physiotherapy (PDPV) | • Activities of Daily Living |
(b) Mechanical In/Exsufflator (MI-E) | • Safety/Inspection Checklist |
5. Tracheostomy Skills | • Home nursing |
(a) Suctioning your Child | • General supplies |
• Tracheostomy | • Cleaning Equipment—Reusables and disposables |
• Mouth/Nose | 14. Communication Development |
• Suction Equipment | (a) Passy Muir valve |
6. Manual Ventilation | 15. Additional Information |
(a) Stoma Care | (a) Glossary |
(b) Changing Trach Ties | (b) Hand Hygiene |
(c) Tracheostomy “Go-Bag” | (c) Phone update Information sheet |
(d) Changing tracheostomy tube | (d) Discipline |
• Routine | |
• Emergency | |
• Care of the cuffed tracheostomy tube | |
7. Humidification | |
(a) HME (Heat-Moisture Exchanger) | |
(b) Heater/humidifier or T-piece if asleep | |
8. Respiratory medications | |
(a) MDI | |
(b) Nebulized | |
9. Ventilator | |
(a) Settings | |
(b) Alarms and troubleshooting | |
(c) Circuit Changes | |
(d) Portability | |
10. Oxygen in the home |
Mapping the Path
Scaling the training “mountain” starts with understanding the destination. In our hospital, we have a unit that is more focused in caring for technology-dependent children and training families/caregivers for independent care at home, although training can start anywhere in the hospital. We hold a formal interdisciplinary meeting with families to initiate the concept of bringing their child home. During the meeting, we outline the training program and educational milestones, inform families about the multidisciplinary treatment team that will be supporting them, discuss the needs for continual and ongoing meetings to review progress, and articulate how training will culminate in an extended bedside stay (most often a 24-h independent stay) as a “final exam” or competency assessment (Table 2). This 24-h independent hospital stay occurs after completion of all the training, much of which has involved portable home equipment. During this stay, two trained parents or caregivers are responsible for administering all medications, checking ventilator settings, responding to ventilator and other alarms, weighing, feeding and performing anything else needed for the child.
Table 2
The 24-h stay—the “final exam”
Nurse and Respiratory Therapist Responsibilities | Family Responsibilities |
|---|---|
Arrange the 24-h stay | A trained caregiver needs to be awake at all times |
Complete the necessary paperwork for the caregivers before the stay. This includes the Daily Care Schedule, the 24-h Stay Checklist and the medication schedule | Provide all necessary care for the child |
Review paperwork with all caregivers | Perform paperwork to document that you performed care and certain tasks |
Measure vital signs | Measure vital signs three times in the 24-h period unless your child needs more frequent monitoring |
Check ventilator settings | |
Perform assessments as usual | |
Document above care | |
Remains alert to all alarms and respond if necessary | Respond appropriately to all alarms |
Place the monitor in the Monitor Pause mode if nurse call and central monitoring are available on the unit. The patient remains visible on the central monitor at all times but alarms only sound in patient’s room. (A doctor’s order is required for Monitor Pause for this 24-h time period) | Respond to all alarms. Request assistance as needed |
Obtain pulse oximeter | Monitor child on home equipment |
Obtain feeding pump if necessary | |
Post medication schedule | Give medications at the correct time according to the medication schedule |
Double check that medications administered by caregivers have correct name, dose, time, route and indication | |
Ask nurse for the correct medicine at the correct time | |
Give meds to the caregivers upon request if above parameters are correct | |
Understand the indications for all medications | |
Watch the caregiver give each medication | |
Have nurse observe | |
Respiratory therapy observes respiratory treatments | Perform all respiratory treatments at the correct time and according to schedule |
Have RT observe | |
Respiratory therapy observes vent tubing change to assure that it is done correctly | Change ventilator tubing change at some point during the stay. Check the ventilator settings and document this on the 24-h Stay Checklist |
Is knowledgeable of time for trach change and available for emergency assistance during trach change | Change trach without help from the staff. Have nurse available in case of an emergency |
Double check that the caregivers have all necessary equipment for the walk off the unit. The patient will be on his highest ventilator support | Gather the necessary equipment for an independent walk off the unit and make the ventilator portable |
Have nurse and/or respiratory therapist check equipment and settings | |
Evaluate 24-h stay and family’s ability to care for child independently | Review/Discuss the 24-h experience with nursing and respiratory staff |
Document the caregivers’ ability during the 24-h stay in a Progress Note in the chart and on the Interdisciplinary Patient-Family Education Flowsheet | Evaluate success or need for remediation |
Reinforce training. Reschedule 24-h hospital stay if first attempt is unsuccessful | Reschedule 24-h hospital stay if first attempt is unsuccessful |
We emphasize that the discharge process starts at on admission and that the more families practice their child’s care, the more comfortable they will be when caring for their child at home. We give them an outline of the eight-week training program, which lists all the steps that are necessary to bring a technology-dependent child home (Table 3). We adjust specifics in the curriculum to the child’s individual medical needs. The actual length of training time depends on the child’s medical stability, the family’s availability for training, and caregiver mastery of the educational materials and accompanying skills. Frequently one or both caregivers have to work or care for other siblings, which can limit their availability to learn care. We ask families to give us a calendar of their availability so we can plan training sessions and ensure we have the necessary nursing or respiratory therapy (RT) staff available for teaching.
Table 3
The “8 week” plan of care—this is the roadmap that many families follow to figure out what they should be doing and when during their training
Timeframe | Task | Responsible parties |
|---|---|---|
Before tracheostomy | Initial meeting to discuss discharge options. Review tracheostomy info | Family with current healthcare team |
Explore shift nursing, therapy and equipment benefits | Case manager | |
SSI disability or Waiver application | Family and social worker | |
Identify 2 Caregivers, if home is the goal | Family | |
Week 1 (once medically stable) | Family Focus meeting to set discharge goals/tentative discharge date | Family and healthcare team |
Develop Letter of Medical Necessity for nursing | Nurse practitioner/doctor and case manager | |
Obtain Breathe Easy: Caring for Your Child with a Tracheostomy at Home | The family learning center | |
Develop training plan—schedule on calendar | Family and registered nurse | |
Begin training | Caregivers and healthcare team | |
Week 2 | Training continues | Family and healthcare team |
Home Nursing Agencies interviewed | Family | |
Durable Medical Equipment (DME) companies interviewed and one chosen | Family (and case manager) | |
Initial equipment list submitted | Case manager. Respiratory therapist, nurse | |
Home Evaluation by DME scheduled | Family and case manager | |
Application for Home Ventilator Program begun (Pennsylvania residents) | Social worker and family | |
Application for Handicapped Parking placard | Social worker | |
Initiate age-appropriate school planning | Family and social worker | |
Consults to therapies for home adaptive equipment—special stroller, wheelchair and other equipment— prescription (Rx) and letter submitted | Physical and occupational therapists and case manager | |
Week 3 | Training continues | Family and healthcare team |
Home nursing agency chosen | Family (and case manager) | |
Therapists schedule a home visit, if needed | Family, physical therapist and occupational therapist | |
Home evaluation by DME completed | Family and case manager | |
DME Report communicated to family | Family, case manager and DME | |
Week 4 | Training continues/documentation reviewed | Family and healthcare team |
Initiate referrals for Outpatient Therapy, if needed | Therapists and case manager | |
Wheelchair ordered if needed | Physical therapist | |
Home Vent Application submitted (Pennsylvania residents) | Social worker | |
Therapists home visit completed; recommendations given to the family | Therapists, family, case manager and social worker | |
Week 5 | Training continues | Family and healthcare team |
Family/Team Meeting to discuss progress, evaluate tentative discharge date | Family and healthcare team | |
Review home readiness, (stroller, car seat) | ||
Identify Primary Care Pediatrician | Family and nurse practitioner/physician assistant | |
2 weeks before discharge (~week 6) | Training continues | Family and healthcare team |
Discharge meeting scheduled for Week 7 | Family and case manager | |
Home Equipment delivered to hospital and vent used | DME, case manager and respiratory therapy | |
Review transportation needs | Family, social worker and case manager | |
Pre-authorizations for medications obtained; pharmacy chosen | Case manager, nurse practitioner/doctor/physician assistant | |
1 week before discharge (~week 7) | Training completed; 24 h stay scheduled | Family and healthcare team |
Submit any changes to home equipment list | Nurse and respiratory therapist | |
Home equipment delivery date set | Family, case manager and DME | |
Home repairs/alterations completed | Family | |
Adaptive equipment needs finalized | Family, therapists and case manager | |
Discharge family/team meeting occurs | Inpatient and outpatient healthcare team | |
Prescriptions forwarded to pharmacy | Family and healthcare team | |
Initiate Early Intervention paperwork | Family and social worker | |
WIC application completed and appt made | Family and social worker | |
Week of discharge | Home equipment delivered and inventoried | Family and case manger |
Letters sent to local emergency response and utility companies | Family, case manager and social worker | |
24 h stay completed, home medications reviewed | Family | |
Formula preparation reviewed | Family and nutrition | |
Discharge transportation plans completed | Family and case manager | |
Home Nursing schedule completed and approved by outpatient attending physician | Family, case manager and doctor/nurse practitioner | |
Outpatient therapy services confirmed; summaries to parents | Case manager, nurse practitioner and doctor | |
Chest X-ray copied for home | Case manager | |
Complete plans for Early Intervention or school reintegration | Family and social worker | |
Follow up appointments reviewed | Nurse practitioner/doctor/physician |
The training involved is a combination of classroom education in our centralized family learning center, which helps assure that all caregivers will get the same training, and bedside hands-on training. Staff nurses and respiratory therapists provide hands-on training for most of the care that the family needs to learn. They assess caregiver’s learning needs on an ongoing basis. The goal of caregiver-in-training is proficiency in each task without requiring additional reinforcement by the completion of the training. All disciplines track each caregiver’s progress on one interdisciplinary form. Once caregivers are deemed proficient, they are encouraged to use that skill to help with the child’s care as opportunities arise. Although there is a prescribed number of times that the family must demonstrate a certain tasks, we are careful to emphasize that the goal is NOT demonstrating a skill the requisite number times, but repetition of skills as often as needed to gain comfort in that skill. We also stress critical thinking skills and troubleshooting techniques.
Hiking to the Mountain: Understanding and Seeing Their Child in a New Light
We teach families the basics of airway anatomy (from nose to alveoli), the muscles of respiration, and the role of the respiratory system in the body. Staff also reviews what a tracheostomy tube is and what it looks like, the function of a tracheostomy, and what to expect after the initial surgery. There is also a list of frequently asked questions (and answers) in the training materials that parents often have about tracheostomy tubes. The goal is to teach them the purpose of the tracheostomy tube in their child’s care and help them appreciate that the facts they are learning are important to their child’s well-being (Fig. 2).
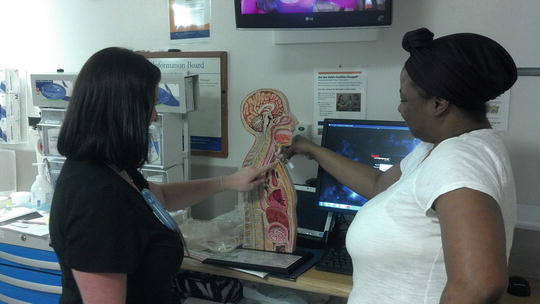
Fig. 2
Nurse and parent review airway anatomy to understand tracheostomy placement
Since the ability to do a respiratory assessment in this population is critical, we teach caregivers to do a thorough clinical respiratory assessment. We teach them to count their child’s respiratory rate accurately and know the differences between inspiration and expiration. We also teach caregivers to use a stethoscope properly, where to auscultate and how to describe what they hear. We emphasize that it is important for them to know their child’s “normal” respiratory status and the value of assessing their child’s respiratory status regularly so that deviations from the baseline can be recognized and addressed quickly if appropriate. They are expected to be able to recognize the symptoms of respiratory distress such as the presence of retractions, nasal flaring, wheezing and cyanosis. Finally, they are expected to know when to call a healthcare provider and how to describe their observations.
Stay updated, free articles. Join our Telegram channel

Full access? Get Clinical Tree


