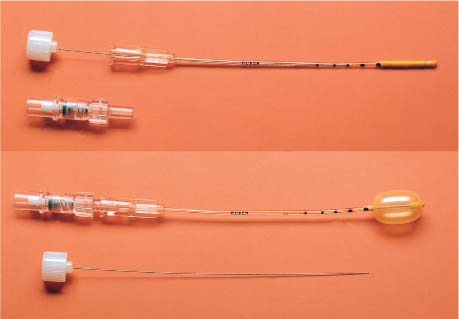
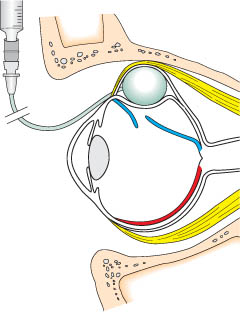
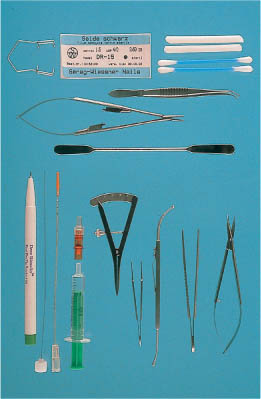
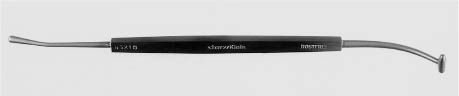
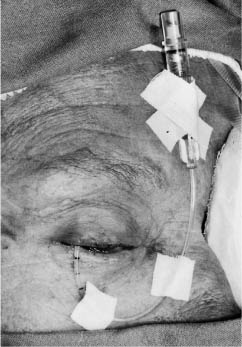
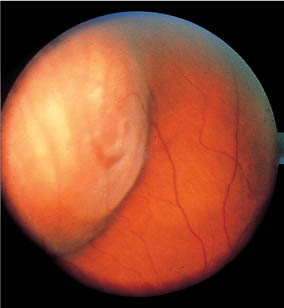
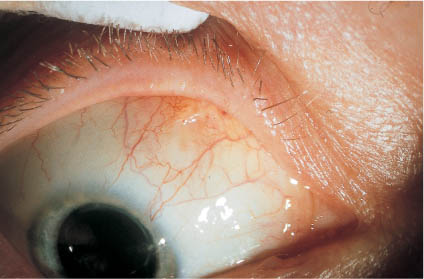
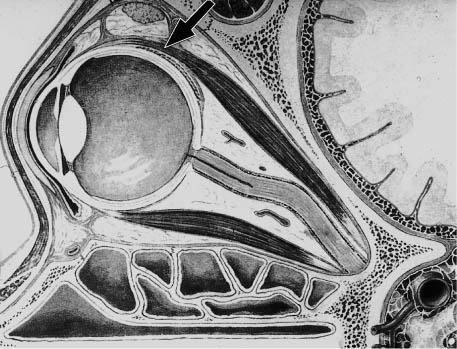
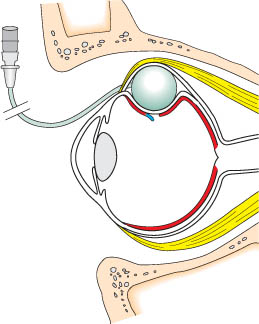
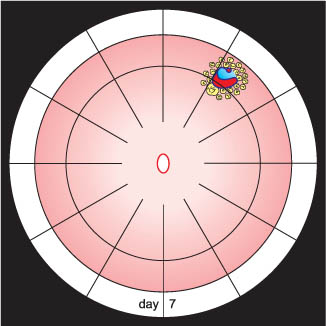
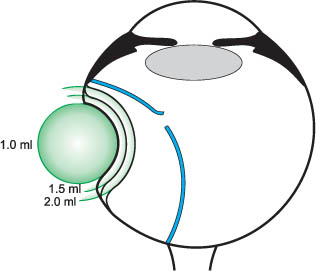
9 Temporary Balloon Buckle without Drainage: Minimal Extraocular Surgery for Retinal Detachments with 1 Break or Breaks within 1 Clock Hour Minimal extraocular surgery for retinal detachments, consisting of an elastic segmental buckle (sponge) and cryopexy to the break without drainage of subretinal fluid, has already significantly reduced the complications of surgery [1–6]. As you recall, the complications of sponge buckling were extraocular, i.e., sponge extrusion, diplopia, and infection of the explant. 1. It eliminates the last complications of the non-drainage procedure. 2. It can return an eye with a detachment to the state that existed immediately after the break occurred when it could have been treated with laser or cryopexy alone. From 1972 to 1978 Lincoff, Kreissig, and the retinal fellows were looking for a way to maintain a temporary indentation beneath a retinal break in a small detachment. We thought that if the indentation could be sustained for a few hours, subretinal fluid would be absorbed and the retina would return to the state that existed immediately after the tear occurred. This would make laser coagulation alone sufficient for sustained reattachment. With this in mind a number of devices were designed and tested over 5 years on animals. The devices were all extraconjunctival and fixation was a problem. In this context, let us recall: Sponge buckles are fixed by scleral sutures and they obtain their indentation by tying the sutures under tension to compress the sponge. Transconjunctival scleral sutures proved possible in rabbit eyes [7] and were tried on the eye of an elderly patient with thin epibulbar tissues. However, the pressure of the sponge (and of other extraconjunctival devices tested) caused erosion of the conjunctiva beneath the sponge. Due to the secondary erosion of conjunctiva by various extraconjunctival devices, the idea of inserting a buckle device through a small opening in conjunctiva occurred to us as a possibility. Of the possibilities, the best proved to be a thin elastic balloon on the end of a soft silicone tube that was 1.8 mm in diameter. It was a balloon catheter, similar to those used in urology and later in cardiology. The first balloon catheter, which was hand-made by Lincoff, measured – including the deflated balloon – 2.5 mm in diameter. This was acceptable, since the conjunctival incision for insertion could still be quite small. The first part of the problem, how to keep the conjunctival opening small, was solved. – How to localize precisely the balloon after insertion of the catheter? – With sutures? 1. The large size of the balloon after inflation. 2. The elasticity of the balloon (see Chapter 9.3). The first balloon was made of latex and proved to be too reactive in the tissues. Subsequently, a balloon of silicone [7] was tried, but it proved to be too fragile. Finally a latex balloon with a silicone coating proved to be ideal. The latex provided the strength and elasticity and the silicone the tissue inertness. This balloon catheter has been reduced in size to 1.5 mm in diameter. The final model has been named the 1. It has a steel stylette that stiffens the catheter during insertion and enables precise control for positioning in the parabulbar space. 2. There are calibrations on the catheter that facilitate measuring the distance of the inserted balloon from the limbus (Fig. 9.1). An adapter at the proximal end of the catheter contains a valve that retains fluid. The valve is open when a standard syringe is inserted and it is closed when the syringe is withdrawn. Postoperatively the size of the balloon can be increased by injecting additional fluid. The balloon can be removed from the eye by deflating the balloon and pulling gently on the catheter. Fig. 9.1 Lincoff–Kreissig Balloon. The balloon has a metal stylette to facilitate insertion into the parabulbar space and calibrations (black marks) on the tube to enable a more precise determination of the balloon’s position in the parabulbar space. Top: Deflated balloon catheter with stylette in place; beneath it the adapter. Bottom: Inflated balloon (0.75 ml of sterile water) with self-sealing valve in place; beneath it the withdrawn stylette. 90 mm for inferior breaks and 125 mm for superior breaks (see Chapter 9.4, p. 9). The mechanism of the temporary balloon [9–17] is the same as that of any other elastic buckle, such as the sponge cylinder or the elastic pouch (see Part 1, Chapters 8.1, pp. 126–127 and 8.8.2, page 181). Fig. 9.2 Sagittal section of the globe and neighboring structures. The parabulbar balloon will be positioned between the bony orbit and the globe (see arrow). 2. The inflated balloon, not anchored by sutures, will provide a reliable buckle and remain in the correct position beneath the break for the period in which retinal adhesion forms. 3. After 1 week the retinal adhesions around the break, induced with cryopexy or laser, will be strong enough to secure the break after removal of the balloon buckle (see Part 1, Chapters 7.2.2 and 7.2.3, pp. 98–110). If you are convinced of these 3 premises, then the balloon procedure, implying a temporary unfixed buckle, becomes a logical operation. Now a question you might raise: After inflating the inserted balloon, it is initially compressed between the eye and the bony orbit (Fig. 9.3). Intraocular pressure is increased (the central artery has to be checked for patency!). The eye is not static, but is dynamic. Intraocular pressure will return to normal within 1 to 2 hours. As the eye decompresses under the pressure of the balloon, a deeper indentation in the globe is created into which the balloon expands and from which it does not move after ocular rotations are restored (Fig. 9.4). Fig. 9.3 Sagittal section of the orbit showing the balloon in Tenon’s capsule shortly after insertion. The balloon is compressed (it has a slightly oval shape) between the globe and the bony orbit. The intraocular pressure is increased. Fig. 9.4 Sagittal section of the orbit showing the balloon in Tenon’s space after the eye has decompressed and the balloon has expanded to a round shape and closed the retinal break. The retina has reattached and the break is ready for laser treatment. Thereafter the balloon buckle acts like a large silicone sponge to close the retinal break and cause subretinal fluid to be absorbed. 2. The balloon is withdrawn after 1 week, i.e., it represents only a temporary tamponade for the period in which a retinal adhesion of sufficient strength develops to secure the break. The preparation of the eye for surgery is the same as that for a segmental buckle operation (see Part 1, Chapter 8.2, pp. 127–128). However, less instruments are needed for the balloon procedure (Fig. 9.5). As a rule only flat instruments are used, except for the forceps (Castroviejo) used to grab the very anterior muscle insertion to place a transconjunctival/episcleral traction suture. Of course, prior to surgery you should check your cryoprobe, test the freezing capacity of the cryo instrument and set the temperature you will apply at around −40° to −60°C (see Part 1, Chapter 7.5.2, pp. 118–120). The balloon procedure can be performed with parabulbar, subconjunctival, or topical anesthesia. After insertion of the speculum, 2 traction sutures are placed in the muscle insertion (the 2 muscles neighboring the retinal break) to rotate and stabilize the eye during cryopexy and localization of the break. Fig. 9.5 Instruments for balloon operation. Top (horizontal items from left to right): Wire speculum, suture for traction sutures through muscle, cigars and Q-tips, Castroviejo forceps, needle holder, Bonn spatula (narrow). Bottom (vertical items from left to right): Scleral marker, balloon consisting of: metal stylette, balloon catheter, syringe filled with sterile water and yellow adapter, Castroviejo calipers, Bonn forceps blunt, Kreissig depressor, Kreissig balloon forceps (siliconized), West-cott scissors blunt. The retinal break is localized with the cryoprobe by depression, its position marked with gentianviolet on the conjunctiva and its distance from the limbus measured. 1. The parallax of the detached break. 2. The mobility of the posterior conjunctiva. 1. Localize the retinal break from a position diametrically opposite to the break with the cornea in horizontal position, i.e., not tilted. 2. Avoid unnecessary circumferential dislocation of mobile conjunctiva by rotation of the eye. This can be achieved by placing the cryoprobe first at the ora serrata in the correct clock hour and then moving it radially towards the break by holding it in vertical position to the globe. 3. After this: During the moment of the localizing freeze, the mobile conjunctiva becomes temporarily fixed to the underlying tissues. This is the moment for an exact marking on conjunctiva, i.e., not being jeopardized by an accompanying slippage of the conjunctiva. Since the conjunctiva will immediately become mobile after thawing of the posterior freezing mark, it is helpful to add 2 additional anterior marks in the radian of the break during this cryogenic fixation: 1 mark at 7 mm anteriorly and another 1 at the limbus. This defines the radial axis of the break (Figs. 9.6a, b, c). If the break is beyond the limits of the conjunctival cul-de-sac, only the radian of the break is marked and the antero-posterior distance is estimated. Localization of such a break is difficult and should only be done after some experience with this procedure. As mentioned, precise transconjunctival marking of a posterior break can be compromised by the mobility of the conjunctiva. – First test the balloon with sterile water (not balanced salt solution, because the crystals of salt might compromise the valve and cause subsequent leakage). – Then fill and empty the catheter several times until all of the air bubbles are removed. Fig. 9.6a The location of the posterior edge of the break is marked. Anterior to it are 2 additional marks: 7 mm anterior (in the area of the muscle insertion) and at the limbus. They determine the radian of the break. c The balloon catheter has been inflated and become visible as a bulge under conjunctiva. The 2 more anterior conjunctival marks (appearing grayish) are visible beneath the transparent catheter indicating its correct radial position. The central artery has to be checked for patency. Next the metal stylette is placed into the catheter to stiffen it and the balloon is ready for insertion. Prior to this, a 2-mm incision in conjunctiva (approximately 6 mm anterior to the mark of the break) is made in the radian of the break. First, the curved end (with the small knob) of the Kreissig depressor (Fig. 9.7) is inserted beneath Tenon’s capsule and moved posteriorly to free a passage for the balloon catheter. Before inserting the balloon catheter, the measured distance of the break from the limbus (e.g., 14 mm) is noted and marked with gentianviolet in the area of the calibrations on the catheter. Recall that the calibration closest to the balloon is 10 mm from its center, the next 15 mm, then 20 mm and so on. The balloon catheter has to be handled with utmost care, preferably by using special forceps (Fig. 9.8). These forceps have flat ends coated with silicone and an indentation matching the diameter of the catheter. These precautions avoid injury to the balloon during its insertion. During insertion the balloon catheter can be held tightly between the ends of these forceps without the threat of damaging the balloon. Then the balloon catheter is maneuvered beneath the break. The question arising is: Fig. 9.7 Kreissig depressor. A depressor with 2 curved ends almost correlating with the curvature of the globe. During balloon surgery, the curved end with the little knob (left) is placed on conjunctiva adjacent to the inserted catheter. It provides an ab externo stabilization of the inserted catheter (which has become a soft and flexible tube after withdrawal of the stylette) during inflation of the balloon. Fig. 9.8 Kreissig balloon forceps. Top: The 2 open flat arms show a half-circular indentation; the arms are coated with silicone. Bottom: Magnification of the closed branches. An opening becomes apparent which matches the diameter of the catheter. Due to the silicone coating (lighter gray), the balloon catheter will not slip, nor become compressed or damaged when held between the branches. – To avoid altering the position of the inserted catheter when its stylette is withdrawn, place the curved end of the depressor (the end with the little knob) parallel to it on unopened conjunctiva to provide an ab externo stabilization [18]. After withdrawal of the stylette, the adapter with the self-sealing valve is inserted into the catheter. To make this juncture watertight—i.e., to prevent a postoperative leakage out of this area—the adapter is lubricated with sterile ointment before insertion. The balloon is inflated with 0.5 ml of sterile water. At this moment the central artery has to be checked for patency and the balloon for correct positioning. If this does not suffice you have to re-insert the catheter. If the position of the balloon is correct, another 0.5 ml of fluid is injected to total 1.0 ml. A balloon inflated with 1 ml of fluid has a diameter of 1.25 cm, – and that represents a large scleral buckle. After full inflation (1 ml) the central artery must be checked again for patency. If it is closed, some fluid from the balloon is withdrawn until patency is restored. No sutures are placed to secure the balloon. After inflation the balloon is still slightly mobile. 2. Be careful when removing the speculum. • short balloon catheter (90 mm) and • lead the catheter upwards (nasally or temporally) to the forehead. – For superior breaks use the • longer catheter (125 mm) and • lead it downwards, then around the lower lid—so as not to interfere with closure of the lids—and upwards (nasally or temporally) to the forehead (Fig. 9.9). It is helpful to use a different type of tape for fixation of the catheter than for the eye patch to avoid unnecessary untaping of the catheter (removed after 1 week) when the eye is prepared for the daily fundus examination. Fig. 9.9 A superior break at 11 o’clock was treated with the long (125 mm) balloon catheter. The catheter is first led downwards, then around the lower lid so as not to interfere with lid closure, after that up nasally (cave corneal erosion!). The adapter and the tube are taped to the patient’s forehead. Atropine and antibiotic ointment is applied to the eye and lid margins. Both eyes are patched. The next day the balloon buckle is checked for correct placement and height: If the retina is reattached and the break stretched out on the balloon buckle (Fig. 9.10), the fellow eye is unpatched. If the edges of the retinal break were not treated with transconjunctival cryopexy at the time of surgery, laser lesions can be added the next day. The balloon buckle is well tolerated. Patients report little or no discomfort in the post insertion period, unless the tube abrades the cornea, in which eventuality the direction of the catheter has to be adjusted so that it does not cross the cornea. Fig 9.10 Fundus photograph of a horseshoe tear on a balloon buckle 16 hours after insertion of the balloon catheter. The localizing cryopexy mark is still visible at the posterior edge of the break. The residual circumference of the reattached break will be sealed off with laser lesions (the alternative would be transconjunctival cryopexy around the break intraoperatively). The balloon is removed after the retinal adhesions have developed sufficient strength, i.e., after 7 to 8 days [19–21] (see Part 1, Chapter 7.2.2, pp. 98–99). Prior to withdrawal of the balloon, you should ascertain that the break is sufficiently surrounded by pigmented lesions. If the retina remains attached, the balloon is completely deflated and withdrawn without topical anesthesia the next day. The small conjunctival wound closes without a suture (Fig. 9.11). Fig 9.11 The balloon was withdrawn after 7 days. The Fig. represents the eye a day later. The small conjunctival wound closes by itself. To identify this area, take a wet Q-tip and move it posteriorly from the insertion. The muscle insertion then becomes easily recognizable because the conjunctiva is stretched and more transparent. For the next maneuver take a sharp forceps, e.g., a Castroviejo (the only sharp instrument you will use), spread it for only 3 mm and grab the anterior muscle insertion for a transconjunctival/episcleral suture. – You minimize the risk of a subconjunctival hemorrhage. – You will have a traction suture, which will not dislocate the conjunctiva when pulled upon. After insertion of the catheter with the stabilizing stylette in place, the 2 additional anterior localizing marks (about 7 mm anterior to the break and at the limbus) should be positioned beneath the transparent tube where it exits the incision site. Prior to removal of the metal stylette, place the curved end (with the little knob) of the depressor adjacent to the catheter on the conjunctiva to ensure an ab externo stabilization of the catheter during the removal of the stylette and the inflation of the balloon. At the operating table, the balloon indentation may be still quite shallow. To better define its position, pull on the inflated catheter (you cannot remove it by this maneuver) and the anterior portion of the balloon indentation will become more visible identifying its radial position. In the new position the balloon can be re-inflated. One day prior to surgery, after a meticulous search, let us assume that you have finally detected the tiny break. The chances of, first not detecting the break at the operating table or, second not recognizing it after insertion of the balloon are great. 1. Make a precise (in terms of clock hour) and detailed drawing of the break and its neighboring structures (e.g., vessels). 2. Determine its distance from the ora serrata in disk diameters. 3. In special situations, mark the radian of the small break by a laser lesion of 200 to 500 μm in the pars plana (made visible by depression during laser application). The latter preparation will be of help intraoperatively to detect the break by identifying the laser mark with depression and then moving the cryoprobe in its radian posteriorly for the pre-calculated disk diameters. Making a freezing mark in this area afterwards will likely identify the small break. In addition, the subsequent correct position of the balloon under such a break can be best ascertained by viewing it in relation to the laser mark in the pars plana. Due to this maneuver, at least the correct radian of the break is known and only the antero-posterior position has to be estimated. Preoperatively documented adjacent features, vessels or pigment spots, will be of help. Do not try to mark the tiny break with large white retinal cryopexy lesions, which would imply over-freezing! – Unnecessary diagnostic cryopexy lesions for detecting a tiny break – Overfreezing to mark the area of the break by a whitening of the retina for subsequent balloon insertion. We recollect that immediately after inflation (during a period of 1 to 2 hours) the balloon is still slightly mobile, i.e., not yet trapped in a deeper indentation in the globe. 1. Do not rotate the eye when removing the traction sutures. 2. Take care not to displace or pull on the balloon catheter when removing the speculum. 3. Do not dislocate the catheter when taping it to the patient’s forehead. 4. Patch both eyes (you can patch the fellow eye already before starting the operation), which is important when the balloon operation is done under topical anesthesia. Assume the day after surgery that the retina is only partially reattached, i.e., the break is inadequately tamponaded and still leaking. First, try to increase the size of the balloon buckle with an additional injection of 0.3 to 0.5 ml of fluid (check central artery for patency!). This will not be possible even after prior partial or total deflation of the balloon, nor after withdrawal of the balloon and reinsertion. The balloon will always be trapped in the same area in the scleral wall which will be the situation for several hours. – With less elapsed time you will not succeed! These are the facts. All of us have experienced that the localization of a detached break is not easy and requires practice. With the balloon operation the localization of a detached break is slightly more difficult. The problem becomes even greater when there is only a flat balloon indentation discernible under a highly bullous detachment. Otherwise, he or she may not obtain the results a more experienced surgeon will obtain. – For the eye the balloon operation is easy. – But the technique is difficult. – However, with experience it becomes easier. Here are some suggestions on how to succeed when starting with the balloon procedure: 1. At the beginning, select a small detachment in which localization of the break with correct placement of the balloon will not be a problem. 2. Afterwards move step by step on to more extensive, then to more complicated detachments and to detachments with problems in viewing the retina. 3. Finally, to bullous detachments with a very posterior break or group of breaks of 1 clock hour in extent (see Chapter 9.6). – The balloon procedure is an operation of short duration and you will have a satisfied patient. As with segmental buckling, the extent of the detachment is not a factor in patient selection. When learning the balloon operation, start with a small detachment, in which neither the height nor the extent will present problems for localization of the break. There will be no significant parallax to jeopardize localization. You will recall that the original intention of the balloon procedure was to treat only small detachments in which a slightly detached break did not reattach after double patching and so was not suitable for laser treatment. Here is the fundus of a patient (Fig. 9.13a) who came with a detachment of 2 hours’ extension and a horseshoe tear at 1 o’clock. The detachment was quite bullous. As part of our routine, the patient was double patched for 1 day and the next morning the detachment had substantially flattened and decreased in size. The break, however, was still detached and surrounded by a small detachment. Laser treatment would not be appropriate, additional buckling would be needed. Fig. 9.12 Indication for the balloon operation: A detachment caused by a single break (Top) or a group of breaks close together (Bottom) which do not subtend more than 1 clock hour or 6 mm at the equator and which can be located at any clock hour, i.e., superiorly and inferiorly, but which should be in the anterior ⅔ of the globe. Fig. 9.13a A small detachment (2 hours in extent) with a horseshoe tear at 1 o’clock. Fig. 9.13b 1 day after double patching and lying the patient flat: The bullous quality of the detachment has disappeared, there is only a shallow detachment which has decreased in size. Such a small detachment is optimally suited for inserting your 1st balloon. Fig. 9.13c 1 day after balloon insertion in the detachment of Fig. 9.13b: The horseshoe tear is stretched out on the balloon buckle, the localizing cryopexy mark is still exudative. Additional laser lesions were added to secure the tear. Fig. 9.13d 6 days after balloon insertion: The horseshoe tear is sealed off by pigmented thermal lesions, ascertained by biomicroscopy. Fig. 9.13e 7 days after balloon operation: The balloon has been deflated and the catheter withdrawn. The horseshoe tear has remained attached. Special care has been taken to seal off the operculum of the horseshoe tear towards the ora. Sustained attachment will solely depend on the adhesive strength of sufficient thermal lesions around the break. But at this point let us recapitulate: – In a small percentage the contour of detachments will change. – In some detachments reattachment of the break might occur and, as a result, laser treatment become feasible. Assuming you are performing your first balloon procedure and you have selected a small detachment with a horseshoe tear (Fig. 9.13b), localization of such a tear will not be a problem, even if your localization technique is not yet perfect. The inserted balloon has provided sufficient tamponade of the tear and the next morning the retina will be reattached (Fig. 9.13c). Since only 1 localizing freezing mark has been placed (at the posterior edge of the tear), the remainder of the circumference of the reattached tear has to be sealed off with additional laser applications. Of course you could have surrounded it with transconjunctival cryopexy intraoperatively. Prior to removal of the balloon you have to confirm with bio-microscopy that the tear is sufficiently surrounded by thermal lesions (Fig. 9.13d). After 1 week the balloon is removed in 2 steps (Fig. 9.13e). Details of this procedure have already been given above (see Chapter 9.4). – If the balloon is positioned correctly under the break and no break was overlooked, subretinal fluid will disappear as quickly as you have already experienced with the nondrainage procedure when using sewn on elastic explants. However, the balloon procedure offers another advantage. If the morning after the operation you should find out that the buckle is not large enough, without any surgical intervention you can enlarge the diameter of the balloon buckle by another 2 to 4 mm just by injecting additional fluid through the valve fixed at the patient’s forehead. Inject 0.5 ml at a time and be certain to check the central artery for patency. In comparison to a sponge buckle sewn on to sclera, the balloon has the advantage that it can be enlarged postoperatively without additional surgery, i.e., by injecting up to 1.0 ml of fluid (Fig. 9.14) in steps (check patency of central artery!). Fig. 9.14 Options to enlarge the balloon indentation: By injecting up to 1 ml of additional fluid (in 2 steps) you can raise and enlarge the balloon indentation. In the diagram you see the indentation induced by a balloon filled with 1 ml of fluid (the posteriorly located horseshoe tear is not yet re-attached). By injecting another 0.5 to 1.0 ml of fluid (check central artery for pulsation!) the balloon will become enlarged and thus suffice to reattach the horseshoe tear in this bullous detachment. Having become familiar with the technique of the balloon operation and after your 1st, hopefully, successful procedure, you should feel confident enough to move on to more difficult detachments. Somehow this detachment will challenge your diagnostic techniques (Fig. 9.15a): – There may be an area of “suspicious” lattice degeneration. Now you might recall: A round “hole” within lattice degeneration is rarely a full-thickness hole and does not require treatment. – The hole at 1:15 is more elevated because it is more posterior. However, the parallax when localizing should not be too difficult for you. The break is located at 15 mm from the limbus, the balloon catheter is inserted to the pre-determined position and inflated with 0.75 ml of fluid. Since the hole is still elevated above the shallow balloon buckle (not yet having reached its full indentation), you decide to be on the safe side, to inflate the balloon some more, i.e., to a total of 1.0 ml of fluid. Again, do not forget to check the central artery for pulsation after the additional inflation. Fig. 9.15a A 2-quadrant detachment: A so-called anterior traction line extends from 12:15 to 2 o’clock with a round hole at 1:15. The adjoining lattice degeneration has a pseudohole (lamellar hole). Fig. 9.15b The balloon buckle was placed under the round hole at 1:15, the hole became surrounded with transconjunctival cryopexy and the retina reattached. The balloon catheter was withdrawn after 7 days, the retina remained attached. The lattice degeneration was not treated. During the next days the anterior so-called traction line disappeared. Even after reattachment, the lattice degeneration does not require prophylactic treatment, even when presenting with pseudoholes (partial thickness or lamellar holes). As you will recall, we define this as “passive” prophylaxis because it does not imply surgical treatment (see Part 1, Chapter 6.3, pp. 90–92). The next morning the retina is reattached. The break has been surrounded sufficiently with cryopexy at surgery. After 1 week the lesions are pigmented, the balloon is removed, and the retina remained attached (Fig. 9.15b). This detachment (Fig. 9.16a) represents another degree of difficulty. – This detachment is more extensive; more holes can be overlooked. – It is more bullous; more parallactic displacement when localizing the detached break. – The tear is larger, i.e., easier to find; but there is less leeway when positioning an adequate buckle beneath it. As a consequence, your balloon buckle has to be centered precisely beneath the tear. Fig. 9.16a A bullous 3-quadrant detachment with a horseshoe tear at 1 o’clock. Fig. 9.16b The balloon was placed beneath the horseshoe tear and the retina reattached. The tear had been surrounded with cryopexy lesions. After 7 days the balloon was withdrawn, the retina remained attached. – This more extensive detachment could represent the same eye we have already seen in Figure 9.13, but a few days later because the detachment has acquired a larger extent. Now concerning treatment: After insertion of a balloon under the tear and inflation with 1.0 ml of fluid, the tear, which was still detached at the operating table, has reattached the next morning and all of the subretinal fluid has disappeared (Fig. 9.16b). Additional laser treatment around the tear is not needed because it was surrounded with transconjunctival cryopexy. – The extent of a detachment is not a limiting factor when applying the balloon procedure. This total detachment in a pseudophake with some precipitates at the intraocular lens and a minor secondary cataract will represent another challenge for you (Fig. 9.17a), because you do not want to perform a “prophylactic” encircling operation due to uncertainties in the periphery [22] or a primary vitrectomy with a preceding removal of the opacities in the anterior segment and a gas tamponade. Remember: “Hole” formations or “erosions” within lattice degeneration are probably pseudo-holes. – The hole you have detected at 11:30 in this detachment is very tiny; however, its location fits Rule 2 of how to find the primary break and therefore it alone can cause this total detachment (see Part 1, Chapter 2.2, pp. 13–18). – Due to the presence of opacities in the optic media you have to be certain of finding this break also at surgery, therefore you should plan prospectively to plot it quickly and precisely.
9.1 Introduction
 The balloon procedure, which we will now discuss, represents a further swing towards minimal surgery:
 How should one provide only a temporary buckle precisely placed under the break without fixating sutures?
 This was the premise to reduce surgical trauma and the remaining potential complications of the non-drainage buckle procedure (see Part 1, Chapter 8.14, pp. 224–231).
9.2 History
 What was the logical consequence?
 To give up the search for a temporary buckling device without opening conjunctiva?
 No, instead only the approach was changed, i.e., from extraconjunctival to subconjunctival.
 How should a device—that would yield a buckle of 8 to 12 mm in diameter—be inserted through a small conjunctival opening of 1 to 2 mm?
 A pliable elastic device, such as an intraocular lens through a small entrance site?
 No, instead another idea came up.
 Think for a moment, what would you suggest?
 Now the next part of the problem had to be solved:
 No, because this would require more extensive surgery and incur risks during placement of intrascleral sutures. In addition these sutures would have to be removed eventually due to the temporary nature of the buckle.
 Which alternative would you suggest to solve this problem?
 The problem of fixation of the parabulbar balloon without sutures was solved by:
 Lincoff–Kreissig Balloon [8]:
 The balloon catheter comes in 2 lengths:
9.3 Principle of the Balloon Procedure
 But one has to accept a number of premises before accepting the balloon procedure: What are they?
 1. Subretinal fluid will absorb if the break is buckled.
 How does the parabulbar balloon maintain the correct position in the orbit (Fig. 9.2) in the absence of fixating sutures and provide adequate tamponade of the break for at least 1 week, the time needed for an adequate adhesion to develop?
 Here are the facts:
 And this is the secret of how the parabulbar balloon is fixed in the absence of scleral sutures.
 Now what is new with the balloon procedure?
 1. No fixating sutures are needed.
 A consequence of the balloon procedure is that the last 3 complications of segmental buckling, sponge extrusion, diplopia, and infection are eliminated. Why?
 Simply because the balloon is only temporarily present.
9.4 Instrumentation and Surgical Technique
 Now how should the posterior border of the break be localized on conjunctiva?
 As you recall: The key to reattachment with a non-drainage procedure is a most precise localization of the detached break, this time however, on unopened and mobile conjunctiva; this is more difficult than on the sclera.
 However, when performing this maneuver you have to circumvent the following 2 problems:
 The following measures will be helpful for overcoming the problems of parallax:
 Why is the balloon inserted more posteriorly?
 Because, if after insertion the balloon catheter appears to be too posterior, but in the correct radian, it can be pulled anteriorly as needed under ophthalmoscopic control without difficulty.
 Keep in mind that the anterior localization of the radian of the break is less liable to error. Why?
 Because the anterior conjunctiva (being fixed at the limbus) does not move as readily as the posterior conjunctiva.
 Before inserting the balloon catheter do you have to prepare it in a special way?
 Yes, in the following way:
b The conjunctiva is opened 6 mm anterior to the mark of the break and the deflated balloon catheter with the stylette in place is inserted. The balloon catheter is in correct radian, since the 2 anterior conjunctival marks lie under the exiting portion of the catheter. The metal stylette will be subsequently withdrawn.
 Because the air would diffuse through the thin membrane of the inflated balloon and, to your surprise, the next morning the balloon would appear almost empty.
 Is the inserted balloon catheter with the stabilizing stylette in place in the correct radian beneath the break?
 – This can be ascertained by checking whether the 2 anterior conjunctival marks (i.e., in the area of the muscle insertion and at the limbus) lie under the exiting portion of the transparent catheter (Fig. 9.6b). The metal stylette is then withdrawn (Fig. 9.6c).
 What can be done, if with ophthalmoscopy, the inflated balloon is only faintly or not at all to be discerned under the detached break?
 You are in trouble. This is one reason why you should already have sufficient experience with the non-drainage procedure by using sponges sewn onto sclera.
 Keep in mind:
 Consequently, after actually finishing with surgery, you have to be careful during the subsequent manipulations not to dislocate the still slightly mobile balloon: Which measures should be taken to prevent the risk of a secondary dislocation of the balloon at completion of surgery?
 1. Cut the traction sutures of the muscles as close as possible to the conjunctiva to avert dislocation of the globe when pulling the sutures out.
 – For inferior breaks, use the
 If a larger balloon buckle is needed the next day, its diameter can be increased by another 2 to 4 mm just by injecting additional fluid through the valve that is fixed at the patient’s forehead; in this situation no re-operation is needed.
 The balloon is first deflated by half its volume 1 day prior to removal: Why?
 To test the strength of the adhesions.
9.5 Practical Tips when Starting with the Balloon Procedure9.5 Practical Tips when Starting with the Balloon Procedure9.5 Practical Tips when Starting with the Balloon Procedure9.5 Practical Tips when Starting with the Balloon Procedure
 To avoid dislocation of conjunctiva when pulling on traction sutures during localization of the break
 This can be achieved by placing a traction suture with a short bite (2 to 3 mm) in the furthest anterior part of the muscle insertion.
 With this technique:
 To ascertain the correct position of the inserted catheter, i.e., in the radian of the break
 To maintain the correct position of the inserted, deflated catheter during withdrawal of the stabilizing stylette and inflation of the balloon with fluid
 To locate the position of an inflated balloon under the break in a bullous detachment
 It is advisable to position the balloon for a posterior break slightly more posterior than pre-calculated: Why?
 If the balloon is too posterior, but in the correct radian, after withdrawing 0.3 to 0.5 ml of fluid, it can be moved without problems anteriorly to the correct position under ophthalmoscopic control by pulling on the catheter.
 A just inflated balloon can easily be moved anterior-ly by deflating and pulling upon the catheter, but you can never push it more posteriorly: Why?
 Because the stabilizing stylette, present during insertion, is no longer in the balloon catheter.
 What should you do if a more posterior placement of an inserted balloon is required?
 To obtain a more posterior placement, start over again; this means, withdraw and re-insert the balloon catheter with the stylette in place.
 To detect intraoperatively a tiny break in an eye with problematic optic media (small pupil, cataract, intraocular lens with secondary cataract, etc.)
 Intraoperatively locating such a break at the moment of freezing will be difficult and afterwards verifying the correct position of the balloon under the detached break even more difficult: Why?
 Your mark of the break on mobile conjunctiva will be not of much help.
 What to do?
 A better way to cope with these problems is to plan a precise and quick localization of this break 1 day prior to surgery:
 As an alternative:
 With the described regimen you can prevent:
 To maintain the correct position of the balloon during the period immediately after surgery
 Which maneuvers can dislocate the balloon catheter, which is still mobile directly after insertion, and jeopardize the postoperative results?
 Here are some tips on how to prevent these mishaps:
 To re-position a failing balloon the day after surgery.
 But what if the balloon buckle is still inadequately positioned?
 1 day after surgery there is no chance of changing the position of the balloon, whether in anterior, posterior, or lateral direction!
 But how long will you have to wait after withdrawal of the balloon before you can reinsert a balloon and obtain a different position of it?
 Hours? How many?
 – You have to wait for at least 18 hours; we have determined this exactly.
 To have sufficient experience with the nondrainage procedure
 Consequently, a surgeon starting with the balloon operation should have experience with the non-drainage procedure.
 Therefore, the following is true for the balloon operation:
 If you follow these guidelines, you can be successful with the balloon operation and you will realize, it was worthwhile learning this procedure: Why?
 – You can perform another and even more minimal extraocular procedure that needs only topical or parabulbar anesthesia and has even fewer accompanying complications.
 Why?
Why?
 Because the visual acuity will have recovered completely within days or improved and no late deterioration of regained visual function will be expected.
9.6 Indications
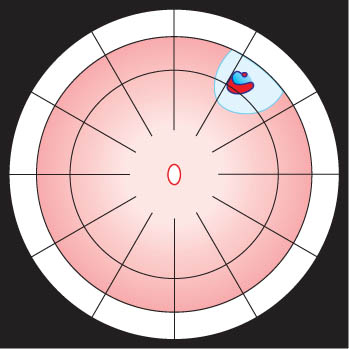
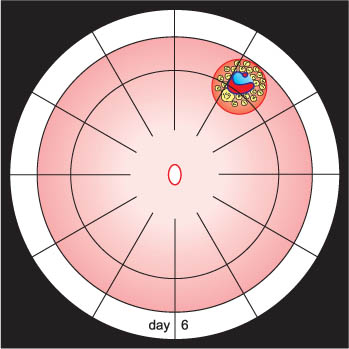
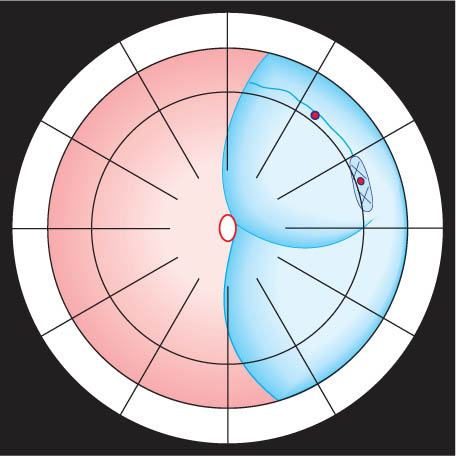
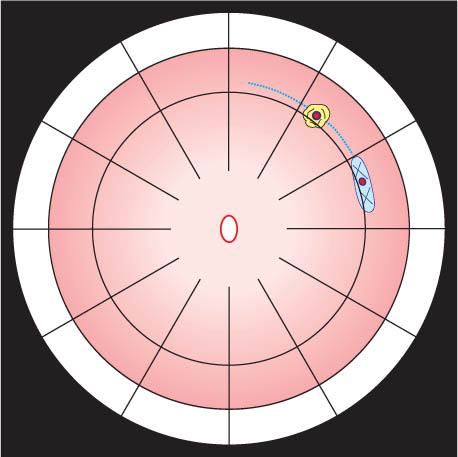
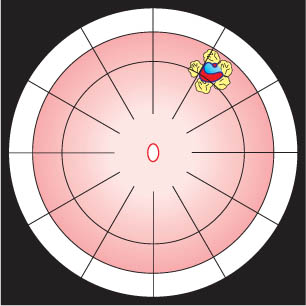
 The balloon buckle is suitable for retinal detachments caused by a single break or a group of breaks close together that do not subtend more than 1 clock hour or 6 mm at the equator and are located in the anterior ⅔ of the globe (Fig. 9.12).
9.6.1 Small Detachment
 Every detachment patient should be double patched for 1 day—or at least over night—prior to surgery. Why?
 – In about 50% of detachments the retina will flatten, providing easier localization of the break during surgery.
 What did you learn after your 1st balloon procedure?
 – A parabulbar balloon, not being fixed by sutures, can provide a reliable buckle during the entire period required for a retinal adhesion to form.
 Therefore:
9.6.2 2-Quadrant Detachment
 Why?
Why?
 – You have to be sure not to overlook an additional break in the more extensive detachment.
 But what would we do instead of an “active” prophylaxis (i.e., cryopexy or laser)?
 We would explain to the patient the symptoms of a detachment and how to test the visual field on a regular basis.
9.6.3 3-Quadrant Detachment
 Why?
Why?
 Let me define the additional problems you will be confronted with when treating this detachment:
 What might also cross your mind when looking at this 3-quadrant detachment?
 Let us pause for a moment:
 What did you learn from this detachment?
 – A break still detached on top of a balloon buckle at surgery will be reattached the next day if the balloon is localized correctly, i.e., providing an adequate tamponade.
9.6.4 Total Detachment in a Pseudophakic Eye
 But what are the problems when doing, instead, a balloon procedure?
 – You have to be certain that you did not overlook an additional break in this detachment because it is more extensive than the previous detachments.
Temporary Balloon Buckle without Drainage: Minimal Extraocular Surgery for Retinal Detachments with 1 Break or Breaks within 1 Clock Hour
 To reduce the slight possibility of conjunctival dislocation when pulling on the traction sutures, the sutures should be placed very anterior at the tendonous insertion, where dislocation of conjunctiva by pulling is unlikely.
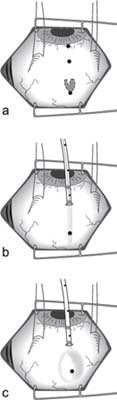
 Why is this necessary?
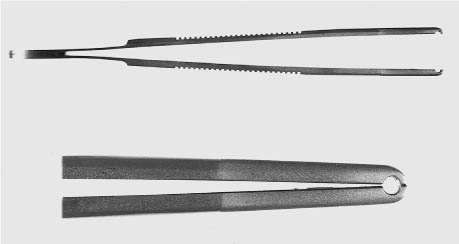
 If the balloon is not in an optimal position, the balloon can be still moved easily at this point by manipulating it transconjunctivally with the curved end of the depressor.
 Several hours after surgery the threat of dislocating the parabulbar balloon during such a postoperative maneuver no longer exists.
 Now you have to ascertain whether the correct position of the catheter was maintained during the inflation maneuver. You can do this by checking whether the 2 additional anterior localizing marks are still visible under the transparent tube of the catheter.
 You will have to make the mark of the break on mobile conjunctiva and after insertion and inflation of the balloon catheter, you can no longer check the correct position of the balloon buckle by the conjunctival mark (as you could by the scleral mark with the sponge operation!).
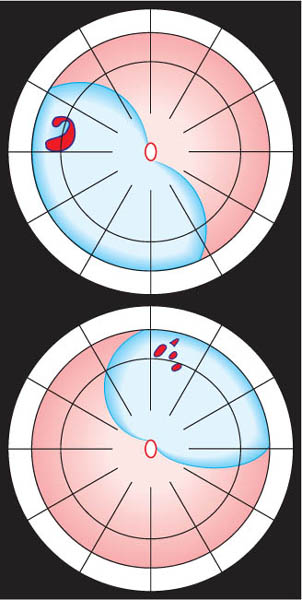


 Will you have to treat the adjacent lattice degeneration?
 No.
No. Or postoperatively as a prophylactic measure?
 No. Let me explain:
Only gold members can continue reading. Log In or Register to continue

Full access? Get Clinical Tree


