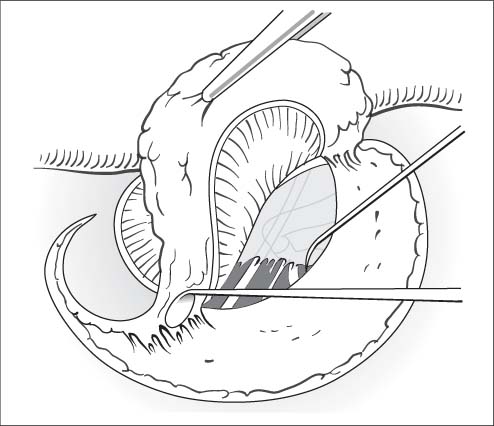
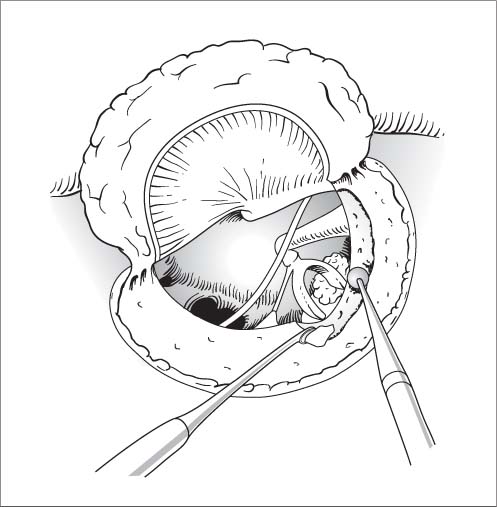
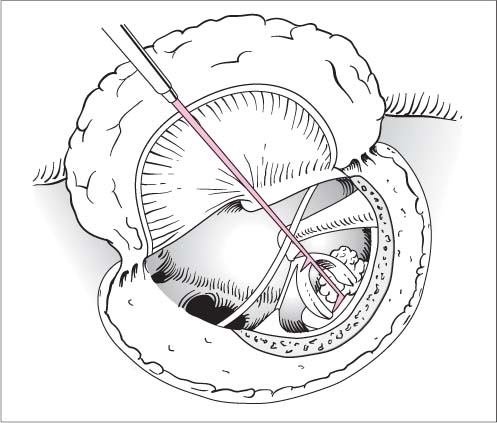
21 Stapes Surgery Restore sound conduction in stapes ankylosis by partial removal of the posterior third of the footplate (stapedectomy) or occasionally the entire footplate, or by making a small perforation 0.6–0.8 mm in diameter (stapedotomy) or inserting a stapes prosthesis. Complete audiometry, test for spontaneous nystagmus, Schüller and Stenvers radiographic views. Perioperative antibiotics if necessary. See under Tympanoplasty in Chapter 18 (p. 367). Also, reinforced 90° hook, very fine Fisch or Plester footplate hooks, perforator, McGee crimper, stapes prosthesis, measuring instrument (gauge). Some techniques require a microdrill (Skeeter) or laser (CO2 or Er:YAG). Local anesthesia is advantageous as it allows for intraoperative auditory testing, and any vertigo due to an oversized prosthesis can be quickly detected and corrected. General anesthesia may also be used. Positioning. The patient is positioned supine on the operating table with the head turned to the side and immobilized on a headrest or ring. Exposure. Endaural incision (see Chapter 17, p. 359f) with a No.15 blade. The initial 1-cm incision is made laterally from the center of the bony roof of the ear canal through the inter-cartilaginous fissure and parallel to the anterior helical rim. The second incision is made circumferentially from the 6 o’clock to the 12 o’clock position about 0.5 cm inside the bony meatal entrance. The two incisions form a triangular flap that is raised, reflected outward, and secured with the self-retaining retractor. Small pieces of connective tissue are harvested from the endaural incision. With a large ear canal, it may be possible to omit the meatal flap or even use a pure endomeatal (transcanal) approach without an endaural auxiliary incision (this requires a self-retaining aural speculum and angled instruments). The tympanomeatal flap is outlined by making additional incisions toward the tympanic membrane at 5 and 11 o’clock in the right ear or 1 and 7 o’clock in the left ear (see Fig. 17.3). The flap is elevated to the annulus with an angled round incision knife. Opening the middle ear cavity. The annulus is elevated in the posterosuperior quadrant, and the middle ear cavity is entered by dividing the thin, tense mucoperiosteum with a sickle knife while sparing the chorda tympani. The tympanomeatal flap is further mobilized and reflected (Fig. 21.1). Fig. 21.1 Stapedectomy. The tympanomeatal flap is developed and the mucoperiosteum is divided to enter the middle ear cavity. Fig. 21.2 Stapedectomy. The oval window niche is exposed with a House curette. The exposure may be aided with a diamond burr. Exposure of the oval window niche. The lateral attic wall is taken down with a House curette to expose the pyramidal eminence and facial nerve over the oval window niche (Fig. 21.2). The long process of the incus is gently probed with a needle or microhook; concomitant movement of the manubrium rules out malleus fixation. Stapes fixation is easily recognized by moving the incus from side to side. Stapes dissection. The distance from the incus to the foot-plate (measured distance + 0.2–0.3 mm = necessary length of prosthesis) is measured with a gauge (Fig. 21.3). The incudostapedial joint is separated with a medium-sized 90° hook, and the stapedius tendon is divided with the sickle knife (Fig. 21.4). Fig. 21.3 Stapedectomy. The distance from incus to footplate is measured with a gauge. Fig. 21.4 Stapedectomy. The incudostapedial joint is separated with a 90 ° hook, and the stapedius tendon is divided. First the posterior and then the anterior stapes crus is fractured with a medium-sized 90° or 45° hook that is applied close to the footplate and is twisted slightly toward the promontory to shear off each crus at its base (Fig. 21.5). The stapes arch is extracted with a microforceps (Fig. 21.6). Opening the vestibule. The mucosa surrounding the foot-plate is scored and divided with a slightly curved needle. The mucosa may then be separated from the footplate, although this is not essential (fragments may remain attached to the mucosa during footplate extraction). Working under high magnification, the surgeon perforates the footplate at the junction of the middle and posterior thirds with the perforator, which is applied to the footplate with a slight twisting motion (Fig. 21.7). The hand should be securely braced to avoid exerting too much pressure. Footplate extraction. The footplate (if still intact) is now split apart with fine 45° or 90° hooks inserted into the perforation. The posterior third of the footplate or the fragments are first elevated with a 45° hook and then extracted with a 90 ° hook (reinforced Fisch or Plester hook or pick, Fig. 21.8). High magnification is still used at this stage to avoid penetrating too deeply into the vestibule. Under no circumstances should these manipulations cause mobile portions of the footplate to sink into the vestibule. Reconstruction.
Stapedectomy
Surgical Principle
Indications
 More than a 20-dB air–bone gap (allowing for the Carhart notch) in suspected otosclerosis, negative Rinne. With bilateral otosclerosis, the ear with poorer hearing should be operated first.
 Impaired sound conduction in the oval window due to tympanosclerosis or sclerosis of the annular ligament.
 Minor malformation.
Contraindications
 Air–bone gap too small.
 Insufficient cochlear reserve, provided a gain in discrimination cannot achieve hearing aid fitness (relative contraindication).
 Pregnancy (after 4 months).
 Deafness in the opposite ear (relative contraindication).
 Inflammatory changes in the ear canal or middle ear.
 Simultaneous stapes surgery in both ears (operations should be scheduled at least 3–6 months apart).
Specific Points Regarding Informed Consent
 Deafness (approx. 1 % risk), lack of hearing improvement, deterioration of hearing—may be delayed due to slippage or loosening of the prosthesis, or may result from further progression of otosclerosis.
 New tinnitus or worsening of preexisting tinnitus. No more than 50 % of patients show improvement of preexisting tinnitus.
 Vertigo, usually in the immediate postoperative period or first few days, but may persist in rare cases (piston too long, part of the footplate sunken into the vestibule).
 Altered taste sensation (chorda tympani).
 Reoperation.
 Intracranial complications.
 Heavy scarring of the incision and auricle, keloid formation.
 Neuralgiform pain.
 Facial nerve injury.
Operative Planning
Special Instruments
Anesthesia
Surgical Technique

![]()
Stay updated, free articles. Join our Telegram channel

Full access? Get Clinical Tree


