FIGURE 28.1 Incision for the advancement flap and resection of the poor quality skin and the tracheal stenosis. The final design of the cervical advancement flap should be created after the resection is complete.
Resection of Stenosis
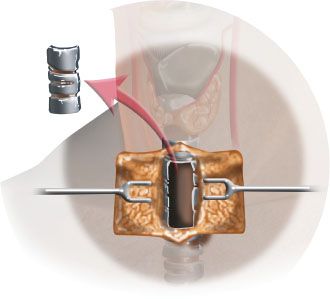
Resection of stenosis is done by resection of the abnormal skin and the scarred trachea. It is critical to resect the abnormal skin and reach healthy tissue both at the skin level and the trachea. In the trachea, it is usually necessary to resect the entire tracheal stoma in order to reach healthy tissue. This may need dissection behind the sternum, and the cervical trachea must be mobilized adequately as in a tracheal resection and anastomosis. Healthy, granulation-free tissue must be reached both proximally and distally in order to become the two ends of the new tracheal conduit (Fig. 28.2.)
Creation of the Flap
The distal tracheal stump is secured by sutures to the skin of the neck at the inferior end of the incision. The skin of the neck that is sutured to the inferior wall of the trachea may need to have the adipose tissue removed so that full-thickness skin is advanced without tether. The angulations of the trachea should not be disturbed by the suture and kinking of the trachea should be avoided. 4-0 Vicryl suture is used for this purpose.
Bilateral cervical advancement skin flaps are now created and advanced to the midline. The size of the skin flap should be just enough to fill the tracheal defect without tension. The skin advanced to create the new lining of the trachea should be full thickness and should not include platysma muscle. Therefore, the distal 2 cm of each flap is thinned out until only the skin is present. The distal end of the flap is trimmed of excessive adipose tissue such that the skin flap that is laid down is skin on muscle (Fig. 28.3).
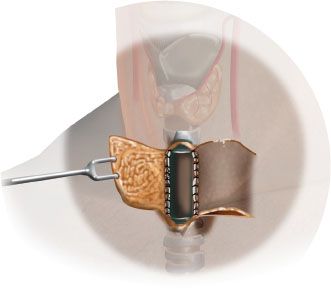
FIGURE 28.3 Bilateral cervical skin advancement flaps are created and advanced into the tracheal defect. Thinning of the cervical flap at the most medial 1 cm of the flap to a full-thickness flap to line the trough is nec¬essary to create the trough.
If the posterior tracheal wall is intact, the skin is advanced as a bilateral cervical advancement flap. The skin is sutured to the membranous portion of the trachea using 4-0 Monocryl. If there is complete stenosis and a complete relining of the trachea is necessary, the skin flaps are approximated in the midline using a 4-0 Vicryl. Sutures are buried, so there are no knots in the lumen side.
Several tacking sutures are placed on to the cervical advancement flap against the sternomastoid muscle. This reduces the tension on the cervical skin flaps and allows the new tracheal skin trough to be formed around a stent. The proximal and the distal ends of the trachea are sutured to the horizontal portion of the cervical flap. It is important that the skin flap lies flat and the skin and tracheal tissue make a smooth transition without redundancy of the skin.
Insertion of the T-tube stent for maintenance of the trough packing is done last (Fig. 28.4). Penrose drain is placed under the flap for drainage. Soft Silastic T-tube or finger cot packing is used. The finger cot pack is made by using iodoform gauze packed into a no. 8 finger cot glove and coated with antibiotic ointment. The finger cot is then sutured into the skin flap so as to create the trough by using a Prolene suture through the top and bottom of the skin flap and pulling the flaps to each other. The Prolene is placed through the top of the finger cot so as to keep the finger cot to prevent displacement. Two sutures secure the packing in place and keep the stent in place while maintaining the trough. The tracheostomy is used to replace the endotracheal tube at the end of the case.
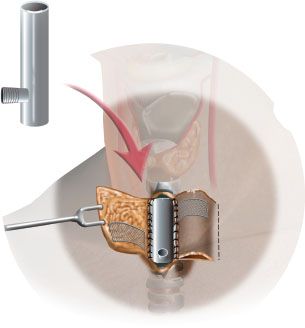
FIGURE 28.4 A T tube or a Montgomery laryngeal stent is placed into the defect and secured in order to create and allow the trough to mature.
Stage II
Stage II is done by inserting the cartilage or titanium mesh for hard tissue reconstruction.
Once the flap has matured, the patient is brought into the operating room for the second stage. At least 6 weeks should elapse after the first stage for the trough to mature and the flap to revascularize. This procedure can be done under local anesthesia and uses titanium mesh inserted below the skin to make the lateral wall of the new trachea. Alternatively, cartilage from the ear or costal cartilage can be used. This depends on the surgeon’s preference.
Stay updated, free articles. Join our Telegram channel

Full access? Get Clinical Tree


