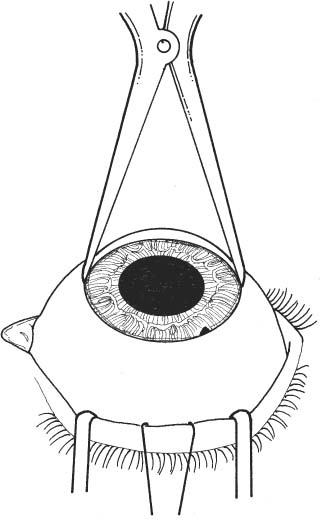
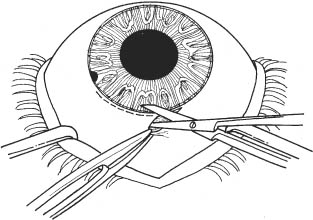
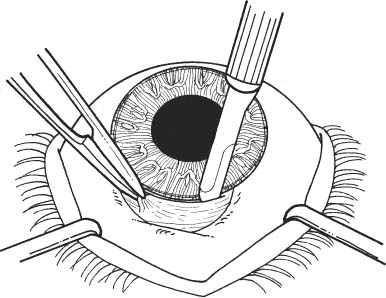
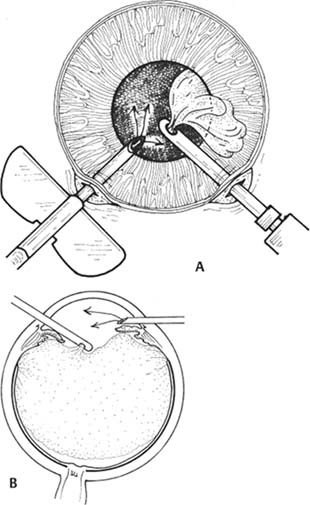
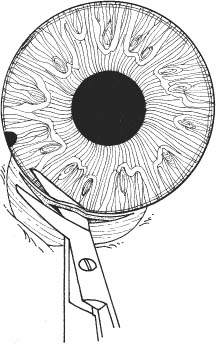
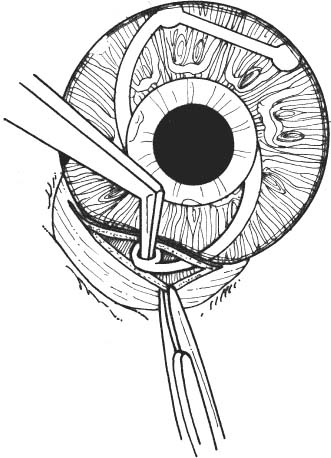
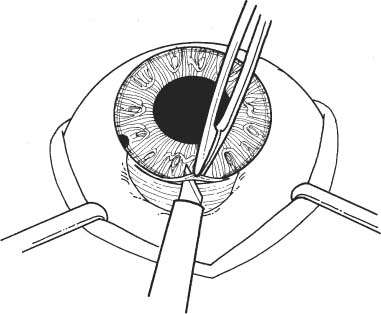
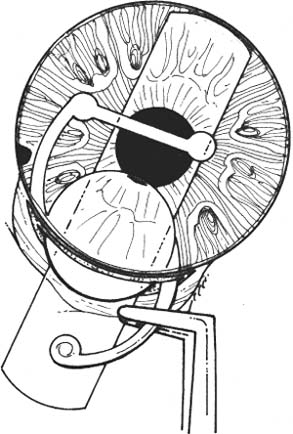
11 See Chapter 3. 1. Examine anterior chamber angle with gonioscope to inspect for peripheral anterior synechiae, angle depth, and location of any peripheral iridectomies. 2. Assess corneal endothelial integrity with careful slit lamp examination, pachymetry, and/or specular microscopy. 3. Examine macula under the slit lamp with a fundus contact lens and/or fluorescein angiography for signs of cyst-oid macular edema. 4. Determine the need for anterior vitrectomy before lens is implanted. For instance, an eye with an intact hyaloid face and vitreous behind the iris plane may not require vitrectomy. In contrast, an eye with a disrupted hyaloid face and vitreous in the anterior chamber will require an anterior vitrectomy. This will prevent uncontrolled vitreous loss as well as vitreous incarceration by the implant or in the surgical wound. In select cases, a small amount of loose vitreous may be held back by a viscoelastic substance irrigated into the anterior chamber or by a lens glide, obviating vitrectomy. 5. Calculate intraocular lens (IOL) power: Numerous formulas for calculating IOL power have been derived based on theoretical optics and empirical data. The Sanders-Retzlaff-Kraff (SRK) formula is one of the most widely used. SRK Formula: Power of IOL = A—2.5(AL)—0.9(K) where a. A = constant is determined by the manufacturer of a specific lens. A typical value is A = 115.1. b. K = average keratometry measurement in diopters. c. AL = axial length of eye in millimeters measured with A-scan ultrasonography. Note: Set ultrasound unit for aphakic, not cataractous, eye. 6. Optional: Topical nonsteroidal anti-inflammatory agent (NSAID) every 15 minutes × 3 starting 1 hour before surgery (to minimize intraoperative miosis). 7. Optional: If a vitrectomy is not planned, a hyperosmotic agent may be administered to dehydrate vitreous in an effort to keep it posterior to the iris plane during surgery. The following may be used: a. Mannitol 20%, 1–2 g/kg IV given over 1 hour, 90 minutes preoperative. b. Mannitol 25%, 50 ml IV push given just before surgery. 1. Anesthesia: Topical, peribulbar, or retrobulbar plus lid block; or general if indicated. (See Chapter 4.) 2. Apply Honan balloon for ~10–15 minutes to decompress eye and orbit. This minimizes positive vitreous pressure. Figure 11.1 3. Optional: Perform surgery using a temporal incision to avoid the original incision, peripheral anterior synechiae, and peripheral iridectomies. 4. Prep and drape. 5. Place lid speculum. 6. Measure horizontal “white-to-white” (limbus-to-limbus) with calipers. Select size of anterior chamber IOL to approximately equal the white-to-white measurement plus 1 mm (Fig. 11.1). Figure 11.2 7. Prepare a fornix-based conjunctival peritomy at the limbus (Westcott scissors, tissue forceps) (Fig. 11.2). 8. Secure hemostasis with cautery. Figure 11.3 9. Perform a partial-thickness groove incision at the limbus (0.12 mm forceps, #64 or #69 Beaver blade) (Fig. 11.3). a. Chord length of groove should be ~7 mm. b. Place at mid-limbus to form an adequate posterior wound lip under which to place the anterior chamber IOL. Figure 11.4 10. Enter anterior chamber with microsurgical knife (Fig. 11.4). Figure 11.5 11. If necessary, perform anterior vitrectomy (see Chapter 12) (Figs. 11.5A and 11.5B). a. May use microvitrectomy suction/cutting instrument and separated infusion sleeve through paracentesis. b. Vitrectomy instrument parameters: i. Cutting rate: ~800 cps. ii. Suction: start at ~50–75 mm Hg and increase as necessary. c. Vitrectomy is complete when: i. the wound is free of vitreous ii. the anterior chamber is free of vitreous iii. the pupil is not peaked iv. positive vitreous pressure is relieved with the iris fallen back posteriorly. d. Alternatively, vitrectomy may be performed using an open-sky technique after wound is extended in step 14. 12. Irrigate Miochol into the anterior chamber to constrict pupil. 13. Irrigate viscoelastic into the anterior chamber to maintain chamber depth and, in some cases, to keep vitreous back. Figure 11.6 14. Extend wound with corneoscleral scissors (Fig. 11.6). 15. Optional: Place Sheets glide over iris into opposite angle (Fig. 11.7). a. The glide guides lens placement and prevents iris tuck by the leading haptic of IOL. b. In select cases, the glide may help keep anterior vitreous from interfering with lens placement. c. Bending the glide to give it a slight upward curvature facilitates its accurate placement over the pupil and iris. Figure 11.7 Figure 11.8 16. Place anterior chamber IOL (Fig. 11.8; see also Figs. 10.8C, p. 50). a. Grasp haptic with IOL or McPherson forceps. b. Slide lens across anterior chamber into opposite angle. c. Stabilize IOL with forceps in left hand before releasing IOL forceps to avoid displacement of lens from angle. d. Remove lens glide. (Stabilize superior haptic with forceps to prevent dislocation of the IOL from the inferior angle while removing glide.) e. Ensure that the pupil is round without iris tuck. f. Retract posterior lip of wound with tissue forceps and place trailing haptic of IOL onto angle. 17. Remove residual viscoelastic with irrigation/aspiration using minimum suction. 18. Perform a peripheral iridectomy if one is not already present (jeweler’s forceps, Vannas scissors) (see Chapter 31). 19. Close wound with interrupted 10–0 nylon sutures (e.g., Alcon CU-5 needle). a. Sutures should be ~90% wound depth. b. Ensure good wound apposition. c. Bury knots on scleral side of wound. 20. Check for wound leak by applying gentle point pressure at the wound (cellulose sponges). 21. Reposition conjunctiva and secure with sutures (e.g., 10–0 Vicryl or nylon), or cautery. 22. Perform subconjunctival injections of gentamicin and SoluMedrol. 23. Remove lid speculum. 24. Apply topical combination antibiotic/steroid ointment. 25. Apply patch if not done under topical anesthesia. 26. Place eye shield. 1. Keep patch (if placed) and shield placed until patient is examined on postoperative day 1. 2. Steroid drops (e.g., Pred Forte 1%) 4 times per day, tapered over ~4 weeks as inflammation warrants. 3. Topical antibiotic 4 times per day for 1 week. 4. Control intraocular pressure rises as needed. 5. Explain postoperative management to patient (see Chapter 6). 1. Postoperative day 1. 2. Postoperative day 4 or 5 (highest incidence of endophthalmitis onset at this time). 3. Two and 4 weeks postoperatively and then as necessary. 1. May selectively cut sutures for astigmatism control beginning ~6 weeks postoperatively. (Do this judiciously, as overzealous suture removal may compromise wound and produce overcorrection.) 2. Remove loose, exposed, or infiltrated sutures as they appear. 3. Well-buried, quiet sutures may be kept in place indefinitely. 4. Technique a. Give drop of sterile tetracaine or proparacaine and 5% betadine. b. Cut suture with scalpel (e.g., #11 Bard-Parker blade or edge of 25 gauge needle). c. Remove suture with jeweler’s forceps or leave in place if ends are buried. d. Give drop of antibiotic and continue 4 times per day for 5 days. 1. Vitreous incarceration in the wound. 2. Iris tuck by the intraocular lens. 3. Pupillary block by lens or vitreous. 4. Suprachoroidal effusion or hemorrhage. 5. Hyphema. 6. Transient increase in intraocular pressure. 7. Wound leak. 8. Endophthalmitis. 9. Corneal endothelial damage and consequent bullous keratopathy. 10. Retinal detachment. 11. Cystoid macular edema. See Chapter 3. 1. Carefully assess capsular integrity, presence of vitreous in anterior chamber, and zonular dialysis through a well-dilated pupil. 2. Make a preliminary determination of possible in-the-bag or sulcus implantation and choose the IOL powers accordingly. For sulcus implantation, the following general rule is used: a. If the planned in-the-bag IOL power is +28.5 D through +30.0 D, subtract 1.50 D power for sulcus implantation. b. If the planned in-the-bag IOL power is +17.5 D through +28.0 D, subtract 1.00 D power for sulcus implantation. c. If the planned in-the-bag IOL power is +9.5 D through +17.0 D, subtract 0.50 D power for sulcus implantation. d. If the planned in-the-bag IOL power is +5.0 D through +9.0 D, no change in IOL power for sulcus implantation is needed. 3. Examine anterior chamber angle with gonioscope to inspect for peripheral anterior synechiae, angle depth, and location of any peripheral iridectomies if an anterior chamber IOL will be needed instead of a posterior chamber IOL (PCIOL). 4. Assess corneal endothelial integrity with careful slit lamp examination, pachymetry, and/or specular microscopy. 5. Examine macula under the slit lamp with a fundus contact lens and/or fluorescein angiography for signs of cyst-oid macular edema. 6. Determine the need for anterior vitrectomy before lens is implemented. For instance, an eye with an intact hyaloid face and vitreous behind the iris plane may not require vitrectomy. In contrast, an eye with a disrupted hyaloid face and vitreous in the anterior chamber will require an anterior vitrectomy. This will prevent uncontrolled vitreous loss as well as vitreous incarceration by the implant or in the surgical wound. In select cases, a small amount of loose vitreous may be held back by a viscoelastic substance irrigated into the anterior chamber or by a lens glide, obviating vitrectomy. 7. Calculate IOL power: Numerous formulas for calculating IOL power have been derived based on theoretical optics and empirical data. The SRK formula is one of the most widely used. SRK Formula: Power of IOL = A − 2.5(AL) − 0.9(K) where: a. A = constant is determined by the manufacturer of a specific lens. A typical value is A = 118.4. b. K = average keratometry measurement in diopters. c. AL = axial length of eye in millimeters measured with A-scan ultrasonography. Note: Set ultrasound unit for aphakic, not cataractous, eye. 8. Optional: Topical NSAID every 15 minutes × three starting 1 hour before surgery to minimize intraoperative miosis. 1. Anesthesia: Topical, peribulbar, or retrobulbar plus lid block, or general. (See Chapter 4.) a. Topical: Apply 1 drop of 0.5% tetracaine 15 minutes before surgery and 1 drop before surgery starts. b. Optional: 2% Xylocaine gel in inferior fornix 5 minutes before surgery. 2. Optional: Apply Honan balloon for ~10–15 minutes to decompress eye and orbit, minimizing positive vitreous pressure Note: Honan Balloon are not used for topical anesthetic cases. 3. Prep and drape. A brow tape cut in half to fully cover eyelashes and glands may be preferable to Steri-Strips in certain cases. 4. Place lid (phaco) speculum. 5. Ensure adequate pupillary dilation (prefer pupil diameter of 7 mm or more). 6. Incision techniques a. Scleral tunnel technique i. Prepare a fornix-based conjunctival peritomy at the limbus using Westcott scissors, tissue forceps; ~9 mm for a one-piece lens; 5 mm for a foldable lens. The peritomy is usually centered around 11 or 1 o’clock on the side of the surgeon’s dominant hand. ii. Secure hemostasis with wet-field cautery. iii. Create self-sealing scleral tunnel: A. Use a rounded blade (e.g., #64 or #69 Beaver blade) and 0.12 mm forceps to make a partial (50%) thickness, linear incision vertical and perpendicular to sclera, 2 to 3 mm from limbus (see Fig. 8.1, p. 27). B. Extend partial thickness groove incision 3.5 mm if a foldable lens is planned and 6.0 mm if a polymethyl methacrylate (PMMA) lens is planned. C. Use crescent or tunnel incision blade (e.g., Beaver #38, #48) to construct a scleral tunnel of same depth on to clear cornea. Maintain a surgical plane parallel to the globe by holding the blade flat against the sclera (e.g., keep blade heel down) (see Fig. 8.2, p. 27). D. Continue tunnel construction just past anterior limbal vessels. iv. Perform a paracentesis through clear cornea adjacent to limbus (see Chapter 7). Place at 10 or 2 o’clock on side of nondominant hand, using a microsurgical knife (e.g., Beaver #75, MVR) (see Fig. 8.3, p. 28). v. Optional: Inject 1 ml of 1% nonpreserved intracameral lidocaine vi. Inject viscoelastic into anterior chamber through paracentesis port. vii. Use keratome (2.65 mm to 3.20 mm) to slowly enter anterior chamber at the anterior edge of the scleral tunnel, 0.5 mm anterior to the anterior edge of the vascular arcade, on the side of the dominant hand (see Fig. 8.4, p. 28). b. Clear cornea technique i. Stabilize and fixate the globe using 0.12 forceps or Fine-Thorton 13 mm fixation ring. ii. Perform a paracentesis through clear cornea adjacent to limbus using a microsurgical knife (e.g., Beaver #75, MVR) (see Fig. 7.1, p. 23
Secondary Intraocular Lens Placement
 Anterior Chamber Intraocular Lens Implantation
Indications
 Monocular aphakia in contact lens intolerant patient in absence of posterior capsule support.
 Selected cases of binocular aphakia in which patient is unable to wear either contact lenses or aphakic spectacles.
 Patients with macular degeneration may, in particular, benefit from the optical consequences of intraocular lenses (no ring scotoma, less magnification of central scotoma) compared with aphakic spectacle correction.
Contraindications
 Low corneal endothelial cell count
 Cystoid macular edema
 Uveitis
 Peripheral anterior synechiae
 Rubeosis
 Need for anterior vitrectomy when placing implant
 Narrow angle glaucoma
Preoperative Procedure
Instrumentation
 Honan balloon
 Lid speculum
 Castroviejo calipers
 Sutures (10–0 nylon, 10–0 Vicryl)
 Elschnig forceps
 Kalt needle holder
 Fine needle holder
 Fine toothed tissue forceps (e.g., 0.12 mm straight Castroviejo and/or Colibri)
 Westcott scissors
 Cellulose sponges
 Cautery (underwater eraser or disposable)
 Scarifier (e.g., Beaver #64, #69)
 Microsurgical knife (e.g., Beaver #75M, MVR, Micro-Sharp, Superblade)
 Microvitrectomy suction/cutting instrumentation
 Acetylcholine solution (e.g., Miochol)
 Viscoelastic substance (e.g., Healon, Amvisc, Viscoat)
 Left- and right-handed corneoscleral scissors
 Straight and angled McPherson tying forceps
 Lens (e.g., Sheets) glide
 IOL forceps
Operative Procedure
Postoperative Procedure
Follow-up Schedule
Suture Removal
Complications
 Posterior Chamber Intraocular Lens Implantation
Indications
 Monocular aphakia in contact lens intolerant patient in the presence of posterior capsule support or intact anterior capsulorhexis.
 Selected cases of binocular aphakia in which patient is unable to wear either contact lenses or aphakic spectacles.
 Patients with macular degeneration may, in particular, benefit from the optical consequences of intraocular lenses (no ring scotoma, less magnification of central scotoma) compared with aphakic spectacle correction.
 Secondary posterior chamber IOL implantation can be performed via a scleral tunnel or clear cornea approach. Additionally it may be placed in the capsular bag if enough capsular support is available or in the sulcus if the capsule is compromised. For a full discussion of each technique, please see Chapter 8.
Contraindications
 If inadequate capsular support present, a scleral or iris sutured IOL is indicated (see Sutured Posterior Chamber Intraocular Lens Implantation section later in this chapter).
 Cystoid macular edema.
 Active uveitis.
Preoperative Procedure
Instrumentation
 Honan balloon (optional)
 Lid (phaco) speculum
 Castroviejo calipers if using a scleral tunnel incision
 Fine toothed forceps (e.g., 0. 12 mm straight Castroviejo and/or Colibri)
 Westcott scissors if using a scleral tunnel incision
 Cellulose sponges
 Cautery if using a scleral tunnel incision (underwater eraser or disposable)
 Scleral incision blade (e.g., Beaver #64, #69) if using a scleral tunnel incision
 Crescent/tunnel incision blade (e.g., Beaver #38, #48) if using a scleral tunnel incision
 Viscoelastic substance (e.g., Healon, Amvisc, Viscoat, Provisc)
 Fine-Thorton 13-mm fixation ring (optional)
 Keratome (e.g., Beaver #55, diamond or steel, 2.7 mm to 3.2 mm)
 Cystotome
 Utrata forceps
 Cyclodialysis spatula or vitreous sweep
 Kuglen hook
 Straight and angled McPherson tying forceps
 Needle holder
 IOL folder or injector system
 IOL forceps
 Sinskey hook
 Vannas scissors
 Sutures: 10–0 nylon, 10–0 Vicryl, 8–0 Vicryl
 Acetylcholine solution (e.g., Miochol)
Operative Procedure
![]()
Stay updated, free articles. Join our Telegram channel

Full access? Get Clinical Tree


