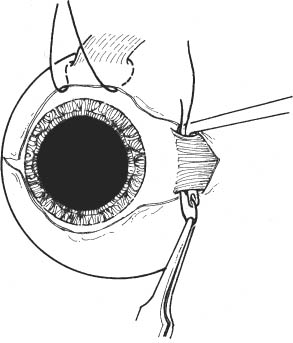
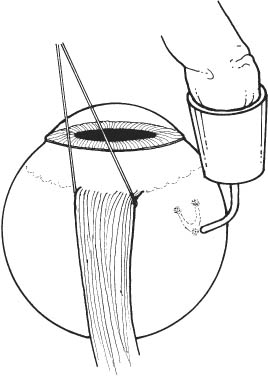
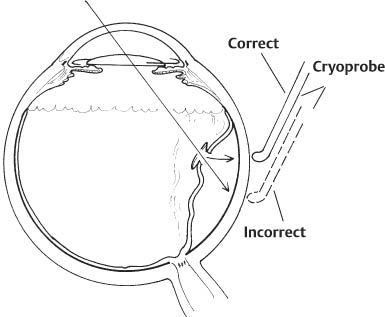
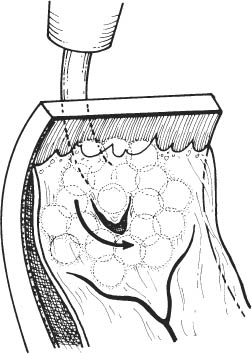
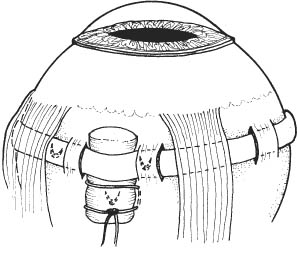
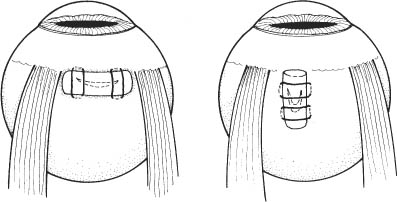
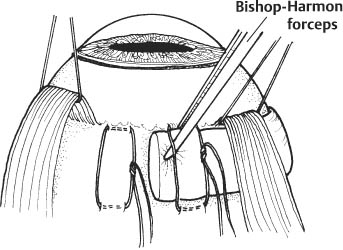
64 Several techniques are used in the repair of rhegmatogenous retinal detachments. These vary depending on the nature of the detachment and preference of the surgeon. The principles of the various techniques of retinal reattachment surgery, however, are the same. These include: See Chapter 3. 1. Schedule surgery expeditiously. a. If the macula is attached and threatened by progression of the detachment or if the macula has been detached for less than several days, then, in general, surgery should be performed within 24–72 hours if possible. i. Generally, in nonvitrectomized eyes, inferior extramacular detachments spread into the macula slowly. ii. Chronic detachments probably can be repaired on a nonemergent basis. Signs of a chronic detachment include: demarcation line (hyper- or hypo-pigmented) separating attached from detached retina; retinal cysts; subretinal fibrosis. b. If the macula has been detached for a lengthy period, surgery may be scheduled electively. c. Impose activity limitations as the nature of the detachment warrants. Strict bed rest with bilateral eye patching can promote substantial resolution of sub-retinal fluid in a minority of patients. 2. Complete retinal evaluation: Identify and diagram all retinal breaks. 3. Clip lashes 24 hours preoperatively, if possible. 4. Dilate pupil (e.g., cyclopentolate 1% plus phenylephrine 2.5% every 15 minutes starting 1 hour before surgery). 1. Local anesthesia with sedation is preferred unless the patient is unlikely to be able to lie flat during surgery (e.g., kyphoscoliosis, congestive heart failure) or cannot communicate with the surgeon. Patients with severe myopia might undergo general anesthesia to avoid the risk of globe perforation associated with retrobulbar injection. One approach in the latter setting is to have the patient sedated, prepped and draped first. Then, after topical proparacaine and/or lidocaine gel is applied, make a conjunctival incision, separate the Tenon fascia from the globe, and provide retrobulbar anesthesia using a blunt-tipped cannula. Usually, surgery is done as an outpatient procedure. 2. Prep and drape. Adhesive-backed plastic drapes help to keep the eyelashes (if present) out of the surgical field. 3. Place lid speculum. 4. Perform a 360 degree conjunctival peritomy at the limbus. Two radial relaxing incisions can be made (West-cott scissors, tissue forceps). 5. Secure hemostasis with cautery. Figure 64.1 6. Isolate and sling rectus muscles (Fig. 64.1). 7. Buttonhole the Tenon capsule and intermuscular septum between muscles (Westcott or Stevens scissors; may use cotton-tipped applicator to bluntly dissect between and expose muscles). 8. Isolate muscle with muscle hook (see Chapter 37). 9. Sling each rectus muscle with a 2–0 silk suture (without a swaged-on needle). 10. The suture is placed through a fenestrated muscle hook, which is then passed under the muscle. The suture is pulled from the hook with forceps, slinging the muscle. 11. Alternatively (but less desirable due to risks associated with needle passage near the globe), one may use 4–0 silk with swaged-on needle (pass hub of needle under muscle). Sling superior rectus muscle last, using the other traction sutures to achieve adequate exposure. The muscle hook should be passed in a temporal to nasal direction to avoid slinging the superior oblique tendon. 12. Tie knot at distal end of each suture. 13. Inspect sclera for abnormalities (e.g., thinning). 14. May rotate globe with traction sutures and retract conjunctiva with Schepens retractor. 15. Use cotton-tipped applicator to move tissue and inspect sclera in all four quadrants, respectively. 16. Examine retina completely with scleral depression (indirect ophthalmoscope, cotton-tipped applicator or straight depressor for scleral depression). 17. Localize and mark location of all retina holes and tears. 18. Indent sclera with retinal break localizer and mark depressed spot with marking pen, cautery, or diathermy. 19. For small holes and tears, mark directly over site. 20. For larger tears, mark posterior, anterior, and lateral margins of break. Figure 64.2 21. Apply cryotherapy to all retinal holes, tears, and areas of lattice degeneration (see Chapter 65). (Fig. 64.2 illustrates marking of a large retinal break.) 22. Test cryoprobe (desired temperature should be −60 to −80°C). 23. Position eye with traction sutures. 24. Examine fundus with indirect ophthalmoscopy. 25. Position cryoprobe at edge of retinal break. 26. Treat breaks in undetached or shallowly detached areas first. (The eye softens as the sclera is depressed with treatment, subsequently allowing easier access to the more bullous areas surrounding a break.) 27. Indent sclera with probe tip (keep tip perpendicular to sclera), avoiding compression with instrument shaft. 28. Activate cryo-unit. 29. Terminate cryo-application when whitening of retinal pigment epithelium (RPE)-retina is observed through ophthalmoscope. 30. If no reaction is observed in several seconds after the cryo-unit achieves its lowest temperature, terminate the application and verify position of probe tip. Figure 64.3 31. If retina is bullously detached, excessive freezing will be required to induce retinal whitening, and one should terminate the cryo-application once whitening of the underlying RPE is observed. Parallax can lead to incorrect identification of the location of RPE underlying the retinal break. (Fig. 64.3 illustrates parallax effect.) 32. After cryoprobe thaws, move probe to adjacent area around break. 33. In this manner, make additional applications until the break is surrounded by treatment. Note: Cryo spots must overlap each other slightly to completely seal the break. Figure 64.4 34. A 1–2 mm treatment zone should surround the retinal break. The anterior-lateral margins of the retinal break should be treated precisely, as failure to do so is a common cause of recurrent retinal detachment (Fig. 64.4). 35. Treatment should extend to the posterior margin of the vitreous base for breaks in the anterior periphery. 36. Select style and size of buckling element to be used. 37. A wide variety of buckling elements is available. Among the most common are: a. Segmental silicone sponges (e.g., one half thickness 5 mm diameter sponge for radial buckle). b. Encircling, solid silicone bands with or without grooves (e.g., 7 mm wide, 3 mm thick, 2.5 mm grooved silicone #287 exoplant). c. Factors favoring placement of segmental element: i. Single break located anterior to the equator. ii. Multiple retinal breaks (one per quadrant) anterior to the equator in different quadrants. Figure 64.5 iii. Retinal break located just posterior to and unsupported by an encircling element. (Fig. 64.5 illustrates combination encircling and radial element.) iv. History of sickle cell disease or sickle trait. v. Presence of advanced glaucomatous optic atrophy. d. Factors favoring placement of encircling element: i. Multiple retinal breaks anterior to the equator in the same or different quadrants. ii. Presence of peripheral vitreoretinal pathology (e.g., lattice degeneration) in other quadrants that should be supported by the scleral buckle. iii. Presence of proliferative vitreoretinopathy (e.g., starfold formation). iv. No breaks found on exam. v. All breaks not definitively localized. vi. Aphakic/pseudophakic detachments. Figure 64.6 38. Determine element size by measuring dimensions of breaks using localization marks. (Fig. 64.6 illustrates support of retinal break by scleral buckle.) Element should completely encompass break. 39. For radial buckles, the buckle should be centered on the meridian of the retinal break and extend ~2 mm posterior to the posterior margin of the retinal break. 40. For encircling buckles, all retinal breaks should be supported on the buckle, and the most posterior retinal break should be supported by at least the posterior slope of the scleral buckle. 41. Soak elements in bacitracin solution before use (if tolerated). Figure 64.7 Preplace mattress sutures to be used in securing buckle (4–0 white silk or Mersilene or 5–0 nylon) (Fig. 64.7). 42. Position globe with traction sutures. 43. Suture passes should be placed parallel to the buckling element (i.e., parallel to equator for encircling and circumferential segmental elements, perpendicular for radial elements). 44. Suture passes should be ~4 mm long through partial thickness sclera. 45. Visualize needle tip as it is placed through sclera to avoid perforating globe. 46. Thin sclera: a. Short suture passes at the corners of the mattress sutures can be taken if the sclera is thin or if there is another reason to avoid long intrascleral suture passes. b. For encircling elements, creation of partial thickness scleral tunnels can be safer than passing sutures (Fig. 64.8).
Retinal Detachment Repair
Scleral Buckling and Pneumatic Retinopexy
 Scleral Buckling
Principles
 Localization of all retinal breaks.
 Creation of chorioretinal adhesion at the margins of the breaks.
 Relief of vitreoretinal traction either permanently (e.g., scleral explant or implant or direct relief via vitrectomy) or temporarily (e.g., episcleral balloon, intraocular gas bubble).
 The following protocol outlines one general method of primary retinal reattachment surgery. Particular operations and the modalities employed therein should be tailored to the requirements of the specific case and the surgeon’s preference.
Preoperative Procedure
Instrumentation
 Lid speculum (preferably self-retaining, e.g., Maumenee-Park)
 Toothed tissue forceps (e.g., 0.3 or 0.5 mm forceps, Bishop-Harmon)
 Westcott scissors
 Stevens scissors
 Cautery
 Cotton-tipped applicators
 Sutures (2–0 cotton, 4–0 white silk or Mersilene on spatula needle, 6–0 double-armed black silk on a spatula needle, 6–0 plain gut)
 Muscle hooks (including fenestrated hook)
 Needle holder
 Utility tying forceps (e.g., Alabama)
 Schepens retractor
 Indirect ophthalmoscope
 Retinal break localizer (modified thimble-type scleral depressor [Gass depressor])
 Straight scleral depressor
 Marking pen
 Cryosurgical unit with retina cryoprobe
 Silicone buckling elements
 Hemostat (small)
 Beaver #69 and #66 blades
 Schiotz tonometer
 Tuberculin syringe with ⅝ inch 30 gauge needle
 20 ml syringe with 30 gauge needle, Millipore filter
Operative Procedure
 Needle for drainage of subretinal fluid (e.g., small-gauge taper-point surgical needle, 2.5 mm diathermy pin)
Stay updated, free articles. Join our Telegram channel

Full access? Get Clinical Tree


