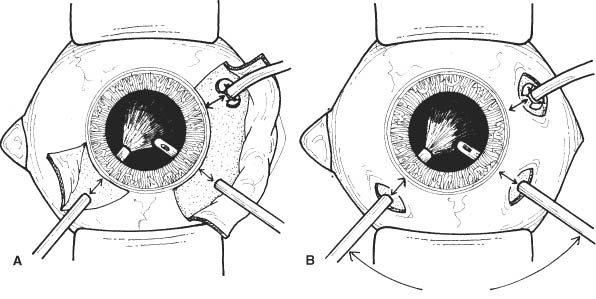
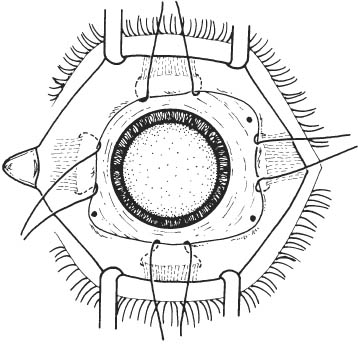
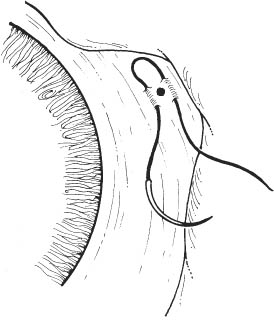
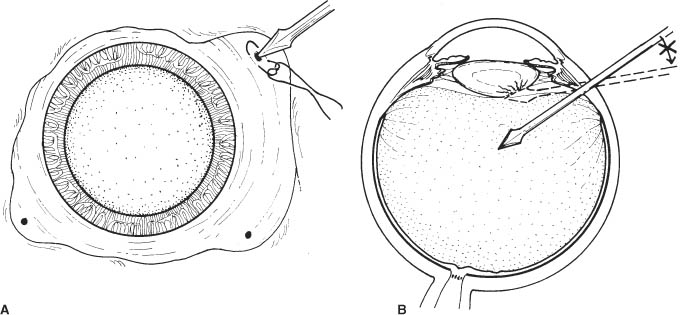
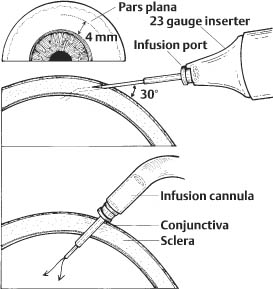
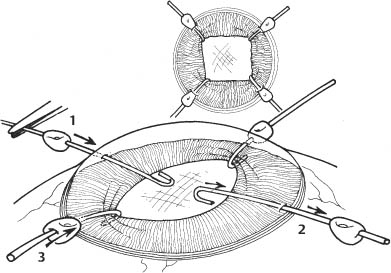
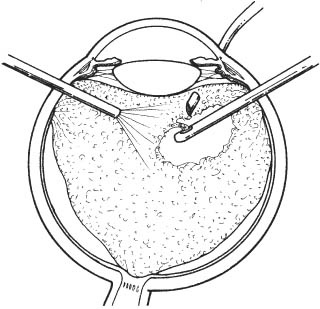
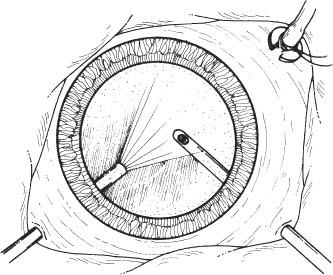
63 The goals of posterior vitrectomy are varied. Most important among these are: Specialized techniques include segmentation and/or excision of vitreoretinal membranes, internal drainage of sub retinal fluid, application of endolaser photocoagulation or endocryotherapy, use of heavier-than-water perfluorocarbon liquids, use of illuminated intraocular instruments (e.g., forceps, scissors), gas-fluid exchange to name a few. An in-depth treatment of these techniques is beyond the scope of this book. Rather, this chapter will describe the essential features of the posterior vitrectomy procedure. See Chapter 3. 1. Complete retinal evaluation with ultrasound examination if necessary. 2. Dilate pupil (e.g., cyclopentylate 1% plus phenylephrine 2.5% every 15 minutes × 3 starting 1 hour before surgery). Note: In this chapter, the Alcon Accurus vitrectomy machine and settings are used for illustrative purposes. The authors recognize that other excellent machines are available. The authors have no financial interest in the Accurus system. Figure 63.1 1. Anesthesia: General, or retrobulbar + sedation + anesthesia monitoring ± lid block. 2. Prep and drape eye. Adhesive-backed plastic is preferred to keep eyelashes out of the surgical field. If there is a concern about patient head movement under local anesthesia, consider taping the patient’s head to the stretcher. 3. Place lid speculum. 4. Perform conjunctival peritomy (Westcott scissors, tissue forceps). a. Perform fornix-based localized conjunctival peritomy over the planned entry sites (Fig. 63.1A). b. Alternatively, perform small focal peritomies over the planned sclerotomy sites (Fig. 63.1B). Note: If a scleral buckle is to be placed, perform a 360 degree limbal peritomy. 5. Optional: Cauterize bleeding vessels and planned sclerotomy sites. 6. Isolate and sling rectus muscles with 2–0 black silk suture if a scleral buckle is to be placed (Figs. 63.2 and 63.3). a. Buttonhole Tenon capsule and intermuscular septum between muscles with Stevens scissors (may use cotton-tipped applicator to bluntly dissect between and expose muscles). b. Isolate muscle with muscle hook (see Chapter 37). c. Sling each rectus muscle with a 2–0 silk suture threaded through a fenestrated muscle hook. i. Suture is placed through fenestrated muscle hook, which is then passed under muscle. Suture is then pulled from the hook with forceps, slinging the muscle. ii. Sling superior rectus muscle last, using the other traction sutures to achieve adequate exposure. Muscle hook should be passed in a temporal to nasal direction to avoid slinging the superior oblique tendon. 7. Plan location of entry sites. a. Place sclerotomies 3 mm posterior to limbus in aphakic/pseudophakic eyes and 4 mm posterior to limbus in phakic eyes (measure with calipers). Figure 63.2 Figure 63.3 Figure 63.4 Figure 63.5 b. Place infusion cannula inferotemporally (unless there is a contraindication) and place sites for bimanual manipulation superotemporally and superonasally. c. Sclerotomy sites should be parallel to the limbus. d. Optional: Mark sites with marking pen or cautery. 8. First prepare infusion site. a. Place inferotemporally in most cases. b. Pre-place 4–0 white silk or 6–0 or 7-0 Vicryl mattress suture through partial thickness sclera spanning the sclerotomy site (Fig. 63.4). c. Enter eye with MVR blade (Fig. 63.5A). i. Hold blade perpendicular to scleral surface, aiming toward anatomical center of globe. ii. Place blade tip on scleral surface, enter eye with controlled firm pressure, and penetrate pars plana completely. iii. Visualize knife tip through pupil to verify penetration, if media are clear. iv. Directing probe into the anterior vitreous can result in lens damage (Fig. 63.5B). d. Place infusion cannula through sclerotomy. (A twisting motion facilitates entry of cannula.) e. View cannula directly through pupil externally. i. Can direct the fiber optic endoilluminator light beam through the pupil toward the infusion cannula to improve view, or ii. Use indirect ophthalmoscope to verify proper cannula position and penetration through pars plana. If infusion cannula does not completely penetrate the pars plana, infusion fluid may detach the retina and/or choroid. f. Secure infusion cannula to sclera with the preplaced suture. 9. Prepare the two superior entry sites. a. Place incisions in superotemporal and superonasal quadrants near superior borders of rectus muscles for comfortable bimanual manipulation (e.g., at 10 and 2 o’clock). b. Use MVR blade in similar fashion to Step 8c: Final instrument positioning according to type of peritomy. c. Close sclerotomies with silver scleral plugs. Gold-colored plugs have a larger diameter than silver plugs. 10. 23 gauge and 25 gauge: Transconjunctival entrance is performed for sclerotomy; conjunctival peritomy is not needed. a. Use a caliper to mark the site of sclerotomy. The sclerotomy for the infusion line usually is made in the inferotemporal quadrant. b. Slightly displace the conjunctiva over the marked site using a forceps or a cotton tip applicator. c. Take the sharp inserter-cannula system (a pre-loaded sharp trocar or a stiletto blade with a cannula; manufacturers include Alcon, Bausch & Lomb, or DORC) to make a beveled incision for the sclerotomy. Figure 63.6 d. Insert the pre-loaded trocar at a 30 degree angle through the conjunctiva and the sclera for approximately 1 mm and then angle directly toward the optic nerve. (For the 25 gauge vitrectomy, some surgeons prefer to make a nonbeveled transconjunctival, incision perpendicular to the sclera.) (Fig. 63.6) e. Stabilize the cannula with a forceps and remove the trocar. f. Connect the infusion line to the cannula. Confirm the location of the cannula tip in the vitreous cavity. g. Perform superior sclerotomies at 2 and 10 o’clock positions similarly. 11. If pupil is inadequately dilated, place flexible iris retractors. a. Incise limbus at 2, 4, 8, and 10 o’clock with 15 degree blade. b. Use 0.12, 0.3, or 0.5 mm toothed forceps or McPherson tying forceps to guide flexible iris retractors through the limbal incisions and capture the pupillary margin. Figure 63.7 c. Advance the sleeve around the flexible iris retractors, thus opening the pupil (Fig. 63.7). 12. Suture corneal ring in position and place contact lens on cornea. a. Secure ring with superficial suture bites ~2–3 mm posterior to the limbus at 6 and 12 o’clock, or 3 and 9 o’clock meridians. b. Place viscous coupling medium on cornea (e.g., Healon or Goniosol). 13. Place contact lens on cornea. a. For those using the traditional Machemer lens system: i. Usually begin with the wide field (48 degree) lens. ii. For dissection over the macula (e.g., internal limiting membrane [ILM] stripping, membrane dissection), use macula lens. iii. For peripheral vitreous dissection, use prism (20 degree, 30 degree) lens. b. For those using the contact wide-angle lens system (Volk, Oculus, or Avi): i. The inverter should be connected in the microscope. ii. Usually begin with the wide-angle lens (Ocular 155D, or Volk’s Mini Quad/Quad XL). iii. For macular dissection, use the macula lens (~66D). iv. For equatorial dissection, use the equator lens (~91D). Figure 63.8 14. Insert fiber optic endoilluminator and vitrectomy instrument after removing scleral plugs (Fig. 63.8). 15. Turn off room and microscope lights. 16. Set vitrectomy instrument parameters: Alcon provides different vitrectomy probes that have different cutting rates and different mechanisms of action. For example, the Accurus 800 and 2500 probes have guillotine action, and the InnoVit probe has rotary action. This machine features a dual mode foot pedal. At initiation of foot pedal depression, the machine activates to a high preset cutting rate (e.g., InnoVit 1800 cpm) and 0 mm Hg vacuum. As foot pedal depression proceeds further, the cutting rate gradually decreases and the vacuum increases to preset levels (e.g., InnoVit 1200 cpm, 200 mm Hg). The settings outlined below are just suggestions. Different surgeons prefer different settings. a. Accurus 800 probe: i. Core vitrectomy: cutting rate 800 cpm, vacuum 150 mm Hg, infusion pressure 25–35 mm Hg. ii. Vitreous base: cutting rate 800 cpm, vacuum 50 mm Hg, infusion pressure 25 mm Hg. iii. Extraction of dense membranes or induction of posterior vitreous detachment (PVD): low cutting rate of 200–400 cpm (0 cpm for PVD induction), vacuum 100–250 mm Hg, infusion pressure 35 mm Hg. With high vacuum, may need to increase infusion pressure to prevent globe collapse. iv. If close to detached retina: high cutting rate 800 cpm, vacuum 50 mm Hg, infusion pressure 25 mm Hg. b. InnoVit probe: i. Core vitrectomy: cutting rate 1000 cpm, vacuum 150–200 mm Hg, infusion pressure 35 mm Hg. ii. Vitreous base: cutting rate 1800 cpm, vacuum 50–75 mm Hg, infusion pressure 25–35 mm Hg. iii. Extraction of dense membranes or PVD induction: low cutting rate of 400–600 cpm (0 cpm for PVD induction), vacuum 100–250 mm Hg, infusion pressure 35 mm Hg. With high vacuum, may need to increase infusion pressure to prevent globe collapse. iv. If close to detached retina: cutting rate 1800 cpm, vacuum 30 mm Hg, infusion pressure 25–50 mm Hg. c. Accurus 2500 probe: i. Core vitrectomy: cutting rate 1500 cpm, vacuum 75–150 mm Hg, infusion pressure 35 mm Hg. ii. Vitreous base: cutting rate 2500 cpm, vacuum 50 mm Hg, infusion pressure 30 mm Hg. iii. Extraction of dense membranes or PVD induction: low cutting rate of 400–600 cpm (0 cpm for PVD induction), vacuum 100–250 mm Hg, infusion pressure 35 mm Hg. With high vacuum, may need to increase infusion pressure to prevent globe collapse. iv. If close to detached retina: cutting rate 2500 cpm, vacuum 50 mm Hg, infusion pressure 30 mm Hg. d. Accurus 23 gauge 2500 cpm probe: i. Core vitrectomy: 1500 cpm, vacuum 400 mm Hg, infusion pressure 35 mm Hg. ii. Vitreous base: cutting rate 2500 cpm, vacuum 150 mm Hg, infusion pressure 25 mm Hg. iii. Induction of posterior vitreous detachment: increase suction to 500 mm Hg. e. Accurus 25 gauge 1500 cpm probe: i. Core vitrectomy: 1100 cpm, vacuum 600 mm Hg, infusion pressure 40 mm Hg. ii. Vitreous base: 1500 cpm. vacuum 250 mm Hg, infusion pressure 25 mm Hg. iii. Induction of posterior vitreous detachment: increase suction to 600 mm Hg. 17. Perform vitrectomy. a. Remove lens if opacity precludes adequate visualization for procedure (see Chapter 66). Figure 63.9 b. Remove central vitreous (Fig. 63.9). Do not touch posterior surface of crystalline lens with intraocular instruments. Figure 63.10 c. “Backlighting” rather than direct illumination with fiber optic probe facilitates visualization of the vitreous.
Posterior Segment Vitrectomy
Indications
 Removal of media opacities.
 Management of tractional or traction-rhegmatogenous retinal detachment (e.g., detachments associated with proliferative vitreoretinopathy [PVR] or proliferative diabetic retinopathy [PDR]).
 Repair of rhegmatogenous retinal detachment.
 Alleviation of tangential traction on the retina (e.g., epiretinal membrane [ERM]).
 Repair of macular hole.
 Submacular surgery to remove subfoveal blood (e.g., with retinal arterial macroaneurysm-induced hemorrhage) or subfoveal choroidal neovascularization (e.g., associated with the presumed ocular histoplasmosis syndrome) in carefully selected patients.
 Removal of intraocular foreign bodies (IOFB).
 Biopsy of the vitreous to identify infectious organisms in cases of endophthalmitis or cancer cells in cases of intraocular large cell lymphoma.
 Biopsy of the retina and/or choroid in cases of ocular inflammatory disease of uncertain origin (e.g., nocardia endophthalmitis).
 Removal of cataractous lens with zonular dehiscence using pars plana approach.
 Repositioning of subluxed intraocular lens (IOL) implant.
 As an adjunct to drainage of hemorrhagic or serous choroidal detachment.
Preoperative Procedure
Instrumentation
 Lid speculum
 Fine-toothed tissue forceps (e.g., 0.12 mm straight Castroviejo and/or Colibri)
 Westcott and Stevens scissors
 Muscle hooks
 Cautery with attachments both for external and intraocular use
 Castroviejo calipers
 Marking pen (optional)
 20-gauge microvitreoretinal (MVR) blade
 Fine-tipped needle holder (preferably locking)
 Infusion cannula, 2.5, 4, or 6 mm depending on: (1) size of eye (e.g., 2.5 mm for pediatric cases) and (2) the visibility of the cannula tip after insertion into the vitreous cavity and/or the presence of choroidal detachment (e.g., 6 mm cannula for cases with choroidal detachment)
 Sutures (4–0 white silk or 6–0 Vicryl, 7–0 Vicryl, and 8–0 Vicryl or 6–0 plain gut)
 Vitrectomy suction/cutting instrumentation
 Corneal ring and high refractive index contact lenses (20 degree and 30 degree prism), wide field (48 degree), macula (34 degree), and biconcave (90D) lenses; or, the wide-angle viewing lens system (wide-angle system lenses: macula, 66D lens; equator, 91D lens; wide field, 155D lens)
 Scleral plugs
 Cotton-tipped applicators
 Indirect ophthalmoscope
 20 D and/or 28 D lenses
 Intraocular forceps (e.g., Tano asymmetric forceps, De Juan forceps), scissors (e.g., Sutherland vertical and horizontal, 25 gauge), pick (e.g., serrated tip, fine tip), diamond-dusted flexible tip cannula (Tano). Some instruments (e.g., scissors, forceps) accommodate fiber optic light and are illuminated.
 Fluted needle with or without (Charles) silicone tip
 Laser (endo- and/or indirect)
 Cryo unit (transscleral cryotherapy) plus appropriate probes
 Gas pump (provided as part of the Alcon Accurus vitrectomy machine)
 Silicone oil infusion syringe (provided as part of the Alcon Accurus vitrectomy machine pack)
 Flexible iris retractors and 15 degree blade (for patients with small pupils)
 Perfluorocarbon liquid and/or silicone oil (depending on the case)
 Gas: SF6, C3 F8
 Inverting system for the wide-angle vitrectomy lenses (e.g., ROLS by Volk)
 Several companies manufacture such inverting systems, including Volk, Ocular, and Avi. Any of these inverting systems can be used with the wide-angle contact lenses manufactured by any of these companies (e.g., use Volk lenses with Avi inverter).
 BD Visitec 20 gauge × 1 inch cannula with 30 gauge × 3/16 inch tip extension for viscodissection (optional)
 Instruments for subretinal surgery: subretinal forceps, pick, and 33 gauge infusion cannula (optional)
Operative Procedure
 Fiber optic endoilluminator (some surgeons use chandelier illumination, which is inserted through a sclerotomy and sutured in position rather than held in the nondominant hand)
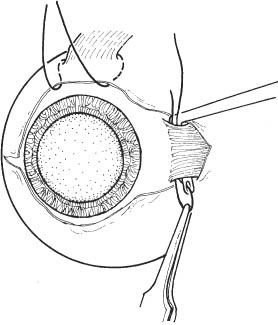

Stay updated, free articles. Join our Telegram channel

Full access? Get Clinical Tree


