Pictorial Documentation: Digital Imaging and Traditional Photography


Pictorial Documentation: Digital Imaging and Traditional Photography


Andrew K. Patel

Amir M. Karam

Samuel M. Lam


Pictorial documentation—whether film or digital based— serves multiple important purposes for the head and neck surgeon: medicolegal documentation, physician-patient communication, preoperative planning and intraoperative reference, lay and professional education, and physician self-education. In particular, the subfield of facial plastic and reconstructive surgery relies heavily on the need for standardized photographs for all of the above reasons. Photography in facial plastic surgery must be accurate, consistent, and of high quality to be useful. Photos should be free of distortion, with the greatest possible depth of field (DOF). In contrast to a studio portrait, the goal is not to make the patient appear as good as possible but rather to represent the patient as accurately as possible. Accordingly, this chapter focuses on the principles of good medical photography that relate, for the most part, to cosmetic and reconstructive facial surgery. Nevertheless, all the topics discussed can be easily applied across the broad spectrum of head and neck surgery, as indicated. The emerging and now well-established role of digital photography is also reviewed in depth and contrasted against traditional 35-mm photography to help the surgeon decide which format is better suited for his or her practice.


PRINCIPLES OF PHOTOGRAPHY

Rather than divide this section into digital and 35-mm film photography, the basic fundamental tenets that underscore good photography are universally applicable and can be discussed without reference to a chosen format. The primary spotlight will remain on good pre- and postoperative portrait photography, as this subject represents one of the most challenging and vital for the surgeon to undertake correctly. However, some practical tips on quality intraoperative photographs will also be outlined.


Informed Consent

Respect for a patient’s privacy is of paramount importance for both ethical and legal grounds. Medical records should be thought of as a systemic documentation of an individual’s medical history. The data contained in the physical chart or photographs is also the medical record separate from its physical embodiment. Though it may seem academic to distinguish the physical document from the information it contains, the distinction is important and relates to ownership. In the United States, patients own the information about their medical past and treatment contained in the physical form. However, the medical provider owns the physical or electronic structure that houses the information. Therefore, when discussing patient photographs, the patient actually controls the data contained in the images unless there is a legal agreement to the contrary. Use of patient photography for media or educational purposes should always be preceded with a thorough and explicit written consent. For instance, now with the rise of the Internet as a ubiquitous medium, consent forms should reflect every medium in which the surgeon intends to use the photographs, including print, television, in-office, Internet, etc. The surgeon can also state that the photograph will be used only for educational purposes and restrict the use of those photographs explicitly to scientific lectures and/or scientific articles. Further, the patient may be offered the option to camouflage his or her identity by blackening out the eyes, using only one angle of view, or cropping the image in a certain prescribed way—all of which should be stated clearly in the consent and with which the surgeon should comply. The surgeon should also guarantee in the consent that the patient’s name and identity will not be further revealed unless otherwise stipulated by the patient, for example, as a testimonial.


Standardization

In order for a photograph to carry any meaningful significance, the photographs must be standardized in the following manner: same photographic media, equipment, and settings; consistent patient positioning and absence of distracting elements (makeup, jewelry, hairstyle); and identical lighting and background. Besides these considerations, the same photographer (physician or staff member) should try to take all of the photographs because slight individual interpretation of these rules can lead to dissimilar photographic results. Before taking the postoperative images, the photographer should also review the preoperative images and then alter the necessary parameters to match the preoperative photographs. For example, if the preoperative oblique view shows that the patient is turned too far laterally, the photographer should try to match the same patient positioning (albeit less than ideal) in order that the postoperative image can be meaningfully compared.


Standardized Patient Positioning and Related Information

Proper patient positioning is the most demanding aspect of achieving reproducible photographic images. The same camera-to-subject distance must be maintained: this objective can be attained by placing the patient’s stool and the camera over prescribed markings on the floor (Fig. 171.1). By using a fixed lens, that is, a lens that has no “zoom” capacity, the physician can also minimize any distortion and variability caused by altering the focal distance. The Frankfort Horizontal Plane must also be observed: the line that runs from the supratragal point through the inferior orbital rim defines the horizontal plane of the image (Fig. 171.2A-C). The Frankfort Horizontal Plane should be respected in the frontal, oblique, and lateral views. The basal view that is mandatory for rhinoplasty, malar augmentation, and midfacial trauma is defined by aligning the tip of the nose with the infrabrow line (Fig. 171.2D). On the oblique view, the patient should also be turned to a certain angle by one of two methods: (a) align the inner canthus of the eye with the oral commissure or (b) align the nasal tip with the malar eminence (Fig. 171.2). Whichever method is chosen, the surgeon should attempt to rely on the same method for all images. Another reliable technique to ensure that the patient turns to the correct angle each time is to place markers on the wall that indicate where the patient should turn and face for an oblique and lateral view. When turning to the oblique and lateral positions, the patient should rotate the entire body in alignment with the face and not just turn the head to those positions, which creates neck distortion, especially in the lateral view. A rotating stool with a low back (that does not enter the frame of the image) is ideal for this goal.


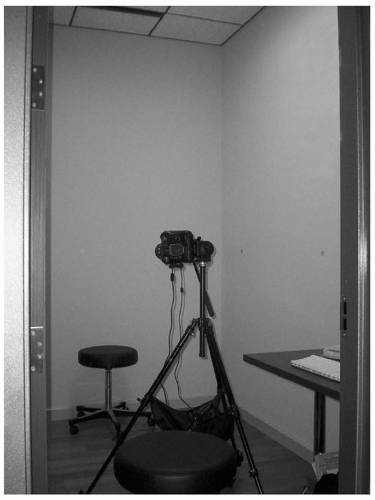
Figure 171.1 Standardized photography requires a dedicated photography room where all pre- and postoperative photographs are taken. A rotating stool with a low or no back is used to rotate the patient’s entire body to the prescribed angle for each view. The digital camera is mounted on a tripod with a quick-release head that can easily adjust from a vertical to a horizontal frame position. In turn, the tripod rests on a rolling dolly to facilitate maneuverability. Markers have been placed on the wall to guide the patient how far to rotate the body in the oblique and lateral positions. In this setup, the back leg of the patient’s stool contacts the wall, and the tripod’s center frame is aligned with the edge of the computer table in order to maintain a standardized camera-to-subject distance. (If flash photography were used, the patient should not be so close to the wall to avoid harsh background shadows.) The back wall is painted a light blue color as a neutral background color.

One of the most common errors encountered is patient positioning with the neck tilted upward and extended, especially in the more mature patient who wants to reduce the appearance of unwanted neck-tissue redundancy. In

addition to distortion of the neck, over- or underrotation of the neck can cause the nose to appear erroneously rotated or derotated, respectively, and would compromise any photography for rhinoplasty (Fig. 171.3). Patients may also reflexively attempt to lift their brow if they have significant brow ptosis, making the pre- and postoperative result for browlift or upper blepharoplasty less meaningful. If the patient exhibits this behavior, the photographer should ask that the patient close his or her eyes forcefully and slowly open them until they appear fully open. This maneuver will help break the unwitting contribution of the frontalis muscle. The patient may also instinctively smile when posing for a photograph, so the photographer should gently remind the patient that no facial expression should be displayed.


Figure 171.2 Standardized photographic views that show (A) frontal, (B) right oblique, (C) right lateral, and (D) basal of the patient. The horizontal line drawn in A-C indicates the Frankfort Horizontal Plane that runs through the supratragal point and the inferior orbital rim, which should be respected. The horizontal line in D shows the alignment of the nasal tip with the infrabrow line. The vertical line in B shows the alignment of the nasal tip with the malar eminence.

Each type of planned surgical procedure mandates a different set of standardized positions with or without additional optional views (Table 171.1) (1). Besides patient positioning, distracting elements from jewelry, makeup, clothing, and hairstyling should also be minimized. All obstructive jewelry, for example, necklaces and pendulous earrings, should be removed. Turtlenecks and high-necked collars can also obstruct a straightforward view of the neck and should be pulled down or folded inward to enhance effective communication. All eyeglasses should be removed regardless of what facial surgery is being contemplated.

Hairstyling ideally should be pulled back to show an unobstructed view of the eyes, nose, ears, lips, and neck and to be reduced to an unobtrusive element. Shorter hairstyles that do not interfere with any of the major facial features and the neck can be left alone or swept behind the helix of the ear as needed. All makeup should be removed, especially if any dermatologic resurfacing or scar revision is planned.


Figure 171.3 Poor patient positioning is shown with the neck overrotated and extended that leads to distortion of the neck as well as for the nose, as seen from the frontal view (A) and from the profile view (B).


Lighting and Background

Lighting is also a critical element that should be standardized. Ambient lighting can be used alone or combined with fill lights or flash strobes. If the ambient lighting is too strong and casts a heavy shadow over the patient’s facial features, then balanced fill lighting can be used to soften these harsh shadows. Hot lights positioned at
45 degrees in front on both sides of the patient can be further softened by aiming the lights away toward reflective umbrellas. A “kicker” light placed behind the patient can fill in any remaining shadows cast by the two forward placed 45-degree lamps and slaved to go off when the camera’s shutter is depressed (Fig. 171.4). Placing the patient an appropriate distance away (˜2 feet) from the rear wall can also minimize unwanted shadows. Generally, an oncamera flash tends to cause excessive highlights and shadows and a “washed-out” appearance to skin tones, but experimentation will determine the best balance of lighting for a particular room and camera. Rather than use fill lights or strobes, the ambient lighting and the camera’s aperture/exposure can be adjusted to achieve the desired lighting objective. Furthermore, the ambient room lighting can be altered to match the color spectrum (e.g., daylight balanced) of the film used or the settings of the camera so that, for example, a green cast from fluorescent lights may be avoided. If shadows and highlights are desired in order to accentuate a scar or other contour irregularity, for example, prominent nasolabial lines for correction with a soft tissue filler, then the balanced fill lights (if used) should be turned off. In addition, the exposure value can be reduced in order to draw out the intended feature. Obviously, the same settings should be used for the postoperative views.


TABLE 171.1 RECOMMENDED, STANDARDIZED PHOTOGRAPHIC VIEWS FOR SPECIFIC FACIAL PROCEDURES


Only gold members can continue reading. Log In or Register to continue

Stay updated, free articles. Join our Telegram channel

May 24, 2016 | Posted by in OTOLARYNGOLOGY | Comments Off on Pictorial Documentation: Digital Imaging and Traditional Photography

Full access? Get Clinical Tree

Get Clinical Tree app for offline access

Procedure


Standardized Views


Botulinum toxin (Botox)


Frontal; frontal smiling: frontal frowning: frontal brow elevation (All photographs are taken before the first session regardless of what areas will be treated in order to enhance patient dialogue should the patient complain as well as to reduce the need for further photography if the patient desires other areas treated during future sessions.)


Rhinoplasty


Frontal; basal; L/R oblique; L/R lateral; +/− dorsal (head tilted down for a crooked nose) +/− smiling laterally (If the patient has an active depressor septi muscle that alters the nasal tip position during animation.)


Blepharoplasty/browlift


Frontal; L/R oblique; L/R lateral; closeup (May also take with eyes closed and upward gaze.)


Rhytidectomy


Frontal; L/R oblique; L/R lateral


Otoplasty


Frontal; L/R oblique; L/R lateral; posterior; R/L lateral closeup (Remember to tie long hair back in a bun and/or wear a headband to lift away obstructing hair.)


Malar augmentation


Frontal; L/R oblique; L/R lateral; basal


Hair transplant


Frontal; L/R oblique; L/R lateral; posterior; posterior with head tilted back; frontal with head tilted down +/− closeup of anterior/lateral hairline (When photographing the hair, the hair should be styled in a standardized fashion and “combovers” eliminated.)


Lip augmentation


Frontal; L/R oblique; L/R lateral; closeup mouth (Remember to remove lipstick, lip liners, and other makeup that can interfere with reproducible photography.)