The in-office modification of gas-permeable (GP) lenses is a well-established art that has existed for many decades. The ability to change the lens design to result in an immediate improvement in the fitting relationship, vision, or comfort is quite integral to the long-term success of all GP lens wearers and, as with verification, should be performed in any office where GP lenses are being fit.
▪ WHY MODIFY?
Modification of gas-permeable lenses is essential for long-term patient satisfaction. The procedures are easy to perform, require little time or expense, and result in both patient satisfaction and a lower dropout rate.
In-office modification of rigid lenses enables any contact lens practice to increase its efficiency and provides a valuable service to the patient. Every student, assistant, and practitioner should be proficient at performing the modifications discussed in this chapter. Almost any material can be modified, including the superpermeables, if the modifier exercises care in the procedures. These valuable skills are acquired easily through practice and the benefits derived easily will justify the effort.1
If a patient’s lenses need modification, the inconvenience of sending the lenses to the laboratory and interrupting the patient’s wearing schedule can result in a very dissatisfied patient. Patients place a high value on their time and appreciate receiving personalized custom services. It also reduces practice expenditures incurred by purchasing additional lenses. The returned lenses may not be satisfactory to the practitioner or the patient, which leads to further delays and the need for readaptation. In-office modification not only provides for uninterrupted lens wear, but also allows the practitioner to correlate the applied lens modifications with the desired fitting results and, therefore, to develop techniques that allow the best lens-to-cornea fitting relationship. This gives the practitioner optimum control over the fit of the lenses, and saves time for patient and practitioner by reducing the number of patient visits.
The ability to modify GP lenses is a powerful in-office problem-solver. GP quality is improving because of technological advancements in manufacturing. Nevertheless, there will be that occasional defective edge, or poorly wettable lens. For example, a patient experiencing symptoms of lens awareness can often be managed by a simple edge polish.2 Dryness and/or fluctuating vision can be managed by surface polishing. A lens that feels dry and exhibits very little movement with the blink can be managed by blending and/or flattening the peripheral curves. If the addition of a slight amount of power will provide the patient with better vision and eliminate the need for reordering the lens, this can be performed in the office as well. Solving these problems in the office will not only result in a much more satisfied patient, but will also minimize the resulting negative effects of a dissatisfied patient who may communicate his or her feelings to other people and, as a result of frustration, give up on contact lens wear in general.
Modifying rigid lenses is simple and requires little time. The procedures discussed in this chapter all take no more than a few minutes to perform. As will be discussed, there are several ways for practitioners to gain proficiency in performing common modification procedures. In addition, technicians in the office can easily be trained to perform these procedures. The expense for equipment is, at most, a few hundred dollars; this is not much to ask to keep patients satisfied while enhancing the lens performance. Some modifications, such as a clean and polish, can be provided as an annual service to patients who have a service agreement.
▪ THE MODIFICATION UNIT
Modification of gas-permeable contact lenses begins with the modification unit. Cost is not a factor since most units are very reasonably priced and pay for themselves over a short period. The basic modification unit consists of a small, electric, motor-driven spindle mounted below a steel or plastic bowl. Some units also have multiple spindles and a variable spindle speed. The latter option has become a very desirable feature with the introduction of newer, softer materials. Many units have fixed spindle speeds in the range of 1,200 to 1,600 rpm, whereas the new materials require speeds of only 1,000 rpm or less.3 High spindle speed causes polish to be removed very quickly, which results in a dry tool. As the tool dries, excess heat is built up, resulting in lens surface defects that will affect surface wettability.4,5 A variable speed modification unit would be preferable, although the spindle speed of a unit can be monitored with a rheostat system purchased at a local hardware store. Caution is needed when using variable speed units. These units are easily inadvertently set to the fastest speed, greatly increasing the risk of lens damage.
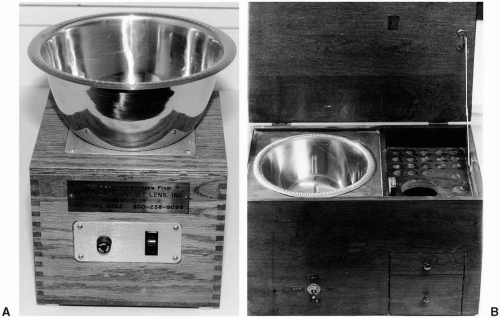
The spindle base may be encased in a wood, plastic, or metal protective covering or may be built directly into a table (Fig. 9.1). The splash bowl prevents water and polish from splashing onto the operator and gives the operator room to place his or her hands and tools near the spindle. A plastic bowl is less likely to scratch or chip a lens that may be thrown from the spindle and is therefore a safer option.6 A table-mounted bowl is a desirable feature because it provides a place for the operator to rest his or her elbows and steady his or her hand during modification procedures.
▪ FIGURE 9.1 (A) Free-standing bowl modification unit. (B) Duffens modification unit.
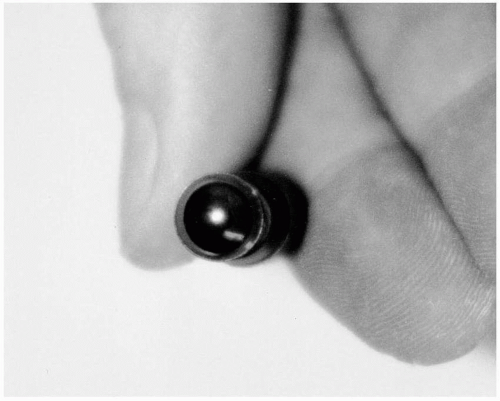
▪ FIGURE 9.2 Centered lens on a suction cup.
▪ LENS ATTACHMENT DEVICES
Holding the contact lens firmly with good centration without altering the lens parameters is crucial for all modification procedures. The most common types of lens holders include the suction cup, concave and convex tools incorporating double-sided tape, and spinners.
Most modification procedures involve the use of a suction cup as a lens holder. It is very helpful to use a suction cup that has interchangeable ends, such as the R & F Stronghold suction cup (DMV Corporation), so that both the concave and convex surfaces of the lens may be attached. It is suggested that though the concave and convex ends can be reversed, two separate holders are used to allow easy conversion from one to another. DMV now offers largerheaded suction cup tips for both convex and concave surfaces, providing more stability of holding increasingly more common larger GP lenses. The suction cup should be wet when the lens is attached, and special care should be taken to ensure lens centration (Fig. 9.2). Failure to center the lens will result in an oval optical zone diameter and uneven edge or surface polishing and will possibly compromise the lens optics.4 Minimum pressure should be used during application to prevent lens warpage. The suction cup should be held by the operator as close to the lens as possible to impart maximum control during the modification process.
Spinner tools are very beneficial for certain procedures requiring care in maintaining optical quality, such as front surface polishing and power changes. The exact style of spinner may vary, but all types work similarly. Most utilize a suction cup for lens attachment, which is preferable over one requiring double-sided tape. Double-sided tape often leaves a residue on the surface of the lens that must be removed by a compatible solvent. Once the lens is attached to the spinner, it is free to spin along with the spindle while the handle is held stationary. This allows power changes or polishing to be performed slowly and evenly, resulting in little or no optical distortion.
▪ OTHER EQUIPMENT
Several accessories are required in addition to the modification unit and lens attachment devices, including radius tools, polishing sponges, and polish (Table 9.1). The radius tools used for polishing and grinding are often included with the unit and commonly attach to the spindle by a form fit. The tool contains a tapered hole drilled along its axis that matches the tapering of the spindle. Friction then holds the tool in place as it is spinning. Although some tools are interchangeable with other units, taper size may vary for both units and tools. It is important to keep in mind that the tapers must match exactly. Incorrect taper size can result in tool wobble and improper modification. Some Contact Lens Manufacturers Association (CLMA) Laboratories where you can obtain modification equipment are listed in Table 9.2.7
TABLE 9.1 IN-OFFICE MODIFICATION EQUIPMENT
Required
Modification unit (variable speed or low single speed)
Edge and surface sponge polishing tools
Suction cups
Polish
Strongly Recommended
7× or 10× magnifying loupe
CLEPA or projection magnifying device
Recommended
Suction cup spinner
Radius tools
90-degree anterior bevel cone tool
CLEPA, contact lens edge profile analyzer.
The amount of cost for modification equipment varies depending on the number of procedures that are performed. For basic edge and surface polish procedures, many laboratories have economical packages ranging from $225 to $350.8 This typically includes a single-speed modification unit in addition to sponge and/or velveteen tools for polishing procedures. Suction cups and polish are also typically provided. A deluxe package (often $300-$500) allows the practitioner and/or staff to perform peripheral curve procedures such as blending and flattening, in addition to changing the power of the lens. This package typically includes a suction cup spinner for polishing and repowering, radius tools for peripheral curve procedures, a 90-degree anterior bevel cone tool for thinning the edge, and possibly a 7× magnifying loupe and/or a diameter gauge. As most CLMA laboratories either manufacture or distribute modification equipment, it is recommended to contact a local laboratory to determine if it provides modification equipment and, if so, what types of packages are available.
TABLE 9.2 WHERE TO OBTAIN MODIFICATION EQUIPMENT
MANUFACTURER
HOW TO CONTACT
EQUIPMENT/SUPPLIES
Advanced Vision Technologies
kdpcl@aol.com
Units and all tools
Boston/Bausch & Lomb
www.bausch.com
Polish
Conforma Contact Lenses
info@conforma.com
Units and all tools
DMV Corporation
www.dmvcorp.com
Suction cups
Lamba Polytech
ChrisJ@lambapolytech.co.uk
Units and all tools
Larsen Equipment Design
www.larsenequipment.com
Units and all tools
Polychem
PolychmUSA@aol.com
Units, tools, and polish
Valley Contax
(800) 547-8815
Units and all tools; polish
Modified from DeKinder J, Bennett ES. Equip yourself for modifying GP lenses. Contact Lens Spectrum 2005;20(2):48.
▪ POLISHING COMPOUNDS
The importance of polishing compounds used for modification should not be overlooked. Liberal use of polish specifically designed for GP lenses is necessary for all modification procedures. These solutions contain a mild abrasive—typically a grit aluminum base—that erodes lens material along with surfactants and detergents to lubricate and cool the lens during modification. They all appear to be successful in modifying GP lens materials. One study evaluated the effectiveness of seven commonly used polishes in repowering GP lenses.9 The polishes used included the following premixed liquid solutions: Boston White Finishing Polish (Polymer Technology Corporation, Wilmington, MA), Evergreen (R & F Products, Denver, CO), Mirapolish (ABBA Optical, Stone Mountain, GA), Nu-Care 2000 (Polychem, Gaithersburg, MD), and Sil-O2-Care (Polychem, Gaithersburg, MD). Two dry powder polishes were used (which can be mixed with water or saline): Al-Ox 721 (Transelco Ferro, Cleveland, OH) and X-Pal (Davison Chemical, Chattanooga, TN). It was found that all seven polishes were effective in adding 0.50 D of power to a 92-oxygen permeable (Dk) GP lens material. The powder forms were faster, taking 35 to 40 seconds, whereas the premixed solutions took up to 2½ minutes to add the desired amount of power. Therefore, it is advisable to practice with a particular polishing compound to ensure predictable results with future modifications. Products containing ammonia are not suitable for use with GP lenses since they can adversely affect surface wettability. Silvo was a popular polish with polymethylmethacrylate (PMMA) lenses, but it contains ammonia and therefore is not recommended for GP lenses.
▪ MODIFICATION PROCEDURES
Introduction
It is important to obtain some baseline parameter information on the lenses before performing any modification procedure. An educated decision about how to modify a lens can only be made after first knowing what the specifications are. Be sure to record all verifications of the optical and structural quality of the lens before beginning any procedure since modification of one parameter can often affect another.
Obtaining the original specifications of the lens is very beneficial. It is, therefore, important to verify parameters of all new lenses from the laboratory before they are dispensed to the patient. This information becomes quite pertinent should the lens need modifying in the future. Note that some laboratories still measure front vertex power instead of back vertex. It becomes critical to know which was used when working with aphakic contact lenses, where the power can vary up to 2 D depending on the method.
Blending/Flattening Peripheral Curves
In-office blending and/or flattening of the peripheral curve radii allows the practitioner to adjust the fit of the lens and immediately observe an improved lens-to-cornea fitting relationship and, more than likely, an improvement in lens performance. If limited lens movement is present with the blink accompanied by tear stagnation, blending the junctions between peripheral curve radii should result in increased movement and better tear exchange. In addition, blending the peripheral curve junctions can also increase patient comfort.10 If peripheral and/or midperipheral bearing is present, seal-off and possibly lens adherence—more common in GP extended wear—can result. Once again, only limited, if any, tear exchange will result. Flattening the peripheral curve radius should resolve the problem and result in greater clearance peripherally. If these problems are not promptly managed, edema and dryness-related problems can result.11
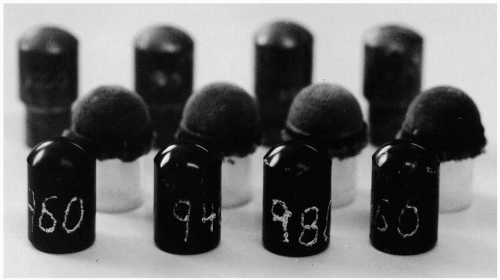
The radius tools used to apply peripheral curves are customarily made of brass, plastic, or Delrin (Conforma). Some brass tools may or may not be impregnated with an abrasive, such as diamond dust (Fig. 9.3). These diamond-coated tools are used to abruptly change the existing curve to re-establish a desired radius of peripheral alignment. The radius blending tools are normally available in 0.10- to 0.25-mm steps, with a minimum set consisting of the following radii: 7.50, 8.0, 8.5, 9.0, 10.50, and 12.00 mm. A more complete set for advanced modification could possibly include 7.6, 7.8, 8.0, 8.2, 8.4, 8.6, 8.8, 9.0, 9.3, 9.6, 10.0, 10.5, 11.2, 12.0, 12.5 and 13.0 mm.4 Steeper tools such as 6.0, 6.25, 6.5, and 6.75 mm may be required and prove very useful in modifying steeper keratoconus designs. Radius diamond-coated tools are fairly expensive and are usually intended in grinding the outer peripheral curve. Hard-pad radius tools, though slower to change radii than a diamond radius tool, are recommended when establishing a change in the secondary or intermediate radii.
▪ FIGURE 9.3 Radius tools.
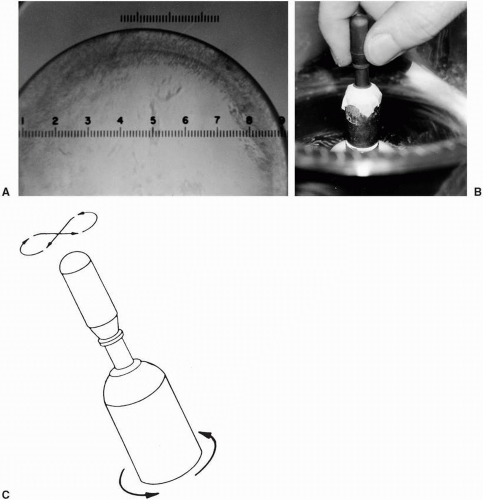
A peripheral curve is applied to a lens modified by first attaching the lens to a suction cup or spinner tool, concave side out. The appropriate radius tool is chosen, and either a square of waterproof adhesive tape or a precut velveteen soft pad or cotton hard pad is attached smoothly over its surface. Some practitioners prefer the softer velveteen pads for obtaining a more gradual peripheral curve or for blending. The soft pad will create a smoother blending area, whereas the hard pad will create a more abrupt change where contacted with the contact lens. The velveteen pad is approximately 0.4 mm thick, and the adhesive tape is 0.2 mm; therefore, either pad on a radius tool will actually be a flatter radius than the actual tool radius. Note: It is recommended to never use a radius blending tool with a soft or hard pad no less than 0.50 mm flatter than the central base curve of the contact lens to avoid pad marks in the optical surface area of the base curve. If a 9.0-mm curve is needed, an 8.6-mm tool should be used with velveteen and an 8.8-mm tool with adhesive tape.6
The soft pad on the radius tool is first thoroughly made wet with fresh clean water, and then the tool is placed on the spindle, the motor is turned on, and polish is applied to the tool surface.4 Note that the appropriate polishing compound must be applied to the tool before use and throughout the modification procedure. In addition, the tool surface and polish must be kept free from all dirt and other abrasive materials, or scratches will appear on the posterior peripheral lens surface (Fig. 9.4A). Once the spindle is spinning, the lens is held lightly against the tool with the concave surface facing the tool (Fig. 9.4B). If a suction cup is used, the lens should be held at a 30-degree angle to the vertical, and the entire outer edge should be in contact with the covered tool at all times. The suction cup is rotated smoothly and evenly with the fingers in the opposite direction of the spindle rotation. Since the spindle rotates clockwise in most units, the suction cup should be turned counterclockwise. Alternatively, rather than holding the suction cup at a 30-degree angle, the lens may be held vertically to the radius tool and rotated in a figure-eight design (Fig. 9.4C). The lens should be lifted from the tool every 5 to 10 seconds and a drop of polish added to the surface every time the lens is touched to the tool. Insufficient polish, as well as excessive pressure, can lead to heat build-up and lens damage.
This procedure may also be performed utilizing a spinner tool. The lens is centered on the spinner, again with the concave surface facing the tool. The spinner is held at a 45- to 60-degree angle off the center of the radius tool. The lens must be spinning at all times during the procedure and polish continually applied as previously discussed.
▪ FIGURE 9.4 (A) “Bull’s eye” effect from scratches on the posterior lens surface caused by excessive pressure or dirty polish. (B) Peripheral curve application with lens and suction cup. (C) Figure-eight design is used to apply peripheral curve.
Practice and experience are necessary to obtain confidence in producing consistent results with peripheral curves. The amount of bevel obtained depends on numerous factors, including spindle speed, pressure of the lens against the pad, consistency of the polish, and flatness of the radius tool (in relation to the base curve of the lens). After a little experience, the operator will be able to determine quickly the length of time needed to produce a peripheral curve of desired radius and width. It is recommended that records should be made of all adjustments made to the lenses, including peripheral curves applied, spindle speed, and time for each curve.12 These records will enable the operator to duplicate a lens adjustment, if necessary, in the future.
Only gold members can continue reading. Log In or Register to continue