10
Complications of Cochlear Implant Surgery
Noel L. Cohen and J. Thomas Roland Jr.
Surgical complications related to cochlear implants are classified as device related or medical-surgical. Device-related complications are mostly concerned with malfunctions and failures of the device or its various components, and may be due to faulty design, failure of electronic circuits or components, or external trauma. The trauma may have been caused by a blow to the head, a fall, or exposure to excessive current (as in a powerful electrostatic discharge or lightning strike). Although these complications are not caused by a medical or surgical condition, they require replacement of the device, and, therefore, additional surgery. Device failure, regardless of the underlying cause, is by far the most common reason for reimplantation.
Medical complications are not the result of conditions occurring due to the surgery or of the device itself. Otitis media may lead to infection under the flap, in the middle ear, or even the inner ear. Meningitis may also occur following cochlear implantation.
Surgical complications result directly from the operation itself, are largely avoidable, and may or may not compromise device function and the ability of the recipient to use or benefit from the implant. Surgical complications of multichannel cochlear implants are largely related to the incision and flap erosion and infection, electrode insertion, device migration, and facial nerve injury. These all have been steadily diminishing in frequency over time, in both adults and children.1–6
The avoidance of surgical complications begins with the thorough evaluation of the patient, continues through careful planning of the operation, and ends with meticulous surgery and postoperative observation.7 A major goal of the evaluation process is to eliminate inappropriate candidates, such as those with useful hearing, active infection in the ear, or absence of a cochlea or eighth nerve. Anesthesia risk must also be considered. High-resolution computed tomography (CT) scanning and, when indicated, magnetic resonance imaging (MRI) are critical in the evaluation of the temporal bone anatomy and aid in both the evaluation of candidacy (e.g., aplasia of the cochlea) and surgical planning (e.g., cochlear dysplasia, aberrant facial nerve).
Whereas CT displays the anatomy of the mastoid, cochlea, vestibular apparatus, and associated structures such as the vestibular and cochlear aqueducts, the MRI shows soft tissue structures such as nerves and fluid such as cerebrospinal fluid (CSF) and perilymph/endolymph.8,9 By thoroughly planning the surgery, especially in the potentially difficult case, many complications can be avoided. A special group within this category is the patient with a higher than average risk of meningitis following cochlear implant surgery.10 The risk factors to be considered are children below the age of 24 months, adults above 65 years of age, those individuals with a prior history of meningitis or having a diminished immune capacity, and the presence of a dysplastic cochlea in the ear to be implanted.
These patients should be fully vaccinated against meningitis prior to surgery. In the case of children, the parents must be informed about the risk preoperatively. Meticulous surgical technique also is of major importance in this regard, in avoiding not only intraoperative problems but also postoperative events. Finally, careful follow-up is required to identify problems early and avoid true complications.
♦ Avoiding Complications During Surgery
Positioning and Anesthesia
The patient is placed on the operating table in the supine position, with the head turned away from the surgical site.1,7 Facial nerve monitor electrodes are placed adjacent to the mouth and eye. Care should be taken that only short-acting paralytic agents are used for intubation to ensure that the monitor records any stimulation of the facial nerve. It is particularly important to use the monitor in operating on a dysplastic temporal bone, or in revising a case when the prior surgery was performed elsewhere.
Perioperative antibiotics are administered, in the form of a first-generation cephalosporin given just prior to incision. If the surgery should last more than 4 hours, a second dose is given. Perioperative antibiotics do not continue past this point unless a drain is placed or there is some reason to suspect an active infection. In this latter case, the implantation may need to be deferred.
Prep and Drape
A minimal amount of hair is shaved behind or above the ear to accommodate the incision. Often, in small children, no shave is needed. The area is then prepped and draped in routine fashion.
Incision
Planning the incision is critical for several reasons: it is imperative that the implants not abut the behind-the-ear speech processor commonly used (Fig. 10–1). The position of the device is chosen so that it lies on a relatively flat area of the skull with the takeoff of the electrode above the canthomeatal line. For adults, the long axis is at ±45 degrees, but for small children it is more vertical. The incision must permit the safe insertion of the implant, and the flap outlined by the incision must have an adequate blood supply to prevent necrosis and breakdown. Because most surgeons have been using smaller incisions with excellent blood supply, flap-related complications have greatly diminished in frequency.5,7 The use of infiltration with dilute (1:100,000 or 1:200,000) epinephrine and the mono-polar cautery to make the incision limits blood loss during this phase of the surgery.
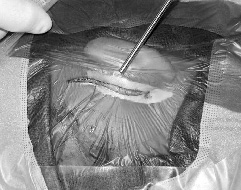
Figure 10–1 Placement of hardware and incision. The device is placed posterior to the behind-the-ear (BTE) speech processor and above the canthomeatal line. The incision is drawn and the center of the well is marked. The incision is usually made with the cutting current.
Raising the flap must also be done carefully, especially in the small child and the older (female) adult. The surgeon must dissect gently in the avascular plane deep to the scalp, avoiding drying of the flap and excessive retraction. When it is necessary to thin the flap of a heavy-set adult, care must be taken not to perforate the scalp or expose the roots of the hair follicles. Using the current short incision, starting at the mastoid tip, ascending behind the postauricular crease to the upper attachment of the auricle, then a short distance posterosuperior, we find that barbless fishhooks give sufficient retraction, and flap problems are routinely avoided. After retracting the flap posteriorly, we then raise a large anteriorly based Palva flap, exposing the areas for both the mastoidectomy and the well (Fig. 10–2). The flap will be closed over the proximal electrode at the end of the procedure.
We do not advocate the “minimally invasive” technique11–13 since our standard incision for small children requires little or no shave, measures 4.0 to 4.5 cm in length, and permits both the drilling of a well and the tying down of the device. We do not think that any perceived cosmetic advantage should sacrifice safety.
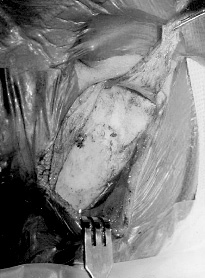
Figure 10–2 The posteriorly based skin flap and anteriorly based Palva flap are elevated and retracted with barbless fish hooks.
The Well or Recess
The well may be created either prior to or following the mastoidectomy. We prefer the former because the location of the well or recess is very important as it determines the location of the device itself. Marking the center of the well with a single drop of methylene blue injected transcutaneously through the scalp prior to the incision simplifies this step. When creating the well, drilling down to dura is necessary in the case of a small child to lower the profile of the device as much as possible. The bone is thinned, and drilling to dura peripherally creates one or more bony islands. It is necessary to switch from cutting to diamond burrs to avoid trauma to the dura. If the dura is penetrated, it is closed by suturing a small piece of fascia or pericranium into the defect. The well for the Advanced Bionics (Valencia, CA) 90 K and the Nucleus 24 K and Contour devices (Cochlear Corporation, Sydney, Australia) is drilled to fit the protruding portion of the titanium case, including the electronics. Some surgeons drill the well sufficiently large for very small children so that the entire forward portion is recessed. The well for the Med-El Combi 40+ (Innsbruck, Austria) accommodates the entire ceramic case. After the well is created, tie-down holes are drilled in the adjacent bone to fix the device to the bone and to lower the profile as much as possible to diminish the chance of damage from external trauma (Fig. 10–3). This is particularly important in implanting a small child.
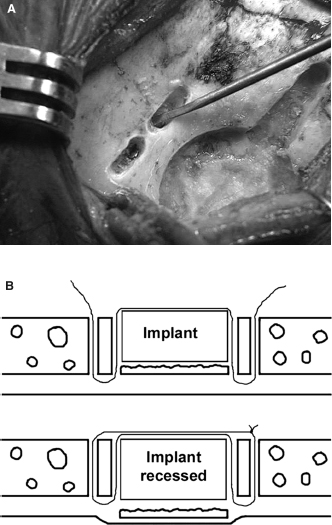
Figure 10–3 Well and tie-down holes. The well is drilled for the electronics of the Nucleus and Advanced Bionics devices and the entire body of the Med-El implants. (A) Tie-down holes for the Nucleus and ABC devices are drilled obliquely, whereas those for the Med-El devices are drilled vertically, and (B) a “sling” suture is placed.
The Mastoidectomy
A simple mastoidectomy is performed in routine fashion, except that the superior and posterior cortex is not saucerized. Allowing some overhang creates an edge, under which the proximal electrode is placed. This keeps it below the level of the surface of the skull and eliminates tension, which might lead to electrode extrusion. For adults and older children with very well pneumatized mastoids, it is not necessary to drill out the periphery of the bone, such as a retrosigmoid, mastoid tip or zygomatic root cells. It is necessary to visualize the incus short process and the lateral canal as well as to thin the posterior external auditory canal wall, because these structures permit identification of the facial nerve and allow access to the facial recess. A channel is then drilled between the well and the mastoid cavity, sufficiently deep to allow the electrode or electrodes to lie deep to the surface of the bone, and in a gentle curve without angles or kinks.
The Facial Recess (Posterior Tympanotomy)
Opening the facial recess (performing the posterior tympanotomy) requires care since injury to the facial nerve, external auditory canal, and annulus of the tympanic membrane must be avoided. The facial nerve should routinely be identified but not exposed, whereas the chorda tympani may occasionally be sacrificed if the recess is very narrow. If the facial nerve has been exposed, every effort should be made not to cause either direct instrumental injury or thermal damage by the drill shaft while performing the cochleostomy. If the facial nerve has been exposed on its anterior surface, it should be protected at the end of the surgery by placing a piece of Silastic sheeting between the electrode and the nerve. If the anatomy is difficult or the surgeon unsure or inexperienced, the facial recess may be opened from above by sacrificing the incus bar and removing the incus. If the external auditory canal wall is perforated, it should be reconstructed with bone and fascia prior to the end of surgery. This will help to prevent a retraction pocket in the future. The annulus and drum should also be grafted with fascia and, if they have been injured, supported from within by Gelfoam pledgets.
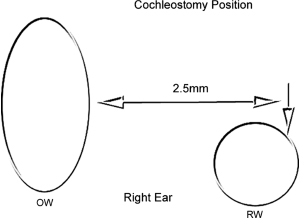
The facial recess should be wide enough so that the round window niche, stapedius tendon, and posterior promontory are visualized. Some surgeons remove the bone forming the roof of the round window niche to visualize the round window membrane itself.