Chapter 2 Myringoplasty, Meatoplasty, and Canalplasty The term tympanoplasty implies reconstruction of the middle ear hearing mechanism with or without tympanic membrane grafting. Grafting is impossible without sufficient visualization of the entire tympanic membrane with one position of the microscope. This is achieved with meatoplasty and canalplasty. Meatoplasty is defined as the enlargement of the lateral cartilaginous portion of the external auditory canal (EAC). Canalplasty consists of widening the bony medial portion of the EAC. Grafting of the tympanic membrane is generally called myringoplasty when the middle ear cavity is not entered and tympanoplasty when the surgeon works also in the middle ear in the presence of an intact ossicular chain. In practice, only small perforations may be closed without extensive work in the middle ear. Therefore, in this atlas, the term myringoplasty is used for all reconstructions of the tympanic membrane that are not associated with ossiculoplasty. A synonymous term would be tympanoplasty without reconstruction of the ossicular chain. The procedures used for meatoplasty and canalplasty will not be described separately but in conjunction with the different surgical steps of the retroauricular approach (see Chapter 3, pp. 24 and 39). With this approach surgery is performed through an ear speculum in the external canal. The transcanal approach is indicated when the EAC canal is sufficiently wide to allow complete visualization of a posterior perforation. The approach cannot be used when the anterior margin of the perforation is obscured by the overhanging canal wall (Fig. 3A). For this approach, a small incision is made between the tragus and the helix. The entrance of the canal is enlarged with specially designed endaural retractors (1-I). A posterior overhang of bone can be eliminated with a burr (broken line). A more anterior surgical view is achieved than with the transcanal approach. However, most anterior perforations are still obscured by the anteroinferior overhang of the bony external canal (Fig. 3B). Fig. 3A This approach cannot be used for an anterior perforation that is obscured by the overhanging canal wall. Fig. 3B A posterior overhang of bone can be eliminated with a burr to provide a more anterior surgical view than the transcanal approach. However, most anterior perforations are still obscured by the anteroinferior overhang of the bony external canal. With this approach the pinna and the attached retroauricular tissues are reflected anteriorly. Removal of the overhanging canal walls (canalplasty, broken lines) provides for complete exposure of the anterior edge of the tympanic membrane (Fig. 3C). Fig. 3C The retroauricular approach allows a sufficient canalplasty for visualization of all anterior perforations. The transcanal approach is mostly used for repairing larger acute traumatic perforations (Fig. 4A). The endaural approach is selected for posterior perforations (Fig. 4B) and the retroauricular approach for anterior perforations whose margins cannot be seen entirely through the intact external canal (Fig. 4C). Fig. 4 Two techniques are used for grafting the tympanic membrane: 1. Combination of anterior tympanic membrane and bone underlay and posterior bone overlay. 2. Total bone overlay. The terms underlay and overlay are used in this book in a different sense than usual and refer to the position of the graft in relation to bone and not only to the tympanic membrane. Overlay means that the graft has been placed over the bony tympanic sulcus or over a bony ledge newly carved into the bone when the former is absent (Figs. 5 and 6). Underlay defines the position of a graft under the tympanic membrane and surrounding bone. Usually it is an anterior underlay with a fascial graft situated under the anterior remnant of the drum (including the anterior annulus) and kept in contact with the lateral bony wall of the protympanum. The overlaid fascia is completely supported by the new or old tympanic sulcus and is locked in position by a remnant of the tympanic membrane whenever the latter is still present (Figs. 5 and 6). The presence of an anterior remnant of the tympanic membrane (at least of the fibrous tympanic annulus) is required for this type of fascial graft. Anteriorly, the graft is placed under the anterior remnant of the tympanic membrane and under the lateral wall of the protympanum. Posteriorly, the graft is positioned over the posterior tympanic sulcus and under the remnant of the tympanic membrane. With the exception of perforations limited to the anteroinferior quadrant, the graft lies under the malleus handle. This technique is used when no remnant of the tympanic membrane is present. A new bony sulcus is drilled to support the fascia at the lateral opening of the tympanic cavity. The graft rests over the sulcus and underneath the malleus handle. The edges of the graft are covered along the canal wall by meatal skin. Fig. 5 The graft is placed anteriorly beneath the anterior remnant of the tympanic membrane and beneath the lateral wall of the protympanum, and posteriorly above the posterior tympanic sulcus. The graft lies beneath the malleus handle. Fig. 6 The graft rests above the anterior and posterior tympanic sulcus and beneath the malleus handle. The edges of the graft are covered by meatal skin. The transcanal approach is mostly used as an emergency procedure for the repair of large acute traumatic perforations of the tympanic membrane.
General Considerations
 Definitions
 Surgical Approaches
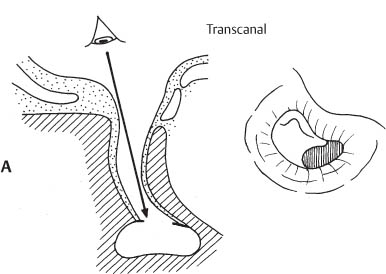
 Transcanal Approach
 Endaural Approach
Transcanal approach for myringoplasty
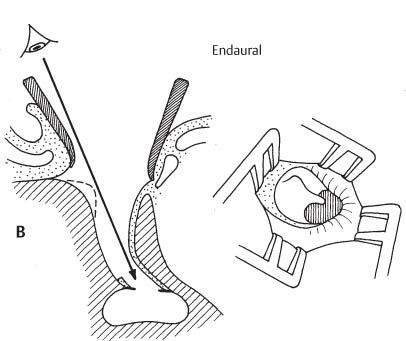
Endaural approach for myringoplasty
 Retroauricular Approach
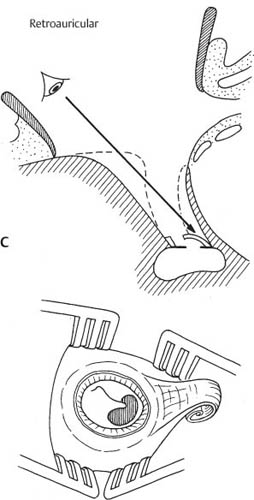
Retroauricular approach for myringoplasty
 Selection of Surgical Approach
Selection of surgical approach for myringoplasty
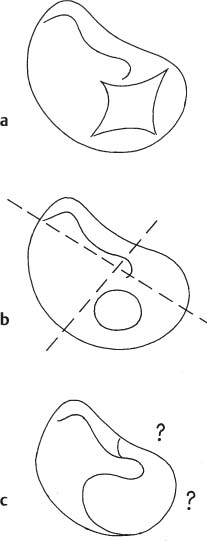
a Acute traumatic perforations are repaired through a transcanal approach.
b Posterior perforations are adequately visualized by an endaural approach.
c Anterior perforations with margins that cannot be seen entirely through the intact external canal require a retroauricular approach.
 Grafting Technique
 Definition of Underlay and Overlay
 Combination of Anterior Underlay and Posterior Overlay (Fig. 5)
 Total Overlay (Fig. 6)

Combination of anterior underlay and posterior overlay of the temporal fascia
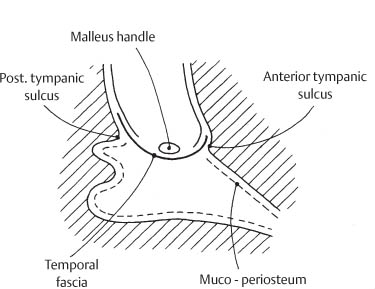
Total overlay of the temporal fascia
Specific Surgical Techniques
 Transcanal Approach
 Surgical Technique
Surgical Highlights |
|
 Local anesthesia
 Use of the ear speculum
 Outfolding of perforation margins
 Intra- and extratympanic fixation of repositioned perforation margins
 Surgical Steps
For other applications of the transcanal approach see page 126.

Fig. 7A
Use of the ear speculum
The traumatic perforation is visualized through the ear speculum. No incisions are made in the EAC.
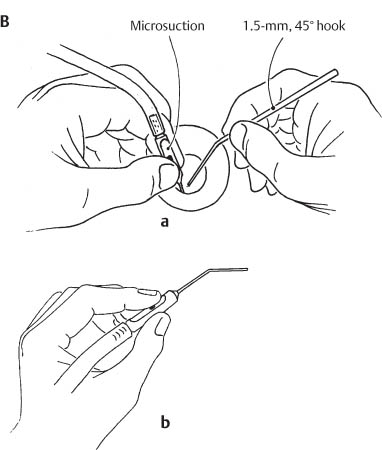
Fig. 7B
Fixation of the ear speculum
a The left hand holds the ear speculum between the index and third finger and the adaptor for microsuction cannula (22-I) between the thumb and index finger. The right hand carries the instruments needed to reposition the perforation margins (mainly a 1.5-mm, 45° hook [29-I]).
b The majority of surgeons control the vent opening of the adaptor for microsuction with the index finger.
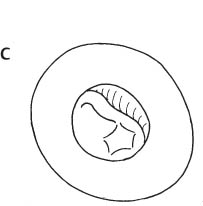
Fig. 7C
Exposure of the traumatic perforation
Note the infolded edges of the perforation which has the typical irregular shape.
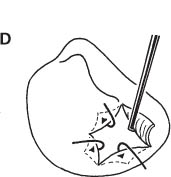
Fig. 7D
Outfolding of perforation margins
The edges of the perforation are out-folded using a 1.5-mm, 90° hook.
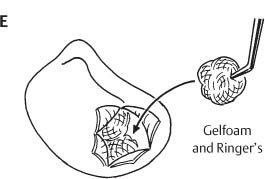
Fig. 7E
Intratympanic fixation of perforation margins
The outfolded perforation margins are kept in position by intratympanic Gelfoam pledgets soaked in Ringer’s solution.
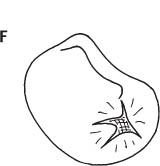
Fig. 7F
Intratympanic Gelfoam in place
Surgical site following introduction of the intratympanic Gelfoam pledgets.
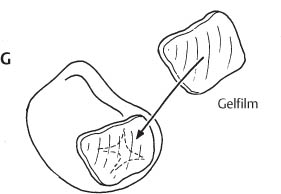
Fig. 7G
Extratympanic fixation of perforation margins
A piece of Gelfilm is placed briefly in Ringer’s solution and then used to stabilize the outer surface of the lacerated tympanic membrane. The external canal is packed with Gelfoam and antibiotic ointment (terracortril) gauze for 5 to 8 days. Antibiotic coverage is also given for 5 to 8 days.
 Endaural Approach
 Surgical Technique
This technique is used for posterior perforations with margins that can be clearly visualized through the EAC.
Surgical Highlights |
|
 Local anesthesia.
 Endaural incision.
 Refreshing of perforation margins.
 Elevation of tympanomeatal flap.
 Anterior fascial underlay.
 Posterior fascial overlay.
 Fixation of underlaid fascia with intratympanic Gelfoam.
 Surgical Steps
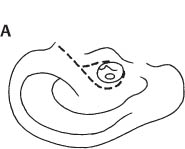
Fig. 8A
Endaural incision
The endaural incision is 5–10 mm long and is performed between the tragus and the crus of helix.

Fig. 8B
Tympanomeatal flap and refreshing of perforation margins
The skin incisions for the tympanomeatal flap are carried from the tympanic annulus at 7 o’clock and 12 o’clock in an ascending spiral fashion to meet the endaural incision. The anterior limb of the incision extends just anterior to the lateral process of the malleus. The edges of the perforation are refreshed with a small biopsy forceps (49-I) before the tympanomeatal flap is elevated (see also Fig. 11A).
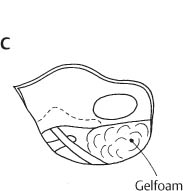
Fig. 8C
Intratympanic Gelfoam
Gelfoam pledgets soaked in Ringer’s solution are placed in the hypotympanum following elevation of the tympanomeatal flap. The mobility of the ossicular chain is checked at this stage and found to be intact.
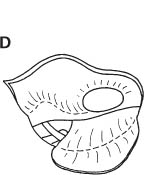
Fig. 8D
Anterior underlay of graft
Fresh tragal perichondrium (see also Figs. 56 and 57) is introduced beneath the perforated drum and above the posterior tympanic sulcus.

Fig. 8E
Repositioning the tympanomeatal flap
The tympanomeatal flap is placed back in its original position and secured with small pledgets of Gelfoam. The broken line shows the extent of the underlaid tragal perichondrium.
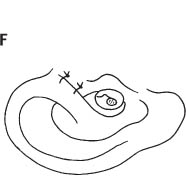
Fig. 8F
Wound closure
Two 3–0 Ethibond sutures are used to close the endaural incision.
 Retroauricular Approach
 Surgical Technique
The retroauricular approach is mainly used for anterior perforations with margins that are obscured by the overhanging canal wall. In most instances a canalplasty and, if needed, a meatoplasty are integral parts of the procedure. The elevation of an adequate meatal skin flap is a prerequisite for achieving an adequate canalplasty.
Surgical Highlights |
|
 General anesthesia.
 Retroauricular skin incision.
 Meatal skin flap.
 Canalplasty.
 Combined anterior underlay with posterior overlay grafting or total overlay grafting.
 Antrotomy and epitympanotomy (if needed).
 Transmastoid drainage.
 Surgical Steps
Fig. 9A
Skin incision
The retroauricular skin incision is carried out along the hairline and behind the mastoid tip. It is made only through skin, preserving the underlying fascia and periosteum.
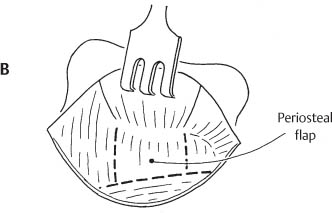
Fig. 9B
Periosteal flap
Following elevation of the skin, a retroauricular periosteal flap is formed. This flap will be repositioned and sutured to the surrounding soft tissues at the end of surgery. The periosteal flap may also be used to cover the posterior surface of the canal wall when a mastoidectomy is performed (see Fig. 80G).
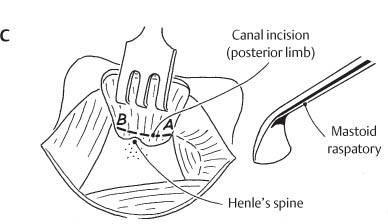
Fig. 9C
Exposure of the EAC
The periosteal flap is elevated from the bone with a mastoid raspatory (13-I). The posterior limb of the canal incision (A–B) is carried out with a No. 15 blade, remaining 2 mm deeper than the entrance of the bony external canal.
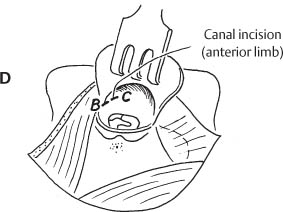
Fig. 9D
Exposure of the EAC (cont.)
The EAC is opened and the canal incision extended along the anterior meatal wall to the 2 o’clock position (B–C).
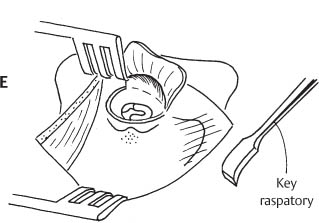
Fig. 9E
Exposure of the EAC (cont.)
The lateral canal skin is elevated with a Key raspatory (14-I). A superior Fisch articulated retroauricular retractor (3-I) is introduced.
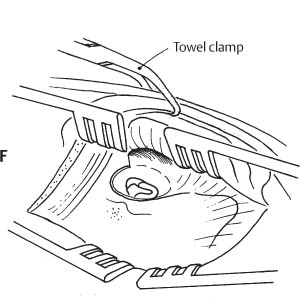
Fig. 9F
Exposure of the mastoid
A second inferior Fisch articulated retroauricular re-tractor (3-I) achieves exposure of the mastoid plane from the mastoid tip to the temporal line. The retroauricular soft tissues attached to the pinna are held anteriorly with a towel clamp. The figure shows the clamp through the pinna; however, it is preferable to attach it to the soft tissue of the wound. It is secured anteriorly to the surgical drape. The meatal skin flap is designed to give optimal exposure of the complete tympanic bone. The pedicle comprises the antero-inferior-lateral canal skin.
Note: details of meatal skin flap elevation are also shown in Figures 87G–L, pages 174, 175.
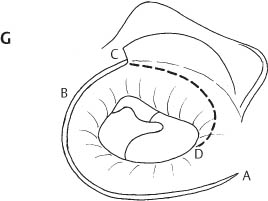
Fig. 9G
Meatal skin flap
The meatal skin is incised, forming an anterior ascending spire (D–C). Care should be taken to remain on the bone of the canal wall with the tip of the No. 11 blade (round scalpel handle [8-I]).

Fig. 9H
Meatal skin flap (cont.)
The meatal skin is elevated from the bone by means of the Fisch microraspatory (23-I, 24-I). The tip of the microraspatory should always remain in contact with the bone. Only small movements in the vertical and horizontal plane should be made. The skin is elevated under direct vision until the posterosuperior margin of the drum and the anteroinferior overhang of canal bone are exposed.
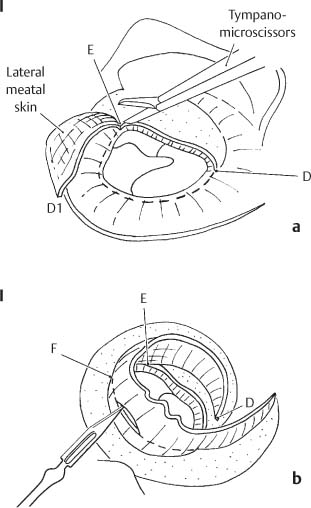
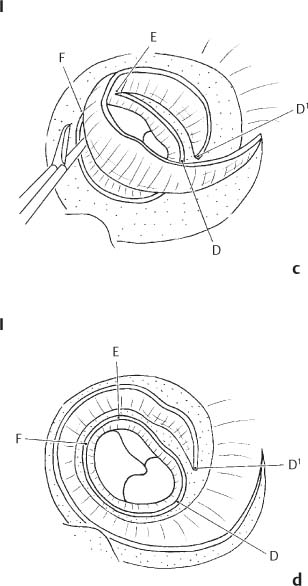
Fig. 9I
Meatal skin flap (cont.): circumferential skin incision
a The elevated meatal skin is cut just medial to the bony overhang with large and small tympanoplasty microscissors (52-I, 53-I) in a circular fashion, remaining 2 mm lateral to the tympanic annulus, until the tympanosquamous suture is met (D–E).
b The posterior limb of the circular incision is initiated posteriorly by cutting through the elevated meatal skin with a No. 11 blade carried by the rounded scalpel handle (8-I), remaining 2 mm lateral to the tympanic annulus.
c Small tympanoplasty microscissors (52-I) are used to connect the posterior and anterior limbs of the circular incision (F–E) along the superior canal wall.
d The circular incision is completed inferiorly reaching the point D, which is at the start of the first anterior ascending skin incision shown in Figure 9G.
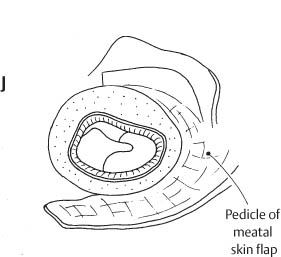
Fig. 9J
Meatal skin flap (cont.)
The inferiorly based meatal skin flap has been elevated out of the external canal. Note that the pedicle includes the skin covering the lateral surface of the tympanic bone.
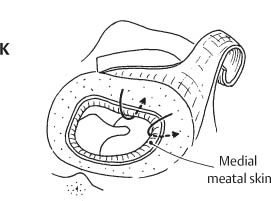
Fig. 9K
Meatal skin flap (cont.)
Surgical site following elevation of the meatal skin flap showing the overhanging bony canal wall (arrows). This figure does not show the exposure of the complete lateral surface of the tympanic bone (see Fig. 87K), which is essential to achieve an adequate anterior and inferior canalplasty.
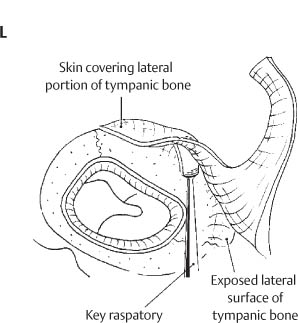
Fig. 9L
Exposure of the lateral surface of the tympanic bone
The lateral aspect of the anterior meatal skin flap is elevated with the Key raspatory (14-I) because with its larger surface it is better suited to separate the strong attachment of the soft tissues to the tympanic bone than the Fisch microraspatory. The Key raspatory is advanced over the lateral rim of the tympanic bone and moved anteriorly to elevate the tissue (see also Fig. 9Q, p. 23). It is imperative to keep elevation movements under good control (with two hands) to avoid laceration of the pedicle.
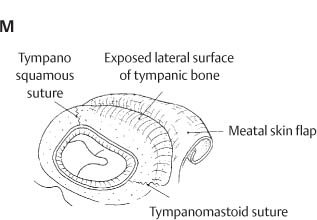
Fig. 9M
Exposure of the lateral surface of the tympanic bone (cont.)
The lateral rim of the tympanic bone is completely exposed between the tympanosquamous and tympanomastoid sutures.
Stay updated, free articles. Join our Telegram channel

Full access? Get Clinical Tree


