and Mitrofanis Pavlidis2
(1)
Department of Ophthalmology, Uppsala University Hospital, Uppsala, Sweden
(2)
Augencentrum Köln, Cologne, Germany
13.1 General Introduction
13.2.1 General Introduction
13.2.2 Practical Procedure
13.2.3 The Surgery: Figs. , , , and
13.2.4 Complications
13.2.5 FAQ
13.3.1 General Introduction
13.3.2 Instruments
13.3.3 Material
13.3.4 The Surgery
13.3.5 Complications
13.3.6 FAQ
13.4.1 General Introduction
13.4.2 Surgery
13.4.3 Complications
13.4.4 FAQ
Electronic supplementary material
The online version of this chapter (doi:10.1007/978-3-319-20236-5_13) contains supplementary material, which is available to authorized users.
Electronic supplementary material
for this chapter is accessible online at http://extras.springer.com/ by searching via the ISBN.
13.1 General Introduction
The key for the understanding of a rhegmatogenous detachment are the four Lincoff rules (Figs. 13.1, 13.2, 13.3 and 13.4). They indicate where the primary break is located with a very high probability [1]. More and more surgeons do not assess longer the retina before surgery because the assessment is much better under the microscope than before the slit lamp. This argument is absolutely true, but I highly recommend taking your time to assess only which type of detachment is present. There are only four types present and the first two types make 70 % of all cases. You do not need to assess the tears.
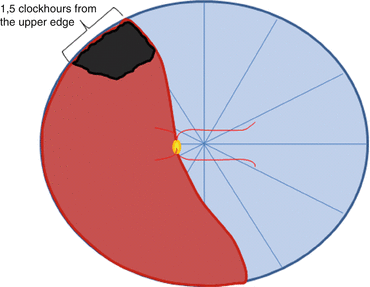
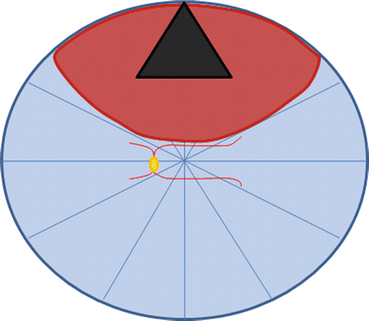

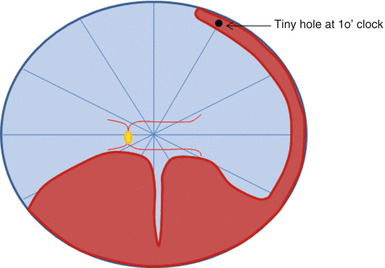
Fig. 13.1
Superotemporalor superonasal retinal detachment. The primary break is located within 1½ clock hours of the superior border of the detachment. Lincoff rule 1
Fig. 13.2
Superior or total detachment that crosses the 12 o’ clock meridian. The primary break is located within a triangle with the apex at 12 o’ clock and the sides between 10:30 (temporal side) and 1:30 (nasal side). Lincoff rule 2
Fig. 13.3
Inferior detachment. The primary break is located between the highest border of the detachment and 6:30. Lincoff rule 3
Fig. 13.4
Highly bullous inferior detachment. The primary break is located at 11 or 1 o’ clock. Lincoff rule 4
Why?
If you know which type of detachment is present, you know where the (primary) tear must be present.
But I will find this tear under the microscope.
Possibly not, if it is a minihole. A few examples, right eye:
1.
Detached retina from 6 o’clock to 11 o’clock. This is called a “superotemporal detachment”. The tear must be present 1.5 clock hours from the superior edge of detachment, i.e. in this case between 9:30 and 11:00 (Fig. 13.1).
2.
A detached retina between 8 o’clock over 12 o’clock to 3 o’clock. This is termed a “superior detachment” and the tear must be located within a triangle at 12 o’clock, in this case between 10:30 and 1:30 (Fig. 13.2).
Now you may argue that this was not difficult and you would solve these cases without preoperative assessment. Okay, probably, but the following case would be a hard nut if you did not assess the eye preoperatively:
3.
Initial assessment: Highly bullous inferior detachment from 4 o’clock to 8 o’clock. If you would start surgery now, you would search after a tear within this area. But there is no tear present there. Why? Because you missed that the detachment is highly bullous and inferior detachments are never highly bullous. So a different kind of detachment must be present. This is a Lincoff-type four detachment with a highly bullous inferior detachment and a very small tear at 11 o’clock. If you examine the fundus thoroughly, you will find a sinus in the periphery to a tiny hole at 11 o’clock (Figs. 13.3 and 13.4).
Conclusion: Make a short assessment of the detached retina before surgery so that you know which type of Lincoff-type 1–4 detachment is present.
Surgical Pearls No. 31
Treat the retinal tears and not the detachment. This sounds simple but often an overtreatment is performed. If you mend a hole in a bicycle tire then you only mend the hole and not the complete tire. The same principle applies to a hole in the retina. Treat only the hole edges and not the complete retina.
The next important question is: Which type of surgery for which type of detachment?
This depends from vitreoretinal clinic to vitreoretinal clinic. The aim is to attach the retina with as little surgery as possible. Our treatment algorithm is as follows:
# A detachment with retinal breaks between 7 o’clock over 12 o’clock to 5 o’clock and macula engagement we would operate with a vitrectomy (Fig. 13.5).
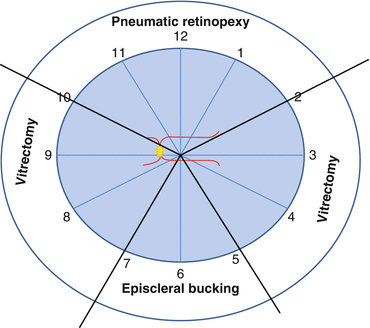
Fig. 13.5
Our treatment algorithm for retinal surgery depending on the location of the retinal breaks
# An inferior detachment with a retinal break between 5 o’clock and 7 o’clock, we would preferably operate with an episcleral buckling (Fig. 13.5).
Special cases are as follows:
# Children: Episcleral buckling. Children have excellent optical media allowing an easy assessment of the retina. The typical case is an ora dialysis.
# Young myopes: Episcleral buckling. Also these patients have excellent optical media which allow an easy retinal assessment. It may be advisable to use a microscope for suturing because the sclera is thin.
# Ora dialysis: Episcleral buckling. The surgical success rate for ora dialysis with episcleral buckling is 100 %. And surgery is simple. Place the sponge just below the muscle insertions and you will succeed (Fig. 13.6).
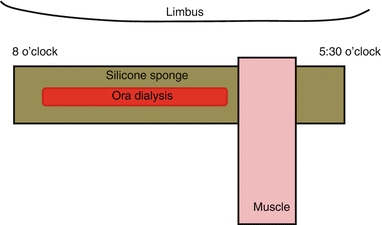
Fig. 13.6
Ora dialysis is often located in the inferotemporal quadrant. The silicone sponge has to be placed on the ora dialysis and under the inferior rectus muscle
# Detachment Lincoff rule 4: Episcleral buckling. This very special case which can be seen with approximately every 20th detachment is very easy to fix with an episcleral buckling and much less time-consuming than vitrectomy. Place a sponge on the minihole at 11 o’clock or at 1 o’clock. No drainage is necessary. The retina will be completely dry the next day demonstrating nicely the excellent pump function of the pigment epithelium (Fig. 13.4).
13.2 Pneumatic Retinopexy with BIOM
13.2.1 General Introduction
Video 13.1: Pneumatic retinopexy with BIOM
A focal detachment with a retinal break between 10 o’clock and 2 o’clock and attached superior arcade, we would operate with a pneumatic retinopexy (Fig. 13.8). There are two possible techniques: (1) binocular ophthalmoscopy with helmet or (2) the microscope with BIOM and insertion of a chandelier light. We describe the second method.
13.2.2 Practical Procedure
1.
Perform a cryopexy of the tear.
2.
Paracentesis and drainage of anterior chamber fluid.
3.
Inject 0.5 ml 100 % SF6.
OR
1.
Paracentesis and drainage of anterior chamber fluid.
2.
Inject 0.5 ml 100 % SF6.
3.
Perform laser coagulation 1 day later.
13.2.3 The Surgery: Figs. 13.7, 13.8, 13.9, 13.10 and 13.11

Fig. 13.7
Pneumatic retinopexy: insert a chandelier light
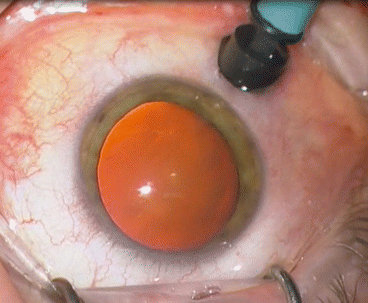
Fig. 13.8
Pneumatic retinopexy: the chandelier light is located on the opposite of the break
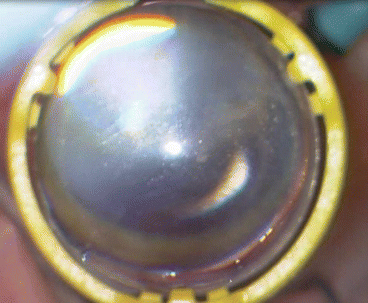
Fig. 13.9
Pneumatic retinopexy: flick in the BIOM
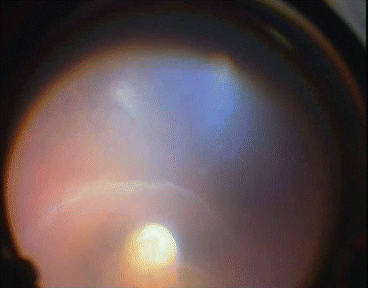
Fig. 13.10
Pneumatic retinopexy: freeze the retinal break
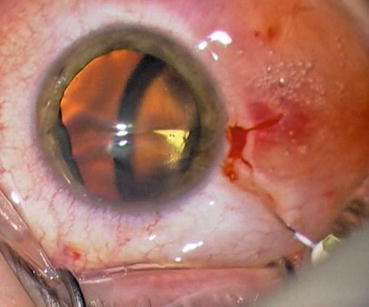
Fig. 13.11
Pneumatic retinopexy: perform a paracentesis and inject 0.5 ml 100 % SF6
1.
Insertion of a chandelier light
2.
Flick in the BIOM
3.
Cryopexy of the break
4.
Removal of the chandelier light
5.
Paracentesis
6.
Injection of air or gas
Insert the chandelier light on the opposite side of the break. Flick in the BIOM, localize the break and freeze the break edges with cryopexy. Remove the chandelier light. A suture (Vicryl 8-0) of the sclerotomy may be necessary. Perform a paracentesis and drain aqueous from the anterior chamber. Inject 0.5 ml 100 % SF6 into the vitreous cavity.
13.2.4 Complications
Infero(temporal) detachment, see Figs. 13.12 and 13.13; in most cases a tractive detachment. In this case, we would perform a 25G or even better 27G vitrectomy + laser + C2F6. In case of a rhegmatogenous detachment, we would prefer an episcleral buckling. This complication occurs mainly in young patients.
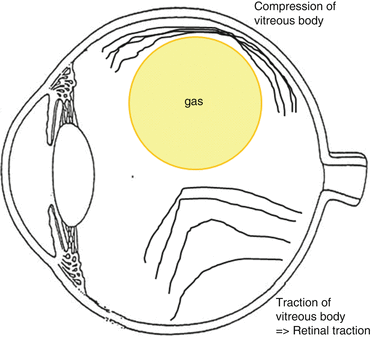
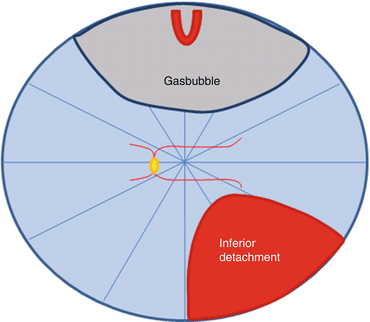
Fig. 13.12
Pneumatic retinopexy: the gas bubble displaces the superior vitreous body and may cause an inferior retinal traction resulting in a detachment
Fig. 13.13
Pneumatic retinopexy: the inferior detachment is often located in the inferotemporal quadrant
13.2.5 FAQ
It only occurs in the eyes with attached posterior vitreous. The gas bubble pushes the superior vitreous against the retina and pulls the inferior posterior vitreous resulting in an inferior detachment.
Remember:
Pneumatic displacement in old patients secondary to submacular haemorrhage never results in a retinal detachment because the posterior vitreous is detached.
How high is your success rate?
100 %, but remember: We use a very restricted indication with breaks only from 10 o’clock to 2 o’clock.
13.3 Episcleral Buckling for Detachment Surgery with BIOM
13.3.1 General Introduction
Video 13.2: Episcleral buckling with BIOM 1
Video 13.3: Episcleral buckling with BIOM 2
The complete surgery is performed with a microscope. We use the microscope with BIOM instead of a helmet with binocular ophthalmoscopy. For endoillumination a chandelier light is inserted.
Why? Today vitreoretinal surgeons are more used to the microscope. It is easier for a vitreoretinal surgeon to inspect the retina with a microscope than with binocular ophthalmoscopy. In addition, suturing of the silicone sponge is easier under a microscope than with a helmet. This is especially the case for long myopic eyes.
The episcleral buckling technique we apply is the minimal buckling technique according to Kreissig/Lincoff [1]. In short: (1) Cryopexy of the tear. (2) Application of a segmental buckle. Finish. No drainage necessary. No encircling band necessary.
Which silicone sponge?
There are many silicone sponges on the market. My department uses in almost all cases only two types of sponges:
1.
A normal sized (3.77 × 5 mm) silicone sponge. Our most common used silicone sponge. Indication: Ora dialysis, all normal size breaks. This sponge requires a 7 mm marking.
2.
A large (3.66 × 7.5 mm) silicone sponge. Less common used silicone sponge. Indication: Big breaks. This sponge requires a 9.5 mm marking.
13.3.2 Instruments
Here you will find all the details of our episcleral buckling instrument set, which we use at the University Hospital of Uppsala (Fig. 13.14). The instruments vary, of course, from hospital to hospital. The instruments in italic are absolutely necessary.
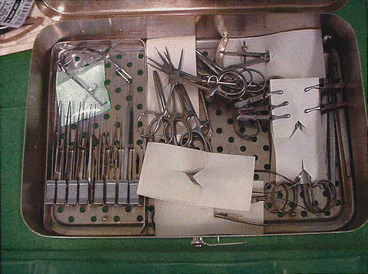
Fig. 13.14
Instrument set for retinal detachment from the University of Uppsala
Blepharostat
1× Williams open adult
Cannulas
1× rough curved
Forceps
2× anatomical forceps
2× forceps claw 1 × 2
1× forceps Bonn
Scissors
1 scissors eyes straight sharp
1 scissors eyes bent sharp
1 scissors straight Vannas Geuder 19760

Clamping scissors
2 clamping scissors bent Halsted
2 clamping scissors Hartman straight
1 clamping scissors Crile straight 14 cm
Needle holders
1 needle holder Barraquer without lock
1 needle holder Snowden–Pencer with lock
Orbital spatula
1 orbital spatula Helvestone
1 orbital spatula Sautter Geuder 15740 (Fig. 13.16)

Fig. 13.16
Orbital spatula Sautter, Geuder 15740
Knot holder
2 knot holder Rapp
Other
1 caliper Castroviejo straight 1–20 mm Geuder 19135, (Fig. 13.17)
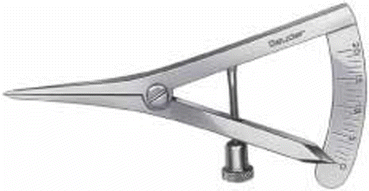
Fig. 13.17
Caliper Castroviejo 20 mm, Geuder 19135
1 ruler
4 clamp Diefenbach 2
1 depressor scleral with or without marker
1 strabismus hook Bonn 1 mm hole, Geuder 15821, (Fig. 13.18)

Fig. 13.18
Strabismus hook Bonn 1 mm hole, Geuder 15821
13.3.3 Material
1.
Silicone sponge: (Fig. 13.19)
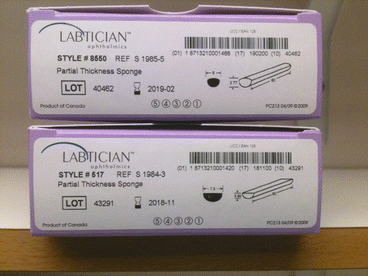
Fig. 13.19
Two different silicone sponges (Labtician, Canada)
1.
5 × 3.77 mm partial-thickness sponge (Labtician, Canada) OR
2
7.5 × 3.66 mm partial-thickness sponge (Labtician, Canada)
2.
Surgical skin marker with ultrafine tip (many companies, e.g.: 1456XL SR-100, Viscot Medical LLC, USA)
3.
Supramid suture 4-0 (REF SP151399, Serag Wiessner, Germany), alternative: polyester 5-0 (Alcon) (Fig. 13.20)
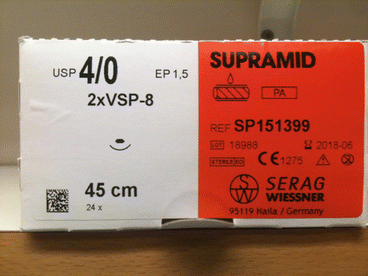
Fig. 13.20
Supramid 4-0 suture for silicone sponge, Serag Wiessner, Germany
4.
Silk suture 3-0 (Ethicon)
13.3.4 The Surgery
1.
180° limbal peritomy.
2.
3 traction sutures.
3.
Insertion of a chandelier light.
4.
Search for the retinal break with scleral depressor.
5.
Cryopexy of the break.
6.
Scleral marking of the break.
7.
Apply the sutures.
8.
Paracentesis, release aqueous from anterior chamber.
9.
Fasten the sponge temporarily.
10.
Inspect the retina.
11.
If sponge covers the break, fasten the sponge permanently. If sponge does not cover the break, then replace the sponge.
12.
Remove the chandelier light and suture the sclerotomy with a Vicryl 8-0 suture.
13.
Remove the traction sutures and close the conjunctiva with Vicryl 6-0.


