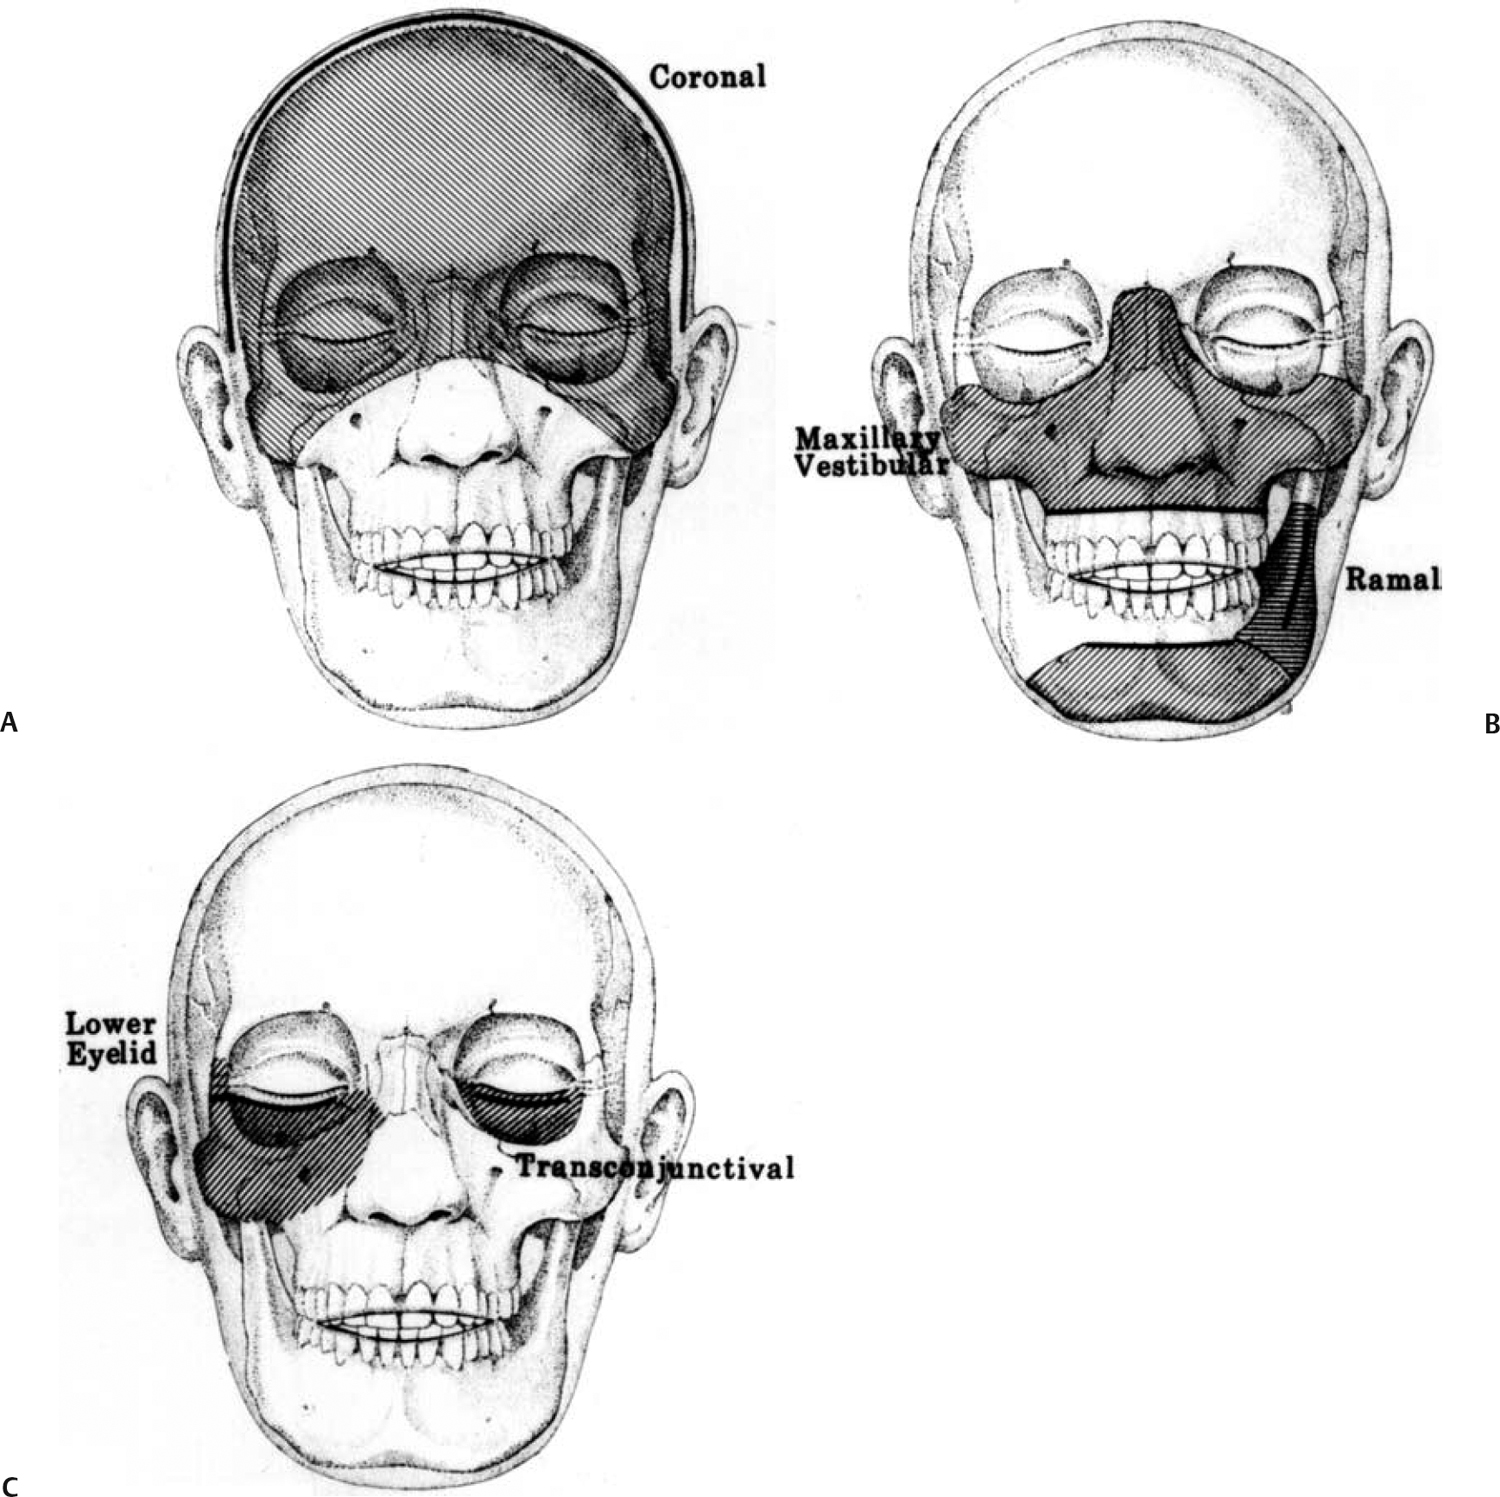
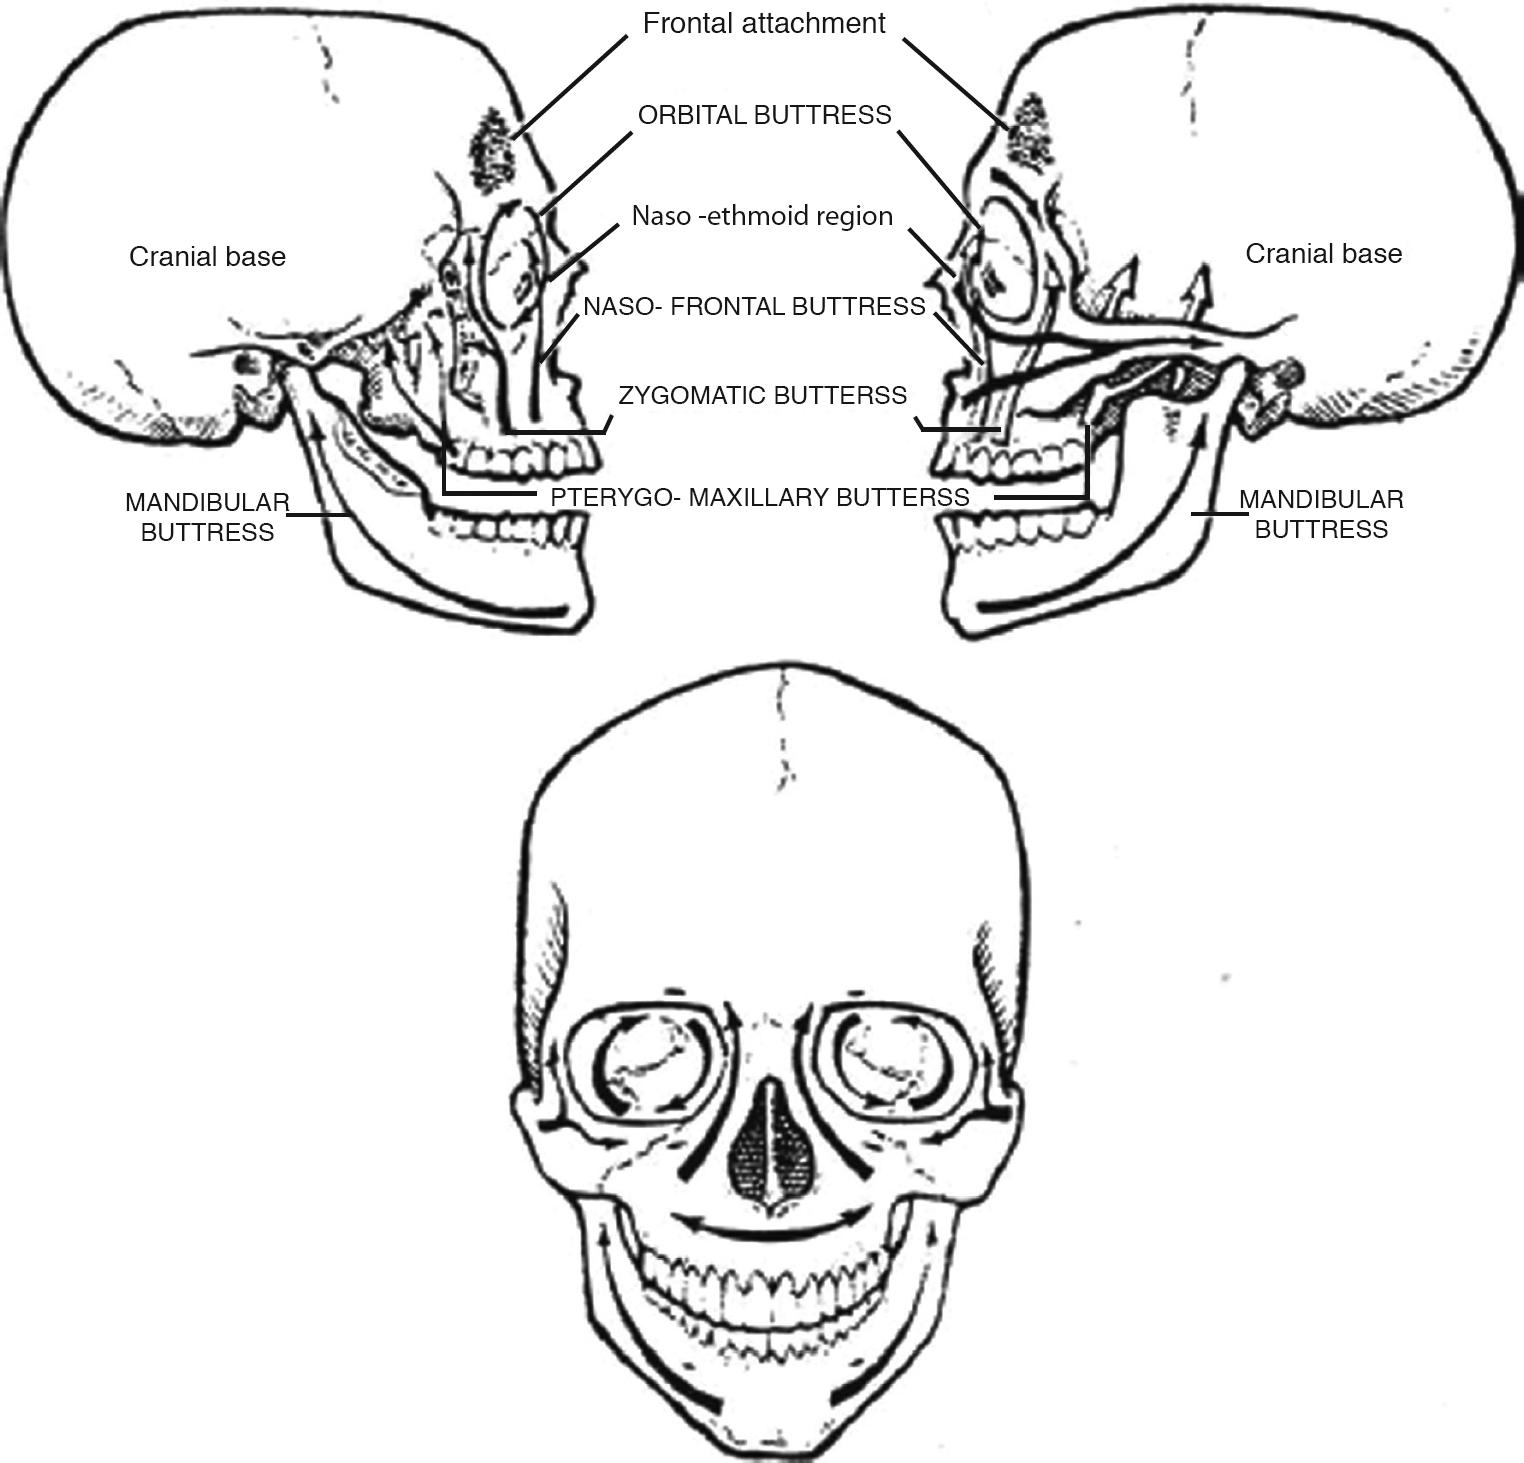
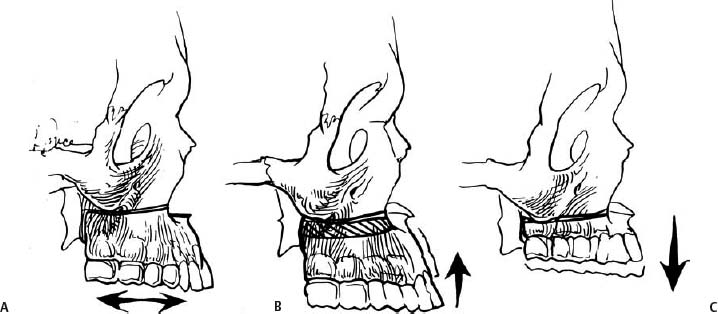
6 Maxillary Facial Fractures This chapter, which focuses on secondary reconstruction of post-traumatic maxillary deformities, is a continuation of the preceding chapter, which discusses management of post-traumatic mandibular abnormalities. Common post-traumatic deformities of the midface include enophthalmos, vertical ocular dystopia, malar flattening, telecanthus, collapse of the naso-orbito-ethmoid area, and malocclusion.1 The guiding principles for successful management of post-traumatic abnormalities remain the same regardless of the site of injury, whether it is the mandible or maxilla. These principles include a comprehensive pretreatment analysis followed by a well-organized treatment plan, which may entail multiple staged procedures.2 Craniomaxillofacial techniques for reconstruction of such deformities consist of complete exposure, osteotomies with repositioning of displaced bone, rigid internal fixation, and bone grafts to fill gaps left by the movements.1 For a detailed discussion of occlusion, pretreatment assessment, and orthodontics, the reader is referred to the previous chapter on mandibular fractures. The remainder of this chapter will focus on analysis, incisions, and osteotomies for deformities of the maxilla and the naso-orbito-zygomatic region. Essentially, the entire midface can be exposed through three incisions: a maxillary vestibular (gingivobuccal sulcus) incision, either a transconjunctival incision or a subciliary incision, and a coronal incision (Fig. 6.1). The maxillary vestibular (gingivobuccal sulcus) incision can be extended from tuberosity to tuberosity to expose the maxilla up to the orbital rim.1 To perform the maxillary vestibular incision, the oral cavity is prepared with povidone and/or hydrogen peroxide solution. The mucosa at the proposed incision site is injected with a vasoconstricting agent. It is important to leave enough tissue on the gingival side to facilitate closure, but not too much tissue to interfere with visualization of the maxilla. The incision is carried down through the periosteum, followed by elevation of the periosteum superiorly to the inferior orbital rims. The infraorbital nerve must be identified and preserved to avoid sensory disturbance in the cheeks. If a Le Fort I osteotomy is to be done, a less extensive incision should be made to preserve additional blood supply to the osteotomized palate and upper teeth. When higher osteotomies are required, more superior exposure can be achieved by converting the maxillary vestibular incision into a midfacial degloving approach through nasal circumvestibular and intercartilaginous incisions.3 In this fashion, the upper lip can be retracted up to the glabella. A watertight closure is important to reduce the risk of wound dehiscence and subsequent infection of osteotomy sites or fixation hardware. If tension is present, the mucosa is closed with a simple interrupted absorbable suture; otherwise, a simple running stitch is usually adequate. When extensive repositioning of the maxilla has been performed, a V → Y closure of the labial mucosa reduces the tendency for lip shortening. Further, a cinching suture should be placed from ala to ala either through or beneath the nasal base to prevent splaying out of the alar base by the advanced maxilla. The malar eminence, inferior orbital rim, and orbital floor can be exposed through a transconjunctival or subciliary incision. A transconjunctival incision with or without lateral cantholysis is preferable to a subciliary incision in most cases to decrease the risk of ectropion and avoid a visible scar. A corneal shield may be beneficial. After skin preparation, the proposed incision should be injected with a vasoconstricting agent. A lateral canthotomy incision is made 5 to 10 mm out into the facial skin and down through the lateral canthal tendon, separating its upper and lower components. Fine scissors are then used to perform the inferior cantholysis by separating the lower half of the lateral canthal tendon from the lateral orbital rim. The incision is then extended through the conjunctiva 3 to 5 mm inferior to the tarsal plate, followed by dissection down to the infraorbital rim. The importance of maintaining a preseptal plane of dissection is debated. The periosteum on the facial side of the infraorbital rim is incised, with care taken to preserve the infra-orbital nerve. A subperiosteal dissection is performed to expose the orbital floor, the lateral orbital wall, the medial orbital wall, and the frontozygomatic suture as needed. The conjunctiva may be closed with a fast-absorbing buried knot suture. A permanent or slow-absorbing suture is required to resuspend the lateral canthal tendon. Limited exposure to the superior and superolateral orbit can be achieved through a lateral brow or a superior lid crease incision. If cranial bone grafts are to be obtained, however, a coronal incision provides superior periorbital exposure.4 A wavy line coronal incision is recommended over a straight coronal incision to reduce the visibility of the scar. After skin preparation with or without scalp shaving, the proposed incision should be injected with a vasoconstricting agent. An incision is made down through the periosteum in the midline and extended laterally until the superior temporal line is identified on both sides. The coronal flap is elevated anteriorly in the subperiosteal plane medial to the superior temporal lines. Lateral to the superior temporal lines, care must be taken to elevate the flap deep to the temporoparietal fascia to prevent injury to the frontal branch of the facial nerve. If exposure of the zygomatic arch is necessary, the superficial layer of the deep temporal fascia is incised just inferior to the temporal line of fusion to expose the temporal fat pad. Dissection is then continued down to the zygomatic arch, with care taken to avoid disruption of the temporal fat pad. The periosteum is incised along the superior portion of the arch and then carefully dissected off the arch laterally. Frequently, the supraorbital neurovascular bundle exits through a foramen, which must be converted to a groove with a small osteotome to free the bundle. During closure, the superficial layer of the deep temporal fascia should be reapproximated. Drains are often used, although suction drains may not be optimal when dural repairs or sinus leaks are present. Certain key areas of the soft tissue, including the medial and lateral canthal tendons, the anterior aspect of the temporalis muscle, and the periosteum over the malar eminence, should be resuspended to the skeleton prior to closure. Closure of the scalp consists of a meticulous galeal repair with medium- to long-term absorbable sutures followed by reapproximation of the skin with sutures or staples. A subcuticular closure is recommended in small children. Fig. 6.1 Incisions used for access to the midfacial skeleton with potential area of exposure (shaded area). (A) Coronal incision. (B) Transconjunctival and subciliary. (C) Maxillary vestibular (gingivobuccal sulcus) incisions. (From Kawamoto HK. Correction of established traumatic deformities of the facial skeleton using craniofacial principles. In: Schultz RC, ed. Facial Injuries. Chicago: Year Book Medical Publishers; 1988:604. Reprinted with permission.) A maxillary fracture can be malunited in any position but is most often displaced posteriorly and inferiorly along an inclined plane at the skull base, which results in premature contact of the molars, an anterior open bite deformity, and an inferiorly displaced chin. This abnormality gives the appearance of an elongated face with a deceiving prognathic appearance due to an undisturbed mandible.5 As part of the physical examination, the middle third of the face should be evaluated for nonunion by grasping the anterior alveolar ridge while stabilizing the skull and applying force in the anteroposterior direction to determine if there is movement. Principles of management are similar to those of elective orthognathic surgery, and the reader is referred to the previous chapter on mandible fractures for an in-depth discussion of occlusion, orthodontics, and pretreatment assessment, including radiographic evaluation. One additional important aspect of the maxilla to understand is the buttress concept.6 The skeletal framework of the midface consists of relatively thick segments of bone acting as a major structural support system that transmits the powerful forces of mastication to the skull base (Fig. 6.2). The intervening thin sheets of bone have a separating rather than a structural role. These buttresses, which give three-dimensional (3-D) strength to the facial skeleton and prevent soft tissue collapse, are typically the areas where rigid fixation and bone grafts are placed.7 Standard midfacial osteotomies resemble the classic Le Fort fracture patterns. However, rather than cutting through the pterygoid plates, as is usually the case with Le Fort fractures, the pterygomaxillary fissure is osteotomized instead.8 The classic Le Fort I osteotomy cuts parallel to the occlusal plane just above the floor of the nose and the floor of the maxillary sinus. Considered the workhorse of maxillary occlusal surgery, the versatile Le Fort I osteotomy can be altered or angulated in a variety of ways, allowing the maxilla to be moved in any direction in space (Fig. 6.3). The addition or removal of bone from the osteotomized maxilla provides vertical height increase or vertical impaction, respectively. Using the Le Fort I osteotomy, posterior or anterior horizontal advancement of the maxilla can be accomplished. Rotating or shifting the osteotomized maxilla to one side can be used to correct asymmetry, and the occlusal plane can be leveled by the appropriate asymmetric vertical changes. By angling the Le Fort I osteotomy downward and forward, simultaneous maxillary advancement and vertical height increase can be achieved. The bone cut can be angled upward from medial to lateral, passing either just beneath the infraorbital nerve or through the orbit out into the zygomaticomalar complex. This slight modification increases the midfacial fullness in the infra-malar area by advancing that area with the maxillary dentition. Interdental osteotomies may be necessary to correct small maxillary segments or individual teeth in crossbite, to alter the transverse width of the dental arch, or to fix discrepancies in the curve of Spee (Fig. 6.4). If the palate has been split to increase the transverse width of the maxilla, a plate across the palate osteotomy and an occlusal splint are especially useful to help prevent transverse relapse, which is particularly prone to occur in this area.9 Fig. 6.2 Horizontal and vertical buttresses of the facial skeleton. (From Hardesty RA, Coffey A. Secondary craniomaxillofacial deformities: current principles of management. Clin Plast Surg 1992;19:275–300, as adapted from Manson PW, Hoopes JE, Su CT. Structural pillars of the skeleton: an approach to the management of Le Fort fractures. Plast Reconstr Surg 1980;66:54–61. Reprinted with permission.) Fig. 6.3 The versatile Le Fort I osteotomy, which allows a variety of maxillary movements. (A) Maxillary recession or advancement. (B) Vertical impaction. (C) Vertical elongation. (From McCarthy JG, Kawamoto H, Grayson BH, et al. Surgery of the jaws. In: McCarthy JG, ed. Plastic Surgery. Vol 2. Philadelphia: WB Saunders; 1990:1369. Reprinted with permission.) The standard Le Fort II osteotomy is primarily used to provide anterior horizontal advancement of the midface and nose. The standard Le Fort III osteotomy advances the zygomaticomalar complex in addition to the midface and nose (Fig. 6.5).10 Alternatives to the standard zygomatic arch osteotomy in the coronal plane allow bony continuity after repositioning, thereby reducing the need for bone grafts (Fig. 6.6
Incisions
Deformities Involving Occlusion
Pretreatment Evaluation
Surgical Treatment
![]()
Stay updated, free articles. Join our Telegram channel

Full access? Get Clinical Tree


