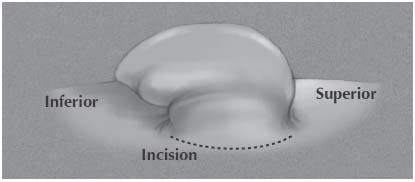
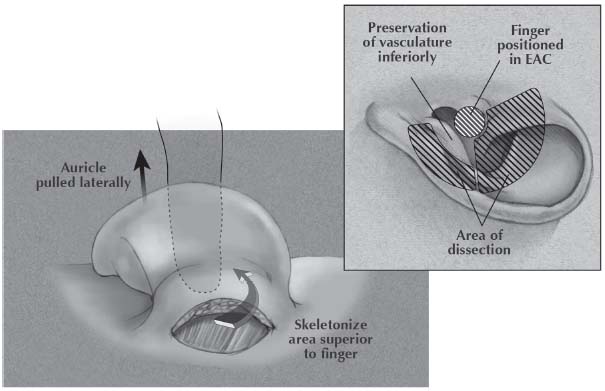
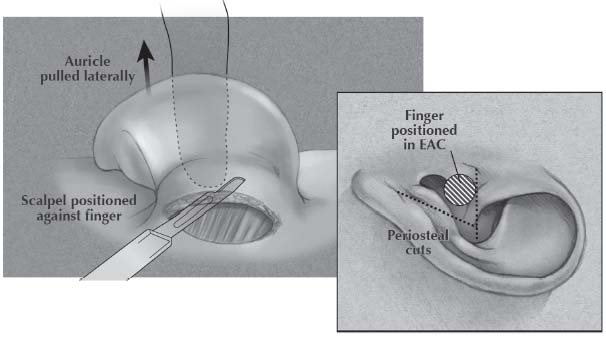
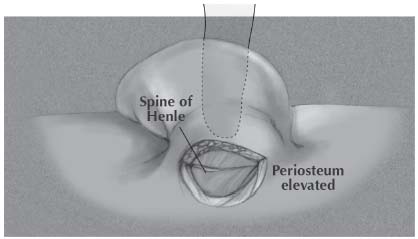
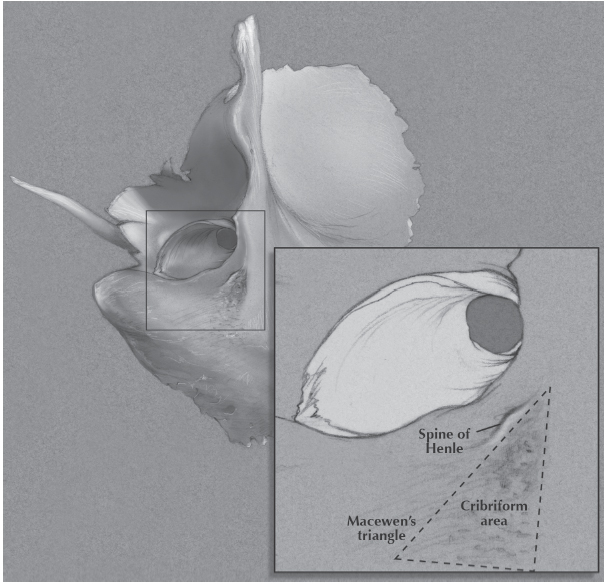
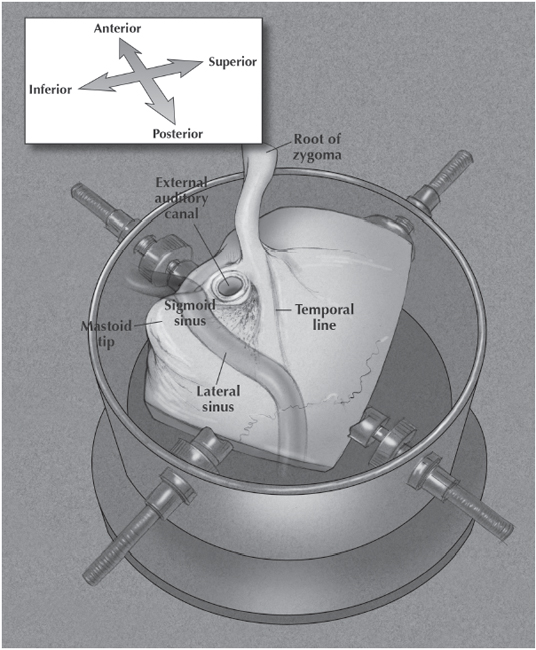
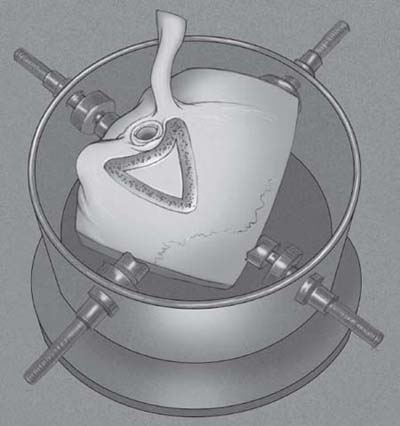
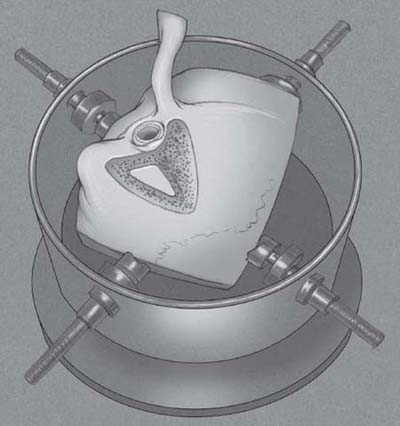
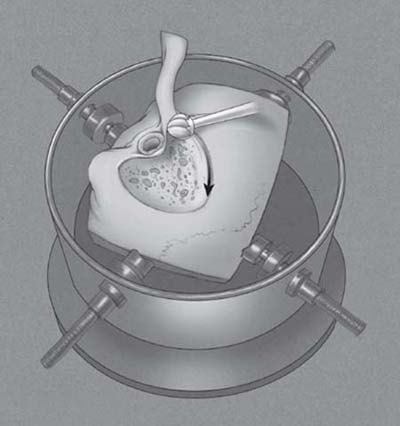
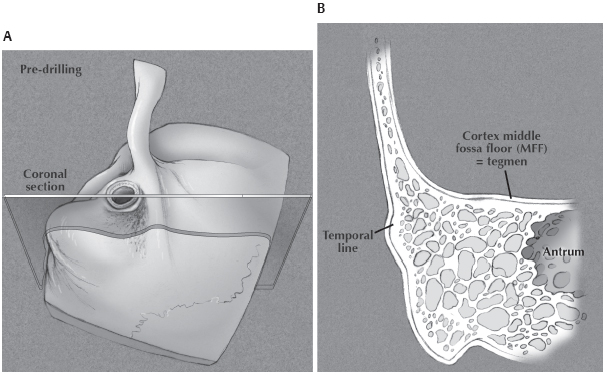
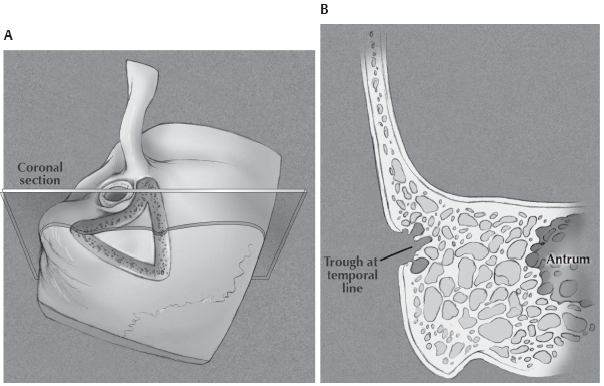
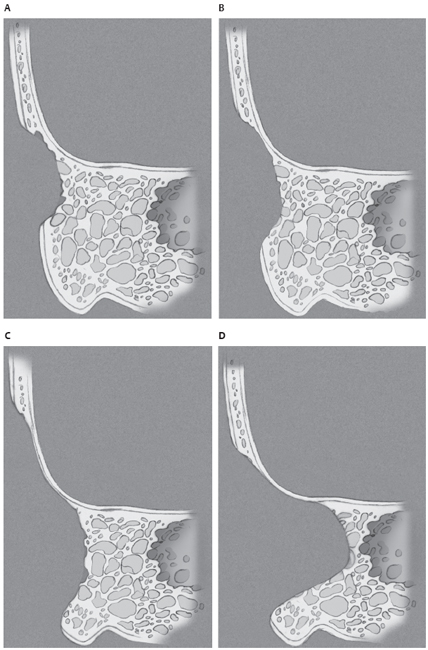
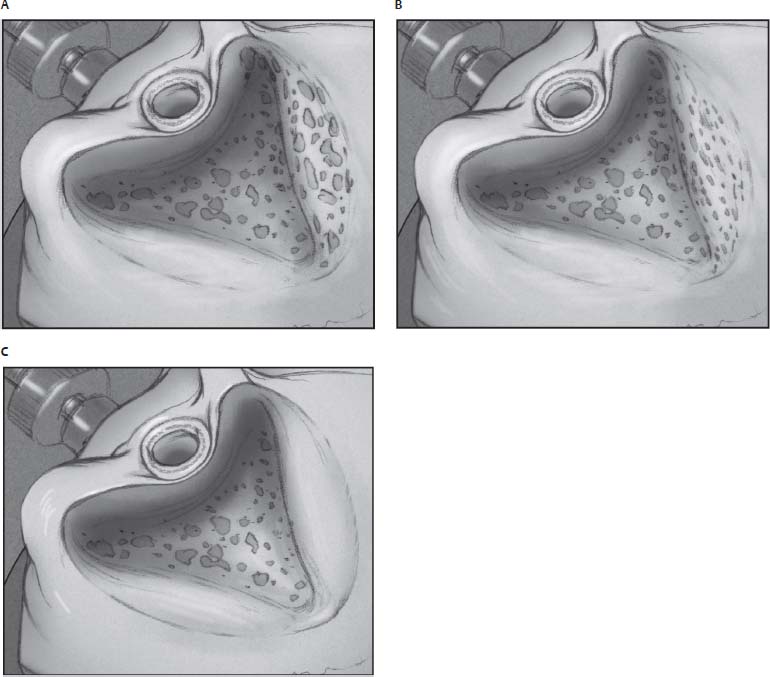
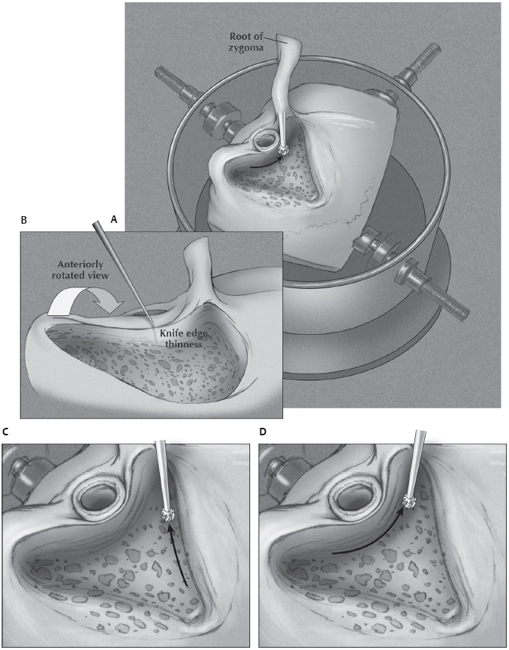
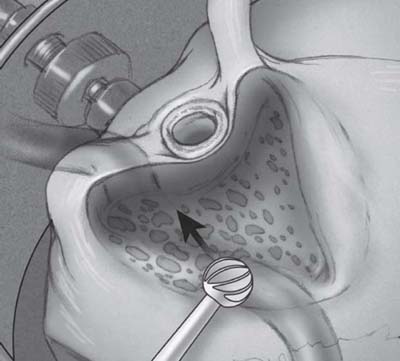
3 The mastoidectomy procedure is the foundation upon which all surgical management of disease in the temporal bone is based. Mastoid dissection, for example, may provide surgical access to structures within the temporal bone or intracranial compartment for tumor removal or prosthesis placement. It is also a surgery that is critical to the treatment and prevention of complications due to acute and chronic otitis media. Whereas the cortical or simple mastoidectomy provides external egress of suppuration from an acutely inflamed mastoid, a more thorough and technically challenging dissection is required to eliminate chronic inflammation within the attic and antrum through the elimination of cholesteatoma and the re-establishment of normal air flow through this vulnerable region. The key to a successful and safe temporal bone operation is wide lateral exposure to afford safe and optimal access to the antrum and attic while preserving the otic capsule, the cortical bone that supports the middle fossa dura, the lateral sinus, the external auditory canal and the facial nerve. Generous beveling or saucerization of the lateral margins of dissection, and precise sculpting of these cortical planes are needed, particularly in the contracted mastoid. A successful mastoid operation begins with optimal exposure of temporal bone anatomy via the post-auricular dissection. The post-auricular incision exposes the mastoid surface and the root of zygoma to provide full access to the attic and antrum. There are four steps to the post-auricular dissection. Practice these steps on your specimen prior to removal of soft tissue for bone dissection. 1. Skin incision (Fig. 3.1): Position the incision so that it is hidden by the auricle. Placement of the incision in the post-auricular sulcus is uncomfortable, particularly for individuals who wear glasses. Thus it should be placed 0.5–1.0 cm posterior to the sulcus. The incision begins superiorly within a few millimeters of the attachment of the auricle, and ends inferiorly at the level of the meatal floor. Fig. 3.1 Placement of the post-auricular incision. 2. Fascial dissection (Fig. 3.2): The scalpel blade should then be oriented at 45° to the horizontal and the incision deepened as the auricle is pulled laterally. Deep to the posterior auricular muscle a layer of areolar tissue is encountered superficial to the temporalis fascia. Place a finger in the external auditory canal (EAC) meatus while pulling the auricle laterally, and dissect in this plane staying superior to the meatus. Continue dissecting in this plane anteriorly until in front of the meatus and then inferiorly to your finger without violating the meatal skin. 3. Periosteal cuts (Fig. 3.3): The first periosteal cut, along the temporal line, should be made directly adjacent and tangential to the superior aspect of the meatal skin, extending from just anterior to the finger to the posterior edge of the incision. A second periosteal cut should be made from the posterior end of the first to the mastoid tip. This cut should spare the facial nerve as it exits the stylomastoid foramen anterior to the mastoid tip. Fig. 3.3 Placement of periosteal cuts relative to the EAC. 4. Periosteal elevation (Fig. 3.4): The periosteum is elevated including the temporalis muscle exposing the temporal line as far anteriorly as the root of zygoma, and the spine of Henle at the superior-posterior edge of the bony EAC. Remove soft tissue and stabilize the temporal bone in the bone-holder. Orient in the surgical position. Examine the surface anatomy and consider the relationship to deeper structures (Figs. 3.5, 3.6). Fig. 3.4 Elevation of the periosteum to the spine of Henle. The spine of Henle is the lateral limit of the posterior EAC cortex (Fig. 3.5). Macewan’s triangle and associated cribriform area located just posterior to the spine of Henle marks the approximate location of the antrum. The temporal line which is continuous with the zygoma, estimates the middle fossa floor and superior limit of the mastoidectomy (Fig. 3.6). The lateral sinus is the posterior limit but lacks a surface landmark. Note the convention used in this book to describe orientation and relative anatomic position. Fig. 3.5 Surface landmarks of the antrum. Fig. 3.6 Surface landmarks indicating approximate limits of the mastoid dissection. Drill three shallow grooves in the mastoid cortex delineating the limits of dissection (Fig. 3.7). Beginning at the 12 o’clock position above the EAC, one groove is parallel to and 1 cm above the temporal line. The second curves inferiorly parallel to the border of the EAC, from the zygomatic root to the mastoid tip. A third (posterior) groove completes the tri angle and overlies the lateral sinus. Fig. 3.7 Initial cortical bone cuts parallel to anticipated limits of dissection. Initial bone cuts approximate the surgical limits and when placed appropriately can set the stage for an efficient and effective dissection. In anticipation of restricted access to deeper anatomy, initial cuts should enable the widest possible exposure of lateral limits, particularly superiorly and posteriorly. Beveled edges provide better visualization and easier access to deeper levels of anatomy. This “saucerization” is most critical in the contracted mastoid. When performing the canal cut, beware the removal of cortical bone within the EAC, which occurs if the drill is placed too close to the edge of the canal. Keep the EAC cut posterior to the spine of Henle or 1–2 mm behind the canal’s edge. A shortened canal wall will otherwise provide a gap through which canal skin may migrate into the mastoid to form cholesteatoma. Fig. 3.8 Remove intervening cortical bone, opening into mastoid air cells. Remove the mastoid cortex between the three shallow grooves and begin the exenteration of the mastoid air cells by finding the tegmen, the upper margin of dissection and cortical lining of the middle fossa floor (Fig. 3.8). Long anterior-to-posterior strokes with the side of a 5 mm or larger burr, at the superior margin of the dissection, will gradually reveal the dense inner cortex of the middle fossa. This cortical plane is easily found superior to the temporal line where it forms the lateral wall of the middle fossa. Expose the tegmen fully at least 1 cm above the temporal line. Thin this cortical bone until translucent from the zygoma to the sinodural angle. This reveals the middle fossa dura along the full anterior-posterior extent (Fig. 3.9). Fig. 3.9 Dissection of superior margin in search of inner cortical lining of middle fossa. Fig. 3.10 (A,B) Location of inner middle fossa cortex relative to temporal line. Once identified superiorly, the inner cortex of the middle fossa can be followed inferiorly and sculpted as it bows medially and becomes the mastoid tegmen. As this occurs you will simultaneously achieve the desired saucerization (Fig. 3.10A,B). Note, if the superior cortical cut is placed too low, the trough can miss the cortex of the middle fossa floor (Fig. 3.11A,B). Widen the existing trough in a cephalad direction. The inner cortical plane can be identified more easily here and followed into the mastoid where it becomes the tegmen. At the same time, the expanding superior rim of the mastoid cortex maximizes your “saucerization” of the cavity (Fig. 3.12A–D). This task is the first of several sculpting procedures that requires careful “reading” of the bone as the drilled surface is transformed from pock-marked aerated bone (Fig. 3.13A,B), to the dense cortical layer that encases all structures of concern (Fig, 3.13C), to the increasing revelation of the target structure as this cortical layer is thinned. Clues to thin tegmental bone include the visualization of dural vasculature and the appreciation of a high-pitched sound to the rotating burr. Sculpt the entire inner cortex of the middle fossa floor leaving an intact but translucent layer of cortex overlying the dura. The changing appearance of the drilled surface is an indication of diminishing bone thickness and should prompt appropriate alterations in burr path and pressure. Areas that are translucent should not be over-drilled. Recognize dural exposure through defects in the cortical plate and avoid further drilling and dural injury. Fig. 3.11(A,B) A cortical cut at the temporal line may be too low to access the middle fossa floor. Fig. 3.12 (A–D) Identify the inner middle fossa cortex along its lateral wall, above the temporal line, and follow into the mastoid where it becomes the tegmen. Fig. 3.13 (A–C) Changes in texture and translucency of bone guide the tegmental dissection. Sculpting of the cortical lining of the posterior EAC should start with a razor sharp lateral cortical edge that encompasses the spine of Henle. Lower the plane of aerated bone to the deepest level at which the tegmen is clearly defined. Use the anterior surface of the burr (not its tip) to remove bone at the anterior edge of dissection up to the EAC cortex (Fig. 3.14A,B). Sharpen the lateral edge of the EAC wall using long strokes from left to right while viewing it on-edge. An adequately thinned EAC cortex is translucent enough to reveal the canal skin or outlines of an instrument placed subcutaneously within the lumen. Use the appropriately sized cutting burr to extend sculpting of both the tegmen and EAC cortex anteriorly toward the root of zygoma (Fig. 3.14C,D). The lateral sinus can be found at its junction with the tegmen as dissection of the middle fossa cortex is extended posteriorly and medially. Remove air cells overlying the proximal portion of the sinus leaving a thin cortical layer. Use long strokes directed from the sino-dural junction superoposteriorly toward the region below the EAC antero-inferiorly (Fig. 3.15). Observe the transformation of surface features from irregular aerated to dense cortical bone, the increasingly dark appearance of the sinus as the cortex is thinned and listen for the high-pitched sound generated by the burr on the thinned bone (Fig. 3.16A,B,C). Fig. 3.15 Drill along anticipated path of sigmoid sinus. By defining the cortical lining of the lateral and sigmoid sinus, the posterior edge of dissection will be beveled for optimal access to deeper anatomy.
Mastoidectomy
 Incisions and Exposure
 Cortical Landmarks
 Mastoid Dissection
Superficial Mastoid Dissection
Cortical Bone Cuts
Rationale
Potential Pitfalls
Superior Boundary: Delineate Mastoid Tegmen
Anterior Boundary: Sculpt the External Auditory Canal
Posterior Boundary: Exposing the Lateral (Sigmoid) Sinus
Rationale
Mastoidectomy
Only gold members can continue reading. Log In or Register to continue

Full access? Get Clinical Tree


