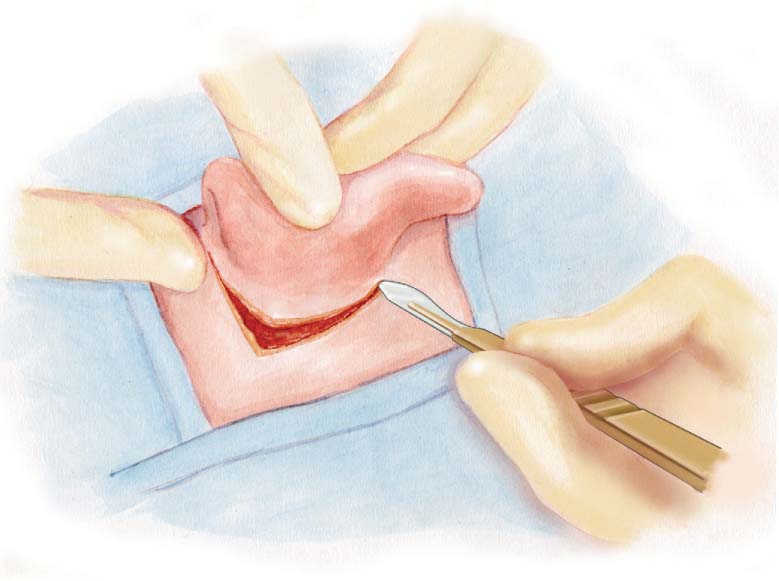
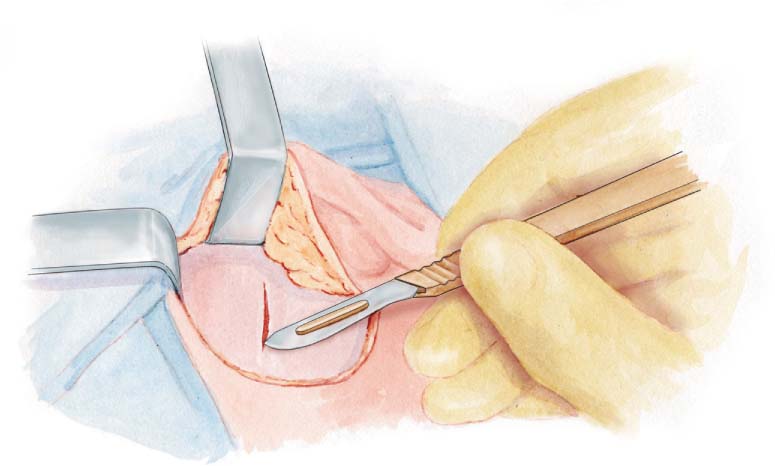
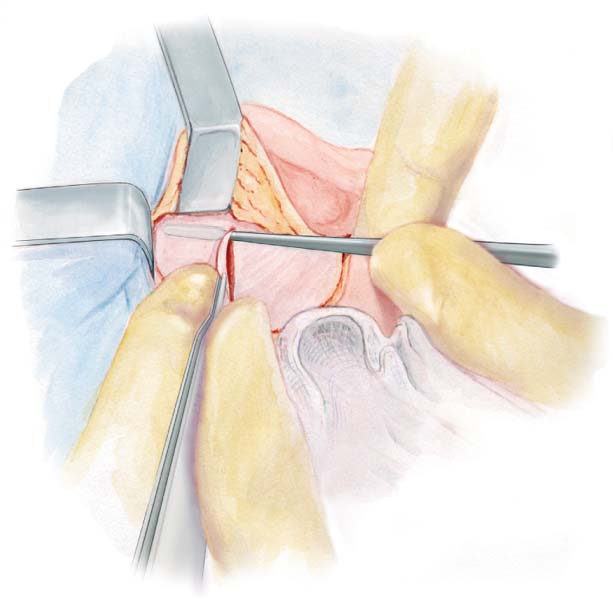
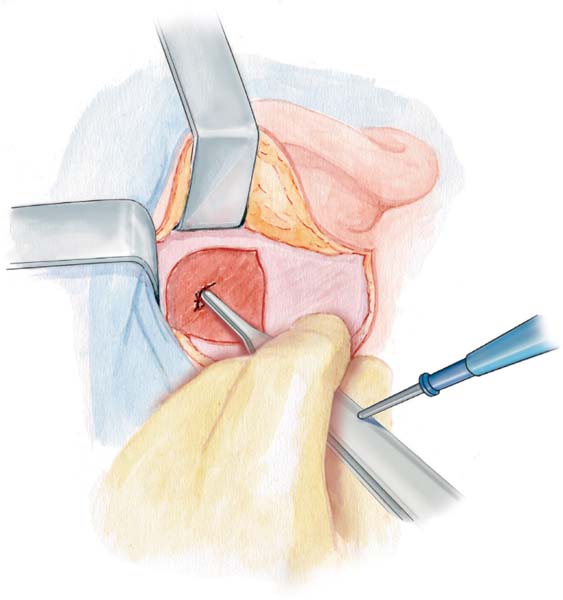
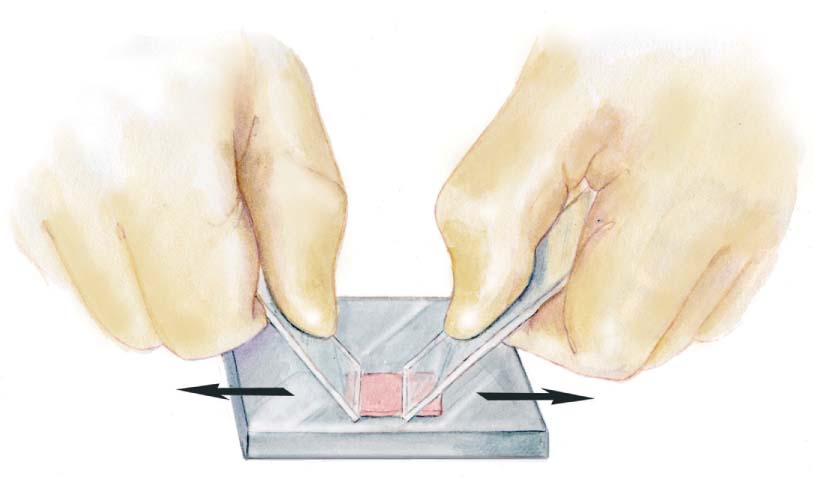
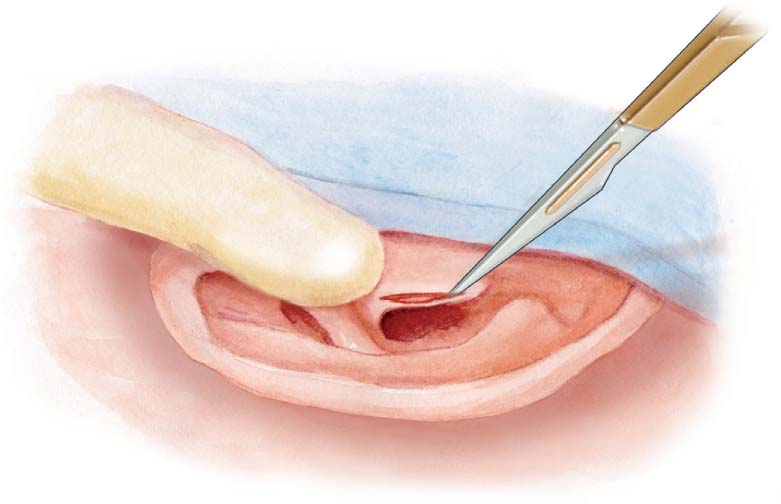
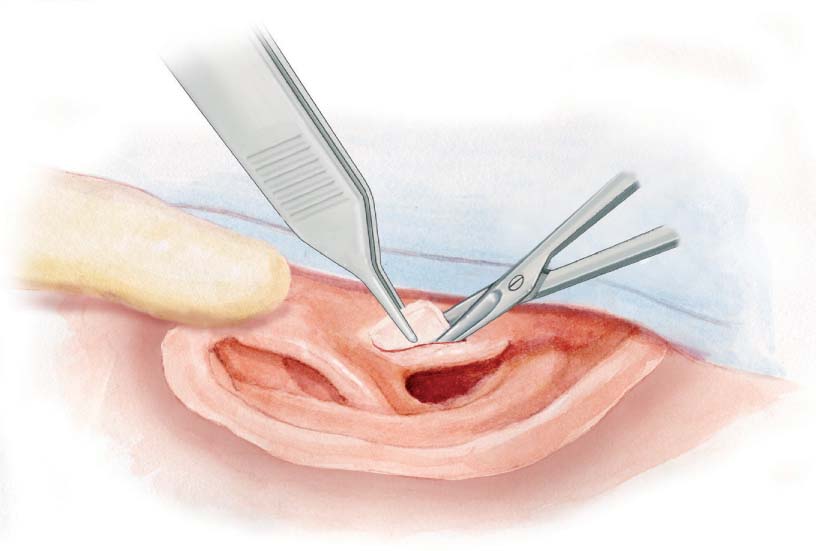
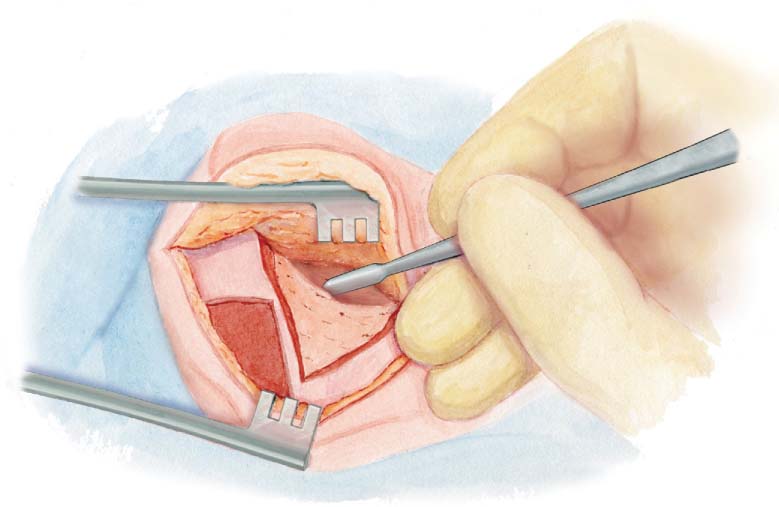
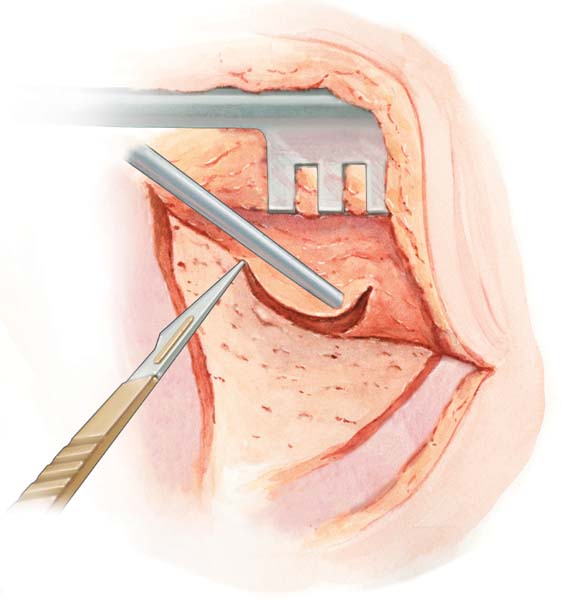
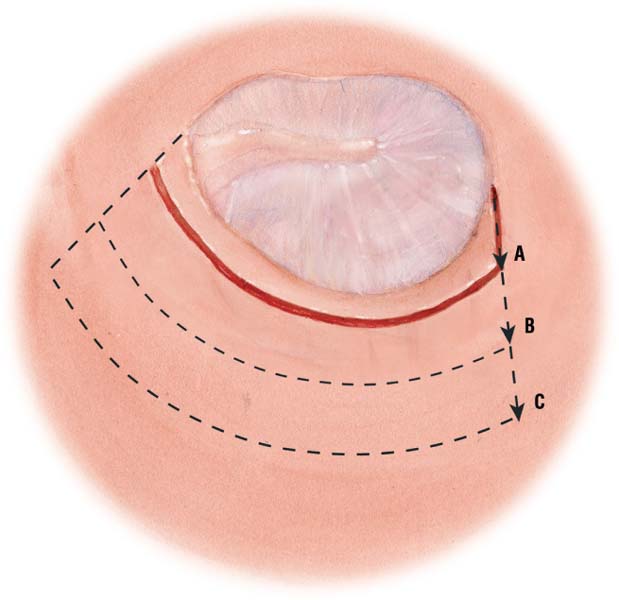
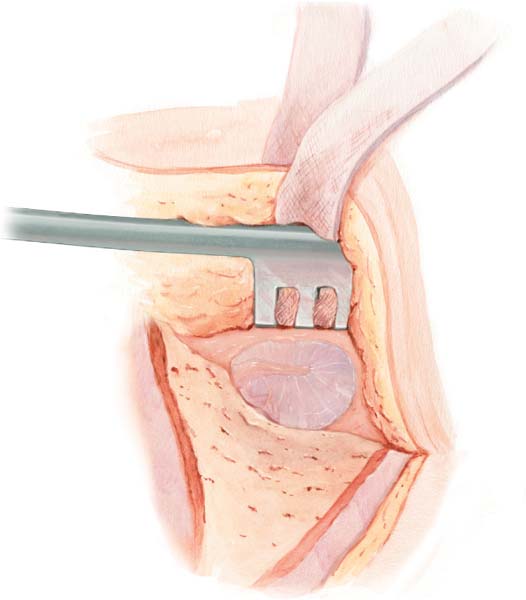
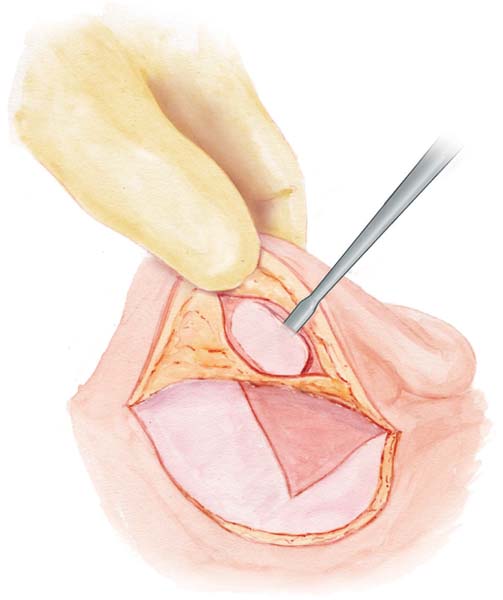
4 Difficult Retroauricular Approaches Tympanic Membrane Perforations Special Tympanoplasty Techniques and Problems Skin and Musculoperiosteal Flap Closure Our teaching hospital mainly uses a retroauricular approach, except for otosclerosis surgery, myringoplasty with xenografts for small accessible posterior or inferior perforations, and functional revision surgery. A retroauricular approach provides better access to the anterior wall of the external auditory canal, the tympanic membrane, and the middle ear, and allows an unplanned transmastoid route. It also enables easy temporalis fascia or conchal cartilage graft harvesting. After pulling up the upper part of the auricle, the subcutaneous skin layer is incised with a no. 25 scalpel blade, 5 mm above the auricular attachment and slightly posterior to the helix attachment. The incision is made anteroposteriorly for the first 3 cm. It then curves inferiorly 1 cm parallel to the auricular fold, ending 1 cm above the mastoid tip, which has been previously palpated. The posterior auricular muscle is cut and the auricle is detached anteriorly just before reaching the perichondrium of the external canal to expose the temporalis fascia area. Fig. 4.1 Tip: The fact that the skin incision runs anterior to the level of the helix attachment allows good mobilization of the auricle and good exposure of the temporalis fascia, like opening a book to 180°, without any tissue tension in any plane. Pulling the skin up with a forceps enables three-dimensional dissection and access to the different tissue layers. A self-retaining retractor held by the scrub nurse at an anterosuperior angle to the incision completely exposes the harvesting site. The superficial fascia layer is removed and the fascia is cleaned with a Freer rugine. A 2-cm fascia incision is made with a no. 11 scalpel blade. Fig. 4.2 Tip: Pulling the fascia up with a retractor helps to naturally find the layer that does not elevate but remains attached to the temporal muscle. Cleaning the fascia graft as much as possible before harvesting further facilitates fascia trimming. Elevation of the inferior side of the fascia from the temporal muscle is achieved with a Freer rugine. Fig. 4.3 A rectangular fascia graft is excised off with blunt curved scissors, starting with an anterior and posterior incision and ending superiorly. The graft is removed with anatomical forceps. Fig. 4.4 Hemostasis of the muscle is performed very carefully due to the high risk of hematoma of the temporal region. Tip: The size of the fascia graft depends on the planned surgery. For a tympanoplasty, a graft between 1 and 1.5 cm2 is sufficient. For mastoid cavity rehabilitation involving a large skin defect of the external auditory canal, harvest the largest graft possible. If second-stage surgery is planned, preserve fascia with easy access. In revision surgery, superior extension of the skin incision may be required to locate the temporalis fascia. Fig. 4.5 The graft is cleaned and trimmed of residual muscle, superficial fascia, and fat using two histological glass slides, and flattened on a metallic sheet without being stretched. In the case of subtotal tympanoplasty, the graft is spread over a Perkins mold. Fig. 4.6 Tip: Maintain the original size of the graft. Take care not to stretch the graft because it will shrink after placement and rehydration. Avoid contact of the graft with gloves and surgical fields to prevent contamination by microscopic foreign bodies, which can lead to myringitis Tragal cartilage and perichondrium can be used for a simple cartilage graft, a perichondrial graft, or a cartilage–perichondrial graft. Except in specific cases of footplate interposition, where we only use the posterior tragal perichondrium, the tragal cartilage is harvested with its perichondrium. Preparation of the tragal support is always the same but the way it is used depends on surgical requirements. After infiltration of lidocaine and epinephrine, a 1.5-cm skin incision is made on the dome of the tragal cartilage with a no. 11 scalpel blade. The cartilage edge lies just beneath the incision. Fig. 4.7 Tip: Note the position of the finger on the illustration. This facilitates the incision under the dome edge. It also helps cosmetically. The subcutaneous tissue is dissected posteriorly and anteriorly from the perichondrium using opening movements of pointed curved scissors over the entire surface of the cartilage. Anatomical forceps help to elevate the skin and improve the view. The cartilage is pulled in a superior direction with anatomical forceps to incise the cartilage inferiorly with blunt curved scissors. An anterior incision is made as deep as possible. Fig. 4.8 Finally, a superior incision is made. Removing the entire cartilage dome improves the esthetic appearance. Bleeding is controlled, and the skin incision is closed with fibrin glue or stitches. Fig. 4.9 The tragus is fixed with a small compress under the thumb on a metallic sheet or a wooden tongue depressor. For attic bony defect reconstruction or posterior tympanic cartilage reconstruction, the anterior perichondrium is detached with a flap knife from the medial cutting edge to the dome of the cartilage (like opening the front page of a book). The posterior perichondrium remains intact. The anterior perichondrium is cleaned of the residual subcutaneous tissue using blunt curved scissors. This is called a cartilage–perichondrium graft. For other uses (total tympanoplasty, bony defect reconstruction, prosthesis interposition, ossiculoplasty), the anterior and posterior perichondria are separated from the cartilage en bloc. The perichondrium is dried out in a press. The cartilage is preserved in a humid compress. Fig. 4.10 Tip: A wooden tongue depressor helps to keep the graft from sliding and is easy to handle. On a wooden tongue depressor, the cartilage, with or without the perichondrium, is refined using a no. 11 scalpel blade. The cartilage is preserved for further processing depending on its use. Fig. 4.11 The cartilage can be cut into chips for tympanic reconstruction or prosthesis interposition, into small pieces for ossiculoplasty, into large pieces for bony defect reconstruction, and left en bloc for posterior tympanic reconstruction. Fig. 4.12 Everything except the perichondrium is placed in a compress soaked with physiological saline solution. Tip: These different applications should be prepared just before starting reconstruction. The advantage of conchal cartilage over tragal cartilage is the availability of a larger surface area. However, conchal cartilage perichondrium is of poor quality and cannot generally be used. For tympanic reconstruction, tragal cartilage is therefore preferred. After dissection and elevation of the subcutaneous tissue and postauricular muscle using pointed curved scissors, the conchal cartilage eminence is exposed by means of the retroauricular incision. Fig. 4.13 Tip: Placing a finger in the concha stabilizes the dissection, thus avoiding puncture of the conchal skin. Fig. 4.14 Fig. 4.15 The perichondrium and cartilage are incised superiorly using a no. 11 scalpel blade. The perichondrium and cartilage are held with anatomical forceps, and the cartilage is elevated from the anterior tissue with the periosteal elevator. When the elevated surface area is sufficient, lateral and inferior incisions are made using blunt scissors or a scalpel blade. On a wooden tongue depressor, the posterior perichondrium is cleaned of residual subcutaneous tissue using blunt curved scissors. The perichondrium can also be removed but cannot usually be used because of its poor quality. Subcutaneous tissue above the harvesting site must be sutured. For fatty tissue myringoplasty, fat can be harvested from the ear lobe or the abdomen (incision in the umbilicus or any previous incision site). The ear lobe is infiltrated with lidocaine and epinephrine. A skin incision is made on the posterior side of the edge of the lobe. The fat is dissected using pointed curved scissors, taking care not to penetrate the anterior or posterior skin. Fig. 4.16 The incision is closed using fibrin glue or stitches. The fat is preserved in a disinfectant solution. When a skin graft is required for partial external auditory canal reconstruction, the harvest graft is taken from the posterior edge of the retroauricular incision, mostly inferiorly, where there is no hair. The strip is between 5 and 7 mm in width, 2 cm in length, and as thin as possible. Fig. 4.17 The skin graft is preserved flat in a compress, humidified with physiological saline solution, or flattened in a press. If a larger graft is required, the skin is harvested with a dermatome from the inner biceps. The retroauricular approach is our preferred option because it provides better access to the anterior tympanum and protympanic region. It allows easy harvesting of the temporalis fascia and conchal cartilage, and unplanned implementation of the transmastoid approach. Tip: Take the time to examine the skin quality properly, as well as the tympanic membrane and the canal anatomy. This helps in planning further skin incisions. A transcanal approach is used in the majority of stapes surgery, functional revision surgery, explorative surgery for conductive deafness with an intact eardrum, and myringoplasty with xenografts for otoscopically confirmed small posteroinferior perforation. A nasal speculum is used at the beginning of surgery to evaluate the meatal and tympanic membrane anatomy and skin quality as well as to clean and rinse with saline solution. Advantages of the nasal speculum are that it makes it easy to change the operative field of vision and adapts to all canal diameters. The disadvantage is the sacrifice of the surgeon’s second hand Fig. 4.18 Tip: Holding the nasal speculum in the palm of the hand is more comfortable. For a transcanal approach, when no great change in the angle of visualization is required, a fixed speculum is used. The Portmann speculum allows the soft external auditory canal to be extended as far as possible. The holder arm is fixed to the operating table and centered on the canal. Fig. 4.19 Tip: After placement, do not touch the speculum change the position of the table instead. See Retroauricular Skin Incision, p. 18 Fig. 4.20 The self-retaining retractor is utilized to pull up the skin flap. Using electrocautery, the superior incision of the musculoperiosteal flap starts anteriorly at the level of the temporal line, running toward the posterior skin incision. Inferiorly, it ends at the inferior edge of the external auditory canal, creating an anteriorly based isoscel triangle centered on the inferior edge of the Henle spine. Fig. 4.21 For mastoidectomy, the musculoperiosteal flap is enlarged into a trapezium to expose the mastoid process. Tip: Place your finger in the meatus it helps to localize the external auditory canal and to center the musculoperiosteal flap. Mark the temporal line to determine the superior limit of the flap. Palpate the mastoid tip to avoid the risk of damaging the facial nerve in the stylomastoid area, especially in children. The flap is elevated up to the meatus with a periosteal elevator, and the retractor is repositioned to hold both flaps. The posterior skin of the external auditory canal is detached using a raspatory superiorly and inferiorly from 10 to 4 o’clock. Opening the retractor gently aids a natural degloving, except in revision surgery, where the skin is too fragile. Fig. 4.22 Using a no. 11 scalpel, a circumferential incision of the posterior canal skin is made in the center of the canal and first followed inferiorly. This allows localization of the tympanic membrane through the incision. The inferior lateral incision is continued for ± 1 cm. Fig. 4.23 The superior part of the circumferential incision and the superior lateral incision are then completed. A laterally based meatal skin flap, known as a posterior vascular strip, is obtained. Fig. 4.24 The distance of the circumferential incision depends on the type of tympanoplasty: For subtotal perforation, the incision is located as close as possible to the ear drum (A). If the tympanic membrane is intact, or in other types of perforation or pathology, the incision is located approximately 8 mm from the ear drum or just above the external ear canal pathology (B). For canal wall down tympanoplasty, the incision is located approximately 5 mm below the inferior edge of the conchal cartilage, and the lateral incision is shorter (C). Fig. 4.25 Tip: Application of small-diameter (to prevent tearing) microsuction to the meatal skin helps to tighten the skin for easier incision. A string or strip of gauze is pushed into the external canal and pulled out through the incision of the laterally based skin flap. Fig. 4.26 The string is attached to the surgical field with a clamp, and a self-retaining retractor is used to hold the musculoperiosteal and skin flaps in place. Good exposure is required to visualize the anterior wall and ensure an unimpaired view of the tympanic membrane. Fig. 4.27 Tip: To achieve safe and adequate elevation of the laterally based skin flap, the strip needs to be as flat as possible. Placement of a self-retaining retractor on the strip helps it not to slide. If the vascular strip remains elevated and exposure is sufficient, the string is not necessary. To ensure a satisfactory surgical procedure, it is absolutely vital to have a good enough view of the annulus and the tympanic perforation. Bulges of the posterior bony canal, protrusions of the anterior bony canal, and prominent bony sutures are frequent. In such cases, a canaloplasty should be performed by drilling the wall in the following order: posterior, inferior, superior, anterior. A protruding Henle spine is removed using a cutting burr or chisel.
Management of Tympanic Membrane Abnormalities
4__Management of Tympanic Membrane Abnormalities
Harvesting of Graft Materials
Temporalis Fascia
Retroauricular Skin Incision
Fascia Exposure and Incision
Fascia Degloving
Fascia Removal
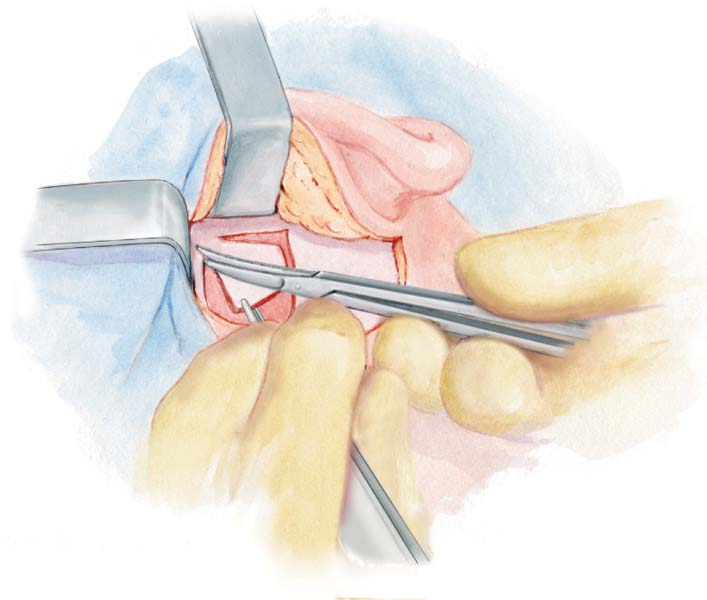
Hemostasis
Fascia Graft Preparation
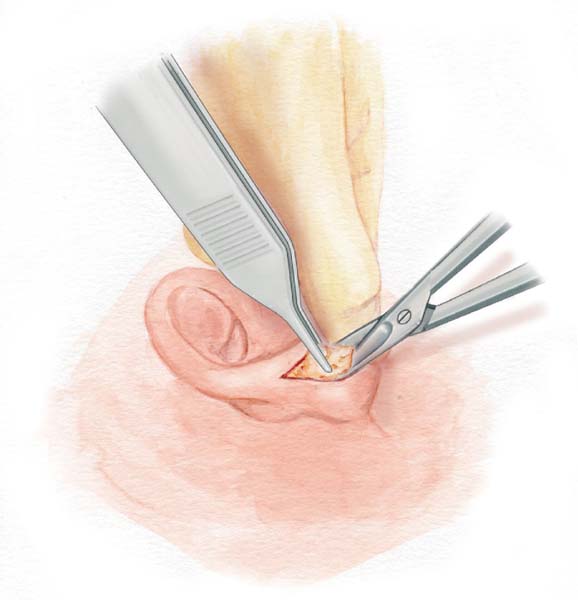
Tragal Cartilage–Perichondrium Graft
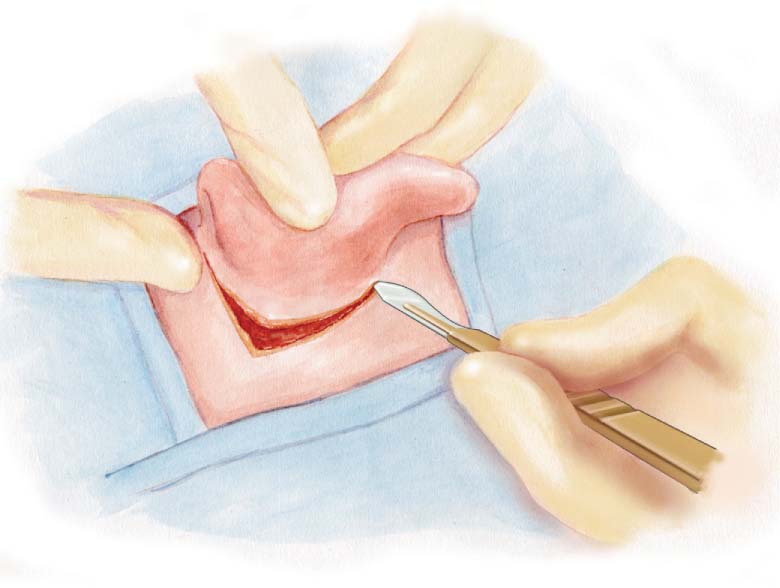
Skin Incision
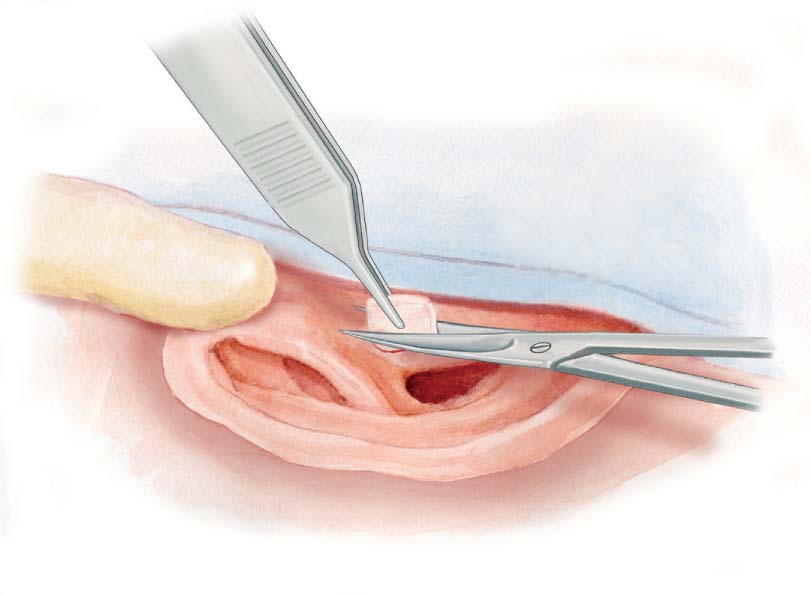
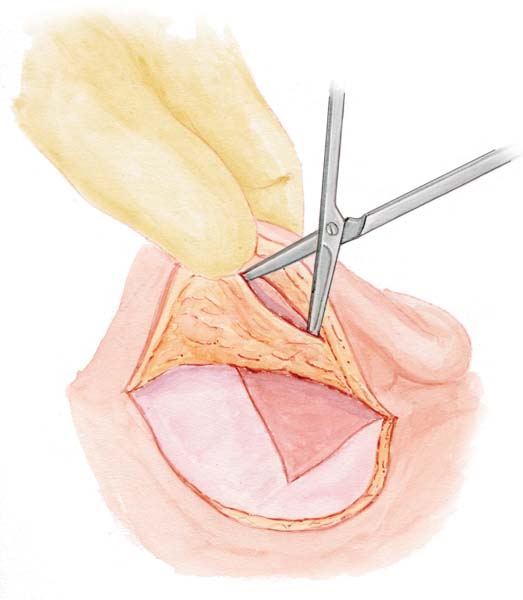
Graft Exposure
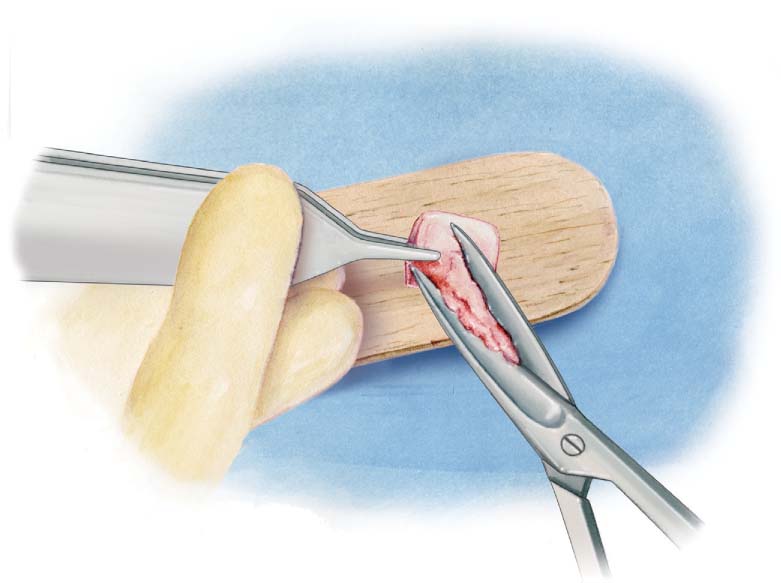
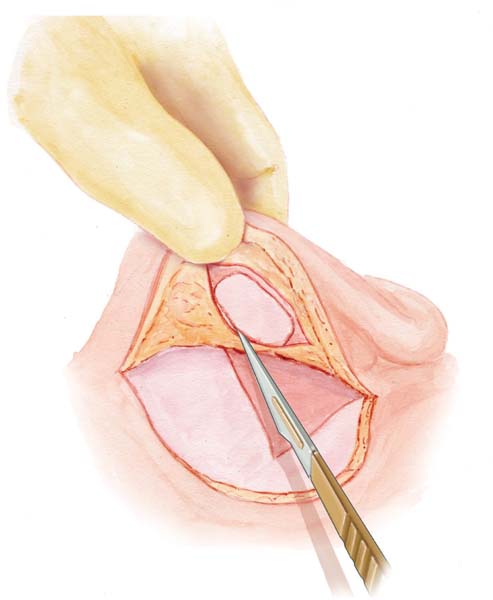
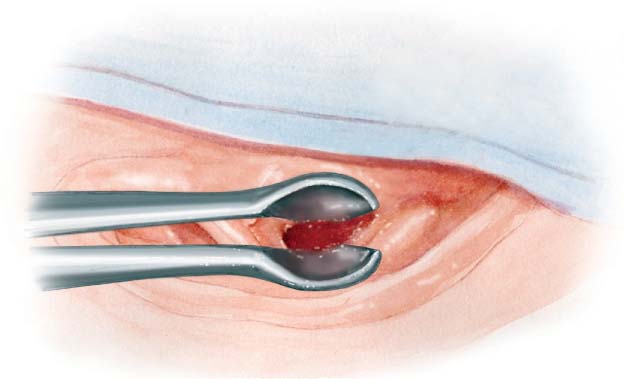
Graft Excision
Perichondrium Elevation and Cleaning
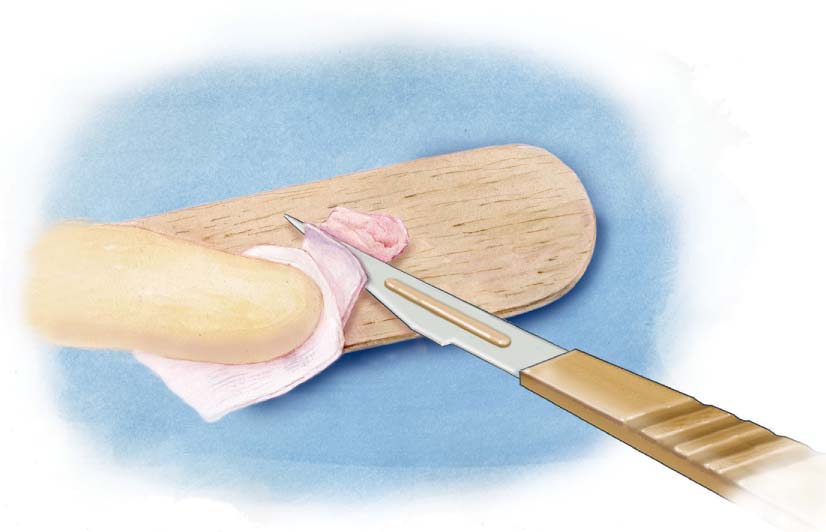
Cartilage Refinement
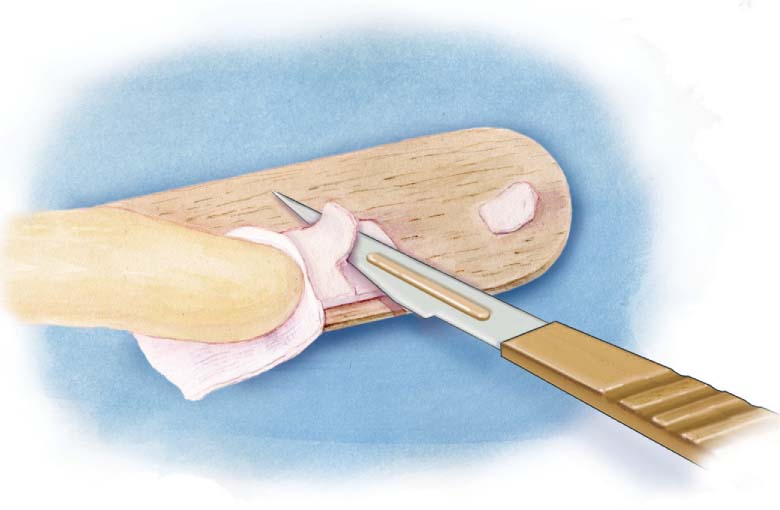
Cartilage Chips
Conchal Cartilage Graft
Cartilage Exposition
Cartilage Incision
Cartilage Excision
Fatty Tissue Graft
Skin Graft
Tympanic Membrane Approaches
Retroauricular Approach
Transcanal Approach
Nasal Speculum
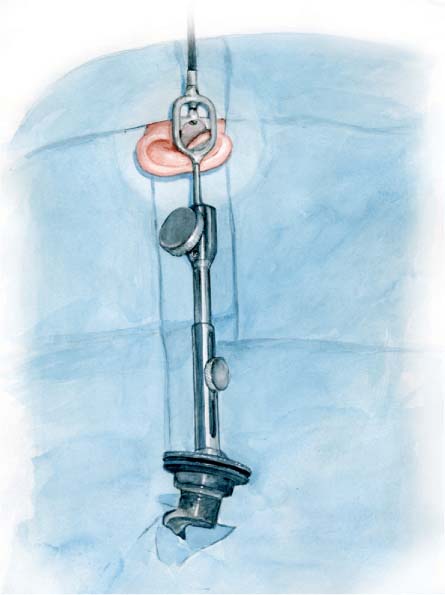
The Portmann Fixed Ear Speculum
Skin Incision
Musculoperiosteal Flap
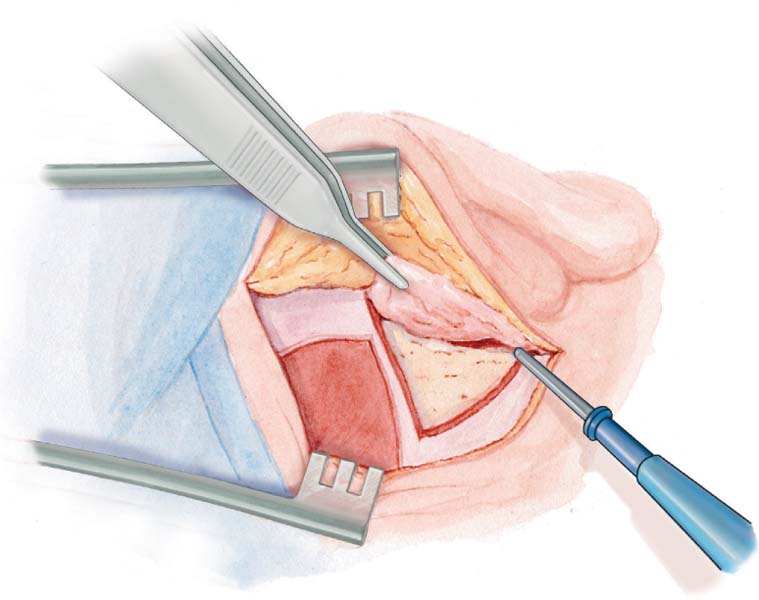
Flap Elevation
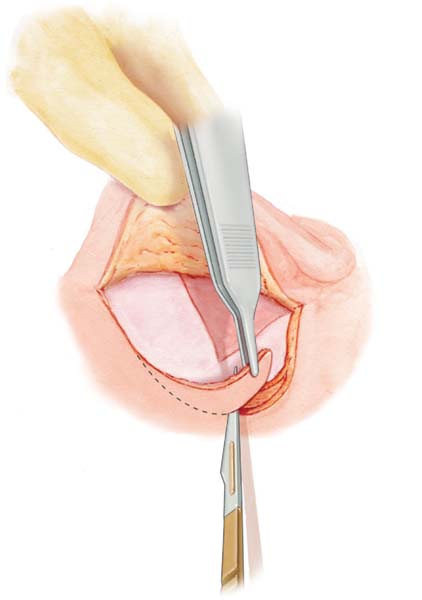
Meatal Skin Counterincision

Vascular Strip
Incision Distance
Vascular Strip Elevation

Optimal Exposure
Difficult Retroauricular Approaches
Protrusion of the Posterior Bony Canal Wall
Henle Spine Protrusion
Stay updated, free articles. Join our Telegram channel

Full access? Get Clinical Tree


