and Mitrofanis Pavlidis2
(1)
Department of Ophthalmology, Uppsala University Hospital, Uppsala, Sweden
(2)
Augencentrum Köln, Cologne, Germany
Electronic supplementary material
The online version of this chapter (doi:10.1007/978-3-319-20236-5_4) contains supplementary material, which is available to authorized users.
Electronic supplementary material
for this chapter is accessible online at http://extras.springer.com/ by searching via the ISBN.
27G instruments are more delicate than their 23G and 25G counterparts. In addition, the dilemma of the Hagen–Poiseuille law reduces the flow significantly. These different features require specific adjustments for vitreoretinal techniques.
4.1 Induction of Posterior Vitreous Detachment (Fig. 4.1)
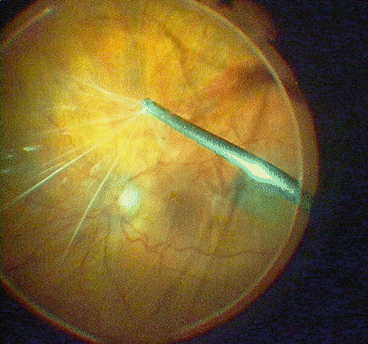
Fig. 4.1
Induction of PVD with vitreous cutter. Note the silky appearance of the posterior vitreous
Video 4.1: PVD with Atkinson cannula (no audio)
Video 4.2: 27G difficult PVD (audio)
A PVD induction is easier to perform with a 27G vitreous cutter because it can be placed very close to the retina. For this step, we routinely use a 90D front lens. To induce a posterior vitreous detachment is a difficult procedure in the learning phase. We therefore recommend staining the vitreous first with triamcinolone or trypan blue. The vitreous body is then much easier to identify and the induction of posterior vitreous detachment significantly easier.
For induction of PVD, position the vitreous cutter just in front of the optic disc, and then increase suction (foot pedal to bottom position) to a maximum. In the suction phase, the cortex and especially the posterior hyaloid will be engaged in the aspiration port. Then draw the vitreous cutter slowly with maximal suction towards the lens. Perform this manoeuvre in all directions. If the manoeuvre is successful, you will see a kind of fine silk screen that moves forward together with the vitreous cutter. Sometimes, this whole manoeuvre must be repeated several times until it succeeds. Before you repeat the manoeuvre, cut the aspirated vitreous in the vitreous cutter to prevent traction and tractional tears and then place the vitreous cutter in front of the optic disc again.
Surgical Pearls No. 2
PVD:
1.
The correct assessment of the relationship between the posterior vitreous face and the retina/optic disc is one of the key steps to master pars plana vitrectomy. Always check if a PVD is present or not. Even in cases when you expect a PVD to be present (e.g. retinal detachments), you will sometimes be surprised by an attached vitreous face.
2.
The freshly detached posterior vitreous face has a “beaten metal” appearance. You know that you have induced a PVD if you see this appear on the posterior surface of the vitreous. When a PVD is induced, suddenly, a lot more vitreous, which must be removed, will appear in the vitreous cavity.
Surgical Pearls No. 3
PVD and dye:
1.
We recommend beginners to stain the vitreous at the beginning of vitrectomy for the first 10–20 vitrectomies. The vitreous is much easier to recognize, and vitrectomy and especially the induction of a posterior vitreous detachment become considerably easier.
2.
To stain the posterior vitreous face with triamcinolone: Perform a core vitrectomy and a peripheral vitrectomy in front of your ports. Induce the cannula into the mid vitreous (be careful not to inject peripherally, or you will inject in to the vitreous base and exert traction). Inject a small amount of triamcinolone that will drop down onto the posterior pole. This will very nicely stain the bursa praemacularis of the vitreous. Do not inject too much triamcinolone for vitreous staining. It will only obscure your view and will be cumbersome to remove later on during the surgery. Few drops are sufficient for staining the posterior vitreous.
3.
Once the bursa praemacularis is stained with triamcinolone, try to engage the posterior vitreous face at the optic disc. Try to cut a small break in the posterior vitreous face nasal to the disc, then “pick up” the posterior vitreous phase with the cutter and suction only. Pull anterior towards the lens. Try to keep an eye on the advancing posterior vitreous face in the mid-periphery. This looks like a tidal wave. It is where breaks will develop during induction of a PVD.
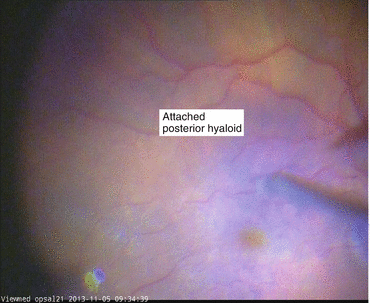
Fig. 4.2
Induction of PVD with instruments. A PVD was not successful. Note the attached posterior vitreous
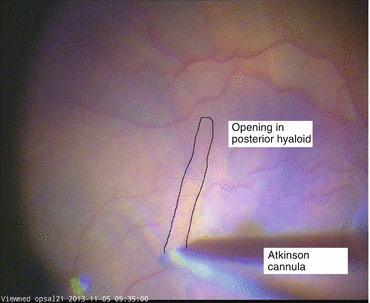
Fig. 4.3
With help of a 27G cannula (Atkinson, Beaver-Visitec), the posterior hyaloid is opened
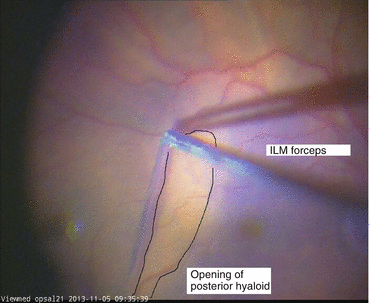
Fig. 4.4
The edge of the posterior hyaloid is grabbed with an intravitreal forceps
Difficult PVD: If you are not able to induce a PVD, try the following: (1) Increase the vacuum to 600 mmHg and try again. (2) Stain the vitreous with trypan blue or triamcinolone and try again. (3) Insert a 60D lens and mobilize the posterior hyaloid membrane with an Eckardt forceps. If you have created a hole, try to aspirate this part with a vitreous cutter and provoke a PVD. (4) Create a hole in the posterior hyaloid with a 27G Atkinson cannula (Beaver-Visitec). Then mobilize the hole edges with a forceps (Figs. 4.2, 4.3 and 4.4).
4.2 Trimming of Vitreous Base (Figs. 4.5, 4.6 and 4.7)
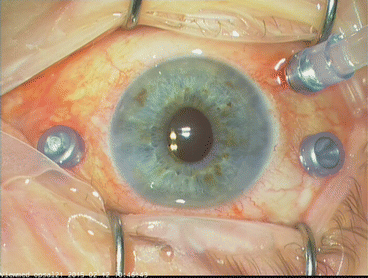
Fig. 4.5
The best set-up for a 27G vitrectomy. The trocars (DORC) are inserted towards 12 o’clock
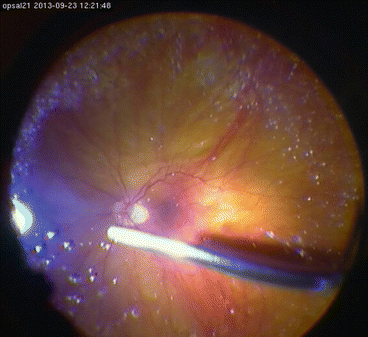
Fig. 4.6


An eye with synchysis scintillans
Stay updated, free articles. Join our Telegram channel
Full access? Get Clinical Tree
