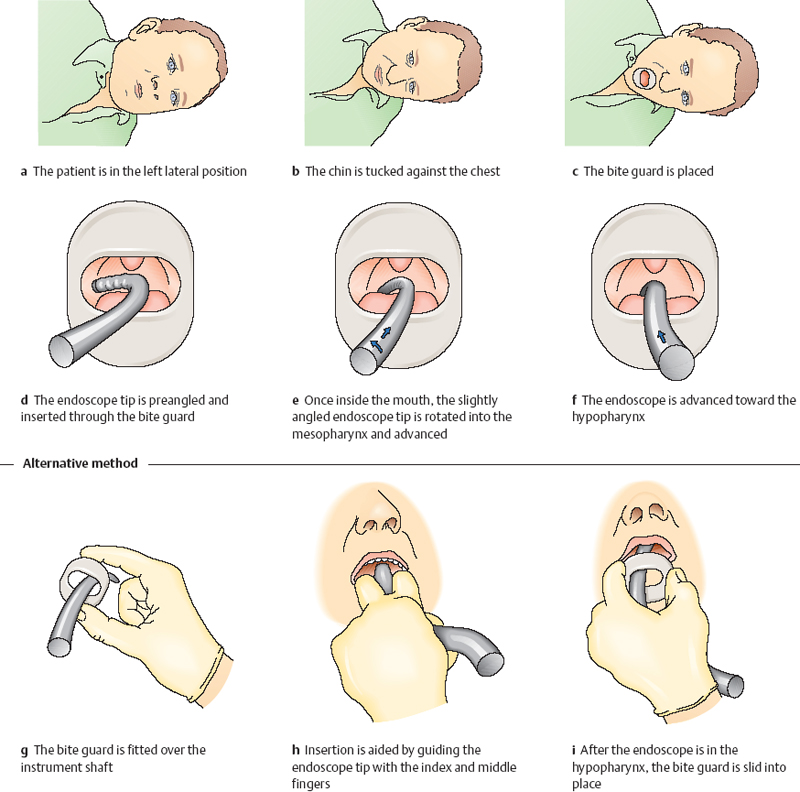
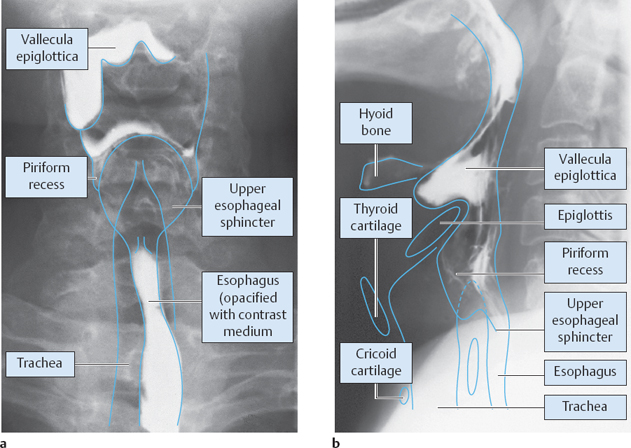
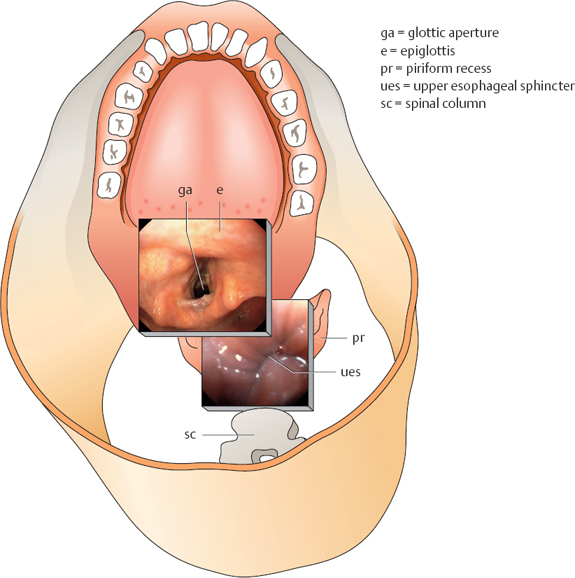
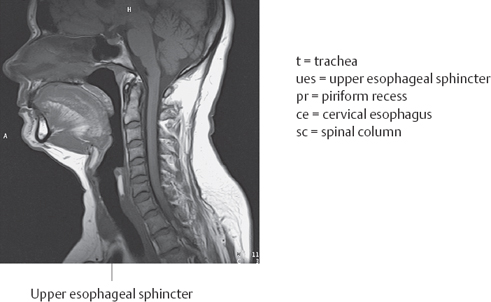
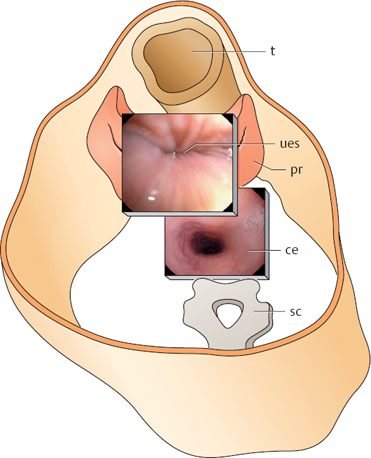
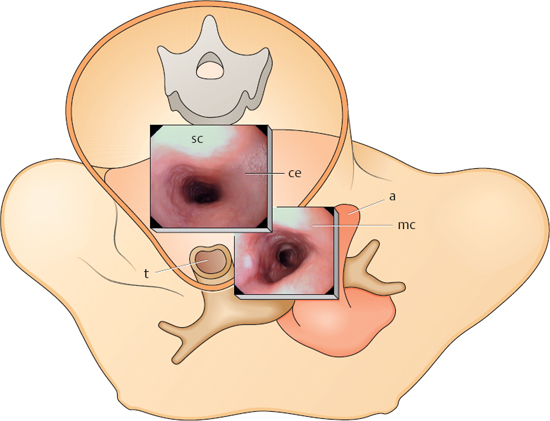
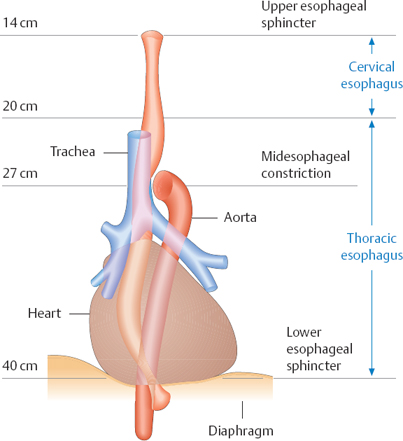
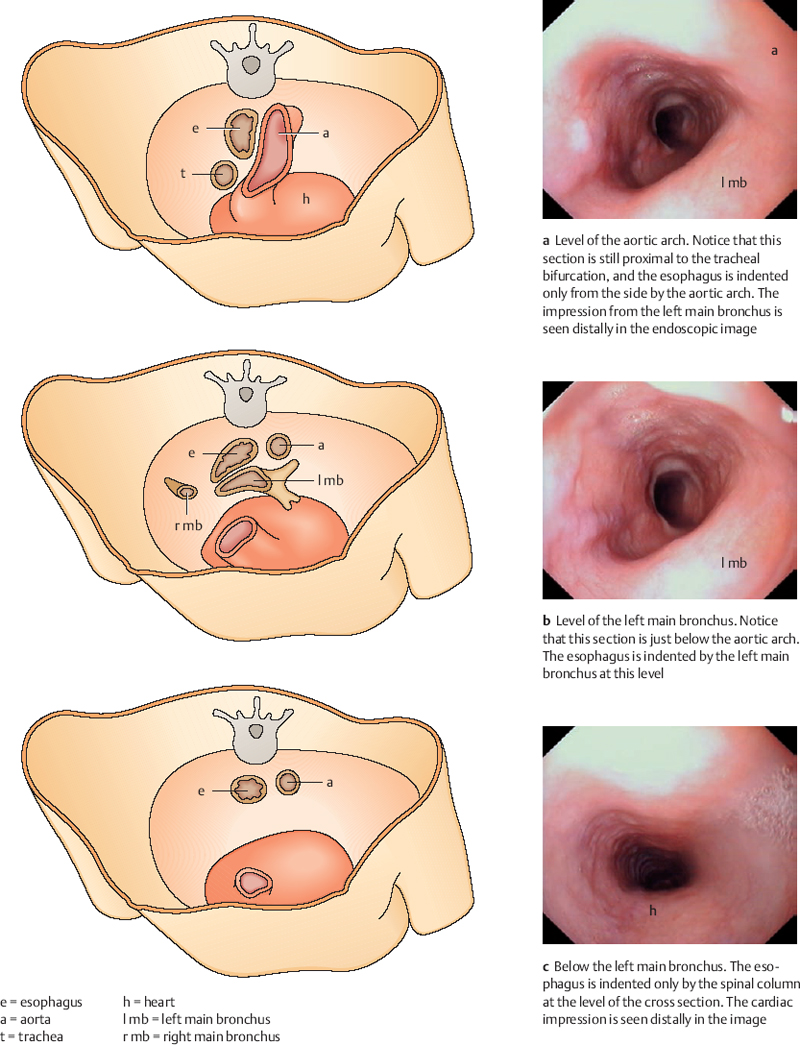
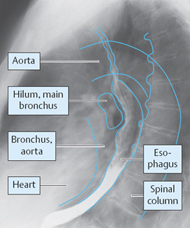
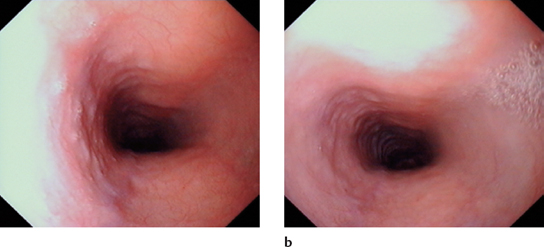
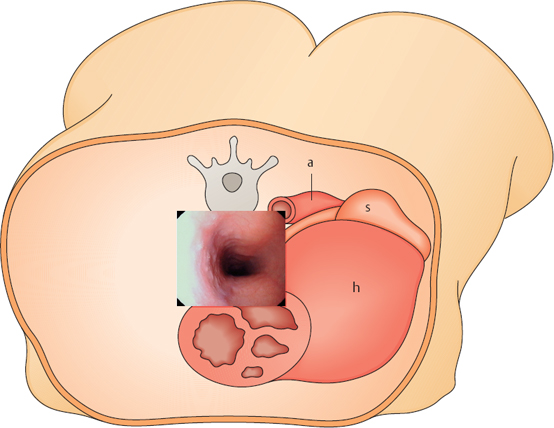
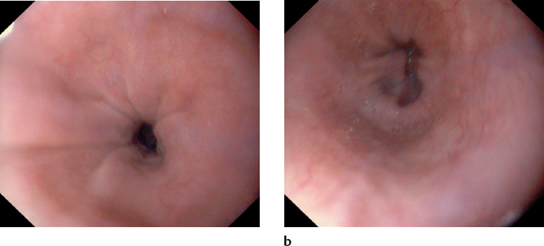
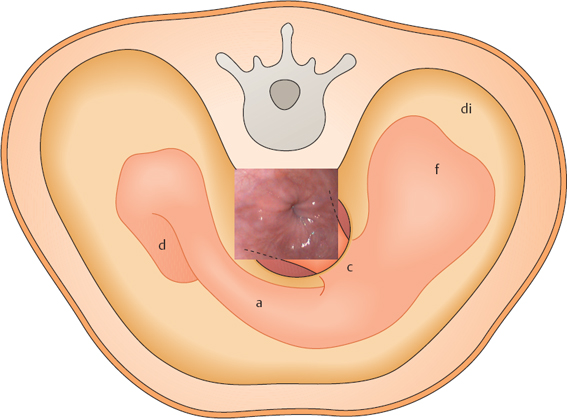
2 Examination Technique and Normal Findings Direct-Vision Insertion: Four Phases Middle Esophageal Constriction Inspecting the Middle Esophageal Constriction Distal Esophagus and Lower Esophageal Constriction Lower Esophageal Sphincter and Diaphragmatic Hiatus Swallowing and Esophageal Motility Examining the Stomach During Insertion Views: Fundus–Body Junction and Gastric Body Views: Body–Antrum Junction and Antrum Body–Antrum Junction and Antrum Relations of the Stomach: Abdominal Wall Relations of the Stomach: Pancreas Relations of the Stomach: Liver Relations of the Stomach: Heart and Spleen Passage into the Duodenal Bulb Passage into the Descending Duodenum Views: Bulbar and Proximal Duodenum Views: Descending Duodenum and Superior Duodenal Angle Several methods can be used to insert the endoscope. None of these methods has major advantages over the others, but certain rules need to be followed (Fig. 2.1). Because insertion of the endoscope is the most unpleasant part of the examination for most patients, it should be carried out in a calm, assured manner. The patient lies on the left side with the chin tucked against the chest. The bite guard may be placed securely between the teeth at this time, or it may be fitted over the instrument shaft before sliding the endoscope carefully into the mouth. In the latter case, the bite guard is not placed until the endoscope has entered the upper esophagus. If difficulties arise, especially due to interference from the tongue, the fingers can be used to assist endoscope insertion. In rare cases the patient may have difficulty tolerating the procedure in left lateral decubitus, and the endoscopist may attempt to pass the scope with the patient sitting up. This should be reserved for exceptional cases, however. Fig. 2.1 Inserting the endoscope In the blind insertion method, the endoscope is first passed over the base of the tongue toward the hypopharynx under external visual control. Care is taken that the endoscope tip is not retroflexed toward the nasopharynx and does not deviate to the left or right into the piriform recess (Figs. 2.2, 2.3). With proper technique, the instrument tip can be advanced just to the introitus of the upper esophageal sphincter, at which time the patient is instructed to swallow. Unless the patient swallows, it is extremely difficult to advance the endoscope through the upper esophageal sphincter without causing injury or significant discomfort. Endoscope insertion is contraindicated while the patient is coughing or taking a deep breath, as this will inevitably lead to tracheal intubation (Fig. 2.2). The period immediately after coughing, when the patient is swallowing saliva, is a favorable time for entering the esophagus. At this time the larynx is in an elevated position, visible externally on the neck. The endoscope is advanced by applying gentle pressure. Following initial resistance, a distinct “give” is felt as the endoscope slips into the upper esophagus. Once the instrument tip is within the esophagus, the insertion is continued under endoscopic vision. Fig. 2.2 Risks and hazards of endoscope insertion Fig. 2.3 Larynx and pharynx a Anteroposterior (AP) radiograph after oral contrast administration. The piriform recess descends lateral to the larynx. Medial to it is the introitus of the upper esophageal sphincter b Lateral radiograph after oral contrast administration. The piriform recess appears as an outpouching structure lateral and anterior to the upper esophageal sphincter. Fig. 2.4 View of the trachea and upper esophageal sphincter. Notice that the slitlike upper esophageal sphincter, not yet visible in the upper plane, lies between the interarytenoid incisure and the spinal column. The epiglottis, which extends to a relatively high level, is usually difficult to identify. The lower plane is at the level of the upper esophageal sphincter Fig. 2.5 Misdirected intubation Fig. 2.6 Intubation of the esophagus The esophagus is 20-24 cm long. It begins approximately 1416 cm distal to the incisor teeth with the upper esophageal sphincter (Fig. 2.8) at the level of the cricoid cartilage and reaches the stomach at 38-41 cm. The upper esophageal sphincter forms the entrance to the esophagus. As the narrowest part of the alimentary tract, it is the first and often the most difficult obstacle for the endoscopist to surmount (Fig. 2.7). It is a muscular sphincter formed predominantly by the cricopharyngeal fibers of the constrictor pharyngeus muscle. This region forms a high-pressure zone 24 cm long with a resting pressure of 40-120 mmHg, making it extremely difficult to intubate. This pressure falls when the patient swallows, allowing the endoscope to pass through. The sphincter almost never has a visible lumen, since the relaxation phase during swallowing lasts for only a fraction of a second (Table 2.1). Fig. 2.7 Upper esophageal sphincter. The tip of the endoscope is positioned directly above the upper esophageal sphincter a The patient is breathing, and the esophageal sphincter is closed b The patient swallows, and the esophageal sphincter briefly opens Fig. 2.8 Midsagittal scan through the head and neck (from: Möller and Reif, Normal Findings in CT and MRI. Stuttgart: Thieme 1999) Fig. 2.9 Cross section just above the n. upper esophageal sphincter. During esophageal intubation, the upper esophageal sphincter is usually closed. It opens during swallowing, momentarily exposing the lumen. At that time the endoscope can be advanced The cervical esophagus begins just below the upper esophageal sphincter and is 6 cm long. Fig. 2.10 Cervical esophagus Fig. 2.11 Cross section at the level of the cervical esophagus. The cervical esophagus appears almost featureless at endoscopy. The next visible landmark is the midesophageal constriction sc = spinal column ce = cervical esophagus a = aorta mc = midesophageal constriction t = trachea The middle esophageal constriction is reached at approximately 27 cm. It is the first definite landmark that is seen in passing through the otherwise featureless cervical and upper thoracic esophagus. It is an asymmetrical luminal constriction caused by indentations from the aorta and left main bronchus (Table 2.3). The aorta and bronchus are difficult to identify as such in the endoscopic image, and it can be difficult to appreciate their spatial relationships. It is necessary to know the anatomy of this region and the orientation of the endoscope (Figs. 2.12, 2.13). Fig. 2.12 Midesophageal constriction. Standard anatomical view from the anterior aspect Fig. 2.13 Cross section at the level of the midesophageal constriction. To understand the appearance of the midesophageal constriction in the upper image, it is necessary to know the rotational position of the endoscope. In this figure the indentation from the spinal column is approximately at the 12-o’clock position. The left main bronchus is at the 6-o’clock position, and the aortic arch is on the right. Notice that the aortic arch is more proximal than the bronchus and runs almost horizontally. The left main bronchus is distal and runs counterclockwise down below the aortic arch a = aorta re = retrocardial esophagus l mb = left main bronchus r mb = right main bronchus. Fig. 2.14 Cross sections The retrocardiac esophagus begins approximately 30-38 cm from the incisor teeth. It is curved posteriorly at this level due to displacement by the heart (Fig. 2.15; Table 2.4). Fig. 2.15 Lateral chest radiograph after oral contrast administration. Midsagittal view of the retrocardiac esophagus. Notice that the entire esophagus is bowed posteriorly and is indented from the front by the heart Fig. 2.16 a,b Retrocardiac esophagus. This region shows pulsatile changes in luminal shape Fig. 2.17 Retrocardiac esophagus in cross section. Notice that the esophagus is symmetrically indented from the anterior side. The descending aorta is posterolateral to the esophagus a = aorta s = stomach h = heart The lower esophageal constriction is formed by a combination of the lower esophageal sphincter and extrinsic pressure from the diaphragmatic hiatus. It is reached at approximately 3638 cm from the incisor teeth (Table 2.5). Fig. 2.18 a,b Distal esophagus. Views of b the lower esophageal constriction Fig. 2.19 Cross section just above the lower esophageal constriction di = diaphragm f = fundus c = cardia a = antrum d = duodenum The gastroesophageal junction is reached at approximately 38 (35-41) cm from the incisors. Besides the indentations from the aorta, left main bronchus, and heart, which give the esophagus a somewhat more variegated appearance, the gastroesophageal junction is the first truly interesting station that is reached during upper endoscopy. On the one hand, the gastroesophageal junction is a functionally and anatomically complex region that is not easily understood or evaluated (Fig. 2.20). At the same time, this region is one of the most frequent indications for upper GI endoscopy and is the site of the most common disease of the esophagus and of the upper gastrointestinal tract in general: reflux disease. The frequency of diseases and complaints in this region is understandable when we consider the stresses that exist there even under physiological conditions. The thoracic cavity is under a negative pressure that is maximal during inspiration. Meanwhile, the flattening of the diaphragm that occurs with inspiration causes a rise in intraabdominal pressure, which is maximal during coughing and straining. This results in a pressure gradient of 10-15 mmHg, which the organ structures in this region must be able to withstand. Additionally, the gastroesophageal junction marks the boundary between the acid-sensitive epithelium of the esophagus and the strongly acidic gastric contents. A technically complex apparatus is needed to handle the pressure gradient and pH differences that exist in this region Three anatomical factors maintain the integrity of the gastroesophageal junction (Fig. 2.21): The endoscopist identifies and evaluates the sphincter itself, the diaphragmatic hiatus, and the transitional region between the squamous epithelium of the esophagus and the columnar epithelium of the stomach, which are separated by a visible junction called the Z-line.
Inserting the Endoscope
 Basic Rules
Blind Insertione
 With Visual Control
 Passage through the Upper Esophageal Sphincter

Direct-Vision Insertion
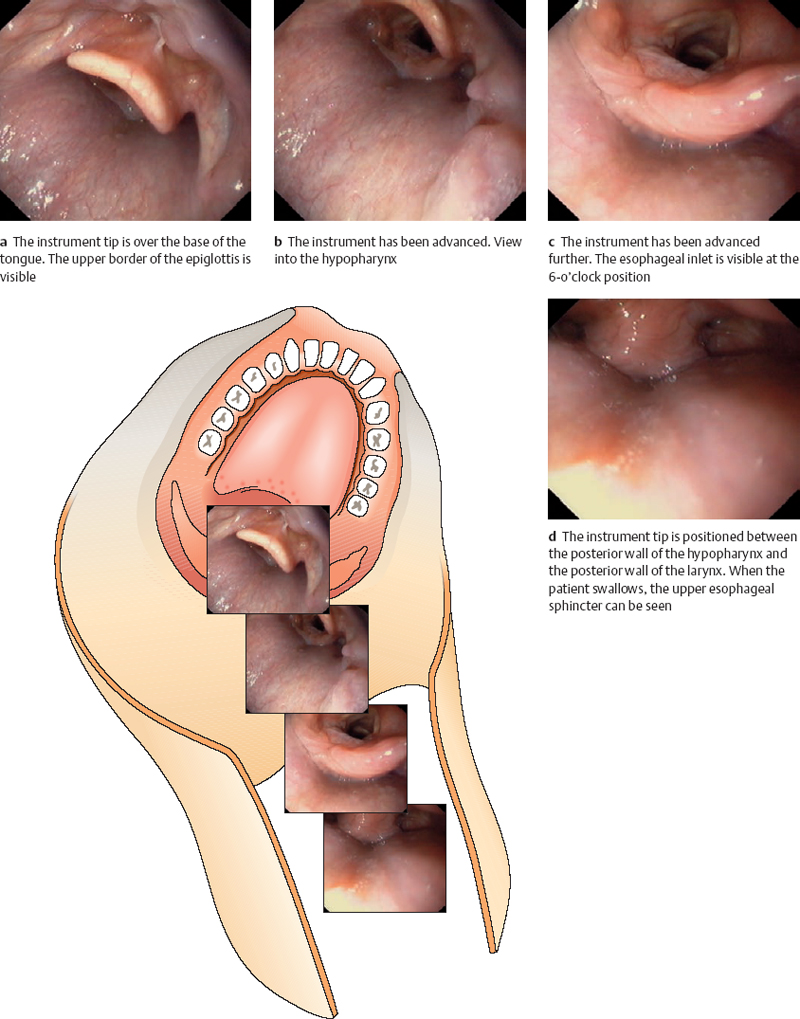
![]() Esophageal intubation can also be performed under direct endoscopic vision (Fig. 2.6). The instrument tip is advanced to the larynx as described above. The open glottic aperture is seen (Fig. 2.4). A slit can be identified between the posterior wall of the hypopharynx and the cuneiform and corniculate tubercles, which are clearly visible in most patients. This slit (not shown in this view) leads to the upper esophageal sphincter, which curves gently around the posterior side of the cricoid cartilage. The posterior wall of the larynx bulges far into the hypopharynx, making central passage difficult. The instrument tip should pass a little to the left or right of the midline, taking care not to deviate into either piriform recess. The instrument is advanced with gentle pressure until the patient swallows. The esophageal lumen becomes visible for a brief moment, and the tip is advanced into the esophagus. In many cases it is also possible to position the endoscope carefully at the esophageal introitus, have the patient swallow several times, and rotate the instrument into the esophagus. Care is taken not to slip into the piriform recess (Fig. 2.6).
Esophageal intubation can also be performed under direct endoscopic vision (Fig. 2.6). The instrument tip is advanced to the larynx as described above. The open glottic aperture is seen (Fig. 2.4). A slit can be identified between the posterior wall of the hypopharynx and the cuneiform and corniculate tubercles, which are clearly visible in most patients. This slit (not shown in this view) leads to the upper esophageal sphincter, which curves gently around the posterior side of the cricoid cartilage. The posterior wall of the larynx bulges far into the hypopharynx, making central passage difficult. The instrument tip should pass a little to the left or right of the midline, taking care not to deviate into either piriform recess. The instrument is advanced with gentle pressure until the patient swallows. The esophageal lumen becomes visible for a brief moment, and the tip is advanced into the esophagus. In many cases it is also possible to position the endoscope carefully at the esophageal introitus, have the patient swallow several times, and rotate the instrument into the esophagus. Care is taken not to slip into the piriform recess (Fig. 2.6).
 Problems
 In both methods—blind and direct-vision insertion—there is always a short segment of the esophagus that must be traversed without vision.
 If a Zenker diverticulum is present in this region, there is a substantial risk of perforation
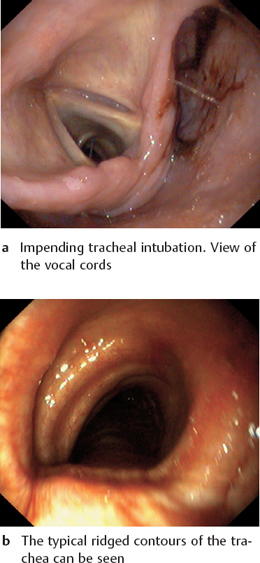
 If the endoscope is misdirected toward the trachea, the vocal cords (Fig. 2.5a) or the typical ribbed walls of the trachea (Fig. 2.5b) will be seen. In this case the endoscope should be withdrawn at once.
Direct-Vision Insertion: Four Phases
Upper Esophageal Sphincter
 Anatomy
 Physiology
![]() Endoscopically, the upper esophageal sphincter appears as a lip-shaped eminence surrounding a transversely oriented, slitlike lumen (Figs. 2.7, 2.9). The stratified squamous epithelium of the esophagus itself normally appears reddish-gray with a smooth, glistening surface. It is not very transparent, but longitudinal, superficially branched venous plexuses can be seen beneath the mucosa.
Endoscopically, the upper esophageal sphincter appears as a lip-shaped eminence surrounding a transversely oriented, slitlike lumen (Figs. 2.7, 2.9). The stratified squamous epithelium of the esophagus itself normally appears reddish-gray with a smooth, glistening surface. It is not very transparent, but longitudinal, superficially branched venous plexuses can be seen beneath the mucosa.
 Approximately 14 cm from the incisor teeth
 Slitlike lumen
 Difficult to see into the lumen
 Endoscope can be passed only during swallowing
 caution: Avoid slipping into the piriform recess.

Cervical Esophagus
 Anatomy
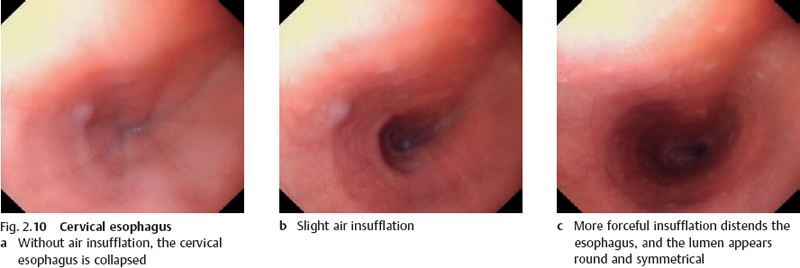
![]() Its distal end cannot be positively identified at endoscopy, however. The cervical esophagus is a straight collapsed tube that appears largely featureless at endoscopy. Air insufflation distends it to a round, symmetrical lumen that is affected very little by respiratory movements (Figs. 2.10, 2.11; Table 2.2). The middle esophageal constriction is located approximately 27 cm from the incisor teeth, several centimeters past the junction with the thoracic esophagus.
Its distal end cannot be positively identified at endoscopy, however. The cervical esophagus is a straight collapsed tube that appears largely featureless at endoscopy. Air insufflation distends it to a round, symmetrical lumen that is affected very little by respiratory movements (Figs. 2.10, 2.11; Table 2.2). The middle esophageal constriction is located approximately 27 cm from the incisor teeth, several centimeters past the junction with the thoracic esophagus.
 Approximately 16-20 cm from the incisor teeth
 Collapsed
 Symmetrical
 Round
Round
 Delicate folds
 Straight course
Middle Esophageal Constriction
 Anatomy
![]() The aorta indents the esophagus from the lateral side and runs almost horizontally as it crosses the esophagus (Fig. 2.14a). The left main bronchus indents the esophagus from the anterior side. In the endoscopic image, it runs obliquely downward in a counterclockwise direction (Fig. 2.14b, c). It has a slightly ribbed surface. A posterior indentation from the spinal column is often seen opposite the bronchus. The aorta and bronchus cannot always be positively identified. Bizarre shapes are sometimes noted in thin patients.
The aorta indents the esophagus from the lateral side and runs almost horizontally as it crosses the esophagus (Fig. 2.14a). The left main bronchus indents the esophagus from the anterior side. In the endoscopic image, it runs obliquely downward in a counterclockwise direction (Fig. 2.14b, c). It has a slightly ribbed surface. A posterior indentation from the spinal column is often seen opposite the bronchus. The aorta and bronchus cannot always be positively identified. Bizarre shapes are sometimes noted in thin patients.
 Approximately 27 cm from the incisor teeth
 Indented by the aorta
 Indented by the left main bronchus

Inspecting the Middle Esophageal Constriction
Retrocardiac Esophagus
 Anatomy
![]() The retrocardiac esophagus is visualized just below the middle esophageal constriction. This portion of the esophagus is compressed anteriorly by the left atrium and posteriorly by the aorta for a length of 8 cm, resulting in an elliptical lumen (Figs. 2.16, 2.17). Distinct pulsations can be seen.
The retrocardiac esophagus is visualized just below the middle esophageal constriction. This portion of the esophagus is compressed anteriorly by the left atrium and posteriorly by the aorta for a length of 8 cm, resulting in an elliptical lumen (Figs. 2.16, 2.17). Distinct pulsations can be seen.
 Approximately 30-38 cm from the incisor teeth
 Elliptical indentation from the heart and aorta
 Bowed posteriorly, then curves forward toward the diaphragm
 Pulsations
Distal Esophagus and Lower Esophageal Constriction
 Anatomy
 Approximately 36-38 cm from the incisor teeth
 Formed by the sphincter and esophageal hiatus
 Venous plexus
 Longitudinal folds with concentric luminal narrowing
![]() The lumen of the distal esophagus again appears round and symmetrical. The lower esophageal constriction is visible in the distance (Fig. 2.18). The muscular contraction and accompanying venous plexus create a typical endoscopic picture of longitudinal folds with concentric luminal narrowing (Fig. 2.19).
The lumen of the distal esophagus again appears round and symmetrical. The lower esophageal constriction is visible in the distance (Fig. 2.18). The muscular contraction and accompanying venous plexus create a typical endoscopic picture of longitudinal folds with concentric luminal narrowing (Fig. 2.19).
Gastroesophageal Junction
 Anatomy
 Physiology
 Closure Mechanisms
![]() Endoscopy is excellent for evaluating the mor7*% phology of this region. A functional evaluation is often subject to a degree of uncertainty and especially to differences of interpretation by different examiners.
Endoscopy is excellent for evaluating the mor7*% phology of this region. A functional evaluation is often subject to a degree of uncertainty and especially to differences of interpretation by different examiners.
Stay updated, free articles. Join our Telegram channel

Full access? Get Clinical Tree


