Examination of the Visual Sensory System
Despite continuous advances in neuroimaging and other new techniques, the examination of the afferent visual sensory system is still the core of the neuro-ophthalmologic examination. This chapter describes the most common subjective and objective testing parameters used in the afferent visual system examination.
Evaluation of the afferent system begins with a thorough medical history, followed by an ophthalmologic examination, including assessment of best-corrected or at least pinhole visual acuity at distance and near, color vision, visual fields, anterior segments (including the media), vitreous, intraocular pressure (IOP), and appearance of the optic discs, retinas (especially the macula), and retinal vessels. At the completion of the examination, one should have an idea as to the structure involved in the patient’s visual sensory difficulties or at least have a differential diagnosis. If the diagnosis remains unclear, a number of ancillary tests are available, including ocular imaging and electrophysiologic procedures, that should lead to the correct diagnosis.
History
A thorough history is one of the most important parts of the examination because it determines the initial strategy for differential diagnostic evaluation. For example, it is essential to establish if the visual loss is monocular or binocular; if its location is central, peripheral, altitudinal, or hemianopic; and if the onset of the loss is gradual, sudden, or intermittent.
It also is important to ask about photopsias (visual phenomena such as flashing black squares, flashes of lights, or showers of sparks) distortions in vision (metamorphopsia or micropsia), and positive scotomas. A positive scotoma is one that is seen by the patient, like the purple spot that is often seen after a flash bulb goes off, whereas a negative scotoma refers to a nonseeing area of the visual field. Metamorphopsia, micropsia, and positive scotomas often occur in patients with maculopathies, whereas photopsias may be present in patients with retinal disease, optic nerve dysfunction, or cerebral dysfunction from migraine and other disorders.
Clinical Office Examination
Clinical evaluation of the afferent visual system for each eye incorporates the items described below, all of which can be performed in the office. The first goal for the neuro-ophthalmology examination is to determine if the visual loss is caused by a disorder anterior to the retina (ocular media), in the retina, in the optic nerve, in the optic chiasm, in the retrochiasmal pathways, or is nonorganic. The second goal is to establish a differential and working diagnosis. By examining various parameters of afferent visual function, the examiner frequently can determine the anatomic site of the afferent system abnormality and the most probable cause or causes.
Visual Acuity
The most common measurement of visual function in a clinical setting is visual acuity. It is the primary method of assessing the integrity of the optics of the eye and the neural mechanisms subserving the fovea. Visual acuity is used to monitor central visual function in patients, is an essential part of clinical refraction procedures, and is important to the patient for reading,
face recognition, and other tasks involving fine visual detail. Visual acuity is specified in terms of the visual angle subtended by the finest spatial detail that can be identified by the observer. The physical size of an object and its distance from the observer determines its visual angle.
face recognition, and other tasks involving fine visual detail. Visual acuity is specified in terms of the visual angle subtended by the finest spatial detail that can be identified by the observer. The physical size of an object and its distance from the observer determines its visual angle.
The most common form of reporting visual acuity is the “Snellen notation,” consisting of a fraction in which the numerator is the testing distance (20 ft or 6 m) and the denominator is the distance at which a “normal” observer is able to read the letter. The standard of 20/20 for “normal” vision was developed more than 100 years ago, and with today’s high-contrast eye charts and better light sources, most normal persons under the age of 50 can be corrected to better than 20/20.
 Figure 1.1 Objects used to test vision. A: An example of a standard eye chart for testing distance visual acuity. B: A “tumbling” E that can be used to assess acuity in children, illiterate individuals, and patients who are cognitively impaired. Note that the E can be turned around, so that it resembles a “W” or an “M.” C: Allen cards. These cards, designed by Dr. Henry Allen, can be used to test acuity in children and adults who have not yet learned, do not know, or, for neurologic reasons, have forgotten their letters. |
The measurement of visual acuity in special populations (e.g., young children and physically challenged persons) is not always possible with a standard letter chart (Fig. 1.1). Testing of central visual function of
infants begins with an assessment of how well the infant fixes and follows the examiner’s face, a small toy, or other objects of interest. For older children, the “Tumbling E Cube” can be used for visual acuity testing. This cube is a white block with black E letters of different sizes on each of its sides. By rotating the cube, an individual E can be presented in four different orientations to test the patient’s ability to distinguish the direction of the E. The cube can be placed at various distances from the patient, and different-sized E targets can be evaluated to make a determination of visual acuity. The Tumbling E Cube thus relies on a child’s ability to orient the hand according to the direction of the E. For older children, the “E game” can be performed using a projected “E” acuity chart. The “HOTV” test involves matching each test letter to one of four letters (H, O, T, or V) printed on a card held by the child. Some visual acuity tests use pictures or symbols. These may be more reliable than the HOTV test. The most popular of the picture visual acuity tests are the Allen Cards that are available as hand-held picture cards or projected images. The objects include an easily identifiable birthday cake, a bird, a house, and a car (although one older card has a picture of a rotary telephone that most children have never seen!).
infants begins with an assessment of how well the infant fixes and follows the examiner’s face, a small toy, or other objects of interest. For older children, the “Tumbling E Cube” can be used for visual acuity testing. This cube is a white block with black E letters of different sizes on each of its sides. By rotating the cube, an individual E can be presented in four different orientations to test the patient’s ability to distinguish the direction of the E. The cube can be placed at various distances from the patient, and different-sized E targets can be evaluated to make a determination of visual acuity. The Tumbling E Cube thus relies on a child’s ability to orient the hand according to the direction of the E. For older children, the “E game” can be performed using a projected “E” acuity chart. The “HOTV” test involves matching each test letter to one of four letters (H, O, T, or V) printed on a card held by the child. Some visual acuity tests use pictures or symbols. These may be more reliable than the HOTV test. The most popular of the picture visual acuity tests are the Allen Cards that are available as hand-held picture cards or projected images. The objects include an easily identifiable birthday cake, a bird, a house, and a car (although one older card has a picture of a rotary telephone that most children have never seen!).
“Preferential-looking” techniques, ocular motor responses such as optokinetic nystagmus, and electrophysiologic measures such as the visual-evoked potential (VEP) can be used to estimate visual acuity (see below). In addition, a number of eye charts and behavior test procedures can be used to assess visual acuity in nonverbal or physically challenged patients.
Visual acuity measurements in children present special problems, in part because the child wants to do well and please the examiner. It is therefore important for the examiner to ensure that the nontested eye is properly occluded to avoid peeking. The examiner must work quickly, may need to use more than one procedure to establish visual acuity capabilities, and should provide continuous positive feedback to the child to maintain cooperation.
In patients suspected of having nonorganic visual loss, several additional methods of assessing visual acuity may be useful. These are discussed in Chapter 23.
In normal observers, visual acuity is highest for the foveal region and decreases rapidly with increasing visual field eccentricity. In many instances, central visual field loss and reduced visual acuity appear to be closely related; however, visual acuity can also be reduced when there is generalized depression of the central visual field. In such instances, a central scotoma is not present. There also are several conditions for which the visual field may be at or near normal sensitivity, but visual acuity may be dramatically reduced. These conditions include refractive errors, corneal surface irregularities, cataract, retinal edema or serous detachment, and amblyopia.
Contrast Sensitivity
Visual acuity defines the smallest spatial detail that can be resolved for high-contrast stimuli, but it does not specify the responses of the visual system to objects of different sizes and contrasts. However, one also can assess afferent visual function by looking at the behavior of the visual system at threshold contrast levels.
A number of factors influence the measurement of contrast sensitivity, including background adaptation luminance, stimulus size, visual field eccentricity, pupil size, temporal characteristics, stimulus orientation, and various optical factors such as defocus, dioptric blur, diffusive blur, and astigmatism. From a neuro-ophthalmologic standpoint, measurement of contrast sensitivity can reveal subtle deficits in patients with a variety of optic neuropathies as well as in other neurologic conditions such as Alzheimer disease and Parkinson disease.
In general, assessment of contrast sensitivity is clinically useful for detecting early or subtle visual loss (especially when visual acuity is normal), making comparisons between the two eyes, and for monitoring the progression of or improvement in visual function. Assessing contrast sensitivity also may be helpful in predicting the performance for various daily tasks, such as the identification of distant objects, reading highway signs and books, recognizing faces, and mobility. Thus, it may be useful not only for revealing subtle visual deficits associated with ocular and neuro-ophthalmologic disorders but also for identifying problems that a patient is likely to encounter during daily activities.
Contrast sensitivity may be measured in several different ways. One method is the Pelli–Robson chart (Fig. 1.2), consisting of letters of a fixed size that vary in contrast. Each line consists of six letters, with the three left-most and three right-most letters having the same amount of contrast. The patient reads the chart in a manner similar to a standard visual acuity chart, and the minimum contrast at which the letters can be detected is recorded. This method of testing contrast sensitivity is highly reproducible and is capable of detecting disturbances in visual function that are not evident with standard visual acuity testing.
Contrast sensitivity can also be measured with Low-Contrast Sloan Letter Charts. These charts have gray letters of progressively smaller size on a white background (Fig. 1.3); each chart in the set corresponds to a different level of contrast, ranging from high (100%, about the same contrast as standard visual acuity charts) to medium (5%) to low (1.25%, 0.6%) contrast levels. Patients are asked to read each of the four charts at 2 m distance under consistent lighting while wearing their
usual distance refractive correction. The charts are readily available and provide a practical, quantitative, and standardized method of visual function assessment. They have proven particularly useful in identifying subtle visual dysfunction in patients with a history of recovered optic neuritis as well as in patients with multiple sclerosis but without any other evidence of optic nerve dysfunction.
usual distance refractive correction. The charts are readily available and provide a practical, quantitative, and standardized method of visual function assessment. They have proven particularly useful in identifying subtle visual dysfunction in patients with a history of recovered optic neuritis as well as in patients with multiple sclerosis but without any other evidence of optic nerve dysfunction.
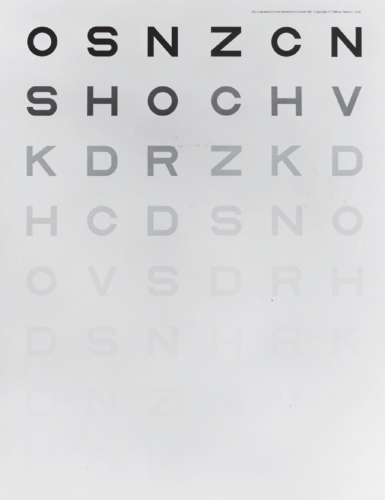 Figure 1.2 The Pelli–Robson contrast sensitivity chart. |
Stereoacuity
Stereoacuity requires good visual acuity in both eyes and normal cortical development. As such, stereoacuity can be helpful in establishing if a patient has visual loss from congenital amblyopia or monofixation syndrome, as well as verifying the extent of any monocular visual acuity loss. Using the Titmus or Randot Stereo Testers, stereoacuity in normal observers with good binocular function and visual acuity should be at least 40 seconds of arc or better when both eyes have 20/20 visual acuity.
Color Vision
From a clinical diagnostic standpoint, it is important to distinguish if a color vision deficiency is congenital
or acquired. Congenital color vision deficits usually are easy to classify using standard clinical color vision tests because color discrimination is impaired for a specific region of the visual spectrum, and the deficits are long-standing, stable, symmetric in the two eyes, and unassociated with other visual symptoms or complaints. In patients with acquired color vision loss, however, color discrimination may be impaired throughout the visual spectrum or along a specific axis, and the deficits may be mild or severe, of sudden or insidious onset, symmetric or asymmetric, and often associated with other visual symptoms or complaints. In acquired color vision deficiencies, tritan (blue) and blue-yellow deficiencies most often are associated with diseases affecting the photoreceptors and the outer plexiform layer, whereas red-green deficiencies most often are associated with diseases affecting the optic nerve and posterior visual pathways. Some notable exceptions include glaucoma, dominant hereditary optic atrophy, and chronic papilledema, that may demonstrate blue-yellow deficits, and Stargardt and Best disease, that often produce red-green deficits. Optic neuritis produces a mixture of red-green and blue-yellow deficits, although one axis is usually more affected than the other.
or acquired. Congenital color vision deficits usually are easy to classify using standard clinical color vision tests because color discrimination is impaired for a specific region of the visual spectrum, and the deficits are long-standing, stable, symmetric in the two eyes, and unassociated with other visual symptoms or complaints. In patients with acquired color vision loss, however, color discrimination may be impaired throughout the visual spectrum or along a specific axis, and the deficits may be mild or severe, of sudden or insidious onset, symmetric or asymmetric, and often associated with other visual symptoms or complaints. In acquired color vision deficiencies, tritan (blue) and blue-yellow deficiencies most often are associated with diseases affecting the photoreceptors and the outer plexiform layer, whereas red-green deficiencies most often are associated with diseases affecting the optic nerve and posterior visual pathways. Some notable exceptions include glaucoma, dominant hereditary optic atrophy, and chronic papilledema, that may demonstrate blue-yellow deficits, and Stargardt and Best disease, that often produce red-green deficits. Optic neuritis produces a mixture of red-green and blue-yellow deficits, although one axis is usually more affected than the other.
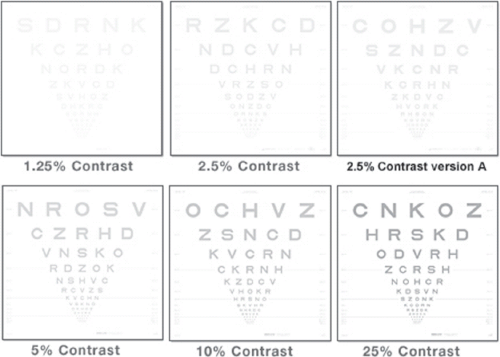 Figure 1.3 Sloan low-contrast letters. Note varying amounts of contrast. |
A wide variety of color vision tests are available to the clinician. Because most were designed to evaluate congenital red-green color vision deficiencies, many do not permit adequate testing of blue-yellow deficits or optimum characterization of acquired color vision losses. As with any test of visual function, it is important that the testing conditions be standardized and performed in the proper manner. A particularly important factor for all clinical color vision test procedures is the use of proper lighting, both in terms of having an adequate amount of light for the test and having a light source with the proper spectral distribution.
Pseudoisochromatic Plates
Pseudoisochromatic plates are the most common color vision tests employed in clinical practice. A number of pseudoisochromatic plate tests are available, although the Ishihara and Hardy–Rand–Rittler are the most commonly used versions (Fig. 1.4). Each of these tests consists of a series of plates that contain colored dots of varying size and brightness. The tests are designed, so that persons with normal color vision see numbers, shapes, or letters as a consequence of grouping certain colored dots together to form a figure against the background of other dots. Depending on how the particular test is designed, persons with color deficiencies are either unable to see the figure because the figure dots are confused with the background dots, or they see a figure different from that seen by persons with normal color vision because figure dots and background dots are grouped together in an abnormal pattern. The variation in size and brightness of the dots is used to ensure that recognition of
figures is made on the basis of color discrimination and not other cues. Even children who are shy or do not know their colors may be able to trace the shapes. Other variations of pseudoisochromatic plates include winding paths of colored dots that the patient can trace. These are useful in young children, illiterates, and some neurologically ill patients who are unable to identify letters, numbers, or shapes.
figures is made on the basis of color discrimination and not other cues. Even children who are shy or do not know their colors may be able to trace the shapes. Other variations of pseudoisochromatic plates include winding paths of colored dots that the patient can trace. These are useful in young children, illiterates, and some neurologically ill patients who are unable to identify letters, numbers, or shapes.
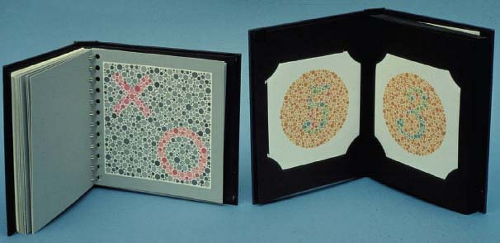 Figure 1.4 Appearance of figures on the Hardy–Rand–Rittler and Ishihara pseudoisochromatic color plates. |
Color vision testing using pseudoisochromatic plates is quick and easy to perform and therefore can be an excellent screening procedure for distinguishing normal color vision from congenital or acquired color vision deficits.
Farnsworth Panel D-15 Test
The Farnsworth Panel D-15 test is a color arrangement test consisting of 15 color caps that form a color circle covering the visual spectrum. A reference cap is permanently fixed in the arrangement tray; the other 15 caps are placed in a scrambled order in front of the patient. The patient’s task is to select the cap that is closest in hue to the reference cap and place it next to the reference cap in the tray. The patient is then asked to continue to place the caps in the tray, one at a time, so that they are arranged in an orderly transition of hue. Patients with moderate to severe protan, deutan, or tritan color vision deficits will confuse colors across the color circle, so that the arrangement contains misplaced caps. On the back of each cap is a number to assist in scoring the test. On the D-15 scoring chart, the caps along the color circle are connected in a dot-to-dot fashion in the order represented in the tray, and the specific arrangement indicates the type of color deficiency. The Panel D-15 test does not indicate the degree of color deficiency, other than to separate color normals and mild anomalous trichromats from those with moderate to severe color vision deficiencies.
Farnsworth–Munsell 100 Hues Test
The Farnsworth–Munsell 100 Hues test permits both classification of the type of color vision deficiency and its severity. Despite its name, it consists of 85 colored caps that are arranged in roughly equal small steps around the color circle. The caps are divided into four boxes, and arrangements of caps are performed one box at a time. In each box, there are two reference caps, one at each end, that are permanently attached to the box. The other caps are taken out of the box, scrambled, and placed before the patient. The patient is then asked to arrange the caps, so that there is an orderly transition in hue from one reference cap to another. As with the panel D-15 test, the Farnsworth–Munsell 100 Hues test is designed, so that certain caps across the color circle will be confused by persons with both congenital and acquired color deficiencies. The caps are numbered on the back, and scoring is determined by the arrangement of the caps in the box. Depending on the type of color deficiency, specific caps across the color circle will be confused, resulting in greater arrangement errors in those locations. In this manner, the type of color vision deficit can be classified. In addition, the severity of the color deficiency can be quantified by determining an overall error score for arrangement errors. This test is rarely used in clinical practice.
Color comparison tests, although only qualitative in nature, can provide valuable information concerning subtle visual anomalies. In general, the best color to compare is red. Using pages from the pseudoisochromatic plates, red-colored bottle caps, or other brightly colored objects, comparisons of color appearance can be very effective in detecting subtle differences between the two eyes. The brightness or saturation of the colored objects may be less in one eye, making the object’s color appear dim or washed out. Similarly, comparisons
within the same eye across the vertical and horizontal midline or between central vision and the mid-periphery can detect subtle differences in color appearance that are indicative of damage to the visual pathways. For example, red may appear pink, orange or brown or the color may disappear completely (Fig. 1.5).
within the same eye across the vertical and horizontal midline or between central vision and the mid-periphery can detect subtle differences in color appearance that are indicative of damage to the visual pathways. For example, red may appear pink, orange or brown or the color may disappear completely (Fig. 1.5).
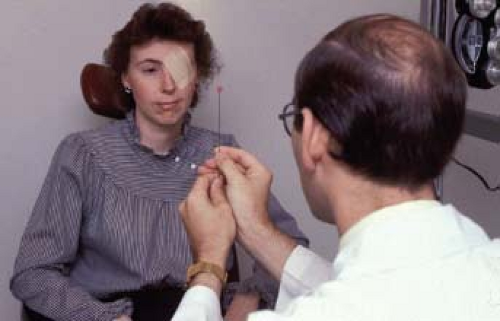 Figure 1.5 Method of testing the visual field using a red test object. This method can be used to detect a subtle central or paracentral scotoma or hemianopia. |
Visual Field Examination
Examination of the visual field is one of the fundamental portions of the afferent system evaluation. A variety of visual field test procedures can be employed, including confrontation, the Amsler grid, kinetic perimetry, and static perimetry. When evaluating a patient with an afferent system deficit, it is important to keep in mind the advantages and disadvantages of the various procedures.
General Principles
Perimetry and visual field testing have been clinical diagnostic test procedures for more than 150 years. Although instrumentation and testing strategies have changed dramatically over this time, the basic principle underlying conventional perimetry has remained the same. Detection sensitivity is determined for a number of locations throughout the visual field using a small target presented against a uniform background. The loss of sensitivity at various visual field locations serves as a noninvasive marker for identifying pathology or dysfunction of the visual pathways. The ability of perimetry to provide helpful clinical information has been responsible for its long-term use as a diagnostic procedure. Because perimetry can provide information about both the likely anatomic locus and disease process or processes for afferent system abnormalities, it remains a vital part of the neuro-ophthalmologic evaluation.
Perimetry and visual field testing fulfill several important diagnostic functions:
Early detection of abnormalities. Because many ocular and neurologic disorders initially are expressed as sensitivity loss in the peripheral visual field, perimetry is an important factor in identifying early signs of afferent system dysfunction. Perimetry is typically the only clinical procedure that evaluates the status of the afferent visual pathways for locations outside the macular region.
Differential diagnosis. The spatial pattern of visual field deficits and comparison of patterns of visual field loss between the two eyes also provide valuable differential diagnostic information. Not only can this information be helpful in defining the location of damage along the visual pathways, it also can assist in identifying the specific type of disease that has caused the damage.
Monitoring progression and remission. The ability to monitor a patient’s visual field over time is important for verifying a working diagnosis, establishing if a condition is stable or progressive, and evaluating the effectiveness of therapeutic interventions.
Revealing hidden visual loss. Perhaps the most important role served by perimetry is the ability to detect afferent visual pathway loss that may not be apparent to the patient. Changes in central visual function typically are symptomatic. Peripheral vision loss, on the other hand, can often go unnoticed, especially if it is gradual and monocular. Paradoxically, even though a patient may be unaware of peripheral visual field loss, it can significantly affect the performance of daily activities such as driving, orientation, and mobility.
Some form of visual field testing should be performed on all patients, regardless of their presenting visual symptoms. It is not feasible nor is it necessary to perform a long quantitative visual field examination on all patients; however, a confrontation visual field should be performed as part of a standard neuro-ophthalmologic examination. When more sensitive measurements of the visual field are needed, automated static or manual kinetic perimetry can be performed.
Manual kinetic perimetry with the Goldmann perimeter has many advantages. As the perimetric stimulus presentation is done by a human, subjects can be cajoled into performing. When the perimetrist senses subject fatigue, he or she can provide a rest break. Unlike the fixed, 6-degree spaced grid of conventional automated perimetry, perimetry using the Goldmann or a similar apparatus allows for custom test point locations along with improvisation of strategies based on coexisting findings. Specific exploration strategies can be used for individual concerns. This allows for much more accurate mapping of defect shape and can be invaluable for the topographic localization of
visual field defects. However, manual perimetry is less sensitive than conventional automated perimetry and it may be more time-consuming. Its most severe limitations, though, are that replacement parts for the perimeter are increasingly difficult to find and, even more importantly, many technicians are adequately trained (or not trained at all) in the performance of manual, kinetic perimetry.
visual field defects. However, manual perimetry is less sensitive than conventional automated perimetry and it may be more time-consuming. Its most severe limitations, though, are that replacement parts for the perimeter are increasingly difficult to find and, even more importantly, many technicians are adequately trained (or not trained at all) in the performance of manual, kinetic perimetry.
Automated static perimetry has had a dramatic impact on improving the quality of care for patients with ocular disorders. Automatic calibration of instruments, standardized test procedures, high sensitivity and specificity, reliability checks (“catch trials”), and quantitative statistical analysis procedures are some of the many advantages of this method of perimetry. However, there are also disadvantages of automated perimetry, including prolonged test time, increased cognitive demands, fatigue, and lack of flexibility for evaluating difficult patient populations. We believe that there is no single method of visual field testing that is best for all circumstances and all patients. Automated perimetry is but one of many tools that the clinician can use to evaluate peripheral visual function, and the various forms of visual field testing should be regarded as complementary techniques, the utility and appropriateness of which are determined by the clinical circumstances and the question that is being addressed. There is no single method of data representation, analysis procedure, visual field index, or other method of evaluating visual field data that provides all of the essential clinical information. It is important to consider all of the information available, including reliability characteristics and the subjective clinical interpretation of the visual field. In addition, it should be kept in mind that although the test may be automated, the patient is not. It is inappropriate to begin an automated visual field test, leave a patient alone in a dark room, and expect the patient to remain alert, energetic, attentive, interested, and to maintain proper alignment and fixation throughout the test procedure. Some patients require periodic rest breaks, encouragement, and personal contact to perform visual field examinations in a reliable manner. It also is important to insure that proper test conditions, refractive characteristics, and other factors have been properly established before initiating the examination.
Specific Techniques for Testing Visual Fields
Confrontation Testing
Confrontation visual fields usually are performed with the patient seated in the examination chair and the examiner seated facing the patient at a distance of 2 to 3 ft. One of the patient’s eyes is occluded using the palm of the patient’s hand, an occluder paddle, or a patch, and the patient is asked to fixate with the uncovered eye on the examiner’s nose or opposite eye. A variety of stimuli can be employed for confrontation visual fields (Fig. 1.6). The basic intent is to use a small, localized target, the presence or absence of which in the visual field can be readily determined by the patient. A confrontation visual field should include an examination of each of the four visual field quadrants, including the superior and inferior hemifields along the horizontal midline, the nasal and temporal hemifields along the vertical midline, and the central and peripheral visual field. Most examiners test patients using double simultaneous finger counting to survey the visual field for any dense quadrantic defect, although some authors recommend finger wiggling instead of counting. Finger counting or wiggling should be followed by a test of the central field. One such test, as noted above, is to use a red object and compare color perception between the two eyes or between parts of the visual field in each eye (Fig. 1.5). By combining several confrontation visual field tests, about 70% of neurologic field defects can be identified. Thus, formal perimetry usually is necessary when the patient has visual loss not explained by a general ophthalmologic examination.
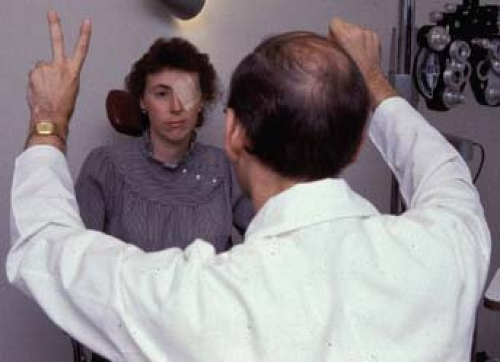 Figure 1.6 Method of testing the visual field by having the patient count fingers in the upper left, upper right, left, right, lower left, and lower right regions of each field. |
Confrontation visual field techniques for infants and children can be quite challenging (Fig. 1.7). For infants and young children, simply holding up one hand and observing whether or not the child looks at it is the best one can do. Another option is to hold both hands up on either side of the child’s fixation and then wave one or wiggle a finger and see if the child looks at the moving hand/finger. For older children, finger mimicking can be used to evaluate the peripheral visual field. The child mimics the examiner by holding up the same number of fingers he or she observes.
In many instances, simultaneous comparison of color saturation or brightness of stimuli between hemifields or between the two eyes is useful in distinguishing subtle anomalies. When the stimuli are presented in a
double simultaneous fashion to the right and left of fixation, it is possible to detect homonymous defects. Subtle deficits across the vertical midline can be detected by asking the patient to indicate which of the two test objects is clearer or brighter. In addition, double simultaneous presentation can be used to detect the phenomenon of visual extinction—the lack of awareness of an object in a seeing area of the visual field when other seeing areas of the visual field are stimulated simultaneously.
double simultaneous fashion to the right and left of fixation, it is possible to detect homonymous defects. Subtle deficits across the vertical midline can be detected by asking the patient to indicate which of the two test objects is clearer or brighter. In addition, double simultaneous presentation can be used to detect the phenomenon of visual extinction—the lack of awareness of an object in a seeing area of the visual field when other seeing areas of the visual field are stimulated simultaneously.
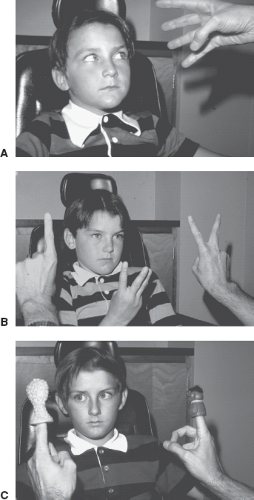 Figure 1.7 Examples of confrontation visual field testing in children. A: Startle response. B: Finger counting. C: Finger puppets. |
The obvious advantages of confrontation visual field testing include its simplicity, flexibility, speed of administration, and ability to be performed in any setting, including at the bedside. The disadvantages of confrontation visual field testing include the lack of standardization, the qualitative nature of the results, and the limited ability to detect subtle deficits and monitor progression or remission of visual loss. Because it is quick and easy to perform, confrontation visual field should be performed on all patients, regardless of their visual complaints.


