Endoscopic Sinus Surgery
Endoscopic sinus surgery has revolutionized the surgical management of paranasal sinus disease and is now the standard surgical approach to the nose and sinuses. Chronic sinusitis remains the most common condition requiring pediatric endoscopic sinus surgery, but with modifications of this approach, indications have been expanded to include excision of endonasal and sinus lesions, drainage of subperiorbital abscesses, treatment of epistaxis, and nasal septoplasty.
Pediatric endoscopic sinus surgery presents challenges. The preoperative examination may be more difficult. The small nasal cavities make surgery more difficult, and pediatric-sized instruments must be available.
22-1,2 Endoscopic Sinus Surgery
Indications
The most common indication for endoscopic sinus surgery is chronic sinusitis that has failed 4 to 6 weeks of medical management with long-term broad-spectrum antibiotics and topical nasal steroid and saline sprays. The child must have significant symptoms and computed tomography (CT) evidence of sinusitis. If they are suspected, contributing factors such as allergies, adenoid hypertrophy and/or infection, cystic fibrosis, gastroesophageal reflux, immune deficiencies, and ciliary dyskinesia should be evaluated and treated before surgery. It is also critical that secondhand smoke be eliminated from the patient’s environment prior to surgery. Other indications for this approach include endonasal and sinus lesions, drainage of subperiosteal abscesses, ligation of the sphenopalatine artery, and nasal septoplasty.
Preoperative Evaluation
Preoperative examination includes anterior rhinoscopy. Ideally, this would be with a telescope, but because of poor patient cooperation, examination with an otoscope may be the only evaluation that can be performed. A CT of the sinus should be performed after medical therapy to assess the child’s anatomy and extent of disease.
Operative Technique
Endoscopic sinus surgery in children is performed under general anesthesia. After intubation an orotracheal tube is taped to the corner of the mouth opposite the surgeon to provide the best access to the nose.
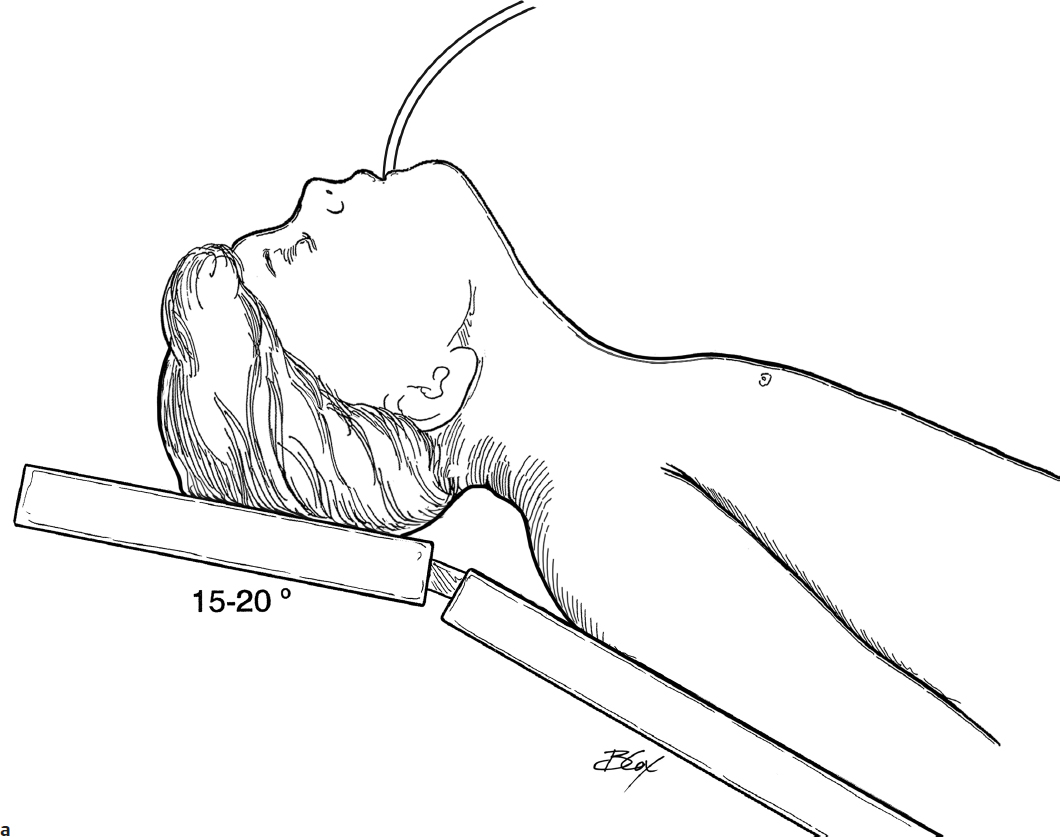
1. The patient is positioned with the head slightly elevated, in the midline, and with the neck slightly extended. The patient is draped with eyes exposed. Lacri-Lube (Allergan) is placed in the eyes to prevent eye injury (Fig. 22.1a).
2. Both nasal cavities are vasoconstricted with 0.05% oxymetazoline (Afrin) on 3 × 1/2 inch neuropledgets (Fig. 22.1b). The pledgets should be placed under direct vision to prevent mucosal trauma. After 5 minutes, the pledgets are removed from the side that is to be operated on first.
3. The nasal cavity is examined to the nasopharynx with a 4.0- mm 0-degree telescope; a 30-degree telescope may also be used (Fig. 22.1c,d). If the nasal cavity is small, a 2.7-mm telescope may be substituted. The surgeon may look directly through the telescope or use a monitor.
4. The middle meatus is then examined (Fig. 22.1e). If access is difficult, a Freer elevator may be used to medialize the middle turbinate (Fig. 22.1f).
5. Under direct visualization, the lateral nasal wall just anterior to the uncinate process is injected with 1–3 mL of 1% lidocaine with 1:100,000 epinephrine using a 25-gauge needle bent 10 degrees toward the bevel on a 3-mL syringe (Fig. 22.1g,h). Blanching of the lateral nasal wall and middle turbinate should occur.
6. New neuropledgets soaked with 0.05% oxymetazoline are replaced into the nasal cavity and middle meatus for an additional 5 minutes.
7. After the pledgets are removed, a Freer elevator is used to medialize the middle turbinate, and the middle meatus is re-examined with a 0-degree telescope.
8. The uncinate process and ethmoid bulla are identified. With gentle palpation, the uncinate process should move (Fig. 22.1i).
9. If a concha bullosa is present and obstructing, the lateral lamella is removed. Using a sickle knife, an incision is made along the anterior face of the middle turbinate (Fig. 22.1j,k), and the lateral lamella is removed with scissors and through cut forceps. The medial lamella is left intact (Fig. 22.1l).
10. The uncinate process is removed to open the infundibulum, expose the ethmoid bulla, and increase access to the anterior ethmoid area. It can be removed using a ball tip seeker and backbiting forceps. The seeker is inserted posterior to the free edge of the uncinate and advanced anteriorly and medially to elevate the edge (Fig. 22.1m). A backbiting forceps is inserted posterior to the edge, and the middle and inferior portions of the uncinate are removed (Fig. 22.1n,o). The inferior portion of the uncinate must be removed completely. The maxillary sinus ostium lies in the anterior inferior portion of the infundibulum (Fig. 22.1p), and any inferior remnants may obscure the ostium. These may be removed with upbiting forceps or a microdebrider (Fig. 22.1q).
11. The uncinate process may also be removed by incising the anterior attachment with a sickle knife. The incision begins superiorly and curves inferiorly to parallel the free border of the uncinate (Fig. 22.1r,s). The uncinate process is subluxed medially and removed with a Blakesley forceps exposing the ethmoid bulla (Fig. 22.1t,u,v).
12. The natural ostium of the maxillary sinus is identified with a seeker and a 0- or 30-degree telescope (Fig. 22.1w,x,y). If the ostium is patent and disease free, it is left alone.
13. If the ostium is obstructed or disease is present, it is opened and enlarged. The ostium is enlarged posteriorly and inferiorly with through cut biting forceps, bent spoon, or small curette (Fig. 22.2a). Anteriorly, the ostium may be opened with a backbiting through cut forceps, but care must be taken not to injure the nasolacrimal duct (Fig. 22.2b,c,d). If secondary ostia are identified, the natural and secondary ostia are connected by removing the intervening tissue.
14. The maxillary sinus is then inspected with a 30- or 45-degree telescope. Diseased mucosa may be removed with a microdebrider and/or forceps.
15. The anterior inferior medial portion of the ethmoid bulla, the largest anterior ethmoid cell, is then infractured with a J-curette (Fig. 22.2e) and opened with forceps. The opening is enlarged by moving the curette anteriorly and laterally.
16. A 45-degree through cutting forceps or microdebrider can be used to remove the anterior face of the ethmoid bulla (Fig. 22.2f).
17. The medial wall of the bulla is then removed to its attachment to the middle turbinate (Fig. 22.2g). This identifies the basal lamella (Fig. 22.2h).
18. The remainder of the ethmoid bulla mucosa and cells are removed with through cutting forceps or microdebrider. Using a 30-degree telescope, the lamina papyracea is identified (Fig. 22.2i,j). It is thin bone, has a yellow tint, is smooth, and should not be penetrated. This completes the dissection of the maxillary sinus antrostomy and anterior ethmoidectomy. In most children, no further dissection is necessary.
19. If CT demonstrates significant posterior ethmoid disease, a posterior ethmoidectomy is performed. The basal lamella, the anterior wall of the posterior ethmoid cells, is infractured inferiorly with a J-curette and is removed (Fig. 22.2k,l). It is vital to keep the dissection at or below the level of the roof of the maxillary sinus to avoid violating the skull base as it slopes inferiorly and posteriorly.
20. The posterior ethmoid cells are entered after dissection of the vertical portion of the basal lamella. The posterior ethmoid cells are opened with a J-curette. Mucosa and bony partitions are removed with an appropriate forceps or microdebrider (Fig. 22.2m,n).
21. As the bony partitions are removed, the roof of the ethmoid sinus, which marks the skull base, is identified. The skull base has a slightly different color than the surrounding bone and is at its most inferior position in the posterior ethmoid cells. Only after it has been identified should the dissection along the skull base proceed. Failure to do so increases the risk of penetration of the skull base and a cerebrospinal fluid (CSF) leak.
22. If it is needed, a sphenoidotomy is performed. The safest method of entering the sphenoid sinus is by identifying the sphenoethmoid recess and natural ostium, which both are medial to the superior turbinate (Fig. 22.2o). The superior turbinate can be lateralized with a Freer elevator to access the sphenoethmoid recess. If access remains difficult, the inferior one third of the superior turbinate is removed with through-cutting instruments.
23. The sphenoid ostium can be visualized in the sphenoethmoidal recess along the anterior face of the sphenoid. If the ostium is obstructed, it may be located by palpation with a ball tip seeker.
24. A J-curette is placed in the ostium and is directed inferiorly and laterally to fracture the anterior face of the sphenoid and to open the ostium (Fig. 22.2p). The opening can be enlarged with a curette or Stammberger mushroom punch.
25. Mucus or infected fluid can be suctioned from the sinus. Lesions may be removed or biopsied with forceps. Care must be taken to avoid injury to the optic nerve and internal carotid artery, both of which are usually located just lateral to the sinus but may run along the lateral wall and to the cavernous sinus.
26. If a complete ethmoidectomy is required, attention is returned to the previously identified skull base. A 30-degree telescope is used to visualize the skull base. Since the lowest point of the skull base is in the posterior ethmoid cells, dissection must proceed from posterior to anterior. The vertical ethmoid partitions are removed with upbiting through cut forceps while the mucosa is preserved along the roof of the ethmoid to promote better healing. It is essential to palpate behind the partitions with the upbiting forceps prior to bone removal to prevent violation of the skull base. Since the skull base slopes down medially and is also thinnest medially, it is also important to keep the forceps pointed slightly laterally.
27. The dissection is completed when the frontal recess is reached. Since most children have small developing frontal sinuses, dissection in the region of the frontal recess is rarely performed. When it is performed, image guidance must be considered.
28. If dissection is required, it should be limited. The frontal recess is bordered by the superior attachment of the ethmoid bulla posteriorly and the agger nasi cell anteriorly (Fig. 22.2q). Using a 45- or 70-degree telescope, the superior attachment of the ethmoid bulla is identified and then removed with upbiting instruments (Fig. 22.2r).
29. Using a 0-degree telescope, the uncinate process is reexamined. Any residual superior attachment of the uncinate is removed. This will expose the agger nasi cell.
30. Returning to an angled telescope, the agger nasi cell is identified and opened. A frontal sinus curette is inserted posterior and superior to the posterior wall of the agger nasi. The curette is gently directed anteriorly and laterally fracturing the wall to provide access to the frontal recess (Fig. 22.2s). Remaining portions of the agger nasi are removed with an upbiting forceps (Fig. 22.2t). The frontal recess should be open.
31. At the conclusion of the procedure, neuropledgets moistened with 0.05% oxymetazoline are placed into the nasal cavity
32. The opposite side, if necessary, is then operated on in the same fashion.
33. Nasal secretions are then suctioned clear from both nasal cavities.
34. If there has been no significant bleeding, packing is not placed. Packing can be placed for hemostasis but should be removed in 1 or 2 days
35. The patient remains on antibiotics and steroid and saline nasal sprays until seen in the office in 2 to 3 weeks.
Complications
1. Recurrence of disease
2. Intranasal complications
a. Scarring of frontal recess
b. Scarring of maxillary sinus ostium
c. Adhesion between the middle turbinate and lateral wall of the nose
3. Orbital injury
a. Diplopia
b. Blindness
c. Hematoma
d. Infection
e. Epiphora
4. Intracranial complications
a. CSF rhinorrhea
b. Intracranial trauma
c. Meningitis
5. Internal carotid artery injury
6. Optic nerve injury
7. Cavernous sinus injury