and Mitrofanis Pavlidis2
(1)
Department of Ophthalmology, Uppsala University Hospital, Uppsala, Sweden
(2)
Augencentrum Köln, Cologne, Germany
11.1 General Introduction
11.2.2 Enclavation Spatula (Fig. )
11.2.3 Caliper (Fig. )
11.2.4 Serrated Jaw Forceps (Fig. )
11.2.5 Endgripping Forceps
11.3.1 Instruments
11.3.2 Material
11.4 Complications
11.5 FAQ
Electronic supplementary material
The online version of this chapter (doi:10.1007/978-3-319-20236-5_11) contains supplementary material, which is available to authorized users.
Electronic supplementary material
for this chapter is accessible online at http://extras.springer.com/ by searching via the ISBN.
Video 11.1: Anterior dislocated IOL and macular hole with 27G
Video 11.2: Bimanual extraction of anterior dislocated IOL
Video 11.3: 27G posterior dislocated IOL
11.1 General Introduction
The first part of the surgery is the extraction of the dislocated IOL. In most cases, the IOL is only subluxated because the vitreous body is present. The extraction is simple with a serrated jaw forceps. In a few cases when the eye has been vitrectomized, the IOL will luxate to the posterior pole. Now the extraction is trickier and requires often a chandelier light for bimanual extraction.
The benefits of an iris-claw IOL implantation are a short surgical time, sutureless implantation, excellent centration without risk of tilting and fast learning curve (approximately five surgeries). The surgical time is approximately 20 min. A redislocation such as in scleral fixated IOLs does not occur with iris-claw IOLs. The disadvantage is that the IOL is fixated into the iris tissue, and a too traumatic implantation may lead to an inflammation. This postoperative inflammation with cellular proliferation of the IOL is induced by macrophages. This occurs, however, only in the learning curve. In addition, sufficient iris tissue is required for implantation, e.g. an implantation in case of aniridia is not possible.
We will demonstrate the implantation of an iris-claw IOL (Verisyse®, Abbott and Artisan®, Ophtec) (Fig. 11.1). The iris-claw IOL can be implanted before the pupil or behind the pupil. If you implant the IOL retropupillary, then it has to be done “upside down” (= on the back) because the haptics are bent upwards.
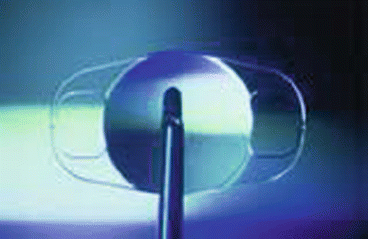
Fig. 11.1
An iris-claw IOL (Artisan®, Ophtec, and Verisyse®, AMO)
We will demonstrate the retropupillary method, which is quite easy to learn. We recommend starting with an aphakic eye which underwent an anterior vitrectomy. The pupil should be constricted before surgery. We recommend retrobulbar anaesthesia.
The A-constants for antepupillar and retropupillar IOL implantations differ; contact the companies for further information.
The most difficult part of the surgery is the dissection of a scleral tunnel, which is the same as for the SICS technique (modified ECCE). We prefer a scleral tunnel to a corneal tunnel in order to reduce astigmatism; this tunnel is 6 mm wide. Why? Because the iris-claw IOL is 6 mm wide. What may happen if the tunnel is 8 mm wide? The wider the tunnel, the more you risk a choroidal detachment.
Which gauge?
We prefer 27G in order to avoid hypotony after surgery which may occur due to the 6 mm scleral tunnel.
11.2 Special Instruments for Iris-Claw IOL Implantation
11.2.1 Instruments for Iris-Fixated IOL
The instruments needed for the implantation of an iris-fixated IOL can be acquired from Abbott (Verisyse®) and Ophtec (Artisan®). The most important instrument is the IOL implantation forceps (Fig. 11.2). In addition you need the following instruments.
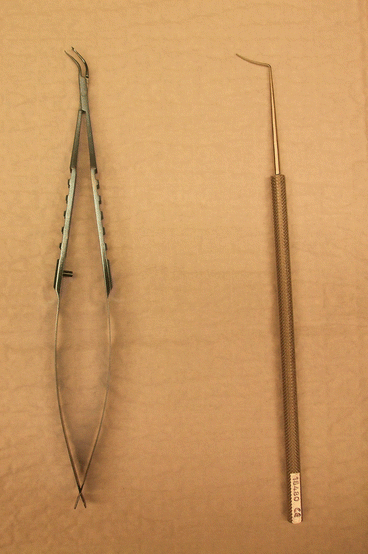
Fig. 11.2
Two instruments are required for Implantation of an iris-fixated IOL. (1) An IOL implantation forceps (AMO), (2) an enclavation spatula (Geuder) for implantation of an iris-claw IOL
11.2.2 Enclavation Spatula (Fig. 11.2)
Indication
Retropupillar fixation of IOL claws in iris tissue. This spatula is thin so that only a little iris tissue is enclavated. Sekundo enclavation spatula, Geuder 32724.
11.2.3 Caliper (Fig. 11.3)
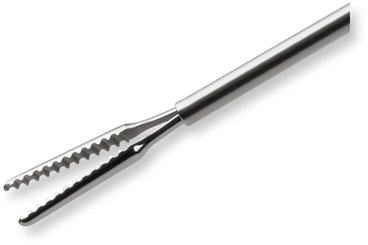
Fig. 11.3
A 23G intravitreal serrated jaw forceps (DORC). Indication: extraction of the subluxated IOL from the anterior chamber
Indication
Marking of main incision and sclerotomy. The main incision for the implantation of an iris-fixated PMMA IOL is 6 mm wide. Caliper by Castroviejo, Geuder 19135
11.2.4 Serrated Jaw Forceps (Fig. 11.4)
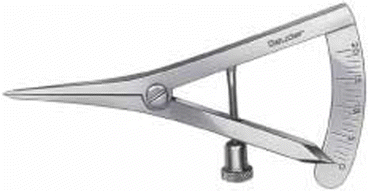
Fig. 11.4
Useful is also a caliper. Indication: frown incision (Geuder)
Indication
Extraction of IOL with lens capsule. 20G or 23G. DORC. 1286. C06
11.2.5 Endgripping Forceps
Indication
Luxation of IOL from posterior pole into anterior chamber. 27G. DORC 1286.WD04
11.3 Iris-Claw IOL Implantation Surgery
11.3.1 Instruments
1.
Crescent bevel up knife
2.
15° knife
3.
2.4 mm tunnel knife
4.
Caliper
5.
IOL implantation forceps (AMO)
6.
Enclavation spatula
7.
20G or 23G serrated jaw forceps
8.
In case of IOL luxation: 27G ILM forceps
11.3.2 Material
Acetylcholine (Miochol)
Iris-claw IOL (Artisan®, Verisyse®)
Maybe: Triamcinolone
11.3.3 The Surgery Step by Step: Figures 11.5, 11.6, 11.7, 11.8, 11.9, 11.10, 11.11, 11.12, 11.13, 11.14, 11.15, 11.16, 11.17, 11.18, 11.19, 11.20, 11.21, 11.22, 11.23 and 11.24
1.


27G 3-port trocar system
Stay updated, free articles. Join our Telegram channel
Full access? Get Clinical Tree
