Cochlear Implantation
Over the past two decades, cochlear implantation (CI) has been shown to be a safe and effective treatment for children with bilateral severe to profound sensorineural hearing loss (SNHL). To date, CI has been performed in approximately 28,000 children in the United States, yielding successful outcomes and low morbidity. Early implantation provides the potential for affected children to develop language skills similar to those in normal-hearing children. In recent years, the clinical focus has shifted to performing minimally invasive procedures that minimize postoperative morbidity and speed recovery.
8-1 Cochlear Implantation
Indications
Cochlear implantation is currently approved by the U.S. Food and Drug Administration for patients 1 year of age or older. Specific audiologic criteria for implantation vary with age. Patients younger than 24 months of age require a bilateral pure tone average (PTA) ≥ 90 dB, whereas children 24 months or older require a bilateral PTA ≥ 75 dB. Because of the risk of cochlear ossification in children with postmeningitic SNHL, many centers offer cochlear implantation to these children as early as 6 months of age.
Preoperative Evaluation
Preoperative evaluation is best performed by an interdisciplinary cochlear implant team. This team evaluates each patient’s anatomy, auditory status, psychosocial characteristics, developmental milestones, and educational setting prior to developing an individually tailored management plan. Computed tomography (CT) scans are obtained to evaluate the temporal bone anatomy, including the osseous labyrinth and internal auditory canal. Magnetic resonance imaging (MRI) scans may be obtained to provide additional information about the nonosseous components of the labyrinth, the cochlear nerve, and the brainstem.
Patients should receive age-appropriate vaccinations against Streptococcus pneumoniae at least 2 weeks prior to implantation. Currently, children ≤ 24 months of age receive the 7-valent conjugated pneumococcal vaccine (PCV-7). Children ≥ 24 months of age receive PCV-7 as well as the 23-valent pneumococcal polysaccharide vaccine (PPV-23). Children ≥ 5 years of age receive the PPV-23 vaccine alone.
Operative Technique
1. Cochlear implantation is performed under general anesthesia without muscle paralysis to permit facial nerve monitoring. The patient is positioned supine. Intravenous antibiotics are given within 1 hour preoperatively. Monopolar cautery is not necessary.
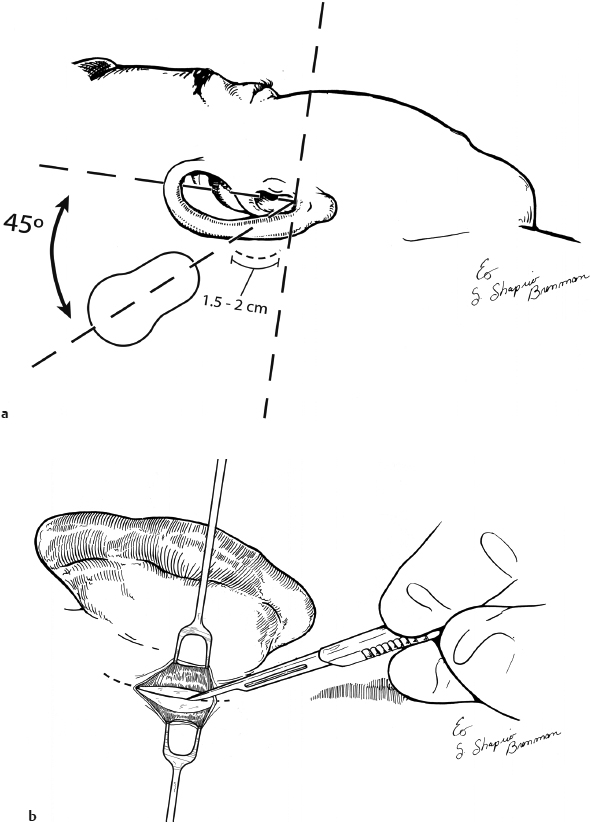
2. The procedure begins by placing facial nerve monitor electrodes and testing the facial nerve monitoring device. An incision site is then marked approximately 0.5 cm posterior to the postauricular crease. The incision extends approximately 1.5 to 2 cm superiorly from its origin at a line perpendicular to the inferior margin of the external auditory canal. The site of placement for the receiver/stimulator (R/S) is then marked using a mock implant for reference. The head is not shaved (Fig. 8.1a).
3. The patient is prepped and draped in a sterile fashion and the occlusive component of a mastoid drape is used to deflect the pinna anteriorly. The incision site is then infiltrated with 1% lidocaine with 1:100,000 units of epinephrine for hemostasis. If the patient is undergoing bilateral implantation, both ears are incorporated into a single sterile field and marked for symmetry prior to draping.
4. The skin is incised, and the incision is carried down to the level of the periosteum (Fig. 8.1b). Exposure is maintained using skin hooks. The periosteum is incised 0.5 cm anterior to the skin incision site. The periosteal incision is carried 0.75 to 1 cm beyond the superior margin of the skin incision in a curvilinear fashion. This allows for improved access to the temporal-parietal scalp, while maintaining a small skin incision site and minimizing unnecessary soft tissue elevation. Periosteum is elevated anteriorly using a Lempert elevator.
5. A Joseph elevator is then used to back-elevate a subperiosteal flap extending approximately 1.5 cm posterior to the skin incision site. The posterior elevation of adherent periosteum allows for the precise creation of an R/S pocket in the desired vector (Fig. 8.1c).
6. Creation of the R/S pocket is performed using a Freer elevator to undermine the periosteum. Approximately two-thirds of the desired pocket width is elevated. The remaining dissection is performed by inserting the mock implant into the undersized pocket, thereby allowing for a tight R/S fit and reducing the potential for migration. The requirement for securing the implant is obviated if the implant pocket is appropriately created. If a cochlear implant with a grounding electrode is used, another small pocket is created anteriorly, parallel to the temporal line (Fig. 8.1d).
7. Next, a self-retaining retractor or blunt retention hooks are placed, maintaining exposure of the mastoid cortex. With the mastoid cortex and posterior canal exposed, a standard cortical mastoidectomy is performed using a cutting bur (Fig. 8.1e).
8. With this exposure, it is possible to identify the tegmen, sigmoid sinus, and lateral semicircular canal. The facial recess is drilled with a small diamond bur, beginning adjacent to the buttress and extending inferiorly, leaving a layer of bone over the facial nerve (Fig. 8.1f). The location of the round window niche is visually confirmed, and the bony overhang of the niche can be removed with a diamond bur if necessary (Fig. 8.1g).
9. The surgical field is then copiously irrigated, removing all bone dust from the surrounding area. Fibrofatty tissue is harvested for use later in the procedure to bolster the electrode in the cochleostomy. Sterile gloves are then changed and the surgical field is over-draped with fresh sterile towels.
10. A cochleostomy is performed with a tapered 1-mm diamond bur, and the scala tympani is entered just anteroinferior to the round window membrane (Fig. 8.1g).
11. The implant is soaked in bacitracin-instilled saline and then placed within the previously created subperiosteal R/S pocket (Fig. 8.1h). If a grounding electrode is present, it is placed in the previously created anterior pocket parallel to the temporal line.
12. The electrode array is then completely inserted into the cochleostomy utilizing a gold-plated electrode guide and jeweler forceps (Fig. 8.1i).
13. Next, previously harvested fibrofatty tissue is cut into three pieces and placed circumferentially around the base of the electrode. The remaining slack of the electrode lead is coiled in the mastoid cavity.
14. Neural response telemetry can be performed during closure. The periosteum and muscle over the mastoid defect and cochlear implant are closed using 3-0 Vicryl (Ethicon) suture in an interrupted fashion. The periosteum is closed from a superior to inferior direction extending away from the array, thus preventing inadvertent damage (Fig. 8.1j). A subcuticular layer is approximated using 4-0 Vicryl suture in an interrupted fashion. The skin is closed using a 5-0 plain gut suture in a running fashion (Fig. 8.1k). A mastoid dressing is then placed.
15. A 7-day course of antibiotics is administered during the postoperative period. A neoprene mastoid band is worn for 10 days following implantation.
Pearls and Pitfalls
1. Monopolar cautery is not required in this procedure and is therefore not included on the instrument tray. This prevents inadvertent injury to the implant and is an important consideration in bilateral implant procedures.
2. Marking of the proper implant location is performed prior to placing a clear mastoid drape. This allows for the marking to be seen throughout the procedure without being smudged or wiped clean prior to implant placement.
3. When creating the implant R/S pocket, it is important to bolster against unwanted dissection superior or anterior to the desired pocket location. This is achieved by holding one hand firmly against the patient at the margin of the desired pocket, resisting the natural tendency for the mock implant to migrate anterosuperiorly along the path of least resistance. Failure to perform this maneuver will result in an oversized pocket and risk excessive mobility or migration of the R/S unit.
4. Drilling of the cochleostomy should be performed immediately adjacent to the round window membrane in an anteroinferior location. This allows for rapid entrance into the proximal scala tympani. In addition, it prevents inadvertent entry into the scala vestibuli, particularly when drilling a right-sided cochleostomy.
Complications
1. Implant migration or exposure
2. Soft tissue infection or necrosis
3. Implant malfunction or damage
4. Vertigo
5. Facial nerve injury
6. Facial nerve stimulation with implant