Chronic Otitis Media
Throughout the history of otolaryngology, chronic otitis media (COM) has been described in a variety of ways, reflecting the varied presentations and clinical courses encountered by clinicians. As a result, it is reasonable to consider COM in the framework of a spectrum of diseases ranging from otitis media with effusion to chronic suppurative otitis media with cholesteatoma (as proposed by several authors). The var ations and challenges that are presented by this complex spectrum of ear diseases and to the wide array of management approaches that have evolved over the years.
From a clinically pragmatic perspective (and for the purposes of this chapter), COM can be divided into two categories, as described by Ian B. Thorburn in 1968. Type 1 disease involves a chronic perforation of the tympanic membrane (TM) that is not associated with chronic or recurrent infection and is typically associated with normal or near-normal hearing. Type 2 disease, in contrast, is associated with chronic mucosal infection, persistent or frequent otorrhea, as well as hearing loss. Cholesteatoma is often present or suspected in type 2 disease but is addressed specifically in another section due to the differences in management strategies.
For type 1 COM, closure of a chronic dry TM perforation is typically surgical in nature and can be achieved using several different techniques as described below. In type 2 disease, a combination of medical and surgical therapies is often required in order to attain a dry and safe ear with an intact TM and good hearing. The general strategy for approaching these ears is similarly outlined below.
3-1 Paper Patch Myringoplasty
Indications
A dry chronic perforation of the TM that has not spontaneously healed after a minimum of 3 to 4 months of observation can often be addressed through a simple paper patch myringoplasty.
Preoperative Evaluation
Following thorough microscopic exam of the ear in the clinic (with particular attention given to degree of myringosclerosis, mucosal disease, squamous debris, etc.), routine audiologic testing is requisite prior to myringoplasty.
Operative Technique
The vast majority of paper patch myringoplasties in children need to be performed under general anesthesia. In older patients, it is feasible to anesthetize the ear canal and drum using 1% lidocaine with epinephrine 1:100,000 in concentration, after which the procedure would be identical to the steps described here.
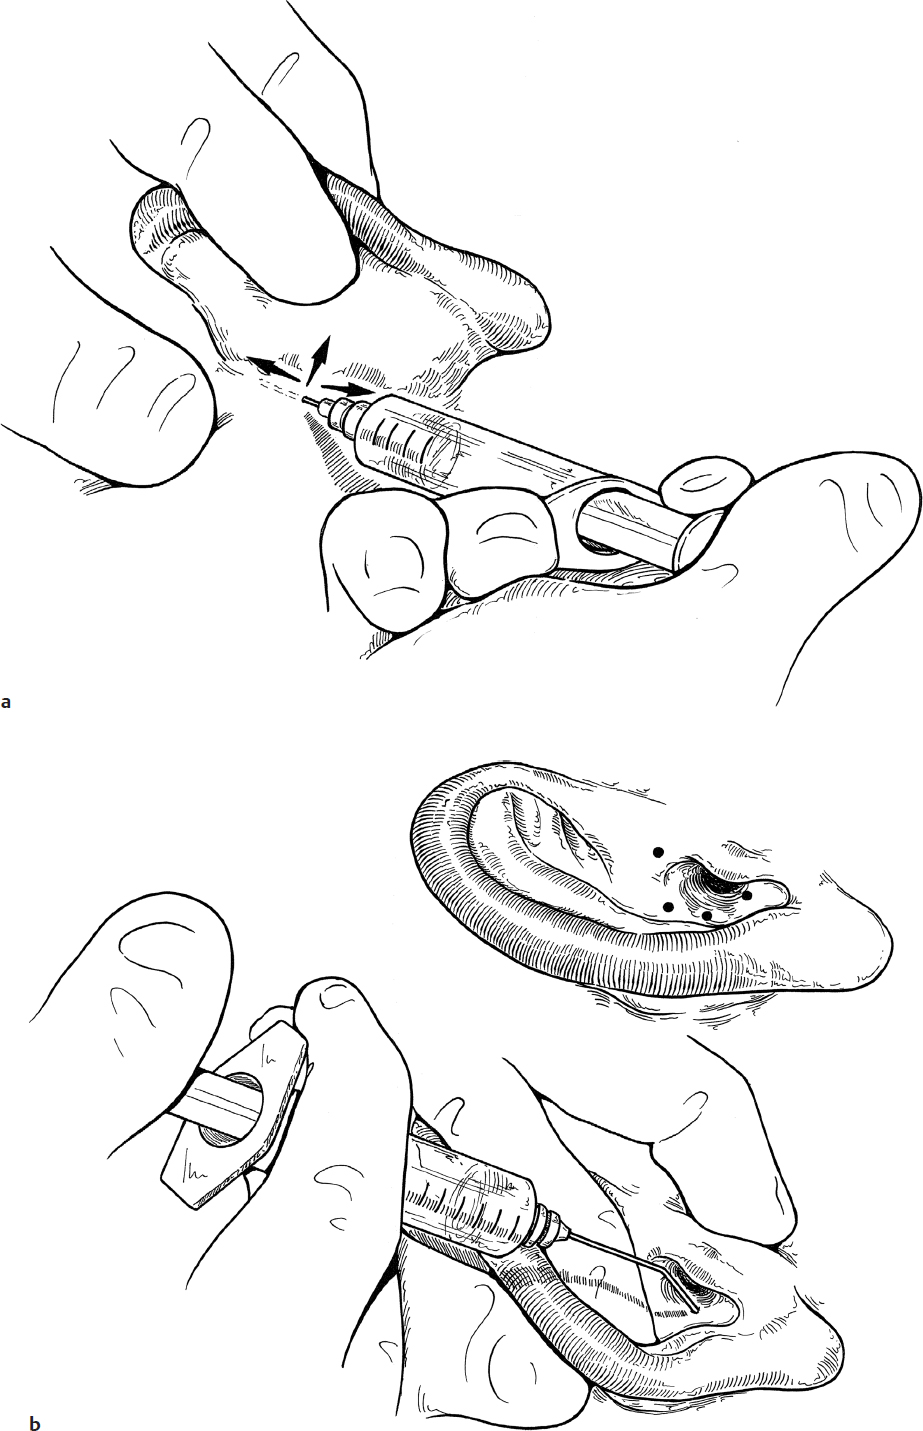
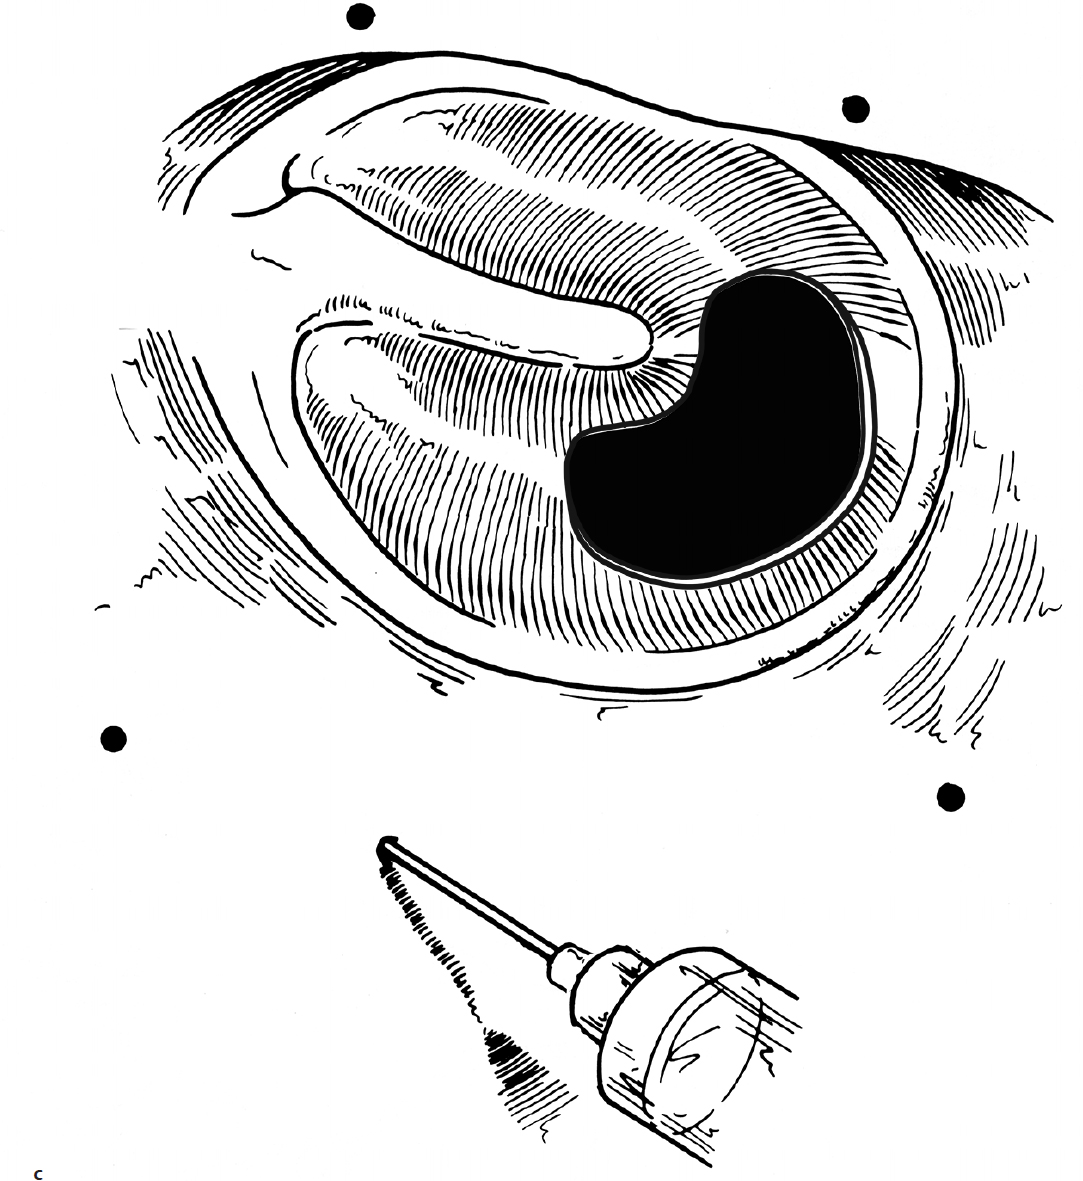
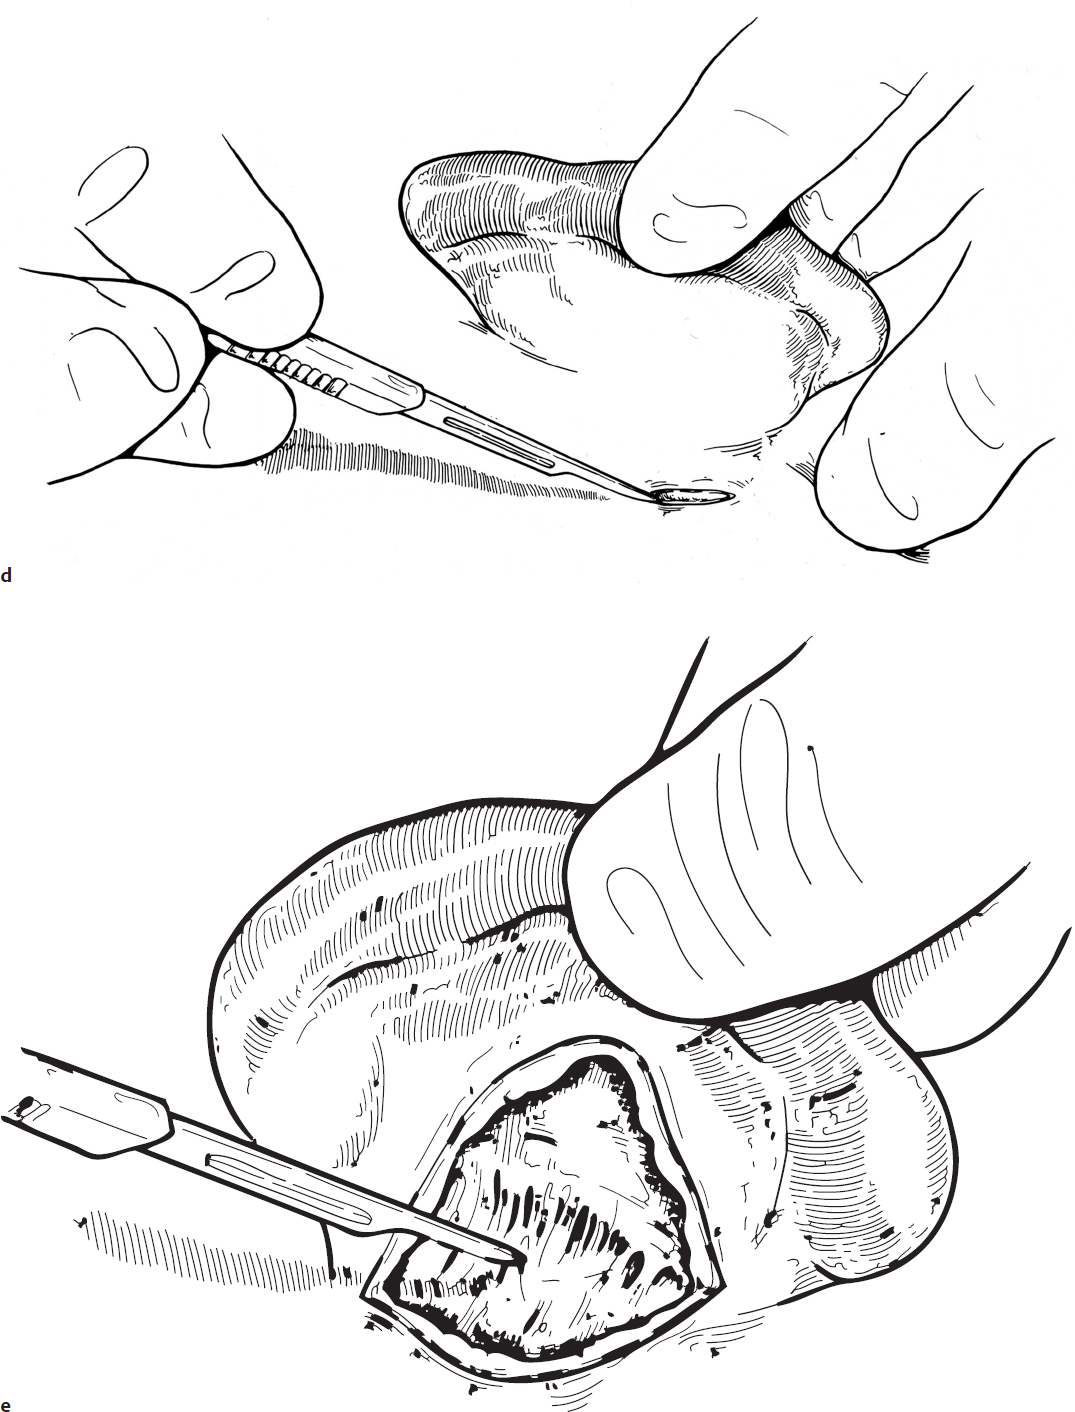
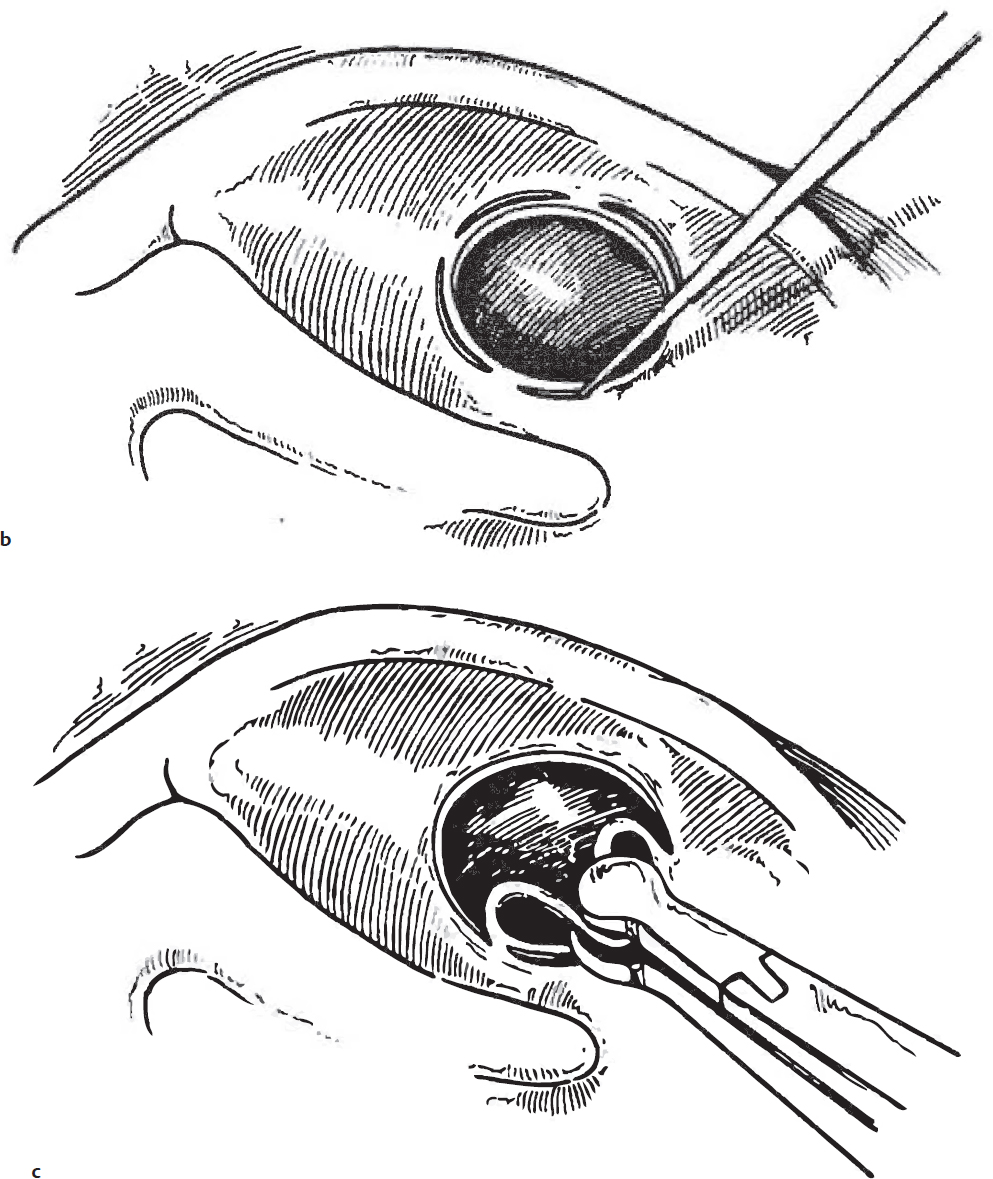
1. After cleaning the ear canal, the edges of the perforation are removed using a micro-pick or knife (e.g., Rosen pick or Sickle Knife). A common technique is to use a pick to methodically create a circumferential ring of stab incisions such that the rim of the perforation can be removed atraumatically (Fig. 3.1a,b,c).
2. Paper patches are fashioned by using a paper hole punch to create small disks out of cigarette paper. Some surgeons apply a liquid adhesive (e.g., Mastasol [Eloquest Healthcare]) to the undersurface of the patch.
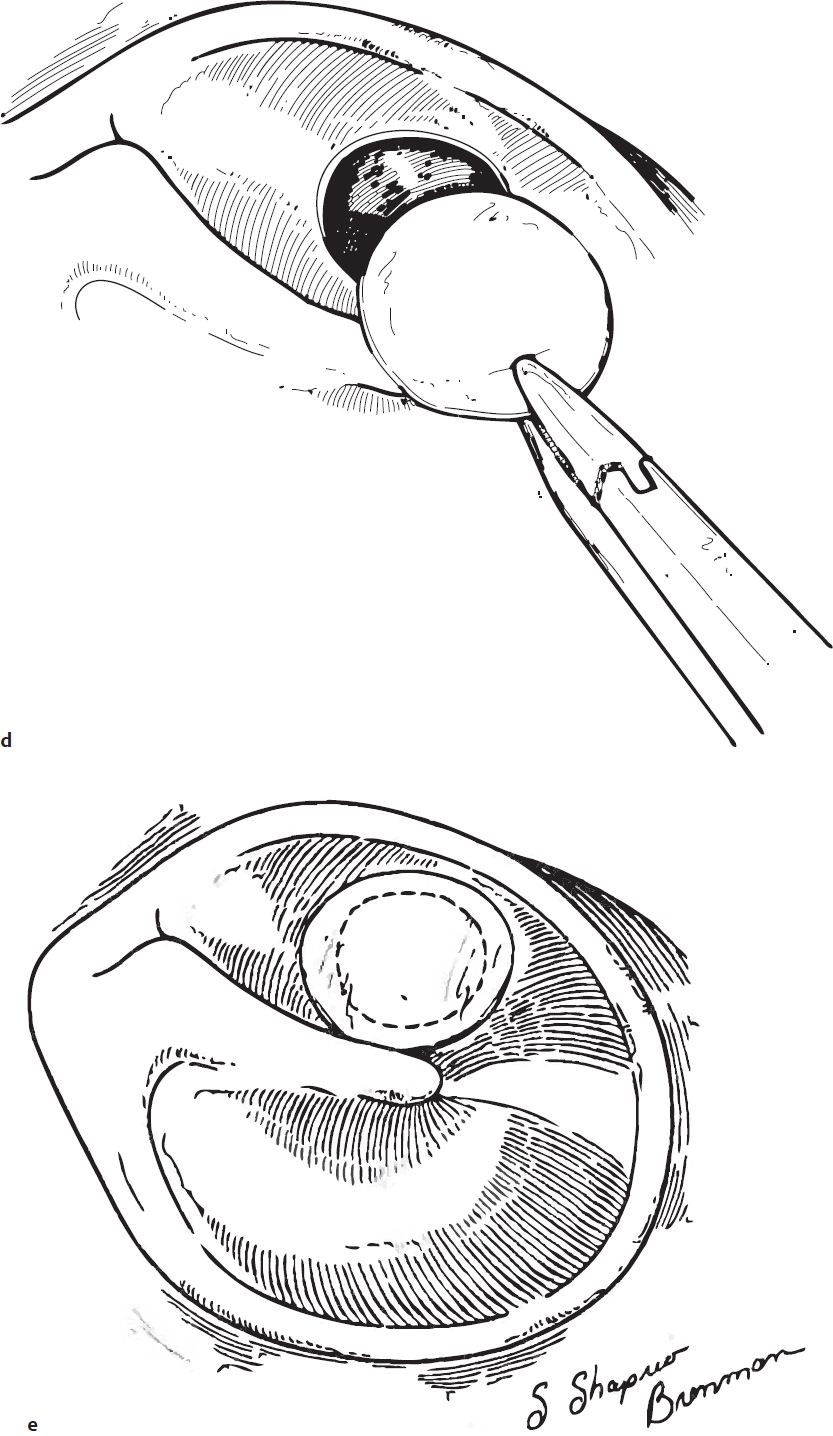
3. The paper patch is applied directly over the freshened perforation (Fig. 3.1d,e).
4. Some surgeons will opt to patch then fill the ear canal with a viscous antibiotic ointment (e.g., mupirocin) to help hold the patch in place during the early postoperative period. Alternatively, Gelfoam (Pfizer) with or without a quinolone antibiotic solution can be used as packing to help hold the patch in position during the early healing period.
Alternative Techniques
Variations of this basic approach for TM repair have included using different materials, such as Steri-Strips (3M), AlloDerm (LifeCells), Gelfoam, or gelatin film, as the scaffolding material as opposed to a paper patch. Results are very equivalent, with the more significant factors being proper patient selection for the procedure and a keen attention to detail in rimming the perforation and prepping the TM for patching.
Using a fat graft (from the ear lobule, the periumbilical region, or other convenient site) offers another effective option for repairing a chronically perforated TM and is attractive in its use of an autologous “biological” scaffolding that the body then remodels as it heals the TM defect.
Guidelines for the overall surgical technique are similar for all of the myringoplasty materials with a slight variation when using fat. In this instance, the fat is trimmed and then loosely packed into the defect in a dumbbell fashion with some redundant fat on the inner and outer aspects of the TM to help anchor it in position while healing.
Complications
1. Persistent perforation
2. Purulent otorrhea
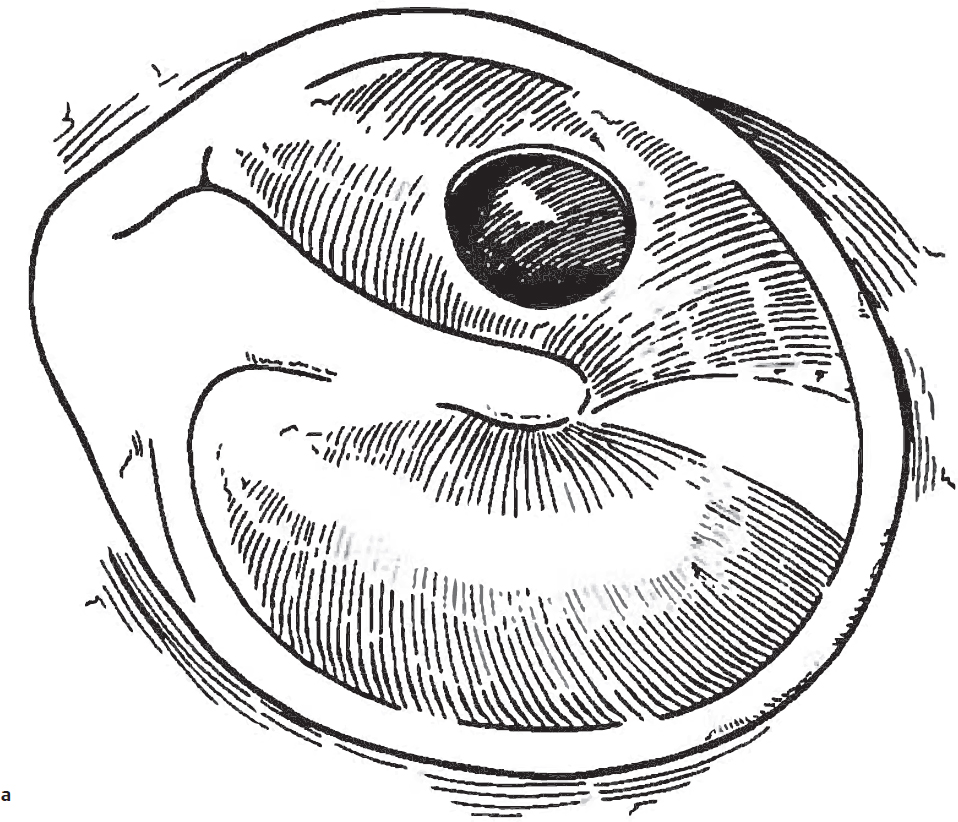
Fig. 3.1a,b
3-2 Tympanoplasty
Introduction
Over the decades, tympanoplasty techniques have been described in extensive detail and with a huge number of variations to address the spectrum of pathologies encountered and to avoid pitfalls inherent with each of the technical approaches. However, one of the standard techniques for tympanoplasty is to employ areolar temporalis fascia that is placed medial to the TM (an underlay graft or medial graft technique) after elevating a tympanomeatal flap. This straightforward method typically yields > 90% perforation closure rate in properly selected patients and is often performed on an outpatient basis.
Indications
Tympanoplasty is usually considered for patients with type 1 COM that has not healed spontaneously after 6 months or more of conservative observation. In contrast to perforations in which paper patch myringoplasty is used to repair the defect, TM perforations that involve a larger portion of the TM (e.g., > 30% of the pars tensa) are better addressed through this formal tympanoplasty approach.
Preoperative Evaluation
As in most cases of COM, comprehensive history and physical examination, followed by microscopic exam of the ears, is required prior to surgery. Preoperative evaluation of the residual TM, the ossicular chain, the middle ear mucosa, signs of active infection, or cholesteatoma can significantly impact the surgical management at the time of tympanoplasty. Preoperative audiologic evaluation is also mandatory and is essential in counseling patients and families about anticipated hearing outcomes.
Operative Technique
1. Meticulous injection of the ear canal and postauricular region with 1% lidocaine containing 1:100,000 epinephrine is critical to a smooth and well-executed tympanoplasty (Fig. 3.2a,b). Inadequate or ineffective infiltration of this local anesthetic and vasoconstrictive solution results in a constant need to obtain hemostasis during the procedure and/or the need to constantly suction away blood that obscures visualization. Such nuisance issues often incur more suction trauma to the delicate tissues that, in turn, can yield poorer wound healing and grafting results. The local anesthetic and vasoconstrictive effects of the lidocaine and epinephrine solution are also time-dependent. Accordingly, it is pragmatic to cleanse the areas to be injected with an alcohol swab, inject the solution, and then formally prep and drape the ear, thus allowing adequate time for the local agents to act. After sterile prep and drape, the ear canal is often re-injected while using the microscope to ensure a thorough infiltration of the entire ear canal and TM (Fig. 3.2c).
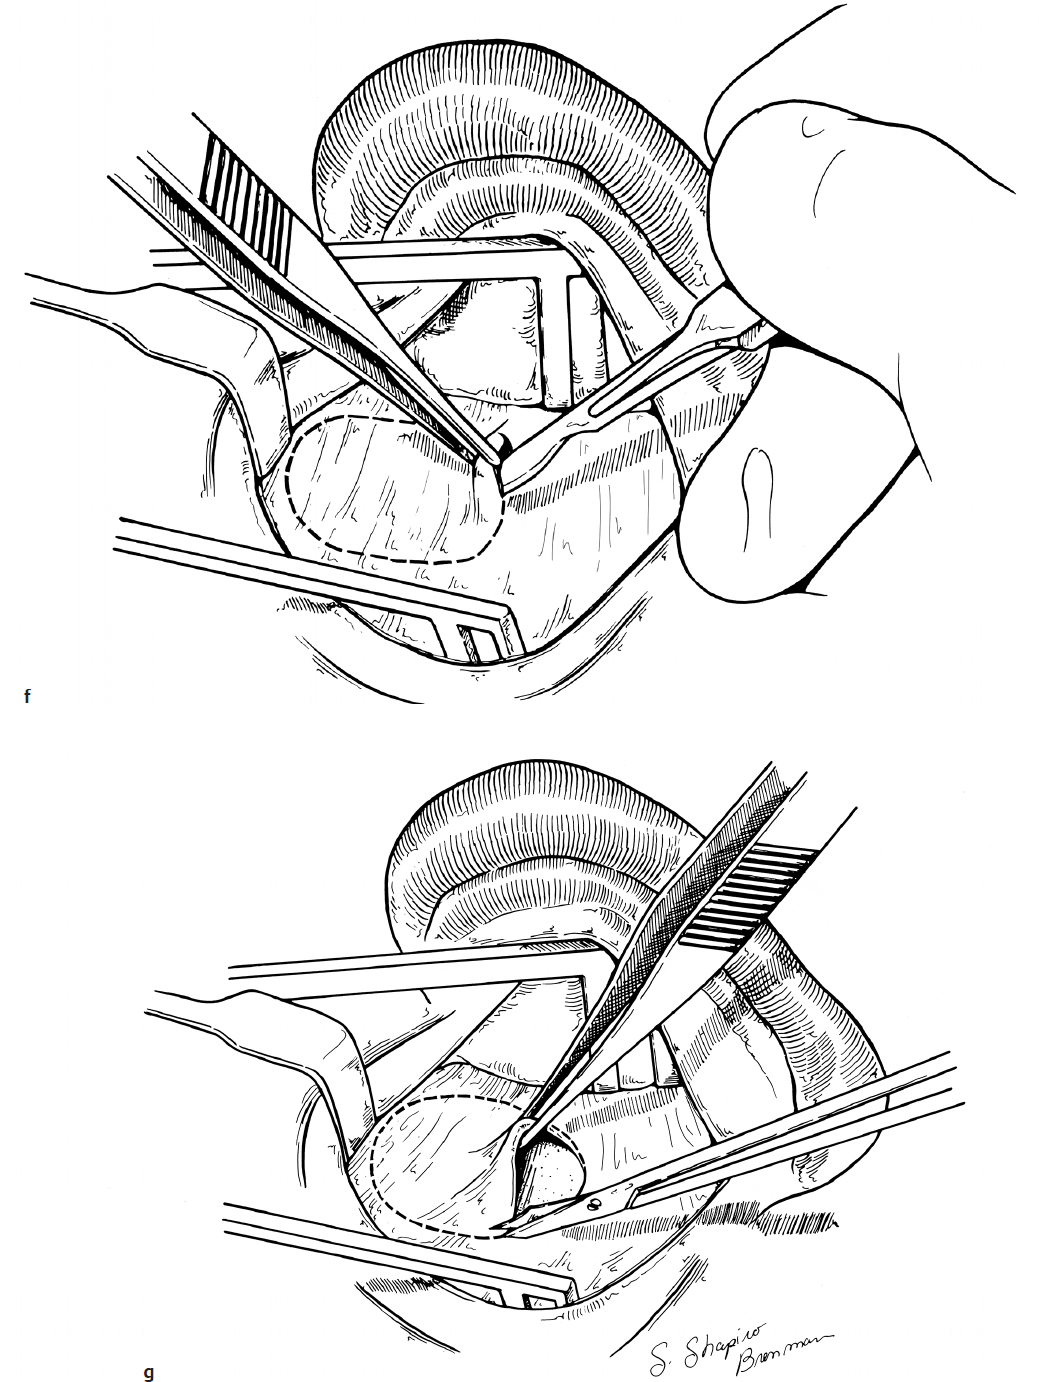
2. A standard postauricular incision is made approximately 0.5 cm behind the postauricular crease with sharp dissection continuing down to the level of the temporalis fascia. Firm retraction of the auricle laterally facilitates separation of the tissue planes and entry into the avascular plane of the loose areolar temporalis fascia (Fig. 3.2d,e). After undermining anteriorly, superiorly, and posteriorly, meticulous hemostasis should be obtained with the electrocautery.
3. Self-retaining retractors are placed at this point allowing harvesting of loose areolar temporalis fascia for grafting later on in the procedure. Injection of the previously used lidocaine solution is an effective way to hydrodissect a tissue plane that makes harvesting of the graft simple (Fig. 3.2f,g). The graft should be thinned to transparency and either pressed or set aside to dry on a nonstick surface (Teflon block).
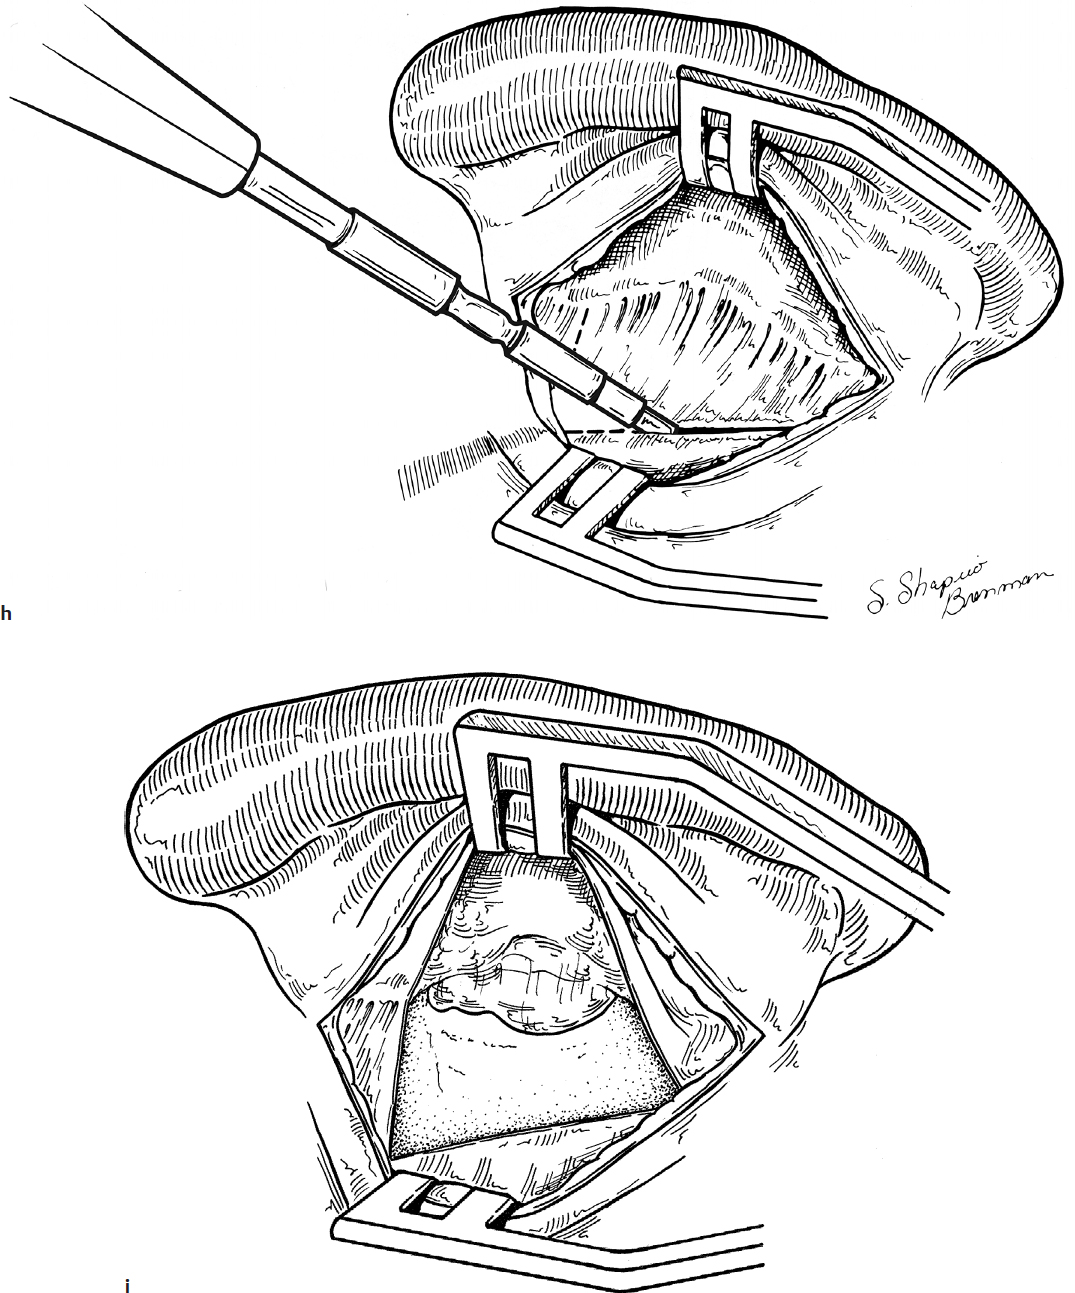
4. The periosteum overlying the mastoid cortex is then incised with the electrocautery, classically in a C-shaped fashion, starting over the mastoid tip, extending posteriorly and superiorly before curving back anteriorly over the superior aspect of the ear canal. This Palva flap is then elevated anteriorly using a Lempert periosteal elevator and tucked into the front flange of the self-retaining retractor (Fig. 3.2h,i,j).
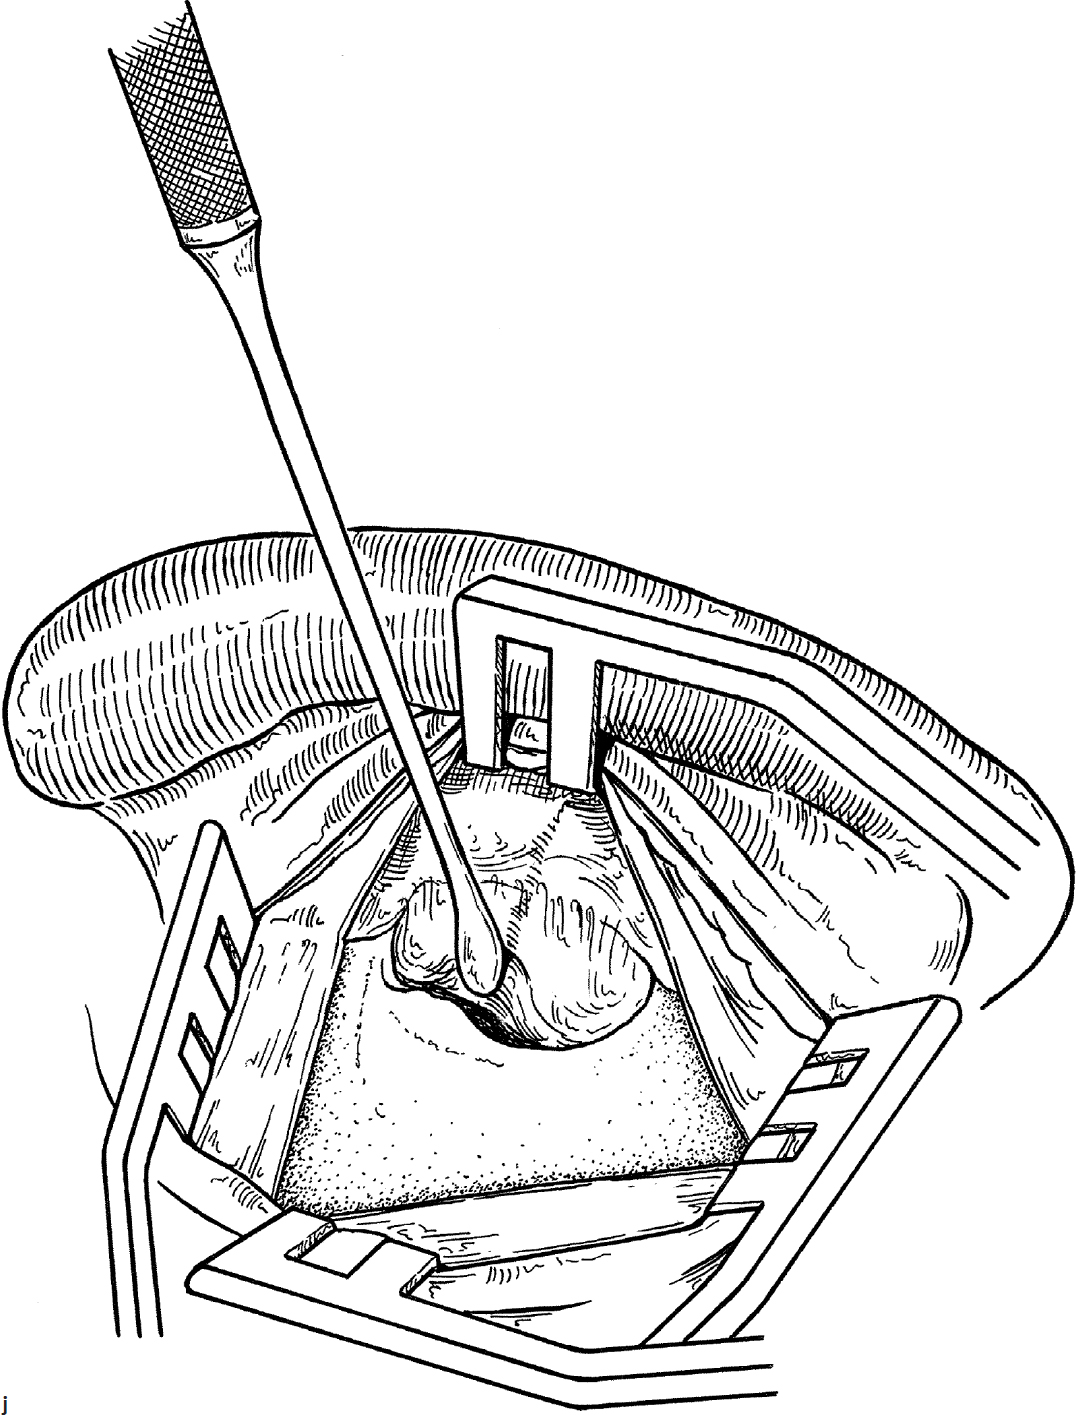
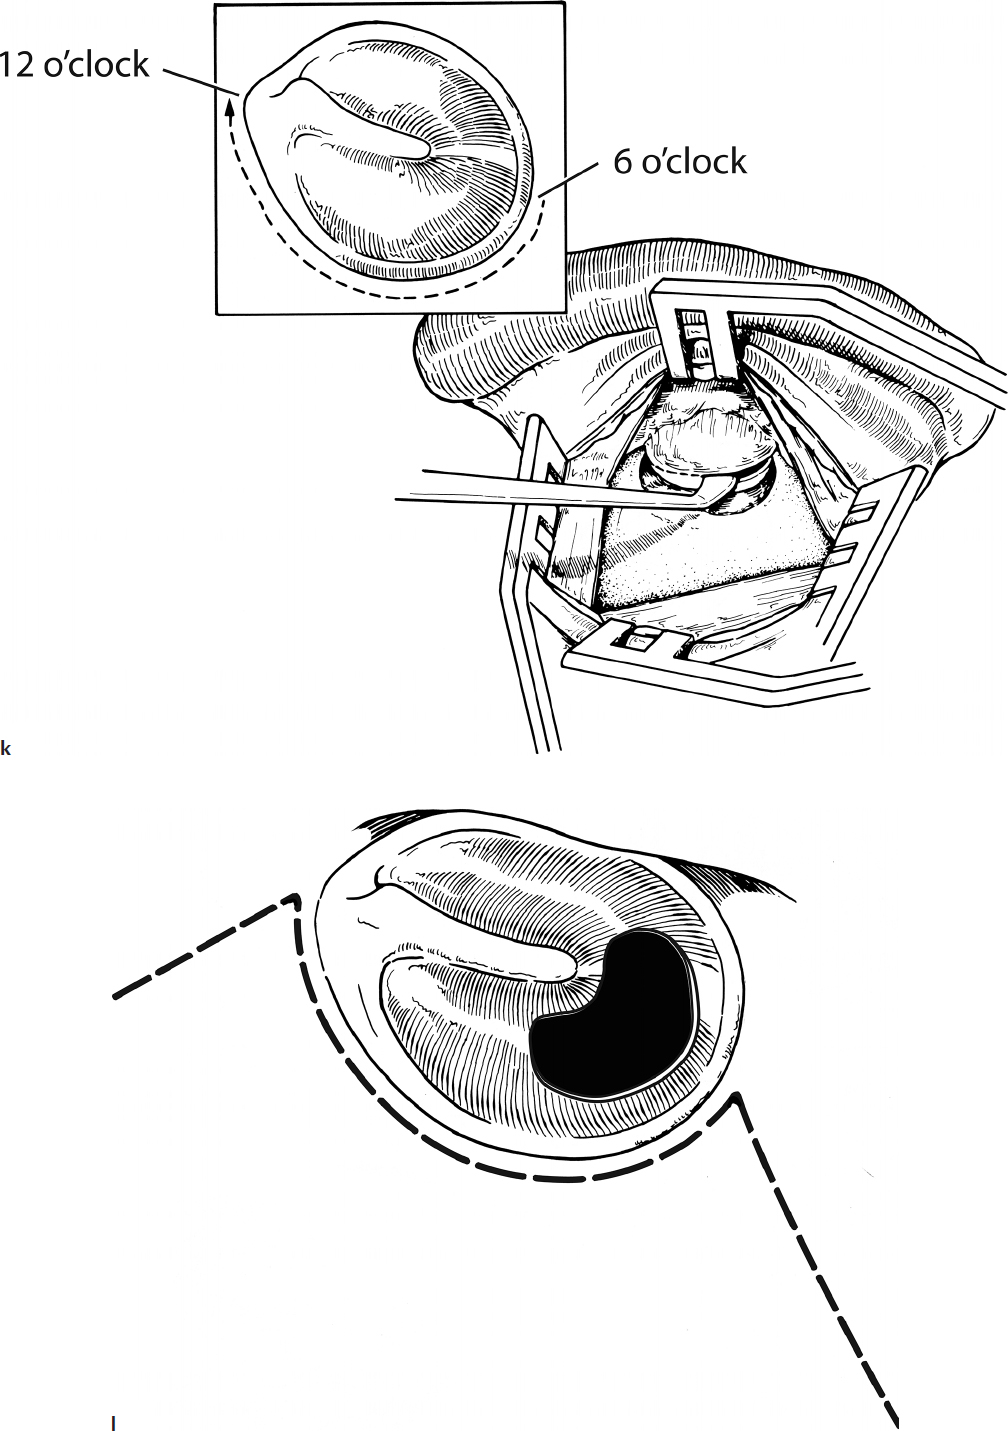
5. Under the microscope, the skin of the posterior ear canal is then gently elevated using microinstruments and suctions, with care being taken to avoid directly suctioning the elevated tissue flaps. After elevation of the posterior ear canal skin down to the level of the annulus, a vascular strip is incised and preserved by first making a transverse cut that parallels the curve of the TM approximately 3 mm lateral to the annulus from the 6 o’clock position (directly inferior) to the 12 o’clock position (directly superior) (Fig. 3.2k). Next, two releasing incisions are made starting at the superior and inferior apices of the first cut. These releasing incisions extend laterally out the ear canal, thereby mobilizing the vascular strip that provides the necessary blood supply to the TM and graft (Fig. 3.2l).
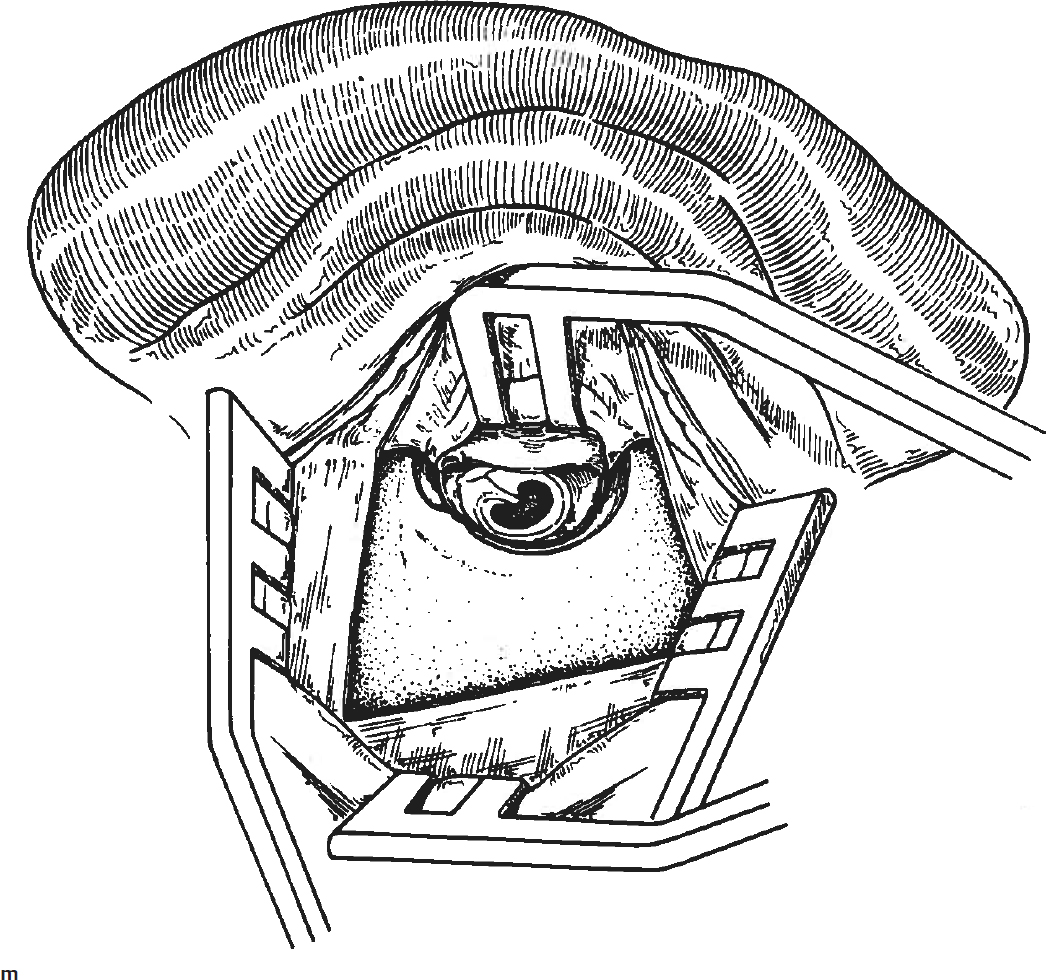
6. After placing a self-retaining retractor (Fig. 3.2m), proper incision and mobilization of the vascular strip typically provides a wide exposure of the entire TM area. Through this exposure, small releasing incisions are often used to facilitate turning of a tympanomeatal flap that does not require constant retraction out of the surgical field (Fig. 3.2l). The placement and extent of these releasing incisions can be adapted dependent on the location of the TM perforation and disease in the middle ear or ear canal.
7. Prior to turning a tympanomeatal flap, it is often preferable to rim the edges of the perforation as previously described (Fig. 3.2n,o). The undersurface of the TM surrounding the perforation defect is also scraped prior to grafting (Fig. 3.2p).
8. Under higher magnification, a round knife or lancet knife can be used to carefully elevate the annulus and TM allowing entrance into the middle ear space (Fig. 3.2q). Initial dissection typically starts in the posteroinferior quadrant in order to avoid injuring the chorda tympani nerve during this initial maneuver. An annulus elevator, aka “gimmick,” is then commonly used to sweep inferiorly and complete elevation of the inferior portion of the TM. More careful dissection is required in the posterosuperior quadrant in order to preserve the chorda tympani nerve and avoid damage to the ossicular chain deep to the TM.
9. Thorough evaluation of the integrity and mobility of the ossicles is routinely performed during tympanoplasty in order to avoid missing pathology that might impact healing and hearing (Fig. 3.2r).
10. A supporting bed of Gelfoam saturated with an antibiotic-steroid solution (e.g., ciprofloxacin with dexamethasone) is placed in the middle ear space against the promontory, filling the hypotympanum and around the ossicular chain (Fig. 3.2s). While an adequate amount of Gelfoam is required to maintain the graft in contact with the medial surface of the tympanomeatal flap, an excessive amount can hamper proper placement of the temporalis fascia graft.
11. After placing the supporting Gelfoam, the fascia is trimmed to the appropriate size to fill the defect with an additional 2 to 3 mm (minimum) beyond the edges of the perforation circumferentially. The graft is then placed under the tympanomeatal flap (underlay or medial graft fashion) (Fig. 3.2t). Placement of an inadequate graft (too small or improperly placed) such that the defect is just barely filling the TM defect is a frequent cause of failure in tympanoplasty.
12. With the graft in proper position, the tympanomeatal flap is then laid into its normal anatomical position on top of the temporalis fascia (Fig. 3.2u) and then secured using the same Gelfoam packing in the medial half of the ear canal (Fig. 3.2v,w).
13. Prior to closing, the self-retaining retractor(s) are released and the vascular strip gently stretched and unfurled so that it rests flat along the posterior canal wall.
14. The postauricular incision is closed using resorbable sutures (e.g., 3-0 chromic suture) at the periosteal and deep subcutaneous tissue layers, followed up a running subcuticular suture that is similarly resorbable in nature (e.g., 4-0 chromic) (Fig. 3.2x,y).
15. A final look through the operating microscope ensures that the vascular strip and grafts are all well-seated, and then the lateral half of the ear canal is filled with mupirocin ointment (Fig. 3.2z).
16. A standard mastoid compression dressing is applied and the procedure terminated at this point.
Complications
1. Persisting perforation
2. Hearing loss (typically conductive in nature)
3. Facial nerve injury
4. Vertigo
5. Dysgeusia from chorda tympani sacrifice
6. Cholesteatoma