Bone-Anchored Cochlear Stimulator
Bone-anchored cochlear stimulators rely on bone vibration to transmit environmental sound stimuli to the cochlea. They provide an alternative for patients who cannot take advantage of conventional hearing aids, such as those with canal atresia, a chronically draining ear, or single-sided deafness. Currently, percutaneous and nonpercutaneous implant systems exist, and both are used in the pediatric population. Multiple percutaneous systems are available and have been approved by the U.S. Food and Drug Administration for more than a decade. These systems require the placement of an abutment post that traverses the skin, extending from the mastoid cortex. The nonpercutaneous system is relatively new (2010), and only one such device is currently available. This device uses a bone-anchored magnetic plate that is coupled with an external bone oscillator and a sound processor. Both devices provide substantial improvement in hearing.
9-1 Bone-Anchored Cochlear Stimulator
Indications
Surgically implanted bone conduction hearing devices are indicated for patients 5 years of age or older who meet either of the following criteria: (1) a conductive or mixed hearing loss with bone conduction thresholds ≤ 45 dB (nonpercutaneous) or ≤ 65 dB (percutaneous); or (2) unilateral severe to profound sensorineural hearing loss with bone conduction thresholds ≤ 20 dB in the normal hearing ear.
Preoperative Evaluation
A complete medical history, a thorough physical examination, and a comprehensive audiologic assessment are required. For patients who have undergone previous mastoid surgery, imaging studies may be indicated.
Percutaneous Bone-Anchored Cochlear Stimulator
Linear Incision Technique
A percutaneous bone conduction stimulator may be surgically implanted using a variety of surgical approaches. The decision as to which approach to use is based on patient age, skin thickness, bone density, and surgical history. In general, the pediatric patient has comparatively thinner skin overlying the mastoid bone. In the absence of anatomic abnormalities involving the postauricular skin or underlying mastoid, the linear-incision technique is an excellent surgical approach.
Operative Technique
1. Implantation of a percutaneous bone conduction device is performed with the child under general anesthesia. Intravenous antibiotics are administered within 1 hour preoperatively. The patient is placed in a supine position so that the postauricular skin of the ear to be operated on is readily visible.
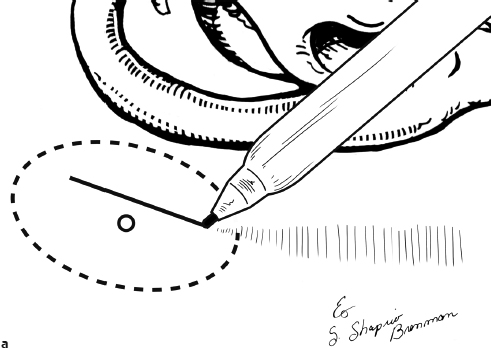
2. A vertical incision site is then marked approximately 5 cm from the external auditory canal and at a 45-degree angle from the vertical axis. Hair located at the proposed incision site and transcutaneous abutment site is shaved (Fig. 9.1a).
3. The patient is then prepped and draped in a sterile fashion and the area previously marked is infiltrated with 1% lidocaine with 1:100,000 units of epinephrine.
4. A tangential incision is made in the area previously marked to transect hair follicles at the incision site and simultaneously undermine soft tissue overlying the mastoid cortex (Fig. 9.1b).
5. Tissue reduction is performed by removing a bulk of underlying soft tissue from the proposed abutment site. A 1-cm diameter circle of underlying periosteum is excised (Fig. 9.1c).
6. A pilot hole is drilled with a supplied guide drill and spacer. This is performed with the drill set at a high-speed setting (approximately 2,000 rpm). The depth of the drill hole is checked intermittently (visually or by palpation with an instrument) to assure that the inner cortex of the mastoid has not been violated. The spacer may be removed to assure adequate depth if necessary (Fig. 9.1d).
7. A countersink is created using a widening drill at 2,000 rpm. This is 3 to 4 mm in diameter. The tip of the widening drill is blunt; however, over-drilling risks inadvertent dural injury, and caution must be exercised despite this safety mechanism.
8. The implant and abutment are then placed using a supplied abutment inserter. Drill settings are reduced to a torque limit of approximately 20 to 25 newton cm (N cm). The implant is placed without irrigation until multiple threads of the abutment have engaged the cortical bone (Fig. 9.1e).
9. After the implant is seated and maximal torque settings have been achieved, the drill handpiece is removed from the abutment. A supplied abutment wrench can then be used to tighten the abutment an additional one-quarter turn.
10. A second “sleeper” implant abutment is placed in an identical fashion. The location of the implant should be approximately 15 mm inferior and posterior to the first abutment. Inadvertent risk of transverse sinus injury can be avoided by avoiding the placement of the second implant directly posterior to the first.
11. A flat cover screw is placed in the second implant at the abutment insertion site. This will inhibit tissue accumulation within the internal threads of the sleeper implant.
12. The wound is copiously irrigated with antibiotic irrigation prior to closure. The skin incision is then closed superficially with a 3-0 running chromic suture.
13. Following skin closure, a 4-mm biopsy punch is used to create a skin defect directly over the abutment site. This allows for the abutment to breach the skin surface adjacent to the previously closed incision (Fig. 9.1f).
14. A healing cap is placed over the abutment (Fig. 9.1g).
15. A 7-day course of antibiotics is administered during the postoperative period, and a neoprene mastoid band is worn for 2 days following implantation. The audio processor is placed 2 months postoperatively.
Alternative Percutaneous Surgical Techniques
Dermatome/Skin Flap Technique
This technique is frequently used for older patients or patients with thicker skin. It involves the creation of a medially based, U-shaped soft tissue flap. The skin flap can be elevated separately from the underlying soft tissue by first using a dermatome. The underlying soft tissue is ultimately excised from the area surrounding the abutment site prior to placement of the implant.
Two-Stage Technique
The two-stage technique is used primarily in patients with poor bone density or with very thin cortical bone. The first stage of this method involves the placement of the implant and the removal of the buttress from the implant site prior to closure. A flat screw is placed in the implant to inhibit tissue accumulation within the internal threads prior to the second stage. The second stage is performed only after the implant has undergone osseointegration over a predetermined period of time. This stage involves exposing the implant site and placing the abutment. A defect is created in the skin overlying the abutment in a fashion similar to that used in single-stage procedures.
Pearls and Pitfalls
1. Because of an increased rate of failed osseointegration in children, the simultaneous placement of a second sleeper implant is an important consideration.
2. Improper drill settings may result in over-torque of the implant post. If the implant continues to rotate despite the flange being flush with the cortex of the mastoid, a new implant site should be created.
3. Appropriate subcutaneous tissue removal is extremely important, as it decreases the likelihood of wound complications.
Complications
1. Cerebrospinal fluid leak
2. Intraoperative soft tissue injury with skin flap technique
3. Failure of osseointegration
4. Pain at abutment site
5. Skin or bone overgrowth at abutment site
6. Surgical site infection
7. Skin flap necrosis
Nonpercutaneous Bone-Anchored Cochlear Stimulator
The benefits of the nonpercutaneous cochlear stimulator include the lack of hair follicle sacrifice intraoperatively, a shorter postoperative recovery time prior to placement of the sound processor, and a decreased potential for soft tissue complications.
Operative Technique
1. Implantation of a nonpercutaneous bone conduction device is performed with the child under general anesthesia. Intravenous antibiotics are administered within 1 hour preoperatively. The patient is placed in a supine position so that the postauricular skin of the ear to be operated on is readily visible.
2. The incision site and implant location are marked using a template. The location of the implant should be approximately 5 to 6 cm from the external auditory canal and oriented at a 45-degree angle from the vertical axis. To facilitate skin closure, hair at the proposed incision site may be shaved preoperatively; however, extensive shaving is not necessary (Fig. 9.1h).
3. The patient is prepped and draped in a sterile fashion, and the area previously marked is infiltrated with 1% lidocaine with 1:100,000 units of epinephrine. An incision is made through the skin and carried deep to the periosteum of the mastoid cortex (Fig. 9.1i).
4. A subperiosteal flap is elevated in a posterior to anterior direction, exposing the mastoid cortex. The implant is outlined with a sterile marking pen directly on the mastoid cortex by using the marks created with the template as a reference (Fig. 9.1j).
5. Two circular bony wells are created to allow for the titanium magnet housing to be secured flush to the underlying mastoid cortex. A cutting bur is used to drill each well to a depth of 2 mm. The superior well is drilled first (Fig. 9.1k).
6. Prior to drilling the second bony well, the implant is placed within the first drill site and the second well is re-marked on the mastoid cortex using a sterile marking pen. This maneuver assures that the previously marked position for the second well remains in the appropriate position.
7. The magnetic implant is seated appropriately within the superior and inferior bony wells. There are five brackets located around the margin of the implant used to secure the device to the mastoid. Each of the five brackets is then marked with a marking pen. After removal of the implant, the previously marked bracket sites are each drilled to a depth of 0.5 mm allowing the implant to lie flush with the mastoid cortex after it is secured.
8. The titanium implant is then secured to the mastoid cortex by placing five monocortical screws in a stepwise fashion. The center screw is secured first, followed by four additional screws that are placed around the implant (Fig. 9.1l).
9. The implant is checked to assure that it is seated flush with the mastoid cortex, and the surgical site is closed in three layers. The periosteum and muscle over the implant are closed using 3-0 Vicryl (Ethicon) suture in an interrupted fashion. A deep dermal layer is then approximated using interrupted 4-0 Vicryl suture. The skin is closed using a 5-0 plain gut suture (Fig. 9.1m). A mastoid dressing is placed.
10. A 7-day course of antibiotics is administered during the postoperative period, and a neoprene mastoid band is worn for 2 days following implantation. The processor is placed approximately 1 month postoperatively.
Pearls and Pitfalls
1. A history of prior mastoidectomy is not uncommon in patients undergoing implantation of bone conduction devices. The presence of a potential mastoidectomy defect must be taken into account when marking the proposed incision and implant site.
2. The inner cortex of the mastoid must not be violated during drilling. Because the implant relies on contact with bone to function, violation of the inner cortex and exposure of the dura will temporarily inhibit the effective bone-conducting ability of the implant; this will prolong the postoperative healing time prior to use of the stimulator. This is an important consideration in the pediatric patient, as the cortical depth is frequently shallow when compared to that of the adult.
3. To assure that the implant is seated flush against the mastoid cortex, it is often necessary to create a shallow well for the narrow portion of the implant connecting the superior and inferior magnet.
Complications
1. Cerebrospinal fluid leak
2. Mobile implant
3. Pain at implant site
4. Soft tissue infection