(1)
Alo Eye Care, Kolkata, India
Keywords
Lid reconstructionEyelid margin defectsLid lacerationTarsal Plate11.1 Indications
Indications for reconstruction of the upper and lower lid are as follows:
Small central lid margin defects
Any marginal defect of 5–10 mm horizontally
Any full-thickness lid defect in which, after proper mobilization of tissue, the edges can be brought together without undue tension
Any full-thickness lid laceration
11.2 Technique of Repair
The resultant lid defect is assessed after the tumor is removed. The surgeon ensures the margins are tumor free. If the anatomy of the cut area is irregular, or triangular or rectangular, the margins are cut into a tent or pentagon shape (seen in Fig. 11.1). The straight ends or the two arms of the tent or pentagon should cross beyond the lower end of the tarsal plate. This is very important to prevent notching or tenting of the lid margin after apposition.
The lid usually is repaired in two layers.
For the deeper layer, two or three interrupted sutures (6/0 Vicryl, with a tappercut atraumatic half-circle needle) are passed from one side of the cut end of the tarsus to a similar position on the other side. The bite is passed through about two thirds the depth of the tarsal plate and is brought out through the margin of cut end of the tarsus. The needle again is passed through the medial cut margin of the tarsal plate at a position and depth similar to what was done in the lateral aspect. The needle should come out about 1–2 mm medial to the cut margin. Care must be taken to avoid passing the suture through the underlying conjunctiva. The lid is everted to check for any suture track before the knot is tied to prevent rubbing on the cornea.
Once the lids are in proximity, the surgeon determines whether the orbicularis muscles on the two sides are close together.
A suture (6/0 Vicryl, with a tappercut atraumatic half-circle needle attached) is passed through the gray line, 1–2 mm beyond the cut end. The suture is tracked through the cut margin of the tarsus at a similar depth of 1–2 mm below the cut margin. The needle again is passed through the other side of the cut end of the tarsus, at a similar position. It again is tracked to come out through the gray line, about 1–2 mm beyond the cut end. A single knot is made, and the cut ends are brought in apposition. (This is done to ensure that the two sides of the gray lines are aligned. This is very important to give a perfect contour to the lid margin.) This suture is kept loose and is the last to be tightened. The ends are kept a little long, so the suture can be incorporated within one of the last skin sutures, which will prevent the suture rubbing on the cornea.
The skin is closed with two to five interrupted sutures (6/0 Vicryl/Nylon, with a tappercut atraumatic half-circle needle attached). The previously taken long arm of the sutures is fixed through the gray line, through the skin sutures nearest to it.
The skin sutures are removed after 5–7 days. The lid margin suture is left in place for 10–14 days.
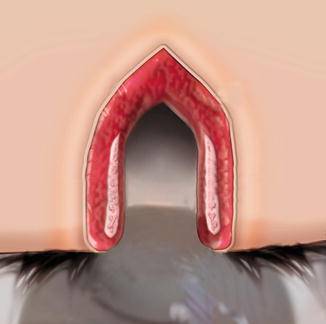
Fig. 11.1
Technique of repair of upper eyelid margin defects. The straight ends or the two arms of the tent or pentagon should cross beyond the lower end of the tarsal plate
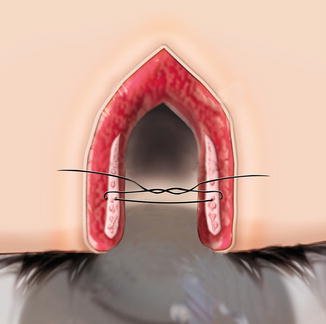
Fig. 11.2
Technique of repair of upper eyelid margin defects. A suture is passed 1–2 mm beyond the cut end from the lateral margin of the tarsal plate. The bite is passed through about two thirds the depth of the tarsal plate and is brought out through the lateral margin of the cut end of the tarsus. The needle again is passed through the medial cut margin of the tarsal plate, at a position and depth similar to what was done in the lateral aspect. The needle should come out about 1–2 mm medial to the cut margin. Caution must be used to avoid passing the suture through the underlying conjunctiva. The lid is everted to check for any suture track before the knot is tied
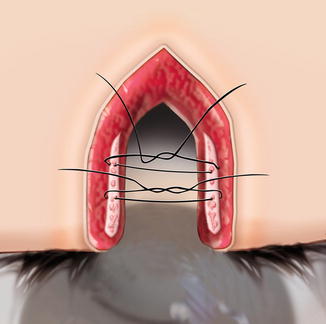
Fig. 11.3
Technique of repair of upper eyelid margin defects. One or two 6/0 Vicryl sutures are passed in a similar manner below or above the primary suture
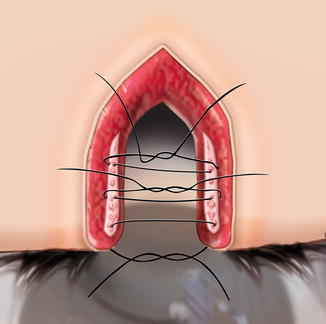
Fig. 11.4


Technique of repair of upper eyelid margin defects. The lid margin suture is passed through the gray line
Stay updated, free articles. Join our Telegram channel
Full access? Get Clinical Tree
